Theory of LWJGL textures - Fish-In-A-Suit/Conquest GitHub Wiki
A texture is an OpenGL object that contains one or more images that all have the same image format (RGBA, BGRA, etc). You can think of a texture as a skin that is wrapped around a 3D model. To apply a texture to a model, you have to assign points in the image texture to the vertices of the model. With that information OpenGL is able to calculate the colour to apply to the other pixels based on the texture image. Textures in OpenGL are simply float arrays stored on the GPU, which are further useful for things like shadow mapping and other advanced techniques. The texture doesn't have to be the same size as the model. It can be larger or smaller.

There are three defining characteristics of a texture:
- texture type (determines the arangement of images within a texture)
- texture size (defines the size of the images in the texture)
- image format used for images in the texture
There are a number of different texture types:
| texture type | explanation |
|---|---|
| GL_TEXTURE_1D | images in this texture are all one dimensional (only width, no height and depth) |
| GL_TEXTURE_2D | images in this texture are all two dimensional (width and height, no depth) |
| GL_TEXTURE_3D | images in this texture are all three dimensions |
How are images (textures) stored?
There are a number of ways an image like a texture can be stored on a computer, most commonly RGBA with 8 bits per channel. RGB refers to red, green and blue channels, A refers to the alpha (transparency) channel. Below are different ways of storing the colour red:
- Hex aka RGB int:
#ff0000or0xff0000 - RGBA byte:
(R=255, G=0, B=0, A=255) - RGBA float:
(R=1f, G=0f, B=0f, A=1f)
The RGBA byte array representing an image say 32x16 pixels would look like:
new byte[ imageWidth * imageHeight * 4 ] {
    0x00, 0x00, 0x00, 0x00, //Pixel index 0, position (x=0, y=0), transparent black
    0xFF, 0x00, 0x00, 0xFF, //Pixel index 1, position (x=1, y=0), opaque red
    0xFF, 0x00, 0x00, 0xFF, //Pixel index 2, position (x=2, y=0), opaque red
    ... etc ...
}
As you can see, a single pixel is made up of four bytes. Keep in mind it's just a single-dimensional array! The size of the array is WIDTH * HEIGHT * BPP, where BPP (bytes per pixel) is in this case 4 (RGBA). We will rely on the width in order to render it as a two-dimensional image.
Since an array of bytes can get very large, we generally use compression like PNG or JPEG in order to decrease the final file-size and distribute the image for web/email/etc.
TODO: RESEARCH IMMUTABLE AND MUTABLE TEXTURE STORAGE
Texture coordinates
Texture is a 2D image, so the coordinates only have two components, x and y. The origin of the texture coordinate space is set in the top left corner of the image and the maximum value for both x and y is 1. Texture coordinates are basically a set of x and y components, where x and y are anywhere between 0 and 1.

Texture atlases/sprite sheets
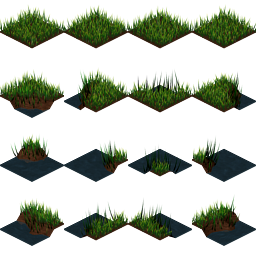
Since we are only binding one texture at a time, this can be costly if we plan to draw many sprites or tiles per frame. Instead, it's almost always a better idea to place all of your tiles and sprites into a single image, so that you are only binding minimal textures per frame:
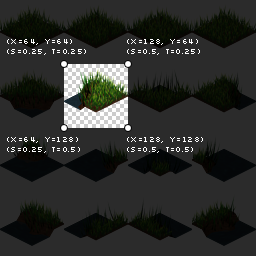
As you might have noticed from the Texture Wrap section, we can tell OpenGL what part of our texture to render by specifying different texture coordinates:
Texture mipmaps
Texture filtering
Filtering is the process of accessing a particular sample from a texture. There are two cases for filtering: minification and magnification. Magnification means that the area of the fragment in texture space is smaller than a texel, and minification means that the area of the fragment in texture space is larger than a texel.
The magnification filter is controlled by the GL_TEXTURE_MAG_FILTER texture parameter. This value can be GL_LINEAR or GL_NEAREST. If GL_NEAREST is used, then the implementation will select the texel nearest the texture coordinate; this is commonly called "point sampling". If GL_LINEAR is used, the implementation will perform a weighted linear blend between the nearest adjacent samples.
When doing minification, you can choose to use mipmapping or not. Using mipmapping means selecting between multiple mipmaps based on the angle and size of the texture relatie to the screen. Whether you use mipampping or not, you can still select between linear blending of the particular layer or nearest. And if you do use mipmapping, you can choose to either select a single mipmap to sample from, or you can sample two adjacent mipmaps and linearly blend the resulting values to get the final result.
**A note on terminology: ** Setting GL_TEXTURE_MAG_FILTER and MIN_FILTERs to GL_LINEAR will create monolinear filtering in a 1D texture (sampling in one axis), billinear filtering in a 2D texture (sampling in two axes), and trillinear for a 3D texture (samping in three axes).
Anisotropic filtering
This feature only became core In OpenGL 4.6 it is widely available through the EXT_texture_filter_anisotropic extension.
todo
LOD range
todo
Creating a texture from an image in OpenGL
The basic steps of getting an image into a texture are as follows:
- decode into RGBA bytes (store image data in a bytebuffer)
<1: create a new texture object>
- get a new texture ID
- bind that texture
- set up any texture parameters
</1>
- "connect" texture coordinates with vertex coordinates of a model
- assofiate a texture sampler for every texture map that you intend to use in the shader (dimensionalities of the texture and the texture sampler must match)
- retrieve texel values through the texture sampler from your shader
Decoding PNG to RGBA bytes
//use a third party api to decode an image into a ByteBuffer. The old version, using Matthias Mann's PNGDecoder looked like this:
//get an InputStream from our URL
input = pngURL.openStream();

//initialize the decoder
PNGDecoder dec = new PNGDecoder(input);

//read image dimensions from PNG header
width = dec.getWidth();
height = dec.getHeight();

//we will decode to RGBA format, i.e. 4 components or "bytes per pixel"
final int bpp = 4;

//create a new byte buffer which will hold our pixel data
ByteBuffer buf = BufferUtils.createByteBuffer(bpp * width * height);

//decode the image into the byte buffer, in RGBA format
dec.decode(buf, width * bpp, PNGDecoder.Format.RGBA);

//flip the buffer into "read mode" for OpenGL
buf.flip();
Creating the texture
in order to change the parameters of a texture, or in order to send the RGBA bytes to OpenGL, we first need to bind that texture, i.e. "make it the currently active texture." The process goes like this:
- enable texturing
- generate a texture hande or unique ID for that texture
- bind the texture
- tell OpenGL how to unpack the specified RGBA bytes
- set up texture parameters
- upload the ByteBuffer to OpenGL
We can use glGenTextures to retrieve a unique identifier (aka "texture name" or "texture handle") so that GL knows which texture we are trying to bind.
//Generally a good idea to enable texturing first
glEnable(GL_TEXTURE_2D);

//generate a texture handle or unique ID for this texture
id = glGenTextures();

//bind the texture
glBindTexture(GL_TEXTURE_2D, id);

//use an alignment of 1 to be safe
//this tells OpenGL how to unpack the RGBA bytes we will specify
glPixelStorei(GL_UNPACK_ALIGNMENT, 1);

//set up our texture parameters
glTexParameteri(...);

//upload our ByteBuffer to GL
glTexImage2D(GL_TEXTURE_2D, 0, GL_RGBA, width, height, 0, GL_RGBA, GL_UNSIGNED_BYTE, buf);
The call to glTexImage2D is what sets up the actual texture in OpenGL. We can call this again later if we decide to change the width and height of our image, or if we need to change the RGBA pixel data. If we only want to change a portion of the RGBA data (i.e. a sub-image), we can use glTexSubImage2D.
Before calling glTexImage2D, it's essential to set up texture parameters correctly. The code to do that looks like:
//Setup filtering, i.e. how OpenGL will interpolate the pixels when scaling up or down
glTexParameteri(GL_TEXTURE_2D, GL_TEXTURE_MIN_FILTER, GL_NEAREST);
glTexParameteri(GL_TEXTURE_2D, GL_TEXTURE_MAG_FILTER, GL_NEAREST);

//Setup wrap mode, i.e. how OpenGL will handle pixels outside of the expected range
//Note: GL_CLAMP_TO_EDGE is part of GL12
glTexParameteri(GL_TEXTURE_2D, GL_TEXTURE_WRAP_S, GL_CLAMP_TO_EDGE);
glTexParameteri(GL_TEXTURE_2D, GL_TEXTURE_WRAP_T, GL_CLAMP_TO_EDGE);
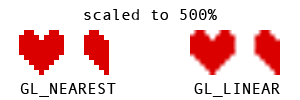
Texture filtering: The minification/magnification filters define how the image is handled upon scaling. For "pixel-art" style games, generally GL_NEAREST is suitable as it leads to hard-edge scaling without blurring. Specifying GL_LINEAR will use bilinear scaling for smoother results, which is generally effective for 3D games (e.g. a 1024x1024 rock or grass texture) but not so for a 2D game:
Wrap modes: To render, say a quad with a texture, we need to give OpenGL four vertices --> 2D quad. Each vertex has a number of attributes, including position (x, y) and texture coordinates (s, t). Texture coordinates are defined in tangent space, between 0.0 and 1.0. These (texture coords) tell OpenGL where to sample from the texture data. The following image shows attributes of each vertex of a quad:
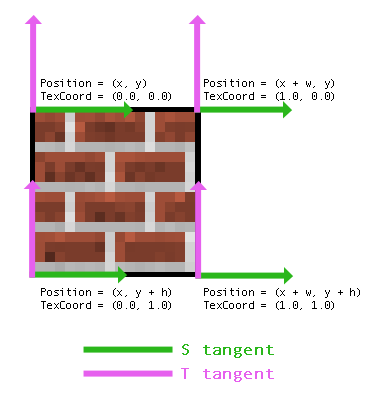
Note: This depends on our coordinate system having an origin in the upper-left ("Y-down"). Some libraries, like LibGDX, will use lower-left origin ("Y-up"), and so the values for Position and TexCoord may be in a different order.
Sometimes programmers and modelers use UV and ST interchangeably -- "UV Mapping" is another way to describe how textures are applied to a 3D mesh.
So what happens if we use texture coordinate values less than 0.0, or greater than 1.0? This is where the wrap mode comes into play. We tell OpenGL how to handle values outside of the texture coordinates. The two most common modes are GL_CLAMP_TO_EDGE, which simply samples the edge color, and GL_REPEAT, which will lead to a repeating pattern. For example, using 2.0 and GL_REPEAT will lead to the image being repeated twice within the width and height we specified. Here is an image to demonstrate the differences between clamping and repeat wrap modes:
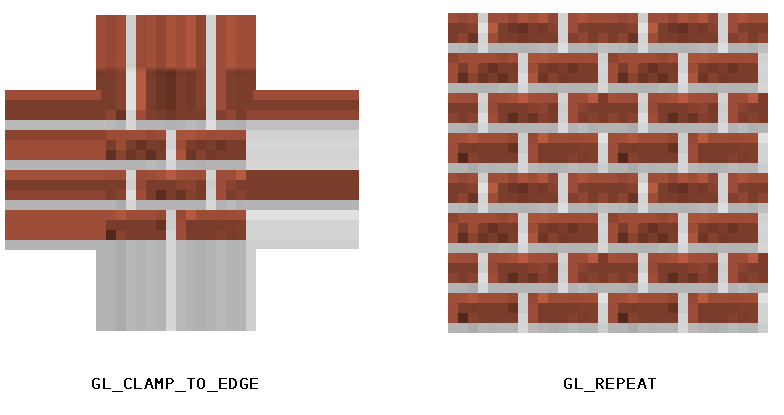
upload the bytebuffer to OpenGL
//todo!
Texture objects
Texture objects are OpenGL objects and therefore follow the same creation pattern (glGenTextures, etc). The parameter to glBindTexture corresponds with the texture type (GL_TEXTURE_1D, GL_TEXTURE_3D, etc).
As with any other kind of OpenGL object, it is legal to bind multiple objects to different targets. So you can have a GL_TEXTURE_1D bound while a GL_TEXTURE_2D_ARRAY is bound to the OpenGL context.
//Textures are bound to the OpenGL context via texture units, which are represented as binding points named GLTEXTURE0 through GLTEXTUREi, where i is less than the number of texture units supported by the implementation (system on which the application runs). Once a texture has been bound to the context, it may be accessed using sampler variables of the matching dimension in a shader.//
Texture completeness
A texture object can't (properly) be used until the following conditions are met:
- mipmap completeness
- cubemap completeness
- image format completeness
- sampler object completeness
Mipmap completeness
Todo: https://www.khronos.org/opengl/wiki/Texture
Cubemap completeness
Todo
Image format completness
Todo
Sampler object completenesa
When using a texture with a Sampler Object, the completeness of that texture will be based on the sampler object's sampling parameters.
For example, if a texture object only has the base mipmap, and the mipmap range parameters permit accessing beyond the base level, that texture object will be incomplete if the GL_TEXTURE_MIN_FILTER parameters require access to mipmaps other than the base level. However, if you pair this object with a sampler who's min filter is GL_LINEAR or GL_NEAREST, then that texture image unit will be mipmap complete.