Deployment Guide - Erithano/Timon-Your-FAQ-bot-for-Microsoft-Teams GitHub Wiki
Let's get Timon into Teams!
This article guides you through every step you need to do in order to deploy Timon to your own Teams environment.
🔗 Quick links:
Took a break while deploying? Use these links to go back to the step where you stopped!
| Step 1:Download Timon | Step 2:Create the foundation | Step 3:Import Timon | Step 4:Verify your progress | Step 5:Connect to app | Step 6:Pin Timon |
|---|
Step 0 - Prepare for deployment
Recommended reading: read through the Prerequisites page.
Don't like reading? - Watch the video: 
Step 1 - Download Timon
To deploy Timon to your own Teams environment, you will need to download two .zip files specific to your selected language.
Available languages (quick links)
Dutch - English - AI✨ - French - AI✨ - German - AI✨ - Swedish - AI✨ - Spanish - AI✨ - Norwegian - Korean - Polish - Traditional Chinese - Italian
- Go to the folder for the language you want Timon to speak. You can do this by either clicking one of the flags/links above, OR by going to the language overview folder and selecting a language.
- Find the two zip files listed in that folder and click on one of them
- Press the "download" (or "view raw") button to download it
- Go back and repeat the last two steps for the second .zip file
You should now have these two files downloaded to your computer:
- A zip file containing Timon (file names vary)
- A zip file called Timon Empty Manifest(your language).zip
Step 2 - Create the foundation for your Timon in Teams
-
Create or use an existing Team you want to associate with Timon (your Copilot), add users, make them team owners if they are to edit/improve Timon going forward.
💡 If you're creating a new team, create two new channels while you’re at it. They’ll be used later in this guide. See suggestion:
/images/Guide1.1.jpg
Create a regular team. If using Teams for Education, a “Class team” won’t work. -
Search for the Power Virtual Agents app in Teams (soon renamed Microsoft Copilot Studio). If you already have it, open it.
-
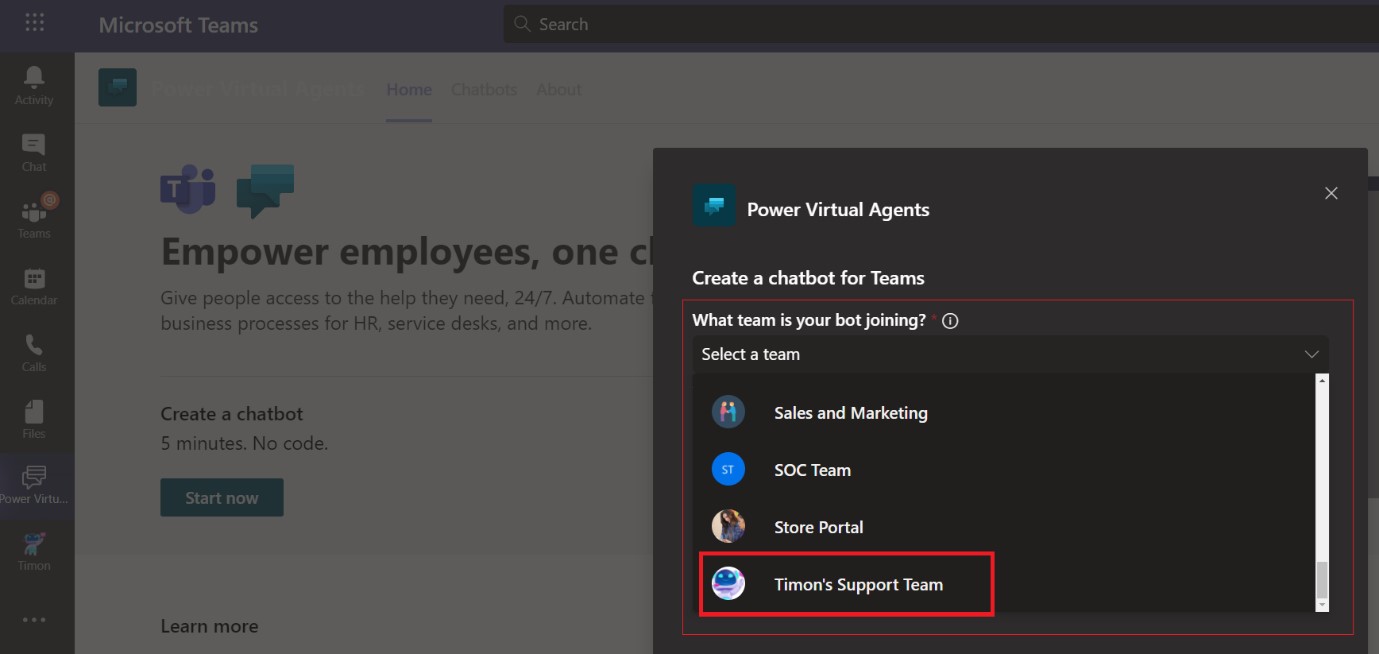
In Power Virtual Agents (soon renamed Microsoft Copilot Studio) , select Start now 🡒 and select the team to associate Timon with. In this guide, the team "Timon’s Support Team" was selected.
💡 The chosen team does not limit your Copilot to that specific team. The goal is to let everyone access Timon after this guide. Everything will make sense as you follow the guide (hopefully) 😉
-
Type a name ("Empty Copilot for example – this Copilot will not be used as you’re importing Timon. Just needed to open the environment). Select your language! (So if you're deploying a German Timon, you would select German here). Takes a few seconds to complete... 😉
Step 3 - Import Timon to your environment
Find and access your new environment in a browser
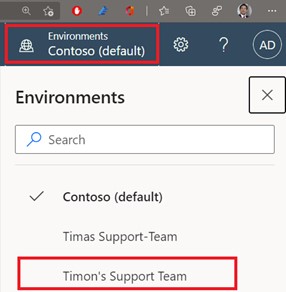
- Open flow.microsoft.com (Power Automate)
- Select environments in the upper right corner and click on the Copilot environment you just created (same name as the chosen Team).
Hit F5 if your new environment won’t show 😊.
/images/Guide2.1.jpg
Import Timon into your Power Virtual Agents Teams app
-
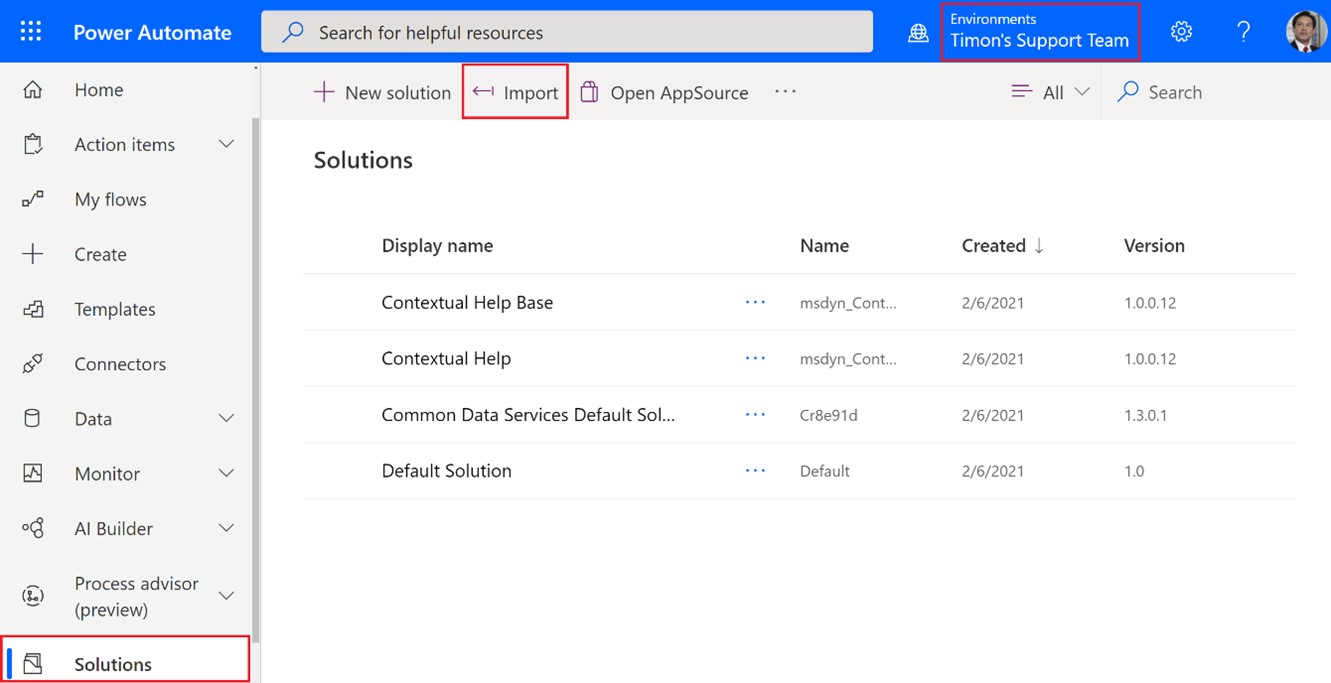
Import Timon's zip file through Solutions 🡒 Import. Select Browse. Find Timon's zip file. /images/Guide2.2.jpg
(A new environment’s name might not show yet under Environments. That’s ok. Just continue 😉) -
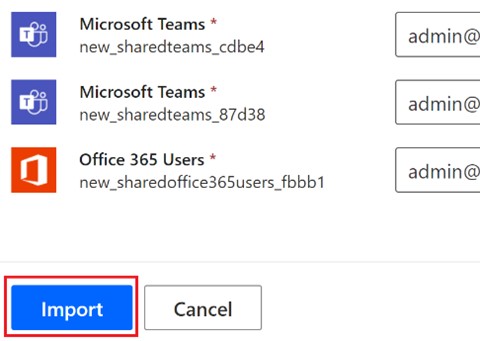
Select a connection 🡒 New Connection, a new page opens. Sign in with the same account you used to create the Copilot (admin, service account or your own). This allows Timon to send questions to channels of your choice in Teams. Keep in mind that individual employees can quit (the connections can be updated).
/images/Guide2.3.jpg
Follow the on-screen prompts.When clicking New connection for Microsoft Teams, a new tab opens in Power Apps.
Login with same account and 🡒 Click Create
/images/Guide2.4.jpgGo back to previous tab and refresh. Both Teams connections are now populated.
/images/Guide2.5.jpgRepeat this for Office 365 users and any other connections.
It now should look something like this in the new tab:
/images/Guide2.6.jpgBack to original tab and refresh again 🡒 Import
/images/Guide2.7.jpgWell done! You’re flying!
-
The environment is now created, and it can take between 3-35 minutes for the solution (Timon) to import! Please enjoy the tiny notification and give yourself a microbreak ☕
/images/Guide2.8.jpgYou’re ready to move on when it looks something like this:
/images/Guide2.9.jpgGotta love those random import times. Life would be so predictable otherwise, right? 😉
Fix your flows. Linking two flows to channels in Teams.
[!IMPORTANT] If you are deploying the AI-only Version of Timon, you can skip this part and jump the next section "Publish to the Team Environment".
-
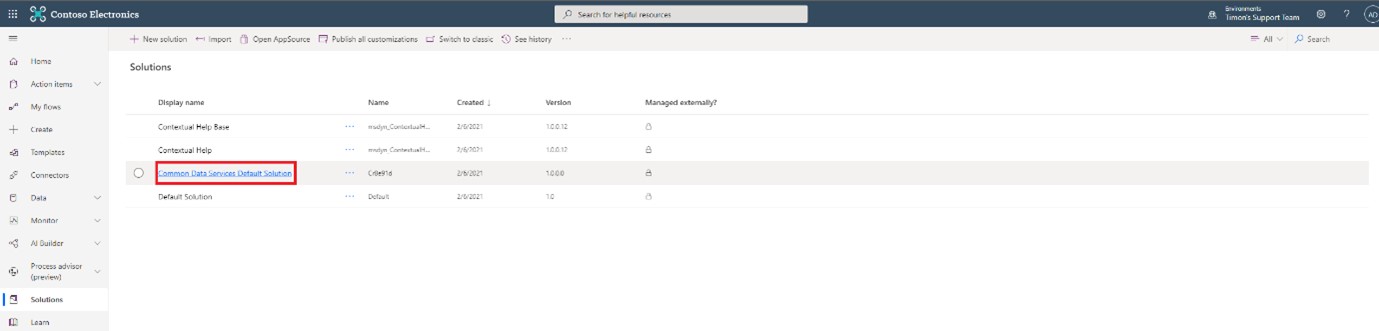
Refresh the page once the solution has imported successfully. (Solutions 🡒 Open “Common Data Services Default Solution”)
/images/Guide2.10.jpg -
Note: Your UI may look different here. That’s ok. It’s new and we still like you.
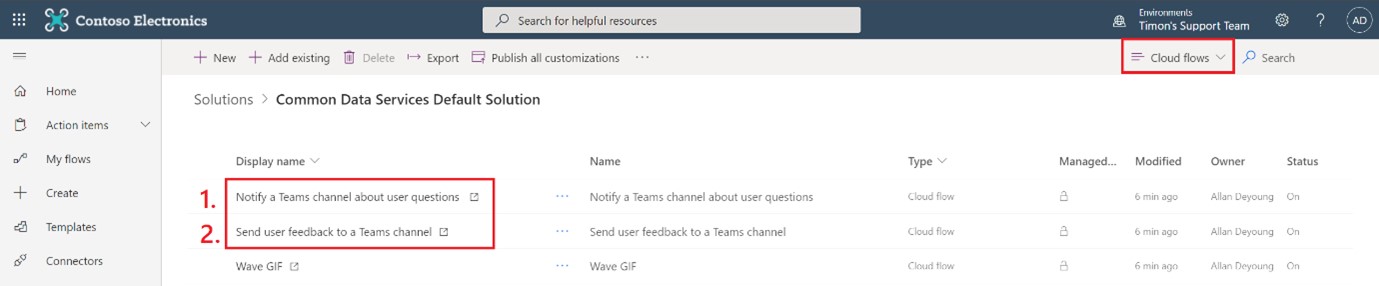
Filter display names by type “Cloud flows” and select:
"Notify a Teams channel about user questions"
/images/Guide2.11.jpg
💡 Start with that flow (1.). When you finish step 6 below, repeat the steps for the flow:
"Send user feedback to a Teams channel" (2.). -
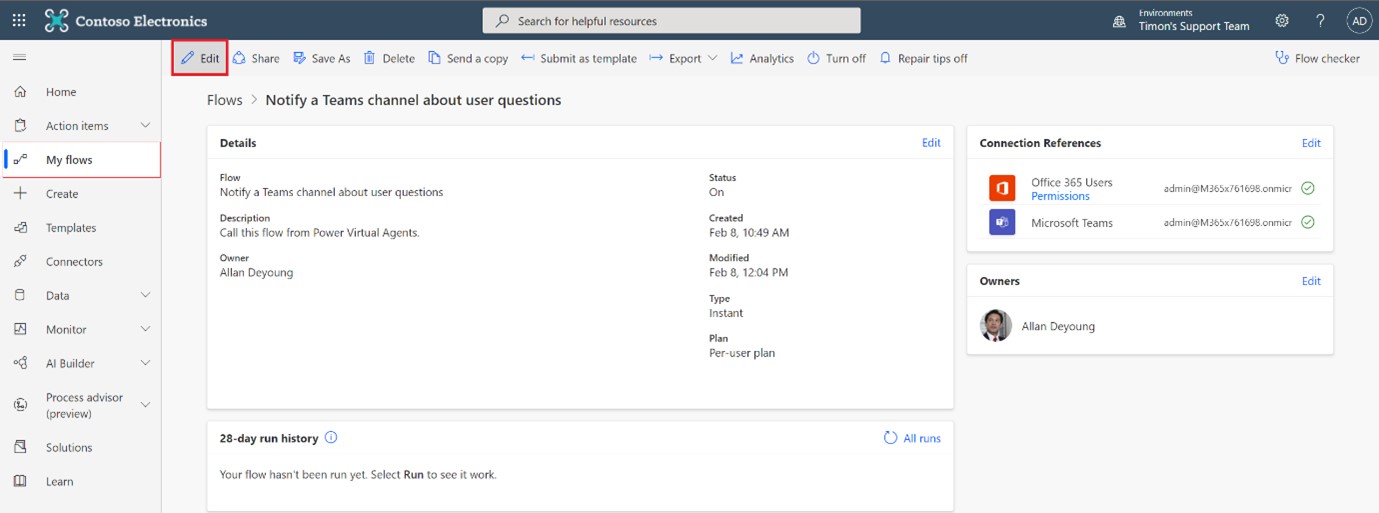
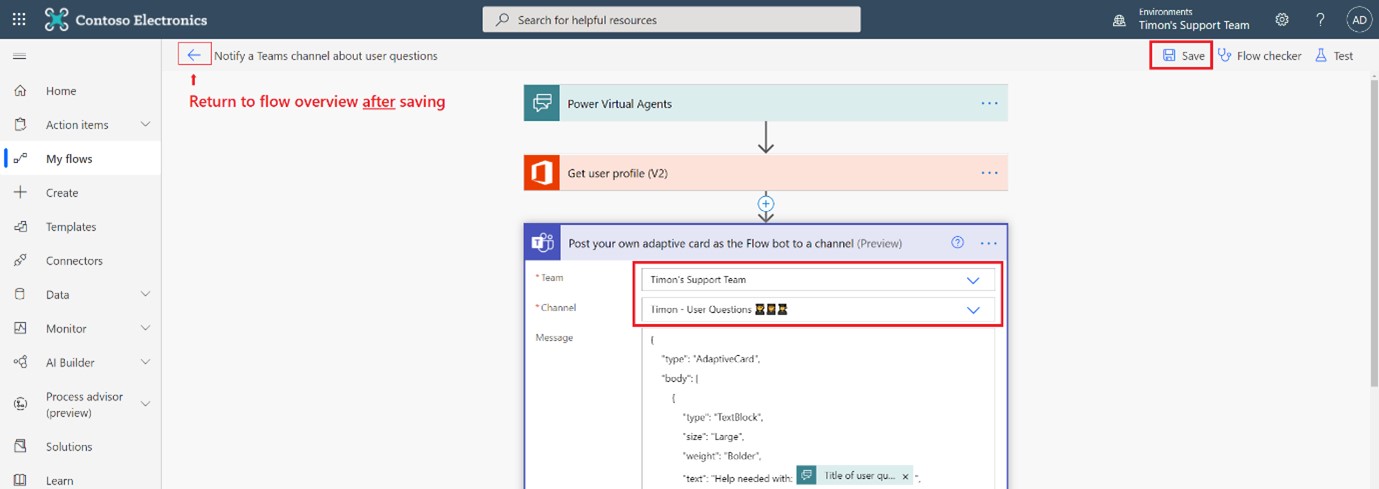
Select Edit in the upper left. /images/Guide2.12.jpg
-
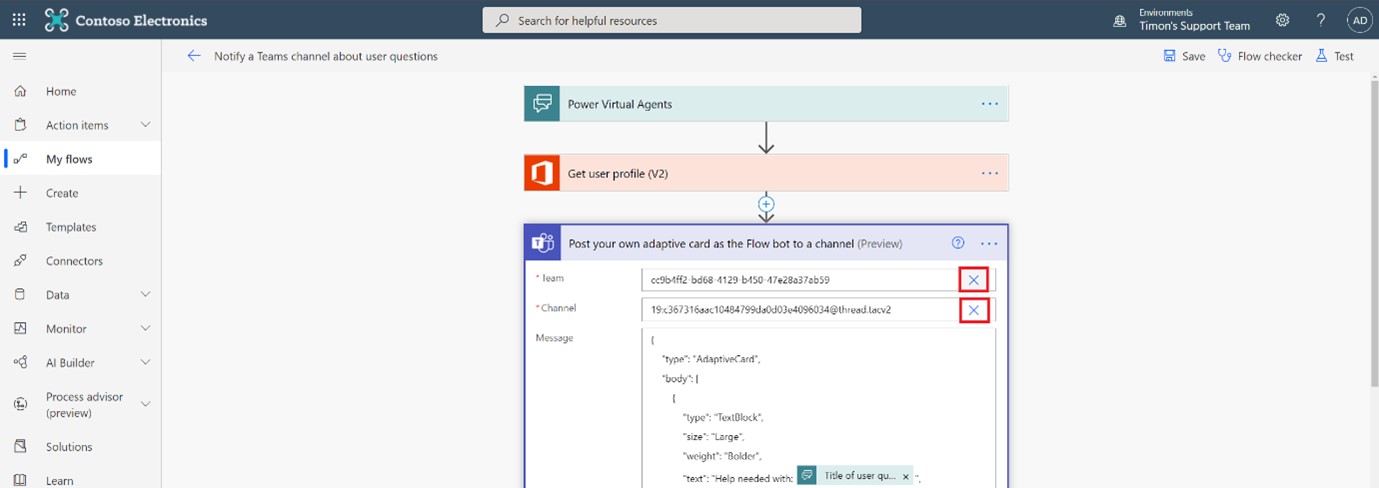
To fix the connections, select a new connection and the appropriate option.
In the Teams box, select the team and channel where you want user questions directed to internal experts (sent via Timon).Remove pre-filled values (click the X).
/images/Guide2.13.jpgSelect your team and channel for “internal experts” that Timon will forward to.
/images/Guide2.14.jpg -
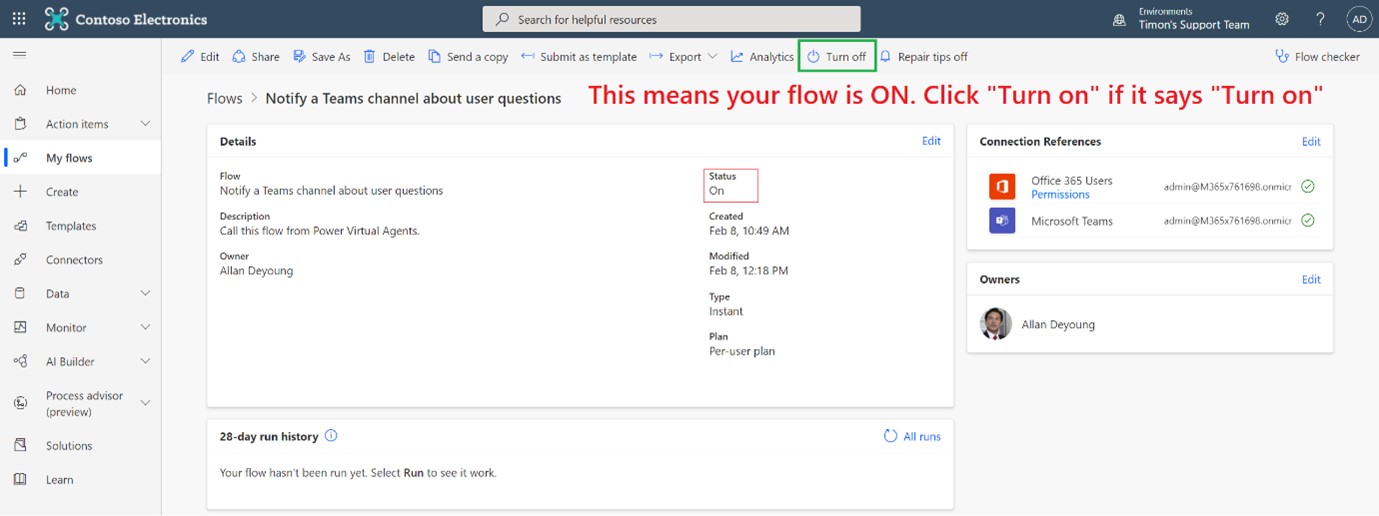
Save and then return to the flow overview (upper left). If needed select Turn on.
If you see “Turn off” your flow is already on 👍
/images/Guide2.15.jpg -
Repeat steps 1-6 for the flow “Send user feedback to a Teams channel”.
/images/Guide2.16.jpg
Publish to the Team Environment (and then the fun begins!)
-
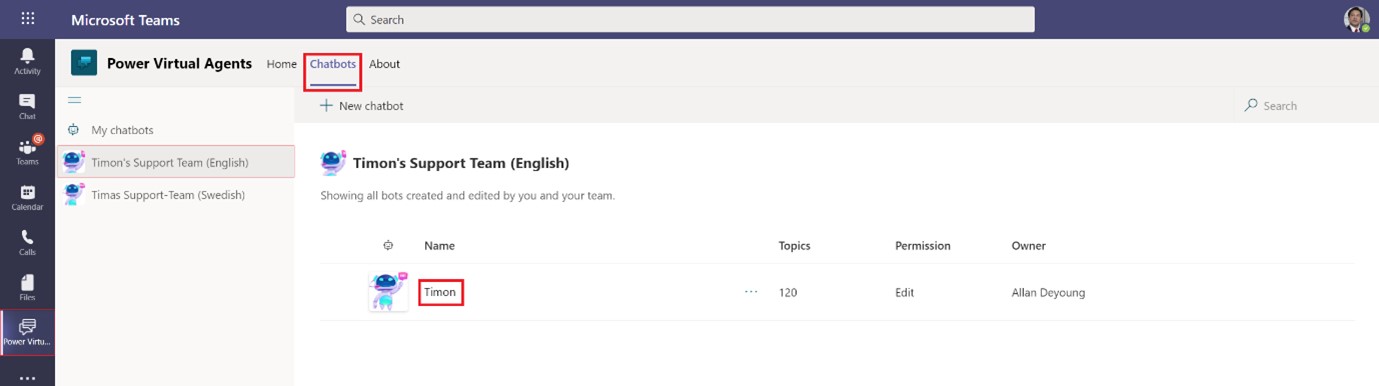
Go to Teams 🡒 Power Virtual Agents 🡒 Chatbots 🡒 Choose Timon from your team.
/images/Guide2.17.jpg -
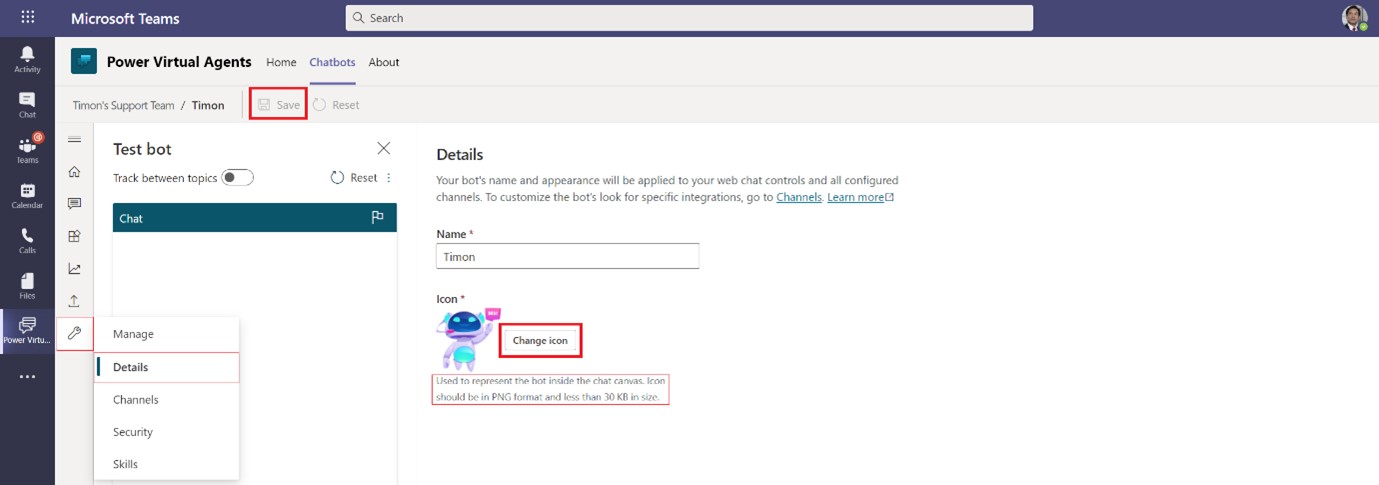
Optional beauty. Click Manage 🡒 Details 🡒 Change icon from default 🡒 Save.
/images/Guide2.18.jpgNOTE❗ Want to use Timon's icon? You can if you write in the bot's long description that the “icon was designed by vectorpouch | Freepik”, as described in the image’s license.
Read image license - then click here to: download Timon as png icon 192x192 (29 Kb)
-
Time to publish! – Go to Publish and Publish your Timon for the first time.
/images/Guide2.19.jpg
Step 4 - Verify your progress and start talking to Timon (your Copilot)
-
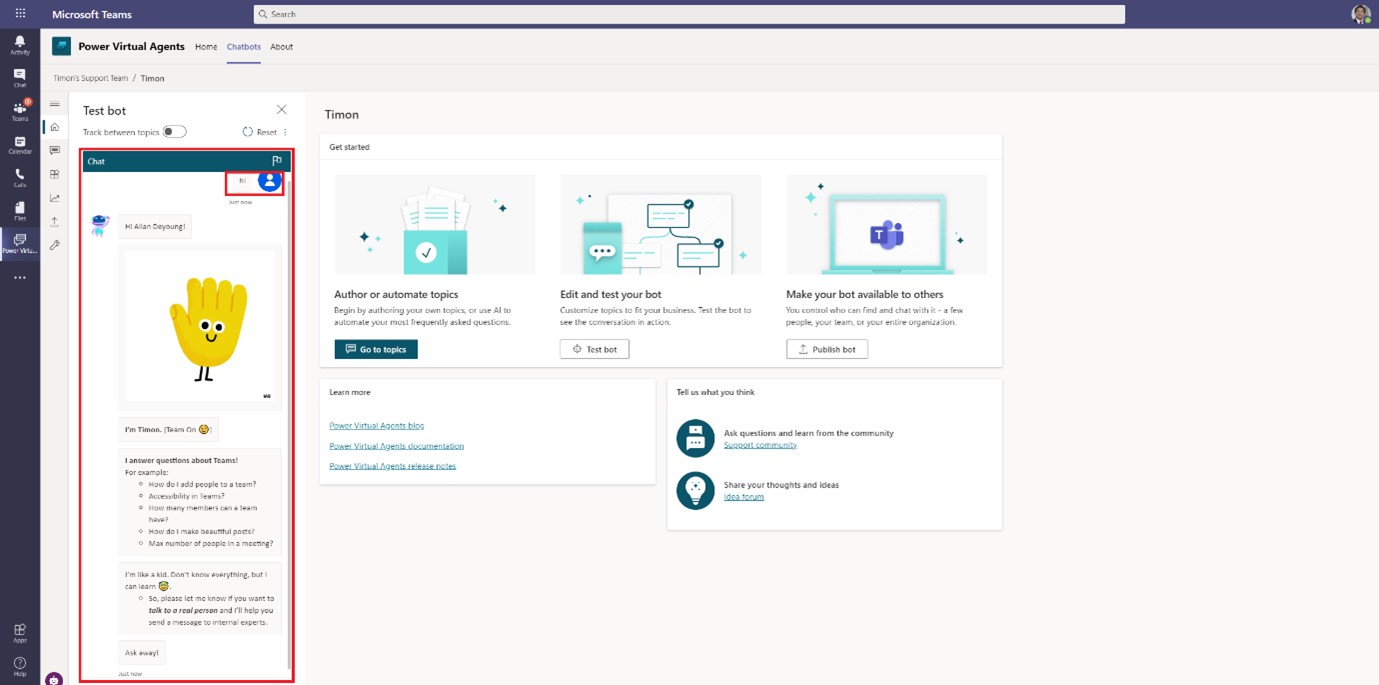
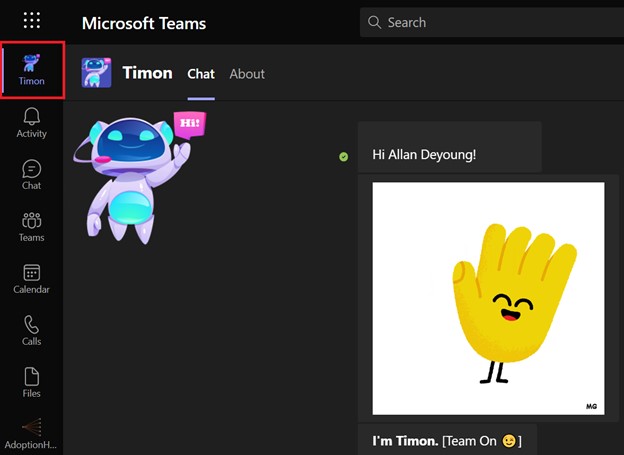
Optional but fun, so let’s do it! Hungry for progress? Say hi to your Timon (Copilot).
/images/Guide3.1.jpg -
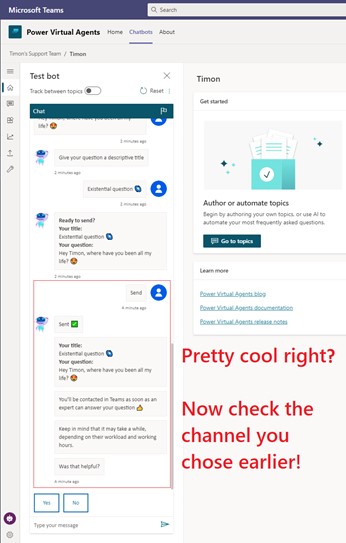
Now is also a good time to test the flows you fixed earlier. Test "Notify a Teams channel about user questions" by asking to "talk to a real person" (multiple ways of triggering this, this is just one example)
Try sending a question to internal experts.
/images/Guide3.2.jpgBe a good user and follow Timon’s guidance.
/images/Guide3.3.jpg -
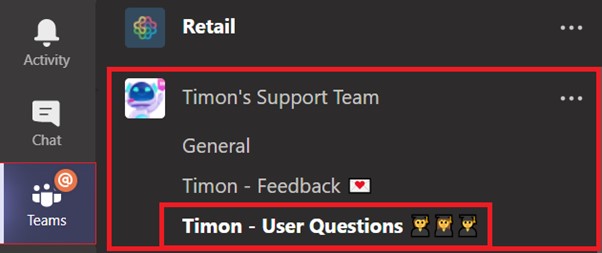
Now, go to the Team you connected to the flow for user questions.
/images/Guide3.4.jpg -
You should see an adaptive card with your question:
/images/Guide3.5.jpg
Please Note! You can't chat with yourself, so the button won’t work for you!
Otherwise, the button opens a 1:1 chat with the person who submitted the question.
💡 Feel free to write “share feedback” if you wish to test the feedback flow as well (I would).
Step 5 - Connect Timon (your Copilot) to a Teams App so you can test and share it in Teams!
PVA UI UPDATE 2022: Just click Manage➡️Details to locate your unique Bot ID much faster! (skip 1 and 2 below).
-
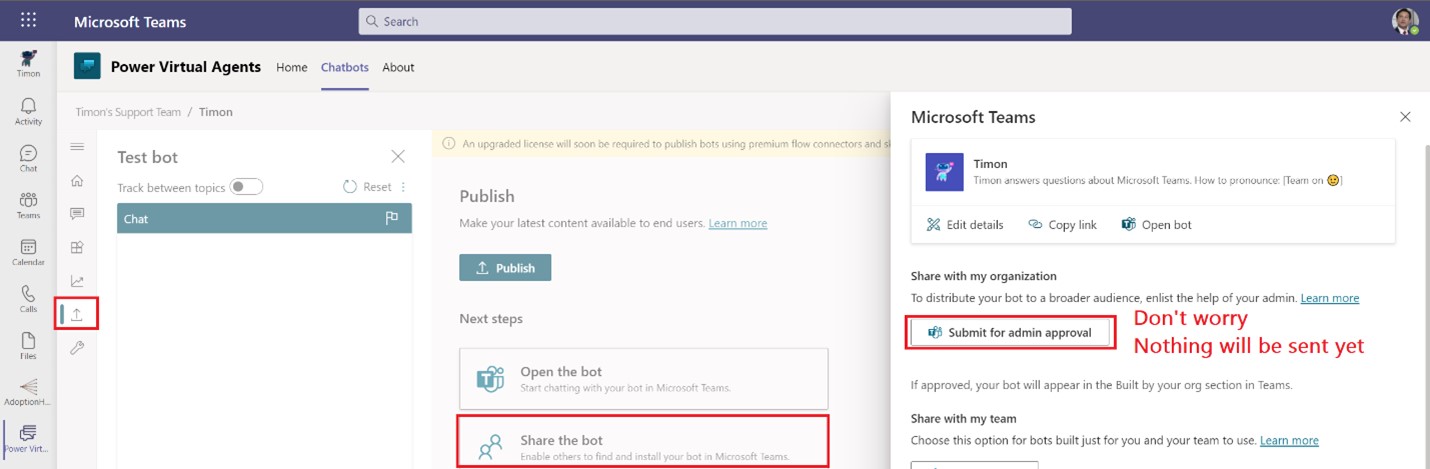
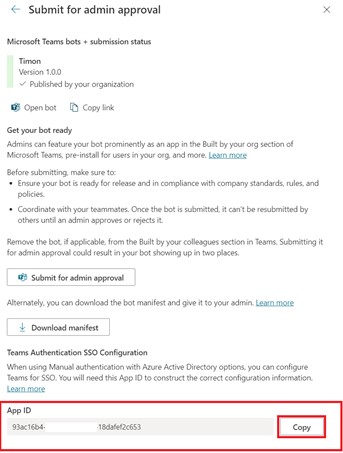
Sharing is caring. Locate your ID. Click Publish 🡒 Make the Copilot available to others 🡒 Availability options 🡒 Show to everyone in my org (Relax! Nothing is sent at this click 😉)
/images/Guide4.1.jpg💡 Sure, you could click Open the Copilot to quickly try Timon in Teams for yourself. But it’s not the full Teams app experience. Trust the guide. Keep going. You got this far, right 😊?
-
Scroll down to locate your unique bot ID (Called Bot app ID in the PVA UI). Copy it.
/images/Guide4.2.jpg -
Skip this step if just deploying Timon. If you already have the Adoption Hub or your own home app, use that Teams app. "What are you talking about?" – Well, some organizations have existing apps they are adding Timon into. Skip this step if just deploying Timon.
-
Get your empty premade Teams App for Timon ("Timon Empty Manifest (your language).zip") ready that you downloaded in Step 1.
Did you forget to download it? You can find it in the same language folder that you found Timon's zip file. (Yes, another zip-file. But pretty sweet not having to do one from scratch…😉)
-
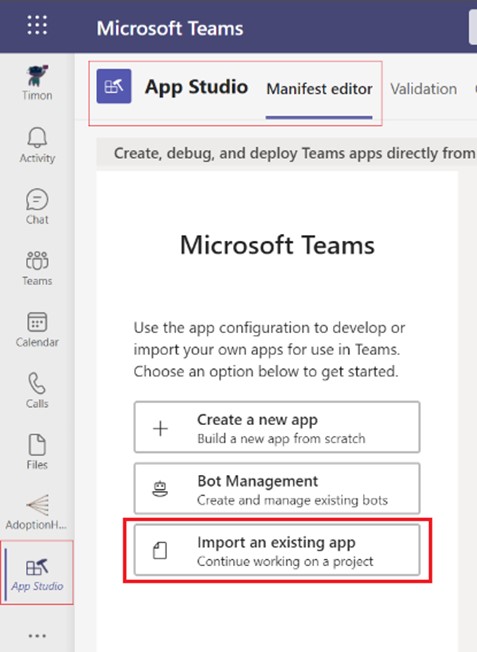
Search for and open the app "Developer Portal" in Teams (Please note! September 2022: App Studio has been retired but steps are basically identical) 🡒 Click the App tab in Developer Portal 🡒 Import app and choose the zip-file
The manifest is a Teams app (zip file) that you upload as a custom app in Teams or easily edit in the Teams app "Developer Portal". This means, for example, that you can test the app only for you or selected colleagues. You can also add additional tabs (web content) to your Timon with Developer Portal, if you like.
Note that you need admin permission to upload custom apps in Teams and access to “Developer Portal” in Teams.
You can upload a custom app in Teams to try for yourself, but again… Sharing is caring.
When testing is over, you (Teams Admin or Global Admin) will upload the Manifest (Teams App zip file) in the Teams Admin Center, and pin Timon in the left menu for everyone in your organization (or some) using policies.
Really neat and recommended way to give all colleagues someone to ask their Teams questions to, while taking the pressure of internal resources! -
Well done getting this far! (Impressive, you completed the step above just by reading it!)
-
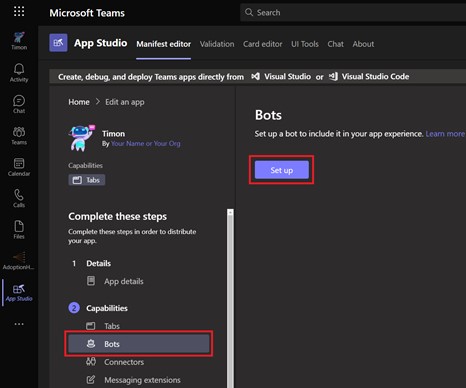
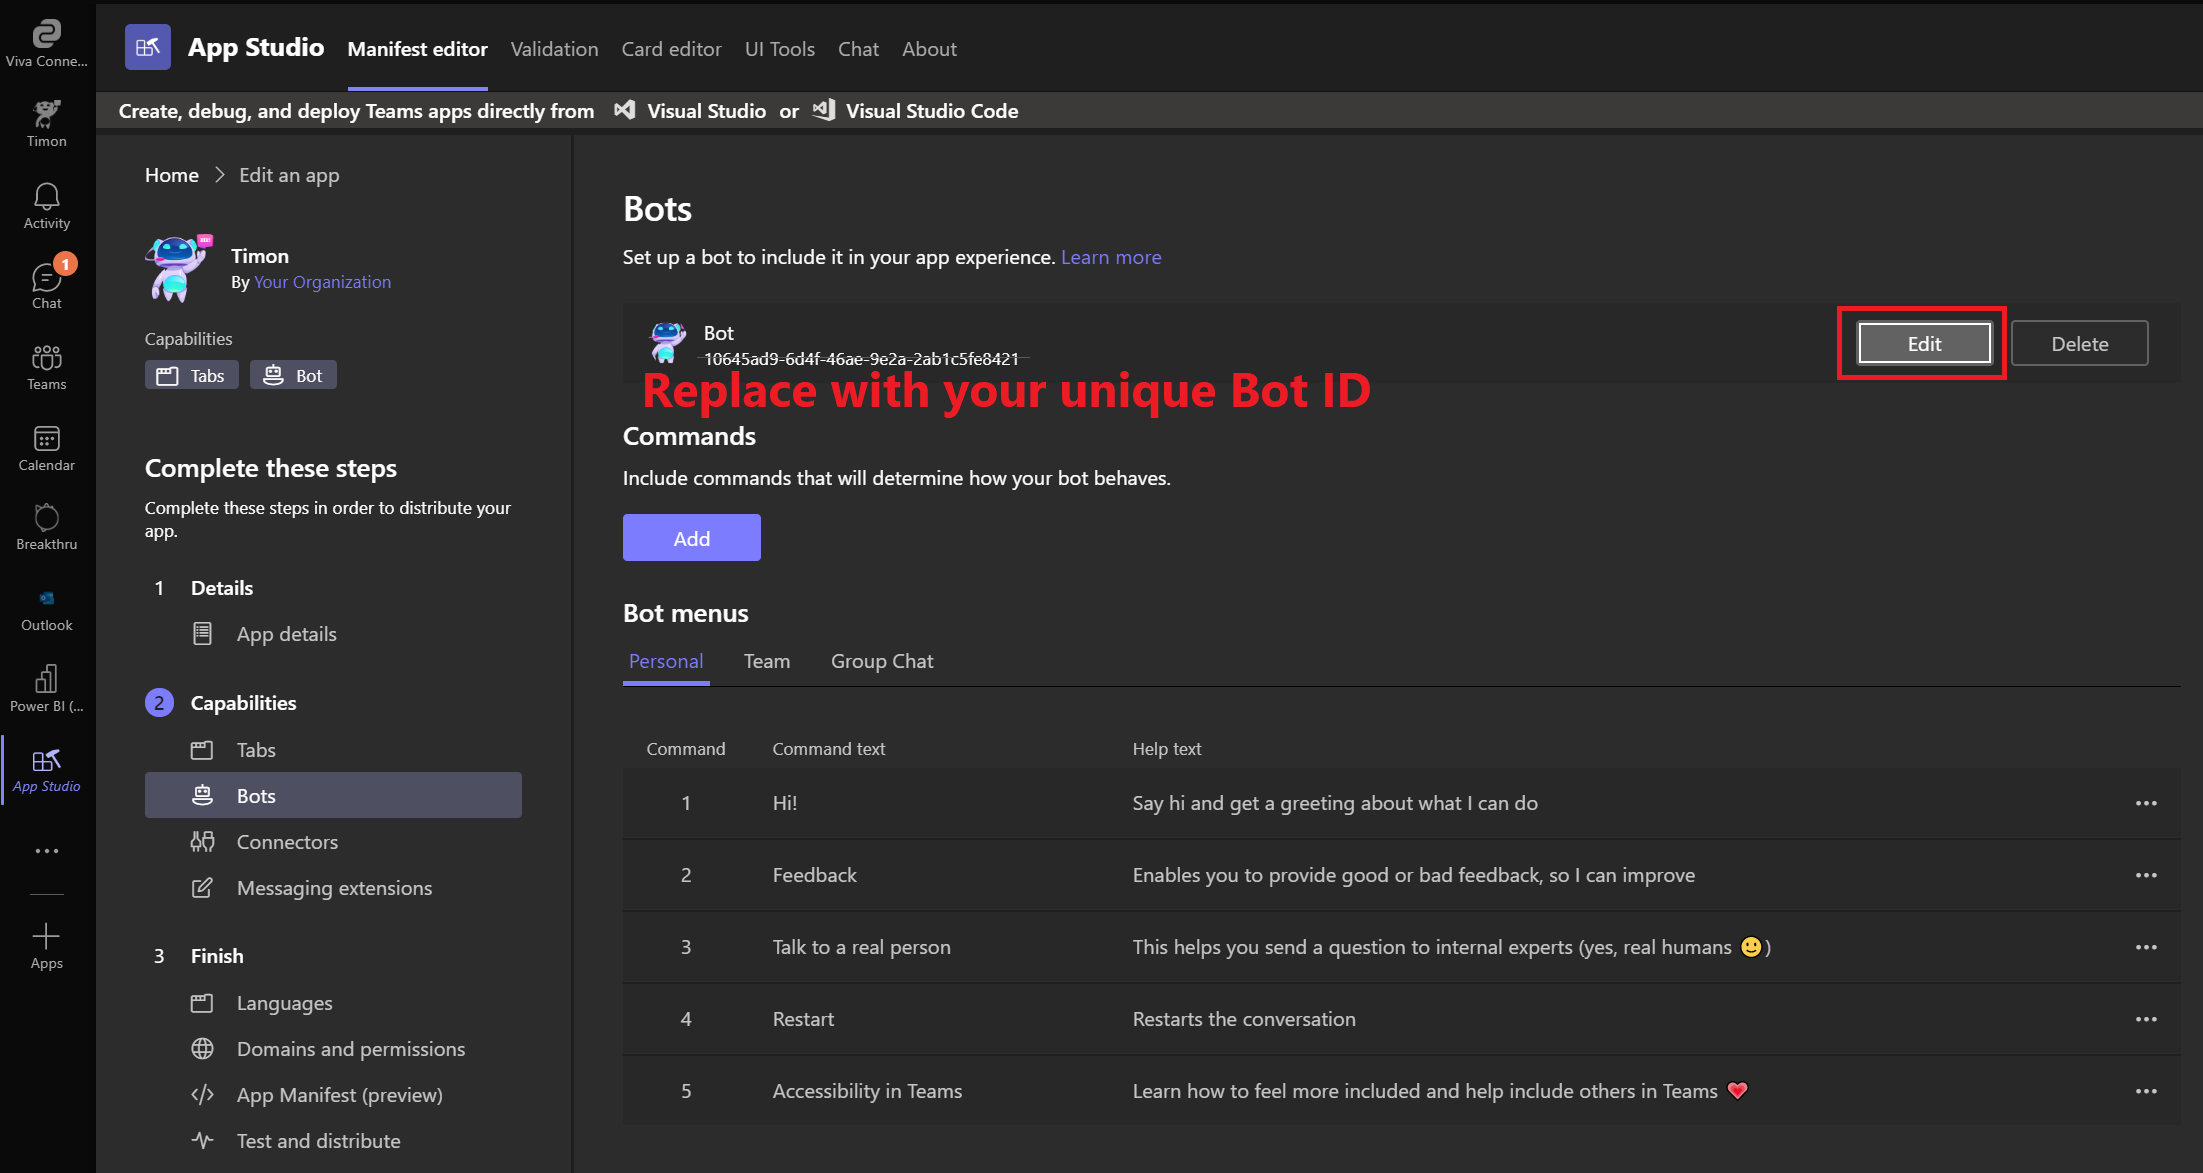
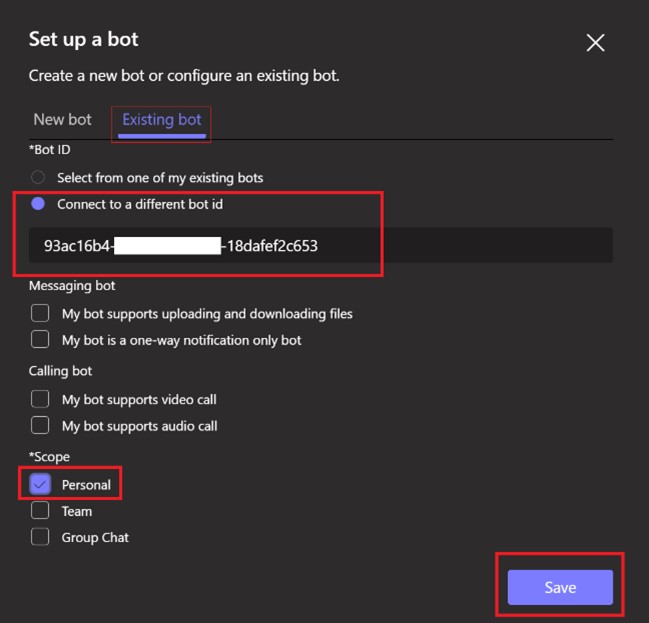
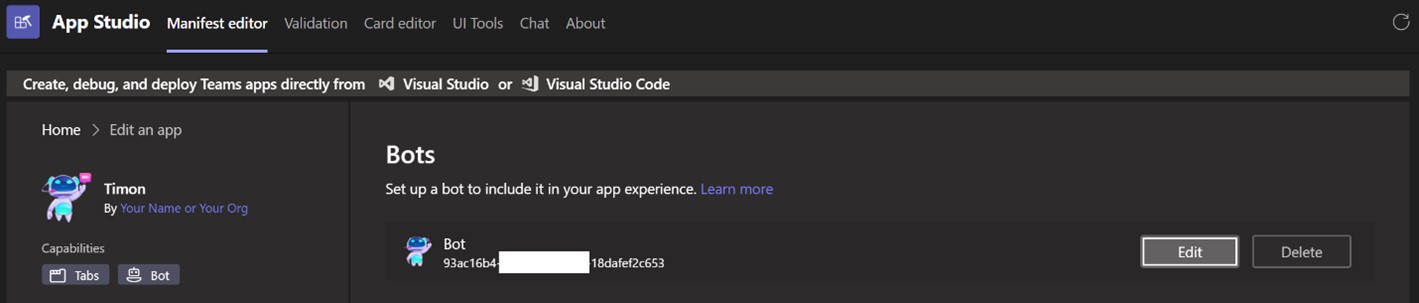
Click Bots 🡒 Set up to connect your own Bot ID to the Teams App.
If your manifest (Teams App Zip file) for Timon shows edit, just click **Edit**Did you notice the black theme switch? Good, gotta keep you awake - just a few more things to do! 😋
-
Existing bot 🡒 Connect to a different bot id 🡒 Paste your ID 🡒 Scope: Personal 🡒 SAVE /images/Guide4.5.jpg
/images/Guide4.6.jpg
Nicely done! Timon is connected to your shiny new Teams app 🌟 -
App ID - Confirm this ID: 10645ad9-6d4f-46ae-9e2a-2ab1c5fe8421
Note: DO NOT CLICK THE GENERATE BUTTON! Also note, that you should use different IDs per language. See the App-ID guide.Please note: If your org is deploying multiple Timons in different languages, you need to change your App ID for the other ones. Use the App-ID guide to find a fitting ID. Why? All Teams App IDs in a tenant must be unique to avoid issues.
💡 Optional: Change the Developer name from “Your Organization” to something more appropriate/fun cool/catchy and edit the description if you like.
-
Download your new Timon Teams app. Go to Test and distribute 🡒 Download
You now have a custom app with your Timon!
This means you can pin Timon in the Teams menu for users! It might take some time for new custom apps to be available for pinning, but maybe you’re special 😉?Wanna find out? Onwards to the final step!
Step 6 - Pin Timon to the left rail in Teams, for everyone!
NOTE: To be able to pin a newly uploaded "Custom app", you may need to be patient for about 24-48h before it becomes possible in your tenant. You can try right away but may face an error message, indicating you can’t save the setup policy right now. You don't have to contact support. Simply try again within 24-48h.
If you want to pin your Copilot only for champions, early adopters and/or testers, create your own setup policy: Docs link.
Final results for you and all your teammates in Teams if you follow this approach:
Also, if you use the Adoption Hub or another home app you can pin that one instead. You’re the boss.
/images/Guide5.1.jpg
Fun fact: Teams is available in Dark Mode – less white light in your eyes. Can be changed under your profile settings in Teams 😎.
Who can pin the app? How is it done?
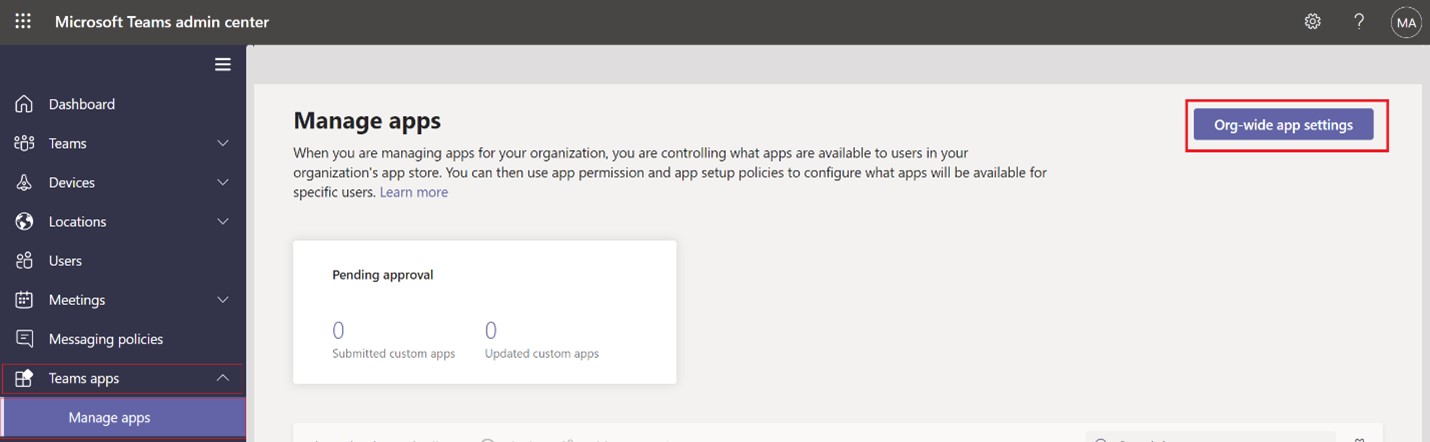
The Teams Administrator or Global Admin can make it happen in the Teams Admin Center 🎯
-
Go to the Team Admin Center and select Teams Apps 🡒 Manage Apps
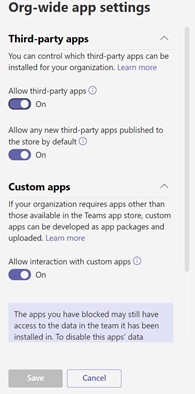
Start by clicking the "Org-wide app settings"-button to allow your own custom apps (which Timon is an example of).
/images/Guide5.2.jpgHere you can enable or double-check that "Custom Apps" is allowed.
💡 This choice is independent of allowing "third-party apps”, so you don't have to turn it on/off if it goes against internal regulations!
/images/Guide5.3.jpg
Unconfirmed rumor: Gandalf 🧙♂ and another wise app wizard 🧙♀️ once said: "Teams with third-party apps expands the possibilities of Teams to infinity and beyond.
Just imagine your phone with or without access to an app store..." -
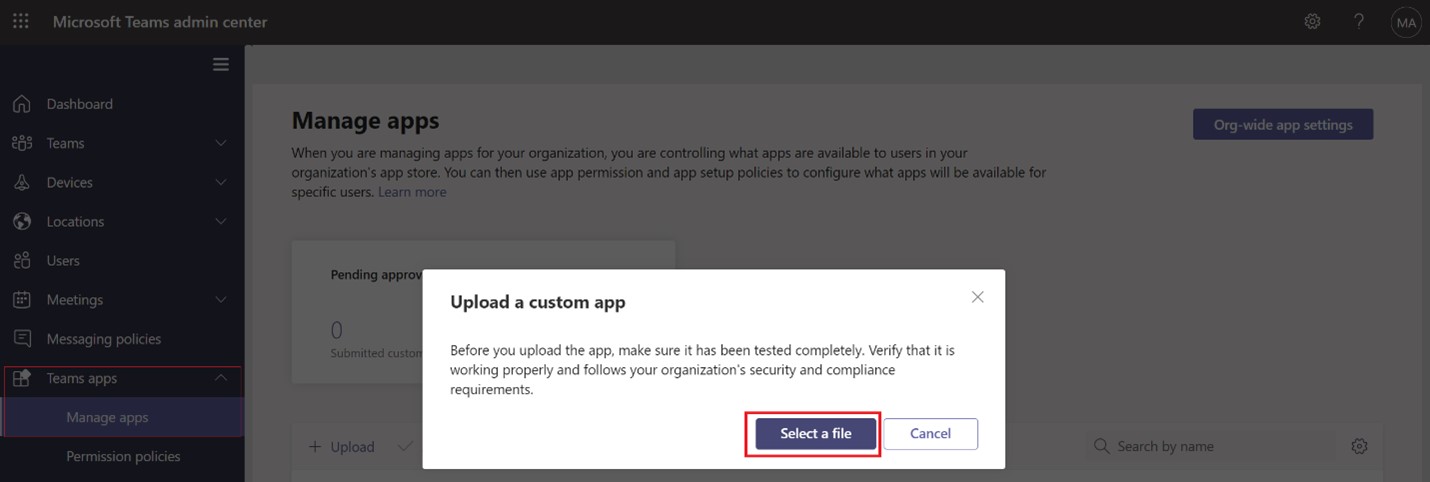
Time to upload your Teams app with Timon (your Copilot) in the Teams Admin Center.
Select Manage apps to upload.Select a file and browse to the location where you saved the Teams Manifest (Teams app) from step 4. If you’re lazy like me, it’s probably in your Downloads folder 😉 /images/Guide5.4.jpg
-
Search the list to see Timon if you have/see multiple apps: /images/Guide5.5.jpg
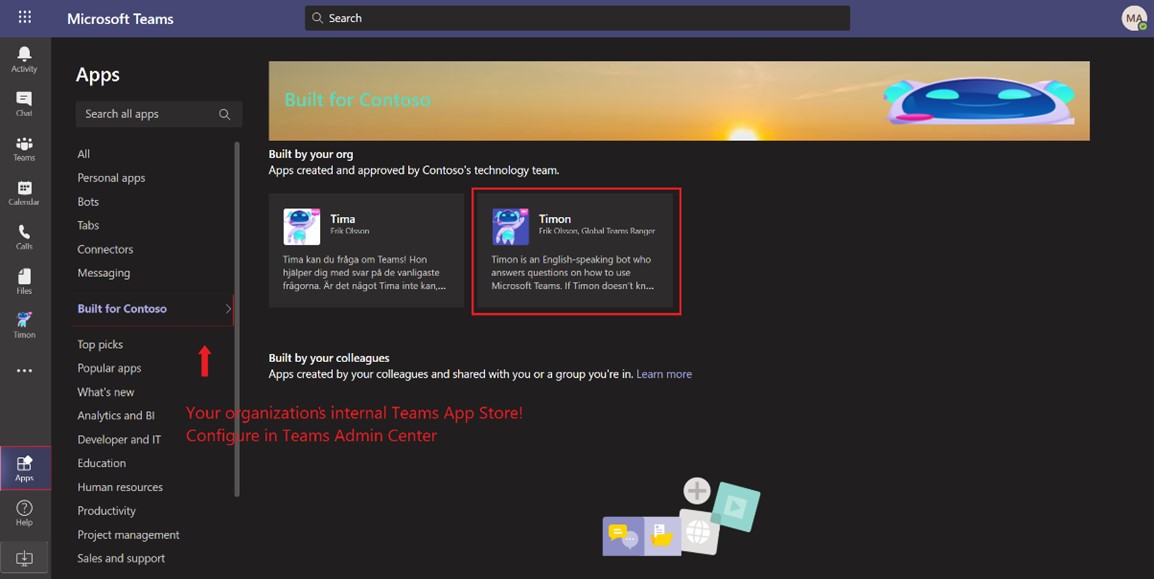
Soon (a few minutes), Timon shows under "Apps" in Teams under its own heading:"Built for Your Organization Name" /images/Guide5.6.jpg
If you click Built for Contoso (your org name), users reach your own internal Teams app store.
-
So far, so good. BUT YOU CAN DO MUCH BETTER!
(Sorry for screaming, got too excited 😇).Now*, let's pin Timon to the menu for ALL colleagues automagically 👍
Then users actually find it and can get those answers.
(The whole point of this, remember?)For more on this, you can reference the official documentation for pinning apps here:
Manage app setup policies in Microsoft Teams*NOTE: To be able to pin a newly uploaded "Custom app", you may need to be patient for about 24-48h before it becomes possible in your tenant. You can try right away but may face an error message, indicating you can’t save the setup policy right now. You don't have to contact support. Simply try again within 24-48h. If you want to pin your Copilot only for some, create your own setup policy (Docs link).
Just a tiny but mighty step left. I know. It’s a strange feeling. It’s happening.
Consider these two pro tips and you’re good to go.
#1💡 You can/should alter the Copilot's greeting to suit your needs. 💡
Why? Because when a Teams Copilot is deployed for the first time, the user gets the greeting message from the Copilot. Be smart and use this to inform about the premiere. After the launch you can change back to a more everyday greeting.#2💡 Large scale deployment (+10 000 users) 💡
We strongly recommend removing the waving gif Timon’s greeting. Because this is currently a flow, you might hit a limit with massive amounts of concurrent runs. -
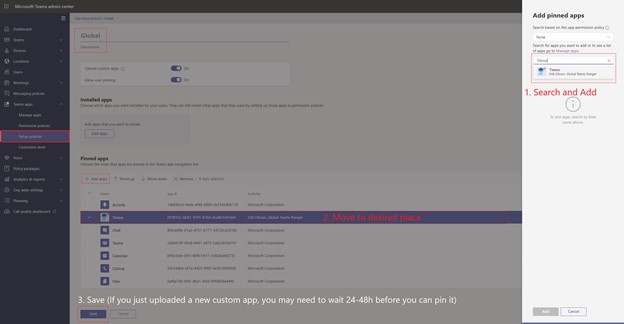
The finale🎉! Teams apps🡒 Setup policies 🡒 Global (org-wide) 🡒 Add apps 🡒 Save /images/Guide5.9.jpg
YAY🥳🐱🏍!
Soon it’ll look like the image at the top of Step 6 for all! #BePatient
Does it work? If so:
🚀🚀🚀👩🚀👨🚀🚀🚀🚀
Mission Accomplished!
🚀🚀🚀🚀🚀🚀🚀🚀
Or...
🤔 Did you come all this way and it won’t work? Seriously?
💡 Tip: See if you missed something, go through the steps again.
Otherwise: Congratulations😀🚀👍!
You now have Timon deployed to your own environment in your organization.
It is now up to you to make any edits or additions - if you want to!
Note that most links in Timon's replies are so-called "evergreen" links. They point to official Microsoft support articles and/or Microsoft Docs. These are kept up to date by Microsoft. Even if you decide not to maintain or update your Timon, the links will still carry users to up-to-date information. This guide only covers the Copilot Timon, who can now answer user questions about Teams in Teams (thanks to "PVA")!