Getting Started Service Integration - DigiBP/digibp.github.io GitHub Wiki
This getting-started illustrates how service integration can be realized with Camunda and the help of Postman without touching Java.
This service integration guide is a follow-up of the Workflow Getting Started guide.
This guide relies on the previous configured settings, as part of the Workflow Getting Started guide, such as the Camunda Modeler and a running instantiation of the
digibp-camunda-templatelocally (on-premise) or remotely (cloud).
- Pre-requisite: Camunda Modeler Templates and Postman
- 1. Modelling the Workflow
- 2. Integration Engineering and Testing
- 3. Service Integration
- Echo Endpoint on PutsReq
- References / Links
You may need to install and configure two artefacts, which are the Camunda Modeler Templates and Postman, for running this tutorial.
1Element templates allow you create pre-defined configurations for BPMN elements such as service and user tasks. Once applied via the properties panel they provide configured custom inputs to the user.
The digibp-camunda-template repository on GitHub contains pre-defined Camunda Modeler element templates for the REST-based service integration as shown here:
You may copy the .camunda/element-templates folder and its DigiBP-Templates.json files/content by considering the following two options:
For local template discovery (recommended option), copy or create a .camunda/element-templates folder relative in the directory or any parent directory of the diagrams you are editing.
For global template discovery (alternative option), you may have to create the resources and element-templates folders:
- On Windows use the
%APPDATA%/camunda-modeler/resources/element-templatesfolder. - On Mac, add a JSON file to the folder
~/Library/Application Support/camunda-modeler/resources/element-templates
It is strongly recommended, to engineer and test a REST API service integration prior integrating it into an executable process or case model. Therefore, this guide is going to illustrate how the engineering and testing can be done using the API development environment Postman.
You can download Postman from here: https://www.getpostman.com/apps
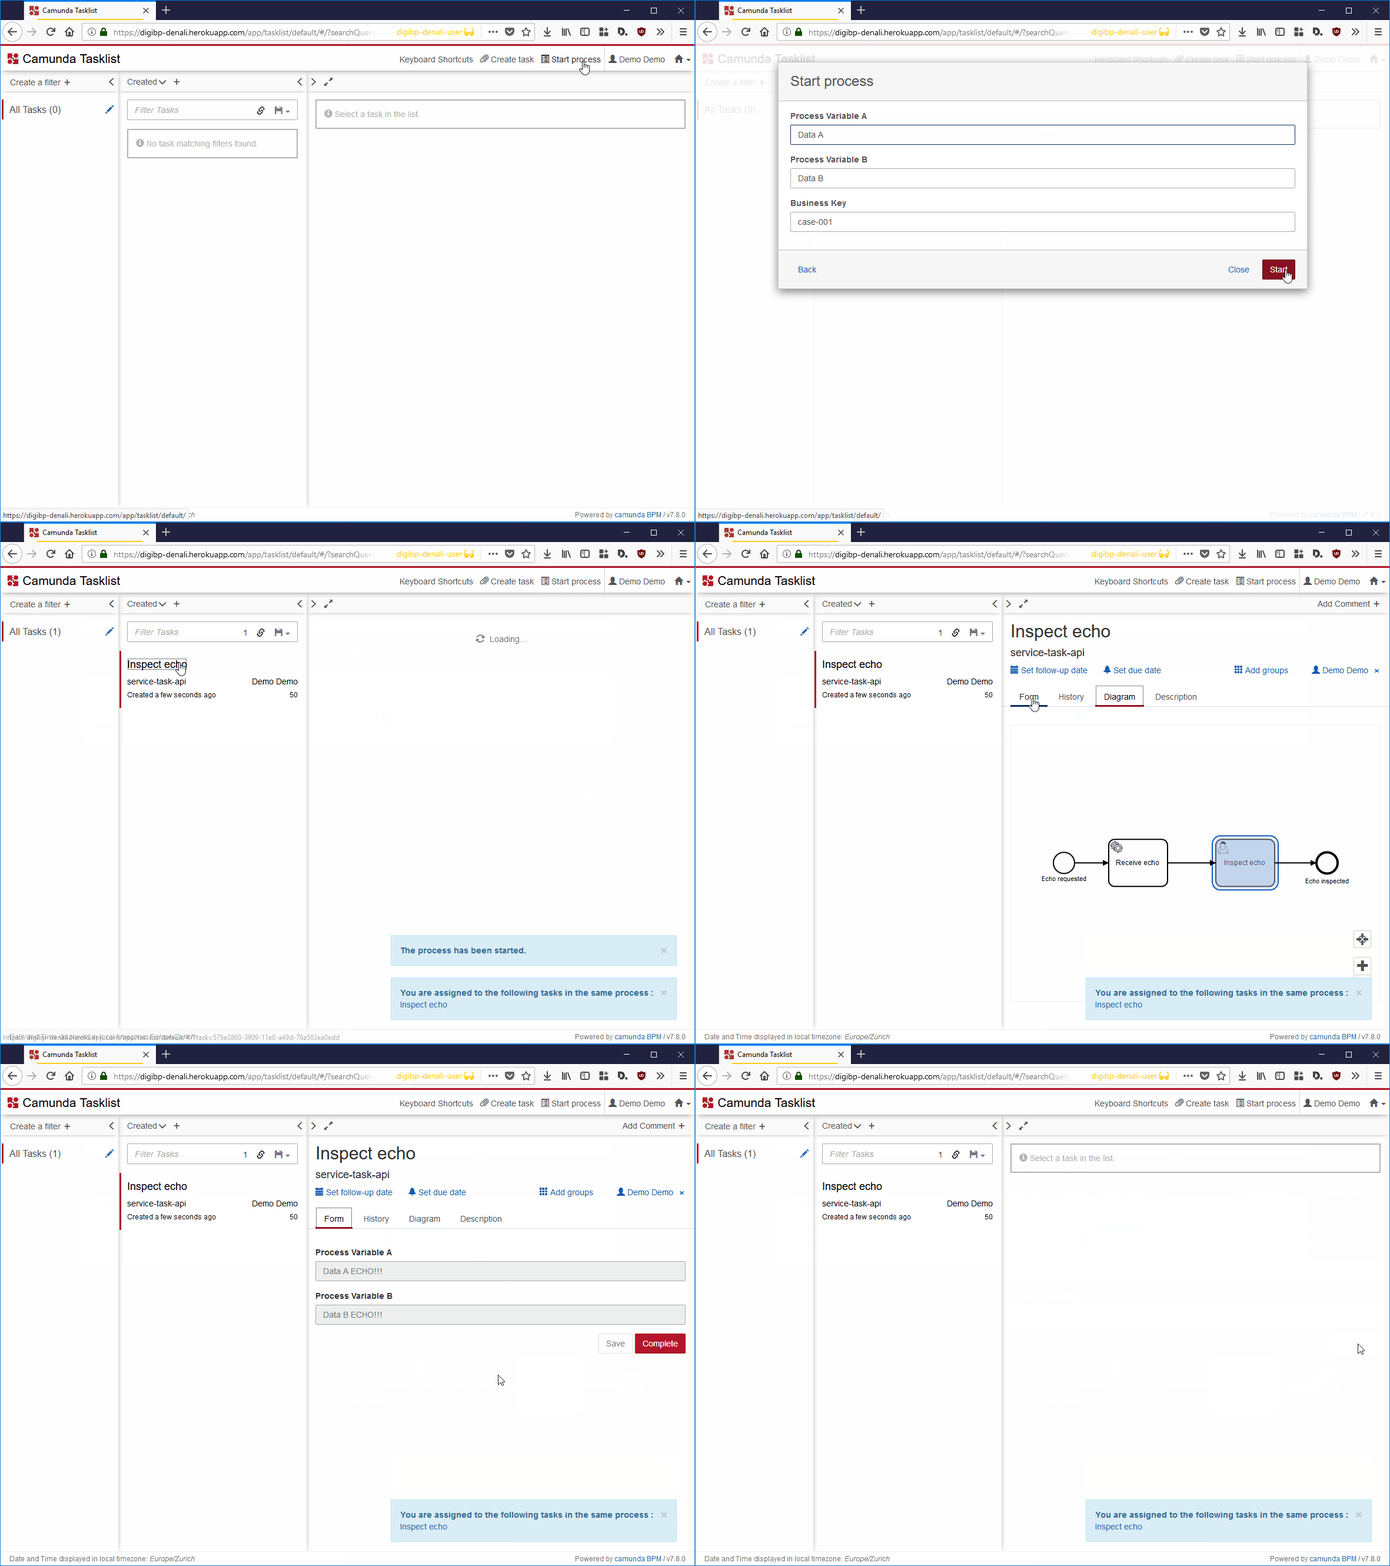
The goal is to model a very basic BPMN model, called echo-process, illustrating how service integration can be realised as animated here:
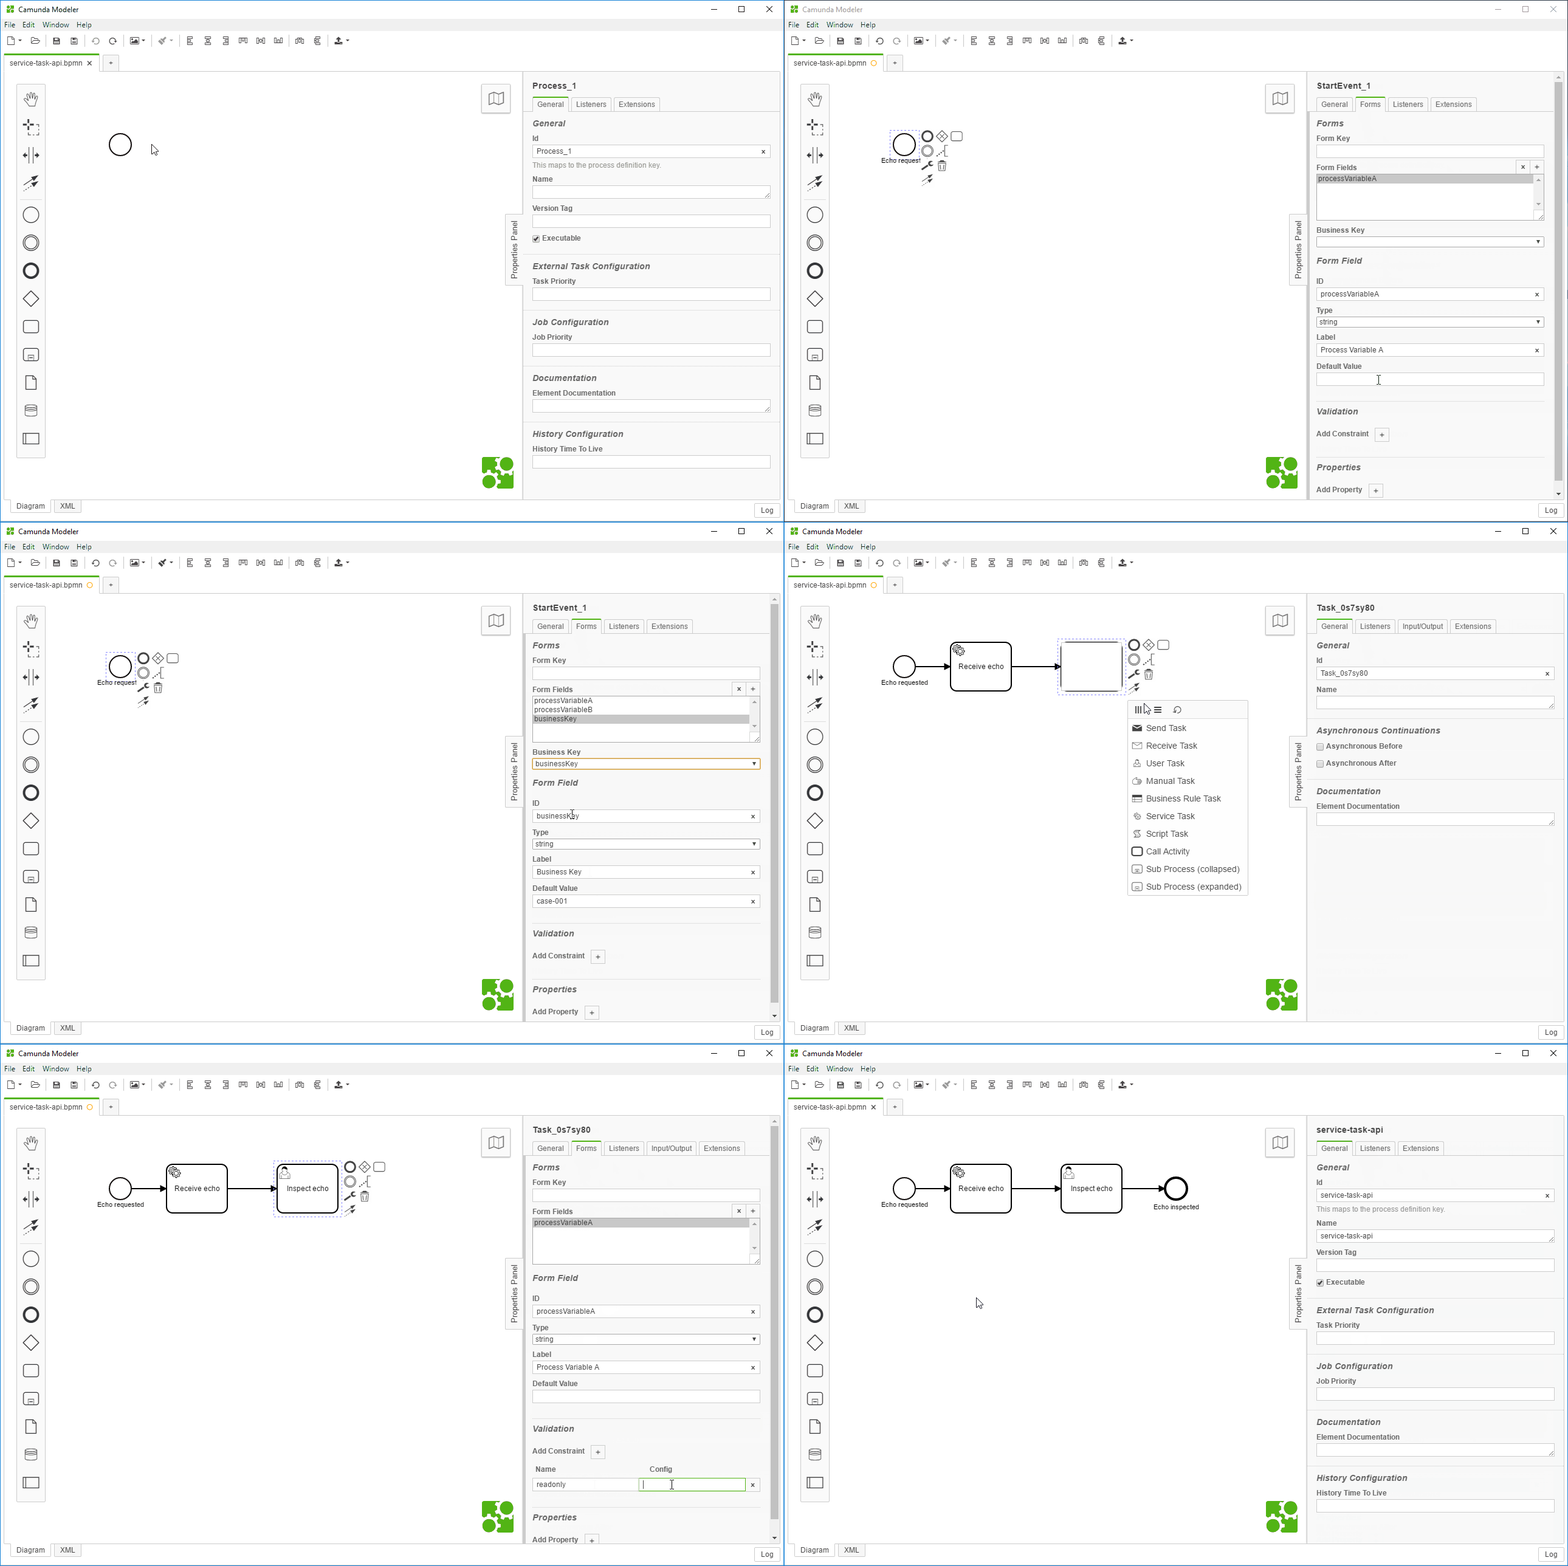
Try to model the echo-process including process variables (form fields) using the Camunda modeler as shown here:
On the start event Echo requested you may define three workflow variables:
<camunda:formData businessKey="businessKey">
    <camunda:formField id="processVariableA" label="Process Variable A" type="string" defaultValue="Data A" />
    <camunda:formField id="processVariableB" label="Process Variable B" type="string" defaultValue="Data B" />
    <camunda:formField id="businessKey" label="Business Key" type="string" defaultValue="case-001" />
</camunda:formData>
The service task Receive echo can be implemented using a place holder for the moment:
<bpmn:serviceTask camunda:expression="${true}" name="Receive echo" id="Task_001"></bpmn:serviceTask>Besides, you may reuse the process variables in the Inspect echo user task:
<camunda:formField id="processVariableA" label="Process Variable A" type="string">
    <camunda:validation>
        <camunda:constraint name="readonly" config="true" />
    </camunda:validation>
</camunda:formField>
<camunda:formField id="processVariableB" label="Process Variable B" type="string">
    <camunda:validation>
        <camunda:constraint name="readonly" config="true" />
    </camunda:validation>
</camunda:formField>
And finally, you define the Echo inspected end event.
In engineering, especially in software development, software testing is a fundamental principle. Developers are writing tests before they start with their actual implementation to specify what the application has to fulfil - this is referred to unit testing2.
It is therefore not surprising that testing is not excluded as well when using APIs3 and integrating services. Consequently, it is recommended to write API tests prior doing a service integration into a BPMN or CMMN workflow too.
In this guide we are going to integrate the following endpoint:
URL: https://www.putsreq.com/AnfG0hKuA9sNHqEIp6hf
Method: POST
Sample Request • Header: Content-Type: application/json • Body:
{
    "variableA": "Data A",
    "variableB": "Data B",
    "businessKey": "case-001"
}
• Optional: businessKey
Success Response • Code: 200 OK • Sample Body:
{
    "variableA": "Data A ECHO!!!",
    "variableB": "Data B ECHO!!!",
    "businessKey": "case-001"
}
Error Response • Code: 404 UNAUTHORIZED
Sample Call:
curl -X POST \
  https://putsreq.com/AnfG0hKuA9sNHqEIp6hf \
  -H 'Content-Type: application/json' \
  -d '{
        "variableA": "Data A",
        "variableB": "Data B",
        "businessKey": "case-001"
}'As a first step try to send the sample call in Postman by either writing it yourself or importing the call into Postman.
When importing collections by using the
buttons, you may have to close Postman first and then try to import in Postman again.
As mentioned above testing is an essential part of engineering. And when testing, you are trying the replicate the reality within a testing environment. Therefore DigiBP provides you with a Postman environment reproducing the Camunda engine and the Camunda HTTP connector extension. You can import that Postman environment by clicking on the following button:
This feature enables you to write test with an environment which makes you feel as you would write directly within Camunda.
And yes for the techies,
evalis evil, but it is currently the only way to integrate predefined JavaScript code into Postman.
For the following two steps (Pre-request Script and Tests) you can import a collection as a blueprint:
In the pre-request script tab, you are going to write the script for the Camunda input parameters. In Postman the resulting data of the script is going to be placed into the body of the request.
Switch to the body tab and set the following postman variable (if you imported the blueprint collection above, it is already there: {{payload}}.
Now it is time that you write your pre-request script by using this template:
// Connector-START • Camunda HTTP Connector JavaScript emulation:
eval(pm.environment.get("camunda"));
// Connector-END

// Test-Data-START • Initialise process variables, and (optionally) business key and/or process id:

    // execution.setBusinessKey("case-001");

// Test-Data-END

// Service-Task-Input-START • Camunda HTTP Connector Input Parameter payload Script:
out = JSON.stringify({
    // Your JSON
});
// Service-Task-Input-END

// Body-START • Postman Body {{payload}}:
payload.set(out);
// Body-END
First emulating the Camunda environment including the process variables and workflow data by defining them between // Test-Data-START and // Test-Data-END (you may have a glimpse into the solution below).
Keep in mind to name your process variables the same way as defined in tor process model.
Then you are going to write they actual part, which will be embedded into the BPMN model. You are going to produce the payload containing the workflow data serialised as a JSON object by defining it between // Service-Task-Input-START and // Service-Task-Input-END (you may have a glimpse into the following solution).
// Connector-START • Camunda HTTP Connector JavaScript emulation:
eval(pm.environment.get("camunda"));
// Connector-END

// Test-Data-START • Initialise process variables, and (optionally) business key and/or process id:
processVariableA = "Data A";
processVariableB = "Data B";
execution.setBusinessKey("case-001");
// Test-Data-END

// Service-Task-Input-START • Camunda HTTP Connector Input Parameter payload Script:
out = JSON.stringify({
    "variableA": processVariableA,
    "variableB": processVariableB,
    "businessKey": execution.getBusinessKey()
});
// Service-Task-Input-END

// Body-START • Postman Body {{payload}}:
payload.set(out);
// Body-END In the tests tab of Postman, we are going to write our test script proving the expected results, which then can be used for defining for the Camunda output parameters. Use this template to define your rest scripts:
// Connector-START • Camunda HTTP Connector JavaScript emulation:
eval(pm.environment.get("camunda"));
// Connector-END

// Service-Task-Output-START • Camunda HTTP Connector Output Parameter Script:
    // object = JSON.parse(response);
// Service-Task-Output-END

// Test-START • Postman Test:
    /* pm.test("Test processVariableA: " + processVariable, function() {
        pm.expect(processVariable).to.include("TEXT");
    }); */
// Test-END
For every output parameter in Camunda, which can be considered synonymous with process variable and form field, we will have to specify how to get the result out of the response JSON.
The response variable contains the body of the response, which can be depending on the endpoint, serialised as JSON. Between // Service-Task-Output-START and // Service-Task-Output-START you are going to define how the system then retrieves the resulting data (you may have a glimpse into the solution below).
You may have to repeat that procedure for every variable you may want to use. And keep in mind that this is highly depending on the response format of your consuming endpoint.
Finally, the test cycle closes here, by writing the Postman test between // Test-START and // Test-END. Here you can check if you truly get the expected results.
Please note that this only works for APIs where you can control the answers.
If you did everything as instructed and shown in the following solution, you should receive a 200 OK and some passing test.
// Connector-START • Camunda HTTP Connector JavaScript emulation:
eval(pm.environment.get("camunda"));
// Connector-END

// Service-Task-Output-START • Camunda HTTP Connector Output Parameter processVariableA Script:
object = JSON.parse(response);
processVariableA = object.variableA;
// Service-Task-Output-END

// Service-Task-Output-START • Camunda HTTP Connector Output Parameter processVariableB Script:
object = JSON.parse(response);
processVariableB = object.variableB;
// Service-Task-Output-END

// Test-START • Postman Test:
pm.test("Test processVariableA: " + processVariableA, function() {
    pm.expect(processVariableA).to.include("ECHO");
});
pm.test("Test processVariableB: " + processVariableB, function() {
    pm.expect(processVariableB).to.include("ECHO");
});
// Test-ENDFinally, integrate your services into your process model as described in the subsequent steps and shown in the following animation:
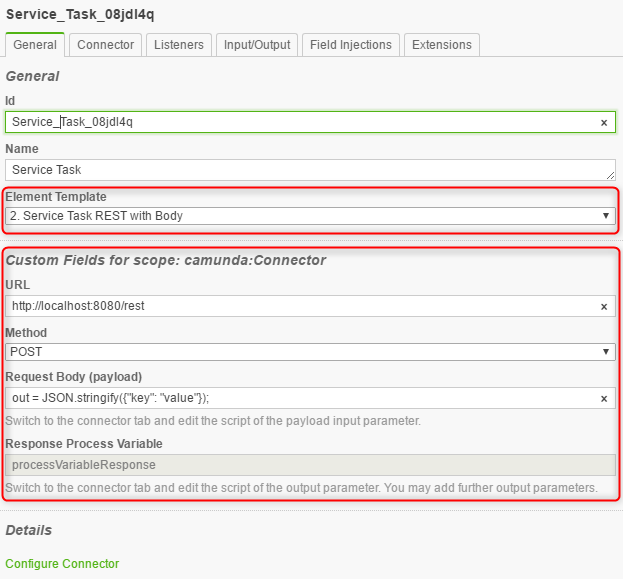
Define (or change) the service task implementation by using the 2. Service Task REST with Body template.
This template pre-defines to Camunda HTTP Connector4, which can be inspected by switching to the Connector tab.
However the
Camunda HTTP Connector4 can also be configured manually without using a template.
Copy the Postman pre-request script part between // Service-Task-Input-START and // Service-Task-Input-END and paste it to the Script field of the Camunda HTTP Connector input parameter payload.
Copy the Postman tests script part(s) between // Service-Task-Output-START and // Service-Task-Output-START and paste it to the Script field of the Camunda HTTP Connector of an output parameter with the name of the corresponding output process variable such as processVariableA.
You may have to repeat this procedure if you would like to initialise further output process variables as shown in the animation above.
Now you are ready to deploy your process and test if it works as expected.
This is optional: Just in case the predefined endpoint is not working or may want to create an own instantiation.
You may create an own version of the Echo-Endpoint on PutsReq using the following script:
const parsedBody = JSON.parse(request.body);

// Build a response
if (parsedBody.variableA && parsedBody.variableB) {
    response.status = 200;
    response.headers['Content-Type'] = 'application/json';
    response.body = {
        variableA: parsedBody.variableA + " ECHO!!!",
        variableB: parsedBody.variableB  + " ECHO!!!",
        businessKey: parsedBody.businessKey // optional
    };
} else {
    response.status = 404;
    response.headers = {};
    response.body = 'not found';
}1 Element Templates
- https://docs.camunda.org/manual/latest/modeler/camunda-modeler/element-templates
- https://github.com/camunda/camunda-modeler/tree/master/docs/element-templates
2 Unit testing
3 API Debugging and Testing
- https://www.getpostman.com/tools#debug
- https://blog.getpostman.com/2014/03/07/writing-automated-tests-for-apis-using-postman
4 Camunda HTTP Connector


 buttons, you may have to close Postman first and then try to import in Postman again.


