Getting started with Bela - BelaPlatform/Bela GitHub Wiki
The Bela Wiki has moved to learn.bela.io. This material has been superseded. Click here for the maintained version.
Getting started with Bela
Hardware Setup
What you'll need
Before starting, make sure you have:
- Beaglebone (Black, Green or Black Wireless) and Bela cape OR
- PocketBeagle and Bela Mini cape
- USB cable
- 4GB or larger micro-SD card
- two audio adapter cables for audio in/out
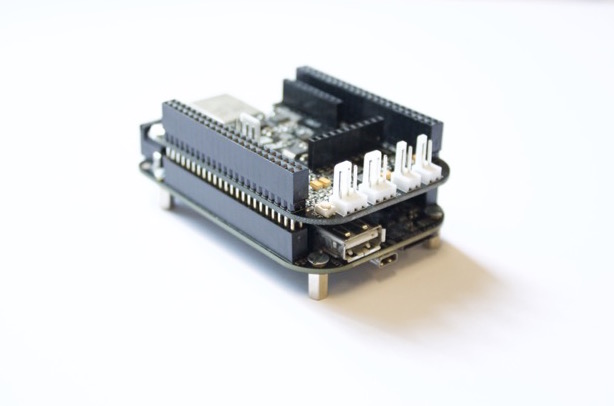
Bela

Stack the Bela cape on top of the Beaglebone. Make sure all the pins from the cape fit into the socket header of the BBB and that no pin gets bent in the process.
Bela Mini
If you ordered a starter kit from us, the Bela Mini is already soldered to the PocketBeagle. If you ordered only a Bela Mini cape, follow these instructions to connect it to the PocketBeagle.
You can also watch this video by Alex Glow from Hackster.io.
The Bela Mini cape is intended to be soldered directly to a PocketBeagle. Make sure you attach it in the correct orientation to avoid damage to the board:
-
The Bela Mini cape goes on top of the PocketBeagle. The components and connectors on the PocketBeagle should face upwards.
-
The USB port on the Bela Mini cape should be above the USB port on the PocketBeagle. The white audio connectors on the Bela Mini cape should be above the SD slot on the PocketBeagle.
-
Leave space between the top of the PocketBeagle connectors (especially the SD slot) and the pins on the bottom of the Bela Mini cape. A gap of 5mm is about right: the will leave just enough pin to on the bottom of the PocketBeagle without needing to trim the excess.
Software Setup
If you bought a Bela Starter Kit then the latest Bela image is already flashed on the onboard storage and there is no need to use an SD card.
If you have a Bela Mini or just bought a Bela cape then you will need an SD card with the Bela image on it before continuing.
Bela SD card image
If you did not get a Bela SD card with your kit, you will need to follow the instructions to flash the Bela image. You can download a copy of the image from here
Once you have your SD card, Insert it into the BBB or PocketBeagle with cape on top and plug that into your computer with the USB cable. The board will boot up after around 40 seconds and advertise itself to your computer as a network interface.
If you are on a recent operating system then you are ready to go. Open a browser and go to http://bela.local/, or http://192.168.6.2 if you're on a Windows machine, and the IDE will load up.
Installing network drivers
If you are on Mac Yosemite and above, Windows Vista and above, or all Linux then no drivers are required.
For older operating systems please follow the instructions below.
Communication between Bela and the host pc takes place through the Ethernet over USB network connection. You may need some network drivers depending on your operating system, as detailed below. In order to log into Bela for advanced use you need an ssh client (optional).
macos users
If you are running macos 10.10 through to 10.14, you don't need any drivers for the latest version of the Bela image (from v0.3.4 onwards).
If you are running macos 10.9 or earlier, or 10.15 or later, or have an older version of the Bela image, you will need to install drivers:
- install network drivers for the BBB from https://github.com/jwise/HoRNDIS/files/3719733/HoRNDIS-9.2-catalina_install.pkg.zip
- if you are on 10.15 or above, you will have to bypass Gatekeeper in order to install the file.
- if you are running
macos10.13 or later, after installing HoRNDIS and rebooting, go to System Preferences -> Security & Privacy and you should see a messageSystem software from developer "Joshua Wise" was blocked from loading.. Click on "Allow" to allow the driver to load. This is only required once. - reboot

Now you should be ready to go:
- make sure the BBB is plugged in and booted up (might take up to one minute after you plug it in). You should see blinking blue lights on the Bela.
- if you don't see blinking blue lights, see the release notes for tips on booting older versions of the Bela board from SD.
- if you do see blinking lights, open a browser and go to bela.local/ . If the IDE shows up, then you are all set and you can jump to Build your first project.
If you cannot see the IDE in the browser visit Troubleshooting - macos.
Linux users
If you're using Linux, everything you need should already be on your machine!
- make sure the BBB is plugged in and booted up (might take up to one minute after you plug it in).
- depending on your system's configuration, everything could already be working. Open a browser and go to 192.168.7.2 , if the IDE show ups then you are all set and you can go to Build your first project.
If you cannot see the IDE in the browser visit Troubleshooting - Linux.
Windows users
If you're using Windows with a recent Bela image ( >= v0.3.5), then your board should not require any drivers.
- Open a browser and go to 192.168.6.2, if the IDE shows up then you are all set and you can go to Build your first project (older images would require drivers and use of the IP 192.168.7.2).
If you cannot see the IDE in the browser visit Troubleshooting - Windows.
**** LEGACY DOCUMENTATION ****
These notes are for users with legacy versions of Windows (Windows XP?) or of the Bela image (<= v0.3.3)
You'll need to install the following network drivers:
- http://beagleboard.org/static/Drivers/Windows/BONE_D64.exe (Windows 64 bit) or
- http://beagleboard.org/static/Drivers/Windows/BONE_DRV.exe (Windows 32bit)
- Note: Windows Driver Certification warning may pop up two or three times. Click "Ignore", "Install" or "Run"
- Note: You may need to reboot Windows.
- Note: for more info visit the manufacturer's website
- Note: if you get an error of the likes of "drivers were not installed successfully", you may have to disable driver signature verification, see here for how to do it.
Once the drivers are installed, plug in the board using the USB cable and wait about 40 seconds. Depending on your system configuration, everything could already be working. Open a browser and go to 192.168.7.2, if the IDE show ups then you are all set and you can jump to Build your first project.
If you cannot see the IDE in the browser visit Troubleshooting - Windows.
Build your first project
Before building your first project it's a good idea to acquaint yourself with Bela's hardware. An explanation of everything that you have at your disposal and how it works can be found in the Hardware explained section.
Building projects with the browser-based IDE couldn't be easier. Make sure your flashed SD card is inserted into the BeagleBone Black and connect the USB to the mini-USB port on the same side as the ethernet port. Then plug in your BBB to the computer and once it is up and running (under a minute the first time you run) open a browser and go to 192.168.7.2 (or 192.168.6.2 on Windows)>
You can edit the code in the browser window, click the button to compile and run it on the board. The IDE also allows you to manage projects in the Project Explorer tab, to edit project settings in the Project Settings tab, to explore many examples in the Code Examples tab and to browse the built-in documentation in the Documentation tab. Messages from the compiler will be displayed in the browser window. A full explanation of the IDE can be found at Bela IDE.
To find out more about building projects with Bela visit:
Troubleshooting
Troubleshooting - macos
In case the IDE is not showing up try the following:
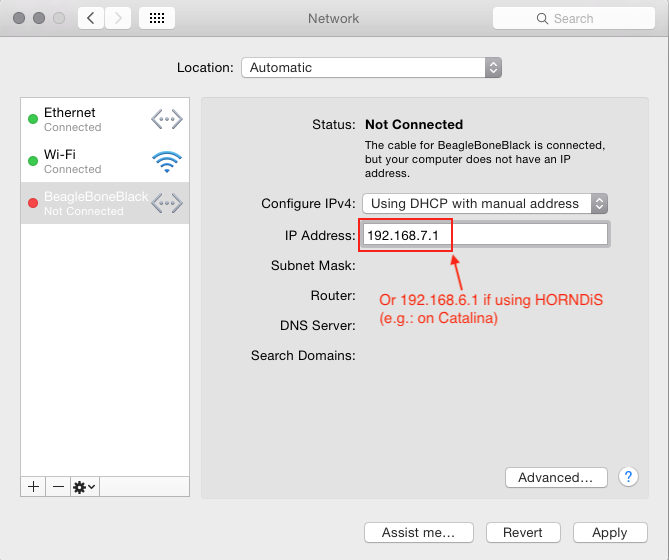
- go to System Preferences->Network, click the + symbol at the bottom left. From the popup window, select "Beaglebone Black"
- now set the "Configure IP v4" field to "Using DHCP with manual address" and set the IP address to 192.168.7.1 as in the image below
-
click apply and wait a few seconds, the indicator next to the icon should turn green
-
open a browser and go to http://bela.local/ , the IDE should show up, so you can jump to Build your first project.
-
if that is still not the case, you may want to try to reload the kernel extensions (or you could try to reboot you computer, but this is quicker). Open up a terminal and run
sudo kextunload /Library/Extensions/HoRNDIS.kext
sudo kextload /Library/Extensions/HoRNDIS.kext
note that you may be prompted to enter your computer's password. If that happens, type it in and press enter. Note that there will be no characters or * will be displayed in the terminal window as you type the password in.
- if you are on 10.13 or above and getting
System policy prevents loading the kernel extension., then you should go to System Preferences -> Security & Privacy as explained above. - if none of the above works, go to the Test the ssh connection section below to troubleshoot even further.
Troubleshooting - Linux
A. If you are having trouble, you may have to manually turn the interface on: bring up a terminal and type
$ ifconfig -a
The command will return a list of the network interfaces available on your computer, one of them will be the BeagleBone Black. Once you identify the name of the interface, you have to self-assign an IP address on that interface. To do so, run:
$ sudo ifconfig interfaceName up 192.168.7.1
where you will have to replace interfaceName with the interface representing the BeagleBone Black.
B. If ifconfig is not on your system or it does not list your Bela device, in some systems you can identify the interface name by typing:
ip link
and once identified you can wake it up and assign the ip address by typing:
sudo ip link set interfaceName up
sudo ip addr add 192.168.7.1/24 dev interfaceName
C. Alternatively, if you have dhclient installed AND you are using the USB connection, you can try to ask the interface to self-configure itself with
$ sudo dhclient interfaceName
note that this will not work if the board is connected via ethernet or wi-fi.
Troubleshooting - Windows
If the IDE does NOT show up, then try the following:
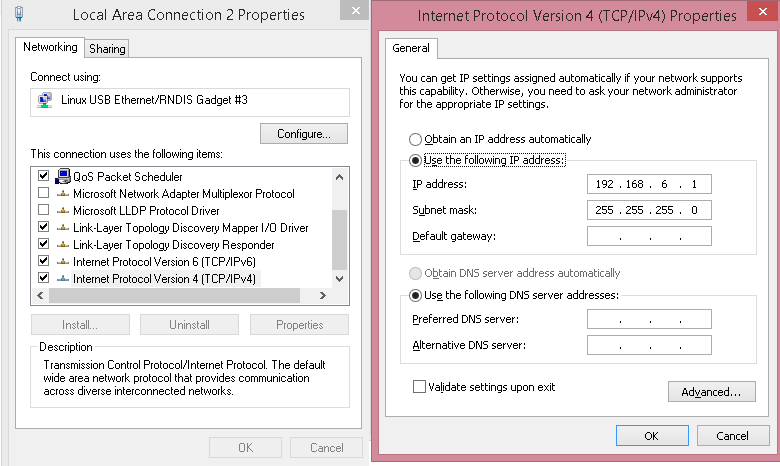
- open the Control Panel, select "Network and Internet" > "Network connections". The BeagleBone should show up with a name of the type "Local Area Connection Linux Ethernet Rndis Gadget". Right click on it and choose Properties. In the dialog (image below, left), click on "Internet Protocol Version 4 (TCP/IPv4)" and press the "Properties" button. Fill-in the details of as per the image below (right ) and click exit on the two dialogs to exit.
Now try again to open a browser and go to http://bela.local/, hopefully the IDE will show up now, so you can jump to Build your first project. In case it does not or if you plan to use ssh as well, jump to the Test the ssh connection section below to check that everything is working properly.
NOTE: if you're using Windows you will need a toolkit that allows you to use ssh and some other basic shell tools. The shell scripts in this project have been tested with mingw http://sourceforge.net/projects/mingw/. Make sure you install the optional package rsync with it. You will want to note that in order to paste code into the mingw terminal you have to right click on the terminal's title bar and navigate the menu to edit->paste.
Test the ssh connection
When using the USB network connection, the BBB has a self-assigned IP of 192.168.7.2 (or 192.168.6.2 on Windows), we will log in with username root and an empty password.
If you have gone through operating system-specific steps above, you should be able to connect to the BeagleBone Black by opening a terminal and entering the following (or adjust the IP accordingly for Windows):
$ ssh [email protected]
According to the settings of your ssh client, you might, or might not, be prompted with something along the lines of
The authenticity of host '192.168.7.2 (192.168.7.2)' can't be established. RSA key fingerprint is 35:b2:ff:ae:c2:02:30:af:84:1e:0d:f5:c9:c8:4b:34. Are you sure you want to continue connecting (yes/no)?
type yes and press the return key.
If everything is ok, you will now be displayed the BBB prompt:
root@bela ~$
If it does not work, make sure you installed the drivers for your operating system and you rebooted after installing them.
At that point, try to get a list of the network interfaces from the terminal with ifconfig on Mac or Linux and ipconfig on Windows and check that your computer is assigned the address 192.168.7.1 in the ethernet-over-usb interface to the BeagleBone, as outlined above.
Last resort
In case none of the above works and you have the possibility to connect the BeagleBone through an ethernet cable to a home router, try the following:
- once connected, the BeagleBone will expect a DHCP server on the port to assign an IP address to it. This should work on most home router configurations.
- you can then retrieve that IP address from your router's configuration panel, typically in the "attached devices" panel. Consult your router's manual to help you through these two steps.
- try then to connect to the IDE by opening in your web browser the page http://1.2.3.4 (where 1.2.3.4 is the IP address you retrieved at the previous step), or, from the terminal:
$ ssh 1.2.3.4
You could also try to log in over serial: when connected to the host, Bela will show up also as a serial device, you should find it under /dev/tty.usbmodem__bela_* where * will be one or more digits. You should therefore be able to do
screen /dev/tty.usbmodem__bela_* 115200
and then insert the user root when prompted. Once logged in, you may be able to inspect the behaviour of the board and possibly troubleshoot it from the inside.
If not even this works, then you may have a faulty unit or a faulty SD card (if you have one). Try first to re-flash the SD card or use a different SD card. If that fails, please get in touch with us at info [at] bela.io.