Basic HTML and HTML5 - zilongxuan001/LearnFreecode GitHub Wiki
<h1>Hello</h1>是一个HTML元素
大多数的HTML元素有一个opening tag和一个closing tag.
opening tag 像这样 <h1>
closing tag像这样</h1>
opening tag和closing tag的区别是closing tag多了一个slash,就是 /。
元素会告诉浏览器你网站的结构。h1元素常用于主标题,h2常用于次标题。h3、h4、h5、h6元素标明不同的新部分。
p元素指网站中的正常大小的段落文本。P是“paragraph”的缩写。
p的写法是
<p>文本</p>
通常使用lorem ipsum text作为文字占位符,lorem ipsum,译为“乱数假文”。
注释就是让你的注释留在代码里,却不影响代码本身。
注释也常用于不删除代码,又让代码不起作用。
注释的形式是
<!--
代码
-->
如果你要开始一个注释,开头用<!--
如果你要结束一个注释,结尾用-->
删除不必要的元素,这里删除了h1标题。
HTML5 有很多很多新元素,用于划分网页结构,比如<main></main>,<article><article>,<section></section>
添加图片,使用<img> ,样式如下
<img src="https://www.your-image-source.com/your-image.jpg" alt="Author standing on a beach with two thumbs up. ">
<img> 说明是图片元素,‘‘ 是自封闭标签。
‘src="图片地址" ’ 表明图片的源位置。
'alt="图片说明"' 说明图片的内容是什么,当图片无法显示时,会显示alt的内容。
使用内联样式(inline style),修改标题样式
<h2 style="color: blue">CatPhotoApp</h2>
其中,
<h2></h2> 是标题元素;
style=" " 是内联样式;
color: XXXX 说明设置的是颜色样式;
blue 说明标题的文字颜色;
CatPhotoApp 是标题文字,会显示在网页中。
CSS,即Casading Style Sheets,即层叠样式表,通过在元素<style></style>里设置样式。
<style>
     h2  {color: red;}
</style>
这种属于元素样式,直接设置元素的样式,如颜色,字体,字体大小,图片大小,内外边距等。
<style></style>表明是CSS,在里面设置样式
h2 { } 表明元素名称,设置的是h2的样式,即所有的h2元素都使用该样式。
color: 表示设置的属性是颜色
red 表示字体颜色是红色。
class样式可以在HTML里重复使用。
class样式如下
<style>
	.blue-text{
          color: blue;
        }
<style>
<style></style>表明是样式元素
. 表明是class样式
blue-text 表明样式名称是 blue-text
color 说明属性是颜色
blue 说明颜色是蓝色。
HTML引用样式如下:
<h2 class="blue-text"></h2>
<h2></h2>说明是元素h2引用该class样式
class=“ ” 表明引用的是class样式
blue- text 是样式名称
可以将CSS的Class样式应用于多个元素
引用样式如下
class="your-class-here"
设置元素的文字大小
文字大小的CSS形式如下
h1 {
   font-size; 30px;
 }
h1 表示是设置元素h1的样式
font-size 表示设置都是字体大小属性
30px 说明字体大小为 30px, px 即pixels,像素
为元素设置字体,字体的CSS样式如下
h2 {
   font-family: Sans-serif;
 }
h2 表明设置的是元素h2的样式
font-family 表明设置的是字体属性
Sans-serif 表明字体是Sans-serif
字体 有 Sans-serif,Monospace等
谷歌的字体为Lobster
想用谷歌字体,必须先引用,在HTML的最上方,插入
<link href="https://fonts.googleapis.com/css?family=Lobster" rel="stylesheet" type="text/css">
href 表明被链接文档的位置
rel 表明当前文档和被链接文档的关系,rel即relationship
stylesheet 样式表
type ,规定被链接文档的MIME类型
MIME,即多用途互联网邮件扩展类型。
浏览器常用字体 Monospace,Serif,Sans-Serif
一种字体不能用时,浏览器会自动识别下一个字体,CSS形式如下
p {
 font-family: Helvetica, Sans-Serif;
}
设置图片大小,使用width,CSS的样式如下
<style>
  .larger-image {
    width: 500px;
  }
</style>
.larger-image 是class的名称,.表明是class,larger-class是class的名称。
width: 表明是图片的宽度属性
500px 是图片设置后的大小,px即 pixels.
在HTML中,引用样式如下
<img src="#" alt="" class="larger-image">
CSS的图片边框属性有style,color,width, CSS样式如下:
<style>
  .thin-red-border {
    border-color: red;
    border-width: 5px;
    border-style: solid;
  }
</style>
.thin-red-border 表明这是个class,class名称为thin-red-border
border-color 说明边框颜色属性
red 说明边框颜色为红色
border-width 说明边框宽度属性
5px 说明边框宽度为5 pixels
border-style 说明边框样式属性
solid 说明边框样式为solid
在HTML中引用如下
<img class="thin-red-border">
另外,一个元素可以插入多个class属性,样式如下
<img class="class1 class2">
使用border-radius,可以设置边框的圆角大小,CSS样式如下:
border-radius: 10px;
border-radius说明设置的是边框圆角属性
10px 说明边框圆角大小为10px
可以用百分比调节边框边角的大小,CSS的样式如下
border-radius: 50%;
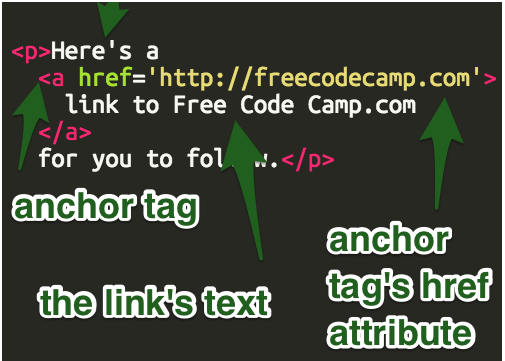
使用a元素(全称“anchor”元素),可以链接到其他页面,在HTML中的形式如下
<p>Here's a <a href="http://freecodecamp.org"> link to Free Code Camp</a> for you to follow.</p>
<p></p>是段落元素
<a></a> 是锚定元素
href="链接地址" 是链接的外部页面地址
link to Free Code Camp 是链接的文字,点击改文字,即可链接到其他页面。
元素的嵌套就是把一个元素放到另外一个元素里,如把<a></a>放到<p></p>里,形式如下。
<p>Here's a <a href="https://freecodecamp.org"> link to Free Code Camp</a> for you to follow.</p>
可以用哈希符号 #,制作死链接。
当你不知道链接地址时,可以用#暂时代替链接地址,相当于占位符。HTML的形式如下
<a href="#"></a>
<a></a> 是锚定元素
href="" 是链接符号,要链接地址
# 是哈希符号,暂时占据链接地址。
使用<a></a>可以将图片作为链接,只需要将<img>潜逃到<a></a>中即可,HTML中形式如下
<a href="#"><img src="https://bit.ly/fcc-running-cats" alt="Three kittens running towards the camera. "></a>
<a></a> 是锚定元素
<img>是图片元素
无序列表,unordered list,或者bullet point-style lists。
在HTML中样式如下:
<ul>
  <li>milk</li>
  <li>cheese</li>
</ul>
<ul></ul> 即unordered lists。
<li></li> 即list。
无序列表在浏览器显示形式为

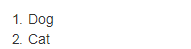
有序列表,即ordered lists,或numbered-style lists,按自然数字排序的列表。在HTML中形式如下
<ol>
  <li>Dog</li>
  <li>Cat</li>
</ol>
<ol></ol> 即ordered lists。
<li></li> 即lists。
在浏览器中的形式如下
创建网页表单,网页表单就是客户填写信息的内容。
Text Field,文本框,在HTML中样式如下:
<input type="text">
<input> 输入框元素,是自封闭元素。
type="text" 输入类型为text。
为文本输入框加入占位符(Placeholder)。所谓占位符,就是不填入任何东西时,浏览器默认显示的文字。 在HTML的样式如下
<input type="text" placeholder="文本">
placeholder="文本" ,文本即浏览器默认出现的文本。
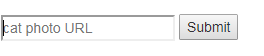
建立form元素,用户在文本框输入的信息可以传送到服务器上。
在HTML的样式如下
<form action="/submit-cat-photo">
  <input type="text" placeholder="cat photo URL">
</form>
<form></form> ,表明是form的表单元素。
action="/submit-cat-photo",action是属性, "/submit-cat-photo"是服务器地址。
添加submit提交按钮到表单中。
在HTML中样式如下
<form action="/submit-cat-photo">
  <input type="text" placeholder="cat photo URL">
  <button type="submit">Submit</button>
</form>
<button></button>表明是按钮元素
type="submit" 表明按钮元素类型是submit。
在浏览器中显示如下
你可以要求用户必须填写数据才能提交。
在input元素里机上required
<input type="text" required>
<link href="https://fonts.googleapis.com/css?family=Lobster" rel="stylesheet" type="text/css">
<style>
.red-text {
color: red;
}
h2 {
font-family: Lobster, Monospace;
}
p {
font-size: 16px;
font-family: Monospace;
}
.thick-green-border {
border-color: green;
border-width: 10px;
border-style: solid;
border-radius: 50%;
}
.smaller-image {
width: 100px;
}
</style>
<h2 class="red-text">CatPhotoApp</h2>
<p>Click here for <a href="#">cat photos</a>.</p>
<a href="#"><img class="smaller-image thick-green-border" alt="A cute orange cat lying on its back. " src="https://bit.ly/fcc-relaxing-cat"></a>
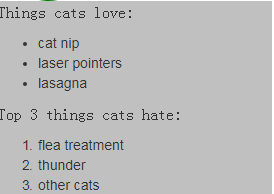
<p>Things cats love:</p>
<ul>
<li>cat nip</li>
<li>laser pointers</li>
<li>lasagna</li>
</ul>
<p>Top 3 things cats hate:</p>
<ol>
<li>flea treatment</li>
<li>thunder</li>
<li>other cats</li>
</ol>
<form action="/submit-cat-photo">
<input type="text" required placeholder="cat photo URL">
<button type="submit">Submit</button>
</form>
没有填内容就提交

填写内容提交后结果

https://www.freecodecamp.org/challenges/use-html5-to-require-a-field
Radio Buttons,即单选按钮
在HTML中样式如下
<form action="/submit-cat-photo">
  <input type="text" placeholder="cat photo URL" required>
  <button type="submit">Submit</button>
  <label><input type="radio" name="indoor-outdoor">indoor</label>
  <label><input type="radio" name="indoor-outdoor">outdoor</label>
</form>
<label></label> ,单选按钮必须内嵌在label元素中
<input>,radio必须放在input中。
<input type="radio" name="indoor-outdoor">,type类型为radio,单选按钮的name必须一致。
在浏览器中显示如下

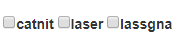
复选框,和单选按钮差不多,在HTML中样式如下
<form action="/submit-cat-photo">
  <label><input type="radio" name="indoor-outdoor"> Indoor</label>
  <label><input type="radio" name="indoor-outdoor"> Outdoor</label>

  <label><input type="checkbox" name="personality">catnit</label>
  <label><input type="checkbox" name="personality">laser</label>
  <label><input type="checkbox" name="personality">lassgna</label>


  <input type="text" placeholder="cat photo URL" required>

  <button type="submit">Submit</button>
</form>
在浏览器中形式如下
为单选按钮和复选框设置默认选项,关键词为checked,在<input>中设置
在HTML中样式如下
<form action="/submit-cat-photo">
  <label><input type="radio" name="indoor-outdoor" checked> Indoor</label>
  <label><input type="radio" name="indoor-outdoor"> Outdoor</label>
  <label><input type="checkbox" name="personality" checked> Loving</label>
  <label><input type="checkbox" name="personality"> Lazy</label>
  <label><input type="checkbox" name="personality"> Energetic</label>
  <input type="text" placeholder="cat photo URL" required>
  <button type="submit">Submit</button>
</form>
在浏览器中显示如下

<div></div>元素,即division元素,重要 用于盛放其他元素。
在HTML样式如下
<div>
  <p>Things cats love:</p>
  <ul>
    <li>cat nip</li>
    <li>laser pointers</li>
    <li>lasagna</li>
  </ul>
  <p>Top 3 things cats hate:</p>
  <ol>
    <li>flea treatment</li>
    <li>thunder</li>
    <li>other cats</li>
  </ol>
</div>
<div></div>之间是要盛放的其他元素。
在<style></style>设置class
<style>
     .silver-background{
    background-color:silver;
  }
</style>
在HTML里设置
<div class="background-color">
</div>
浏览器显示如下
每个HTML元素可以有唯一一个id属性。
在HTML中设置如下
<h2 id="cat-photo-app">
id表明是属性。
"cat-photo-app"是id属性的名称。
可以在CSS里设置id属性,在<style></style>里设置
<style>
   #cat-photo-element {
  background-color: green;
}
</style>
#cat-photo-element ,#是id在CSS里的标识。cat-photo-element是id的名称。
在HTML里引用如下
<form id="cat-photo-element"></form>
控制元素空间的三个属性 内边距 padding 外边距 margin 边框 border
元素的padding控制元素和边框的距离。
在CSS中设置如下
<style>
    .box {
    border-style: solid;
    border-color: black;
    border-width: 5px;
    text-align: center;
  }

    .green-box {
    background-color: green;
    padding: 20px;
  }
</style>
在HTML里设置如下
<h5 class="box green-box">padding</h5>
元素的margin控制元素和边框和周围元素的空间距离。
在CSS中设置如下
<style>
  .box {
    border-style: solid;
    border-color: black;
    border-width: 5px;
    text-align: center;
  }

  .green-box {
    background-color: green;
    padding: 20px;
    margin: 20px;
  }
</style>
在HTML中设置如下
<h5 class="box green-box">padding</h5>
元素的margin控制边框和周边元素距离,margin为负值,元素的空间会变大。
在CSS中设置如下
.green-box {
    background-color: green;
    padding: 20px;
    margin: -15px;
}
可以为元素的四个方向设置不同的内边距。 在CSS中样式如下
<style>
	 .green-box {
    background-color: green;
    padding-top:40px;
    padding-right:20px;
    padding-bottom:20px;
    padding-left:40px;
  }
按照顺时针顺序进行设置。、
padding-top 元素到顶部的内边距
padding-right 元素到右边的内边距
padding-bottom 元素到底部的内边距
padding-left 元素到左边的内边距
可以按照顺时针的顺序,简写元素的外边距。
在CSS中的样式如下
<style>
	padding: 40px 20px 20px 40px;
</style>
padding: 40px 20px 20px 40px;意思是padding: 上边 右边 下边 左边
可以顺时针顺序,简写元素的外边距
<style>
	 margin: 40px 20px 20px 40px;
</style>
margin: 40px 20px 20px 40px;意思为margin: 上边 右边 下边 左边
每个HTML页面都有body元素。
为了证明body元素的存在,可以在CSS中设置
<style>
        body {
             background-color:black;
}
</style>
这样,就将页面改成了黑色。
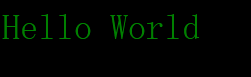
其他元素可以继承body元素的属性,样式如下
<style>
  body {
    background-color: black;
    color:green;
    font-family: Monospace;
  }

</style>

<h1>Hello World</h1>
只需要在CSS的body中设置颜色和字体样式,h1的字体颜色和样式就会继承body的样式。
在浏览器中显示如下
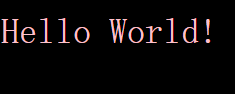
在CSS中,class的优先级,会高于body的优先级。
样式如下:
<style>
  body {
    background-color: black;
    font-family: Monospace;
    color: green;
  }

  .pink-text{
    color: pink;
  }
</style>
<h1 class="pink-text">Hello World!</h1>
classpink-text设置字体为粉色,body设置字体颜色为绿色,由于class的优先级比较高,h1的颜色为粉色。
浏览器显示如下
class的样式可以覆盖body的样式
下边的class样式可覆盖上边的class的样式。因为浏览器读取CSS的顺序是从上到下,所以最下面的class优先级最高。
<style>
body {
background-color: black;
font-family: Monospace;
color: green;
}
.pink-text {
color: pink;
}
.blue-text {
color: blue;
}
</style>
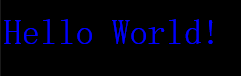
<h1 class="pink-text blue-text">Hello World!</h1>
由于blue-text比pink-text位置靠下,所以以blue-text为准。
浏览器中样式如下
id样式可以覆盖class样式,无论id在class上面还是下面
<style>
body {
background-color: black;
font-family: Monospace;
color: green;
}
.pink-text {
color: pink;
}
#orange-text{
color:orange;
}
.blue-text {
color: blue;
}
</style>
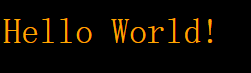
<h1 class="pink-text blue-text" id="orange-text">Hello World!</h1>
在CSS中,classblue-text虽然在idorange-text下面,但是id的优先级高于class,所以h1的颜色为桔色。
在浏览器中显示如下
行内样式(inline-styles)可以覆盖所有的CSS样式(id,class, body)
举例如下
<style>
body {
background-color: black;
font-family: Monospace;
color: green;
}
#orange-text {
color: orange;
}
.pink-text {
color: pink;
}
.blue-text {
color: blue;
}
</style>
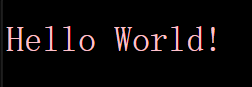
<h1 style="color:white" id="orange-text" class="pink-text blue-text">Hello World!</h1>
由于style="color:white"高于CSS样式,所以h1颜色为白色。
浏览器中显示如下

为什么要覆盖CSS样式?
这是因为很多情况下,你会使用CSS库。CSS库会覆盖你的CSS样式。当你确定一个元素需要一个特殊的样 时,就需要覆盖CSS库的样式。
在你的CSS中加入!important,就能够覆盖所有样式。
<style>
  body {
    background-color: black;
    font-family: Monospace;
    color: green;
  }
  #orange-text {
    color: orange;
  }
  .pink-text {
    color: pink !important;
  }
  .blue-text {
    color: blue;
  }
</style>
<h1 id="orange-text" class="pink-text blue-text" style="color: white">Hello World!</h1>
在class.pink-text中加入了 color: pink !important;,那么h1颜色就会变成粉色。
在浏览器中显示如下
Hex,即Hexadecimals,16进制,0-9表示前10位 A 代表10 B代表11 C代表12 D代表13 E代表14 F代表15
Hex Code,即用6个十六进制数字表示颜色, 前两个表示R(red) 中间两个数字表示G(green) 后两个数字表示B(blue)
#000000表示黑色
用法示例如下
<style>
  body {
    background-color: #000000;
  }
</style>
浏览器显示如下

利用6个十六进制数字,可以表达1600万多个颜色。
0 是十六进制中最小的数字,代表颜色的完全缺失。
F是十六进制中最大的数字,代表颜色的最大亮值。
示例如下
<style>
.red-text {
color: #FF0000;
}
.green-text {
color: #00FF00;
}
.dodger-blue-text {
color: #2998E4;
}
.orange-text {
color: #FFA500;
}
</style>
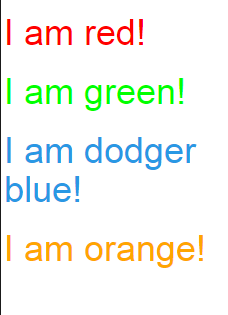
<h1 class="red-text">I am red!</h1>
<h1 class="green-text">I am green!</h1>
<h1 class="dodger-blue-text">I am dodger blue!</h1>
<h1 class="orange-text">I am orange!</h1>
dodgor-blue,宝蓝色
浏览器显示如下
可以使用简写,将6个十六进制数字缩写为3个数字,不过可选的颜色也就变成了4000种。
#0FF 青色(Cyan)
#0F0 绿色
#F00 红色
#F0F 紫红色(Fuchsia)
示例如下
<style>
  .red-text {
    color: #F00;
  }
  .fuchsia-text {
    color: #F0F;
  }
  .cyan-text {
    color: #0FF;
  }
  .green-text {
    color: #0F0;
  }
</style>

<h1 class="red-text">I am red!</h1>

<h1 class="fuchsia-text">I am fuchsia!</h1>

<h1 class="cyan-text">I am cyan!</h1>

<h1 class="green-text">I am green!</h1>
浏览器显示如下

在CSS中,除了十六进制表示颜色,可以使用RGB值,样式如下
rgb(0,0,0)
意思是 rgb(红,绿,蓝)
举例如下
<style>
  body {
    background-color: rgb(0,0,0);
  }
</style>
浏览器显示颜色为黑色。
用不同的RGB值表示不同的颜色
示例如下
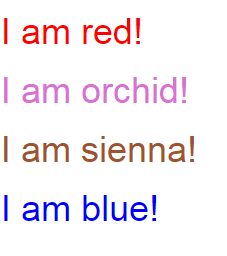
<style>
  .red-text {
    color: rgb(255,0,0);
  }
  .orchid-text {
    color: rgb(218,112,214);
  }
  .sienna-text {
    color: rgb(160,82,45);
  }
  .blue-text {
    color: rgb(0,0,255);
  }
</style>

<h1 class="red-text">I am red!</h1>

<h1 class="orchid-text">I am orchid!</h1>

<h1 class="sienna-text">I am sienna!</h1>

<h1 class="blue-text">I am blue!</h1>
orchid 淡紫色 sienna 赭色,红褐色
浏览器显示如下