VPN Project (Wireguard) - zacharylongo/Tech-Journals GitHub Wiki
Setting up WireGuard VPN
Edge01 / Firewall Rule additions
To allow traffic from the WAN interface to the DMZ interface, a new rule must be created as follows:

set firewall name WAN-to-DMZ rule 30 action 'accept
set firewall name WAN-to-DMZ rule 30 description 'Port Forward Wireguard from jump'
set firewall name WAN-to-DMZ rule 30 destination address '172.16.50.4'
set firewall name WAN-to-DMZ rule 30 destination port '51820
set firewall name WAN-to-DMZ rule 30 protocol 'udp' ```

To set up port forwarding from the WAN interface to the WireGuard in the DMZ, NAT destination rules must be set:


set nat destination rule 30 destination port 51820
set nat destination rule 30 inbound-interface eth0
set nat destination rule 30 protocol udp
set nat destination rule 30 translation address 172.16.50.4
set nat destination rule 30 translation port 51820
set nat destination rule 30 description 'Port Forward Wireguard from jump


Next, A rule needs to be added to allow machines within the DMZ to communicate with the internet:

set firewall name DMZ-to-WAN rule 999 action accept
set firewall name DMZ-to-WAN rule 999 source address 172.16.50.4
MAKE SURE TO DELETE RULE 999, IT WOULD BE POOR PRACTICE TO NOT DO SO
WireGuard installation
-
sudo apt update -
sudo apt install wireguard -y -
sudo umask 077 -
sudo mkdir -p /etc/wireguard/
Key Generation
sudo wg genkey | sudo tee /etc/wireguard/privatekey-server | wg pubkey | sudo tee /etc/wireguard/publickey-serversudo wg genkey | sudo tee /etc/wireguard/privatekey-client | wg pubkey | sudo tee /etc/wireguard/publickey-client
Server Config
sudo touch /etc/wireguard/wg0.confsudo chmod 600 /etc/wireguard/wg0.conf
Next, VI into /etc/wireguard/wg0.conf
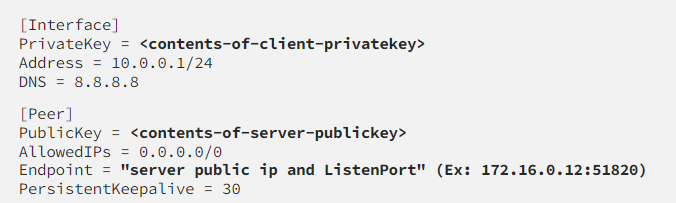
Copy this format for your config:
[Interface]
Address = 10.0.0.1/24
SaveConfig = true
PrivateKey = **INSERT PRIVATE KEY**
ListenPort = 51820
PreUp = sysctl -w net.ipv4.ip_forward=1
PreUp = iptables -t nat -A PREROUTING -p tcp -d 10.0.0.1 --dport 3389 -j DNAT --to-destination 172.16.200.11:3389
PreUp = iptables -t nat -A POSTROUTING -o $adapter_name -j MASQUERADE
PostDown = iptables -t nat -D POSTROUTING -o $adapter_name -j MASQUERADE
PostDown = iptables -t nat -D PREROUTING -p tcp -d 10.0.0.1 --dport 3389 -j DNAT --to-destination 172.16.200.11:3389
[Peer]
PublicKey = **INSERT PUBLIC KEY**
AllowedIPs = 10.0.0.2/32
PersistentKeepalive = 21
Config Insights:
-
wg genkey | tee /etc/wireguard/private.key | wg pubkey > /etc/wireguard/server_public_keywrites the private key to the file "/etc/wireguard/private.key", and writes the corresponding public key to the file "/etc/wireguard/server_public_key". -
sudo vi /etc/wireguard/wg0.confcreates a WireGuard configuration file (replace PrivateKey with server private key, replace PublicKey with clients publickey). -
PreUp = sysctl -w net.ipv4.ip_forward=1enables IP forwarding on the server, which allows packets to be forwarded between different networks. -
PreUp = iptables -t nat -A PREROUTING -p tcp -d 192.168.0.1 --dport 3389 -j DNAT --to-destination 172.16.200.11:3389sets up a destination NAT rule that forwards incoming TCP traffic on port 3389 (RDP) from the VPN client to the target machine's IP address (172.16.200.11) and port number (also 3389). -
PostDown = iptables -t nat -D PREROUTING -p tcp -d 192.168.0.1 --dport 3389 -j DNAT --to-destination 172.16.200.11:3389removes the PREROUTING NAT rule after the VPN connection is terminated. -
PreUp = iptables -t nat -A POSTROUTING -o ens160 -j MASQUERADEsets up a source NAT rule that masquerades the VPN client's IP address with the VPN server's IP address (192.168.0.1) when traffic is forwarded from the VPN server to the target machine. -
PostDown = iptables -t nat -D POSTROUTING -o ens160 -j MASQUERADEremoves the POSTROUTING NAT rule after the VPN connection is terminated.
Client Installation
-
Download client from the official website HERE
-
After installation, copy over
client1.conffrom your server box. In my case I was having issues using SCP, so in a pinch one can simply manually create the file. If you run into trouble, use this formatting:
- By clicking the "Add Tunnel" option as shown below, you will see that you have the option to import config.
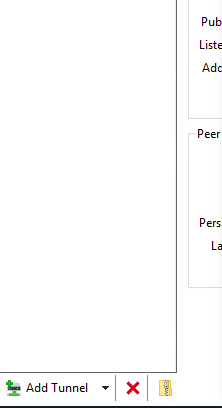
- If successful, you should be able to observe the handshake in the log tab when you click on the tunnel.