Project 1: Pick and Place Project Using AprilTag and RealSense Camera - yz-coder1375/MR-wiki GitHub Wiki
Objectives of project 1:
- Becoming familiar with the RealSense depth camera and AprilTag
- Do a pick and place task using the perception data and px100 arm
Depth Camera and AprilTag
Intel® RealSense™ Depth camera
The camera that we will use is the Intel D415 RealSense Depth Camera which features 1920x1080 resolution at 30fps with a 65° × 40° field of view and an ideal range of 0.5m to 3m. Using the stereo vision technology and the infrared sensor will help us to estimate the 3D structure of the scene. For more information you can see Robot Sensors or the Intel® RealSense™ website.
AprilTag
AprilTag is a visual fiducial system, useful for a wide variety of tasks including augmented reality, robotics, and camera calibration. Targets can be created from an ordinary printer. AprilTags are conceptually similar to QR Codes, in that they are a type of two-dimensional bar code. However, they are designed to encode far smaller data payloads (between 4 and 12 bits), allowing them to be detected more robustly and from longer ranges. By using them we will be able to computes the precise 3D position, orientation, and identity of the tags relative to the camera. This pose estimation can be done by knowing the constant relative position between some landmarks in the tag (corners and sometimes the center of the marker).
To be more specific the algorithm uses a PnP solver, or Perspective-n-Point solver, which is an algorithm used in computer vision and robotics to estimate the pose (position and orientation) of a camera or sensor relative to a set of 3D points. The PnP solver takes 3D World Points' positions, 2D Image Points' positions and the camera Intrinsic matrix (K) which contains information about the camera's internal parameters, such as focal length, principal point, and lens distortion as inputs and solve a mathematical optimization problem that minimizes the reprojection error, which measures the difference between the known 3D world points and their projected 2D image points in the camera frame.Various algorithms, such as the Levenberg-Marquardt, and RANSAC, can be used to solve this problem, depending on the specific application and requirements. The output of the PnP solver is the transformation that describes the camera's position and orientation in relation to the world points. You can find more information about the method Here.
However estimating a 3d position from a 2d image is inherently ambiguous but here we can have a precise estimation by the help of our depth camera. Additional information about the tag system and its creators can be found on their website.
Follow the video below to install the AprilTag (make sure that the orientation of the tag is like the video):

Performing a Pick & Place Task Using the AprilTag and RealSense Depth Camera
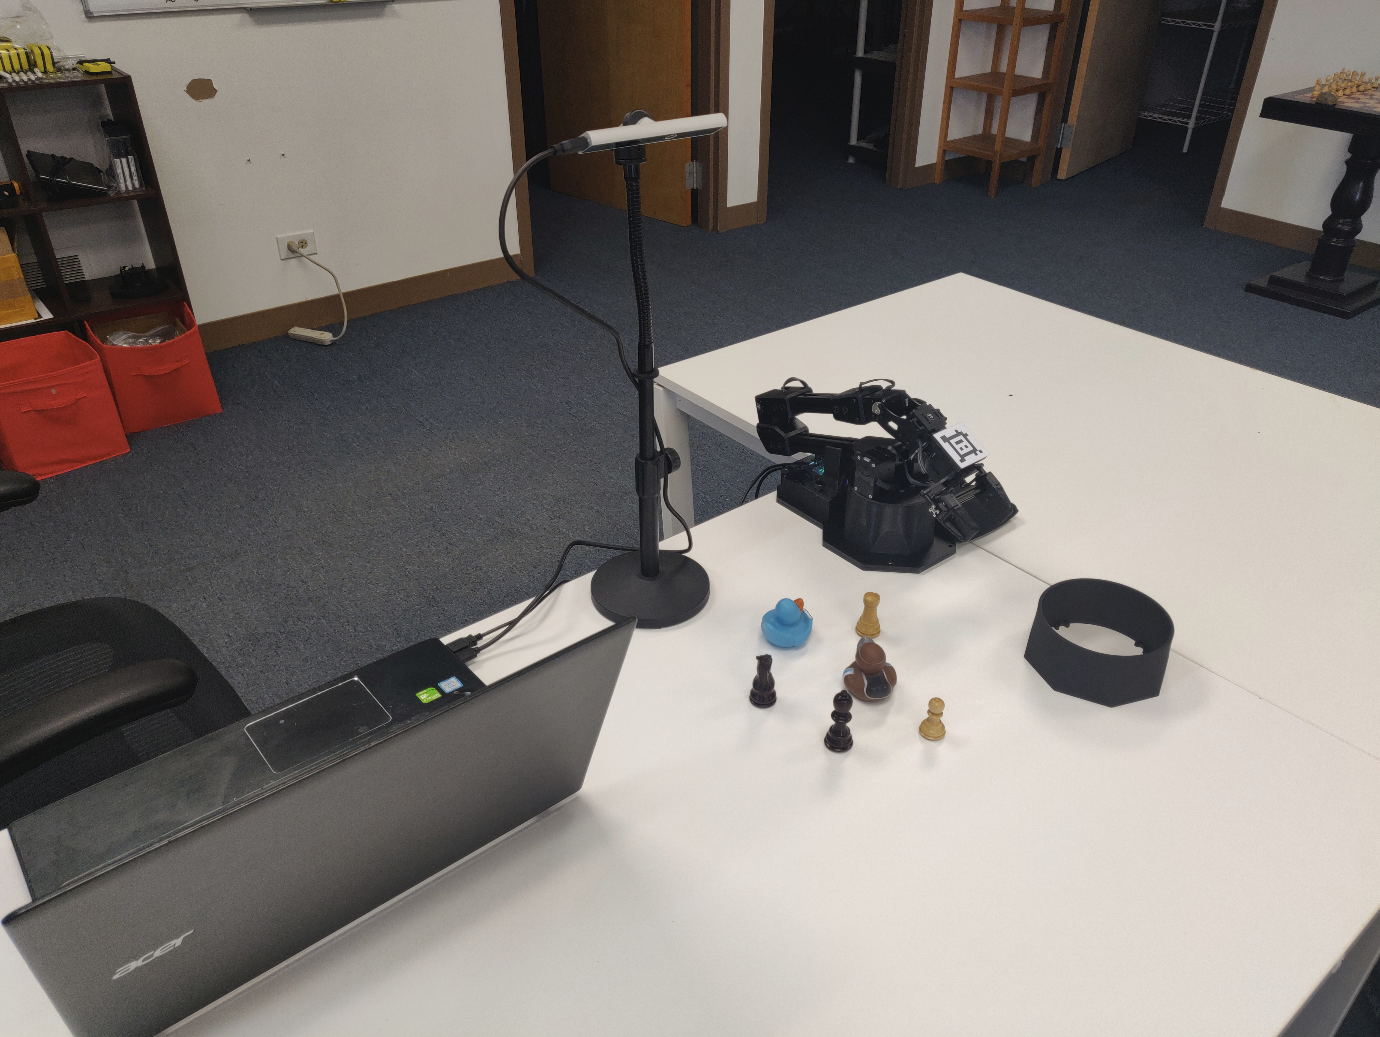
Step 0: First, we need to make the physical setup ready. To begin, construct your stand and fasten the RealSense camera onto the 1/4 inch screw located at the top. Subsequently, position the stand in your designated workspace and manipulate the goose-neck or ball/socket joint to orient the camera towards your tabletop. Then, arrange your target objects in a way that they are clearly visible in the camera's view.
NOTE: Choose objects that can fit into the robot's gripper and avoid reflective ones as they may disrupt the depth camera's ability to detect them using infrared light. Also, the scene cannot have direct sunlight present for the same reason.
Step 1: For the robot to detect the position of each object and pick them first, it is necessary for us to know the position of the camera relative to the arm. We can do this by manually measuring the offset between the camera's color optical frame and the robot's 'base_link'. However, using this method is extremely time-consuming and prone to errors. Instead, we utilize the apriltag_ros ROS 2 package to determine the transformation of the AprilTag visual fiducial marker on the arm's end-effector relative to the camera's color optical frame. Afterward, the transformation from the camera's color optical frame to the arm's 'base_link' frame is computed and then published as a static transform.
To get that transform, run the following launch command in a terminal:
ros2 launch interbotix_xsarm_perception xsarm_perception.launch.py robot_model:=px100 use_armtag_tuner_gui:=true use_pointcloud_tuner_gui:=true
As you can see here there are two parameters that we have configured as true. The first one is use_armtag_tuner_gui:=true that will open up a Graphical User Interface (GUI) that will allow you to figure out where the position of arm is with respect to the camera. This GUI will look like the picture below.
In this step, we must position the arm and the AprilTag in a manner that makes it straightforward for the camera to detect and compute the transformation. So first we need to send a request to disable torque (motors) for all joints in a group using the code bellow in another terminal:
ros2 service call /px100/torque_enable interbotix_xs_msgs/srv/TorqueEnable "{cmd_type: 'group', name: 'all', enable: false}"
Following that, we position the arm so that the AprilTag is entirely visible to the camera, and then execute the code below to maintain that position by applying the torques to all the motors.
ros2 service call /px100/torque_enable interbotix_xs_msgs/srv/TorqueEnable "{cmd_type: 'group', name: 'all', enable: true}"
Now in the Armtag tuner GUI you can see a field named num samples. This can vary from 1 to 10, with 10 indicating the highest level of accuracy. When you press the 'snap pose' button, the system will capture the specified quantity of images as defined in the num samples setting. The AprilTag algorithm will then run on each of the images, probably producing slightly different poses for the AprilTag's location relative to the camera. Finally, the program behind the GUI will average all those poses to hopefully obtain the most accurate position. As you can see in the GUI message the snapped pose represents the transform from the 'camera_optical_frame' frame to the 'px_100/base_link' frame.
NOTE: This pose will be saved to a YAML file in the perception directory named 'static_transform.yaml' after ROS is shutdown. And if you do not change the setup configuration of the camera and the robot, you can always use this static transformation.
Step 2: At this point, you should see a pointcloud version of your tabletop with the objects on it. If your arm is in the way, just torque it off and move it to its Sleep pose (make sure to hold the arm before torquing it off). In this step, RViz should display the configuration as depicted in the image below:
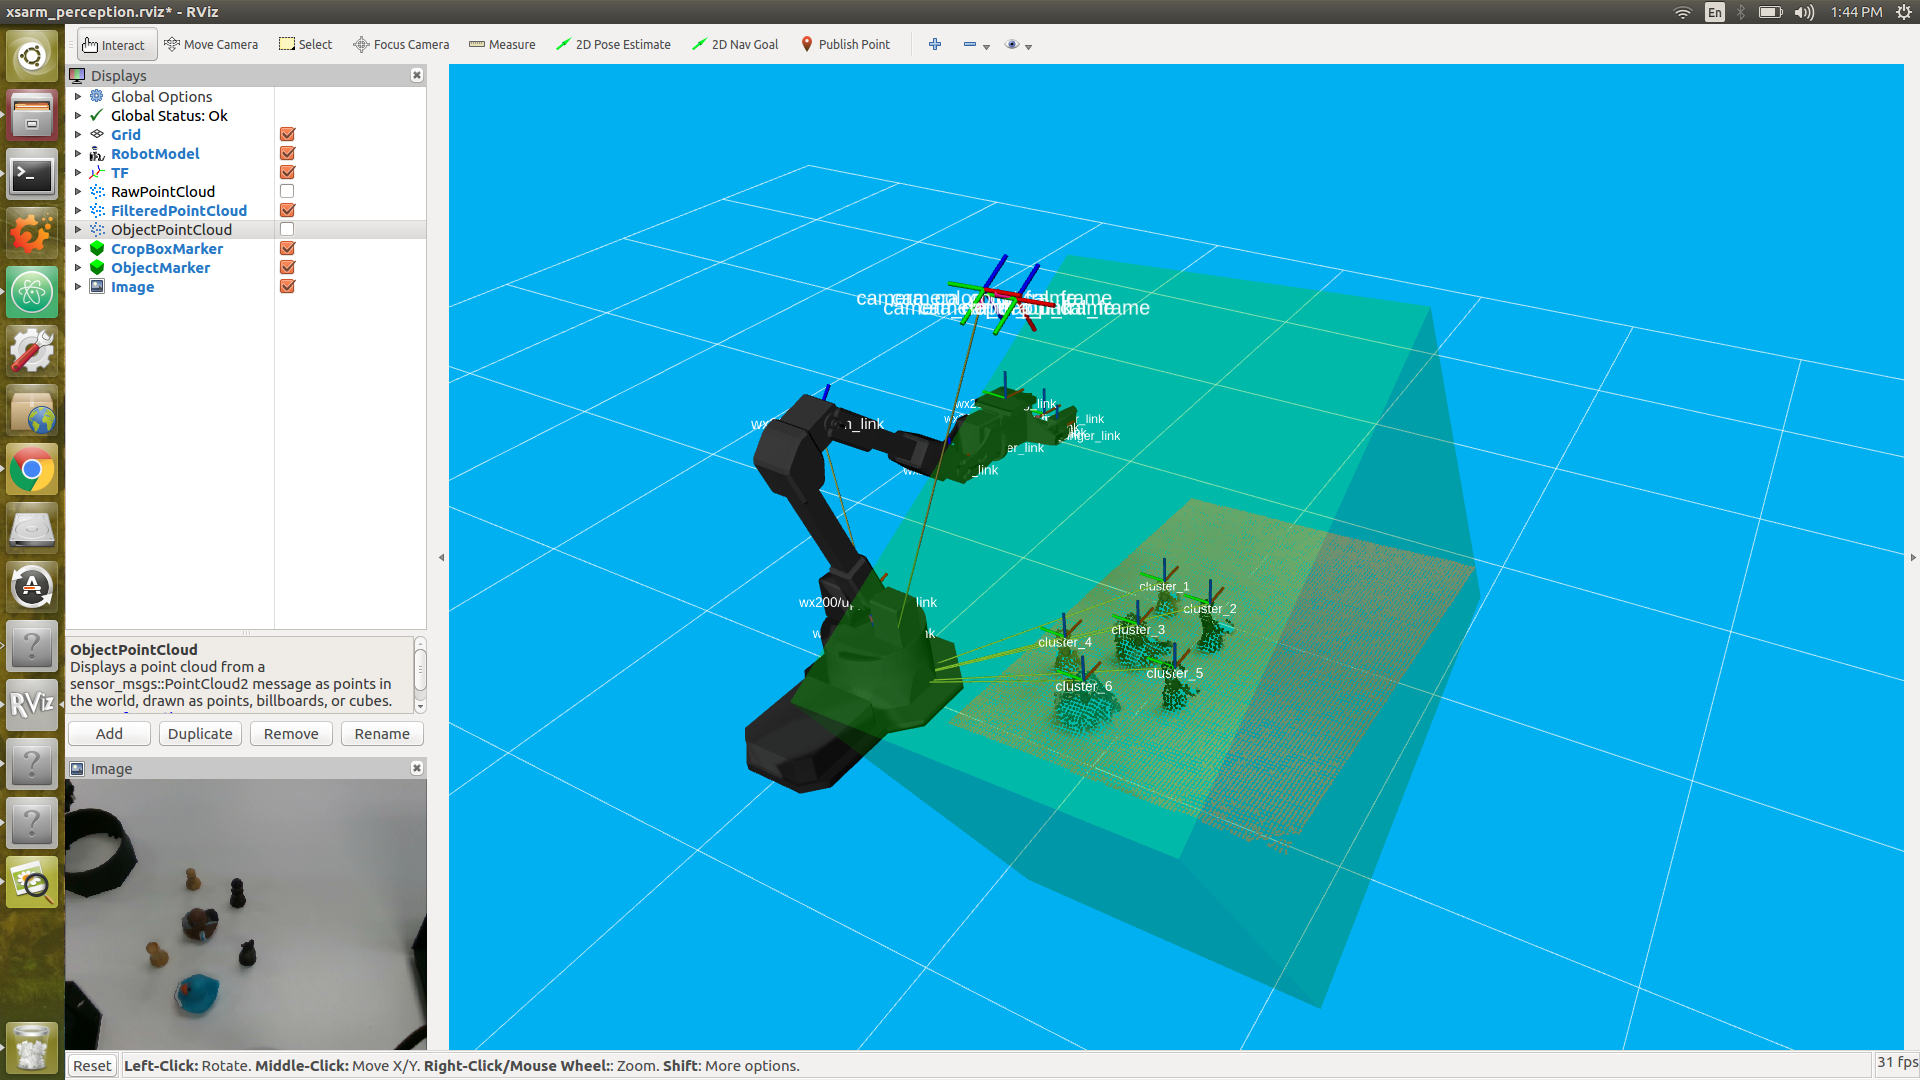
Then, using the PointCloud Tuner GUI, we want to apply some filters on the image in a way that all the objects be clear in our image. This GUI obtains the raw point cloud from our depth camera and applies several filters to it in a manner that makes only the objects (clusters) visible.
This GUI contains several sections for filtering the point cloud. The description for each of these sections is provided in the GUI windows and you can also see this guide for how to go about doing this. In general, this GUI will employs a mathematical model to identify the plane on which the objects are positioned. Then applies a Radius Outlier Removal filter to omit 'noisy' points in the point cloud. Ultimately, our task involves recognizing objects by grouping data points into clusters. To achieve this, we utilize a Cluster Filtering process on the point cloud, where a designated threshold determines that any points located within a specified distance of one another are considered part of the same cluster. This method allows us to distinguish individual objects as distinct clusters.
NOTE: Don't forget to save your configurations after tuning them; these settings will also be saved in a YAML file named 'filter_params.yaml' in the perception directory.
Step 3: With the transformations and the point cloud clusters in our hand, we are ready to proceed with the pick and place process. The Python code presented here serves as a demo for identifying the objects (clusters), picking them, and relocating them to predetermined positions, such as a designated basket. Below, you'll find some clarifications for the code that is provided:
-
This Python code uses a small API that builds upon the apriltag module; it calculates a static transform (usually from the camera's frame to an arm's base_link frame) using the help of an AprilTag located on the arm (at a location specified in the URDF). Included as
from interbotix_perception_modules.armtag import InterbotixArmTagInterfacein the Python script. -
We also use another small API that can be used to tune various filter parameters used in the Perception Pipeline. included as
from interbotix_perception_modules.pointcloud import InterbotixPointCloudInterfacein the Python script. You can find more information about the interbotix perception modules Here. -
This Python code also uses the InterbotixManipulatorXS class from the interbotix_xs_modules.xs_robot.arm module to control our robot arm just like what we have done in the previous sessions.
The provided python code detect the objects and manipulate them as follow:
- First, the instances of the robot, the point cloud interface, and the arm tag interface will be instantiated with the predefined parameters (ROBOT_MODEL, REF_FRAME, ARM_TAG_FRAME, ARM_BASE_FRAME). The point cloud interface module enables us to obtain the positions of various clusters detected by the camera, while the arm tag interface module provides information on the arm's position in relation to the camera.
NOTE: If you have already used the arm tag tuner GUI to compute the transformation you can comment the
armtag.find_ref_to_arm_base_transform()line code which will do the same job in the python code.
-
Then we can get the clusters information by calling
pcl.get_cluster_positions()function. This function returns a list of dictionaries and each dictionary contains the information about a single cluster (name, position, size, average RGB value). The function also returns a Boolean value as TRUE if it can detect at least one cluster in the image. Additionally, we can sort the clusters by their positions by specifying the desired axis as an input parameter,such assort_axis='x'. -
Finally, we simply have to iterate through the cluster positions and command the robot to approach, pick up, and relocate them to a predetermined destination.
# Copyright 2022 Trossen Robotics

from interbotix_perception_modules.armtag import InterbotixArmTagInterface
from interbotix_perception_modules.pointcloud import InterbotixPointCloudInterface
from interbotix_xs_modules.xs_robot.arm import InterbotixManipulatorXS

"""
This script uses a color/depth camera to get the arm to find objects and pick them up. For this
demo, the arm is placed to the left of the camera facing outward. When the end-effector is located
at x=0, y=-0.3, z=0.2 w.r.t. the 'px100/base_link' frame, the AR tag should be clearly visible to
the camera. A small basket should also be placed in front of the arm.

"""

ROBOT_MODEL = 'px100'
ROBOT_NAME = ROBOT_MODEL
REF_FRAME = 'camera_color_optical_frame'
ARM_TAG_FRAME = f'{ROBOT_NAME}/ar_tag_link'
ARM_BASE_FRAME = f'{ROBOT_NAME}/base_link'


def main():
    # Initialize the arm module along with the pointcloud and armtag modules
    bot = InterbotixManipulatorXS(
        robot_model=ROBOT_MODEL,
        robot_name=ROBOT_NAME,
    )
    pcl = InterbotixPointCloudInterface(node_inf=bot.core)
    armtag = InterbotixArmTagInterface(
        ref_frame=REF_FRAME,
        arm_tag_frame=ARM_TAG_FRAME,
        arm_base_frame=ARM_BASE_FRAME,
        node_inf=bot.core
    )

    # set initial arm and gripper pose
    bot.arm.go_to_sleep_pose()
    bot.gripper.release()

    # get the ArmTag pose
    armtag.find_ref_to_arm_base_transform() # Comment this line if you have already used the arm tag tuner GUI to compute the transformations
    bot.arm.set_ee_pose_components(x=0.3, z=0.2)

    # get the cluster positions
    # sort them from max to min 'x' position w.r.t. the ARM_BASE_FRAME
    success, clusters = pcl.get_cluster_positions(
        ref_frame=ARM_BASE_FRAME,
        sort_axis='x',
        reverse=True
    )

    if success:
        # pick up all the objects and drop them in a virtual basket in front of the robot
        for cluster in clusters:
            x, y, z = cluster['position']
            print(x, y, z)
            bot.arm.set_ee_pose_components(x=x, y=y, z=z+0.05, pitch=0.5)
            bot.arm.set_ee_pose_components(x=x, y=y, z=z, pitch=0.5)
            bot.gripper.grasp()
            bot.arm.set_ee_pose_components(x=x, y=y, z=z+0.05, pitch=0.5)
            bot.arm.set_ee_pose_components(x=0.3, z=0.2)
            bot.gripper.release()
    else:
        print('Could not get cluster positions.')

    bot.arm.set_ee_pose_components(x=0.3, z=0.2)
    bot.arm.go_to_sleep_pose()
    bot.shutdown()


if __name__ == '__main__':
    main()