B4A InApp Documentation - yanivav/Documentation GitHub Wiki

NOTES:
- The code samples in this document can be copy/pasted into your source code
- Please notice that steps 1-3 are mandatory
- If you have any questions, contact us via [email protected]
##Step 1, Adding the B4A Wrapper JAR to Your Project
IMPORTANT: This is a mandatory step
In order to add StartApp SDK for B4A to your application please follow the following steps:
1. Unzip the SDK files to your B4A working folder
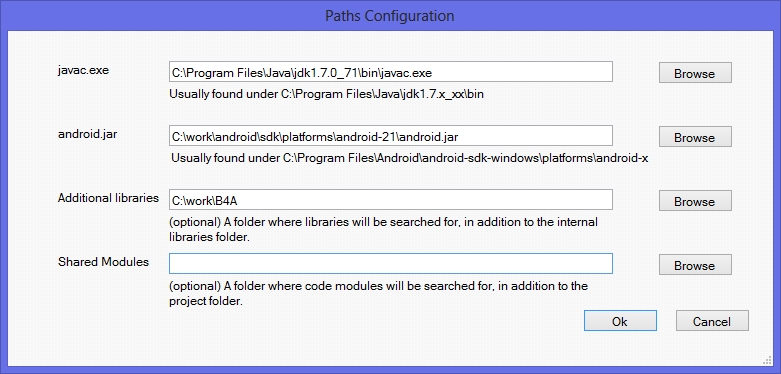
2. Add the folder path to your project's “Additional Libraries”, under "Tools->Configure Paths"

3. Click the "Libs" tab of your project and check the “StartAppInAppB4AWrapper-X.X.XX” lib.

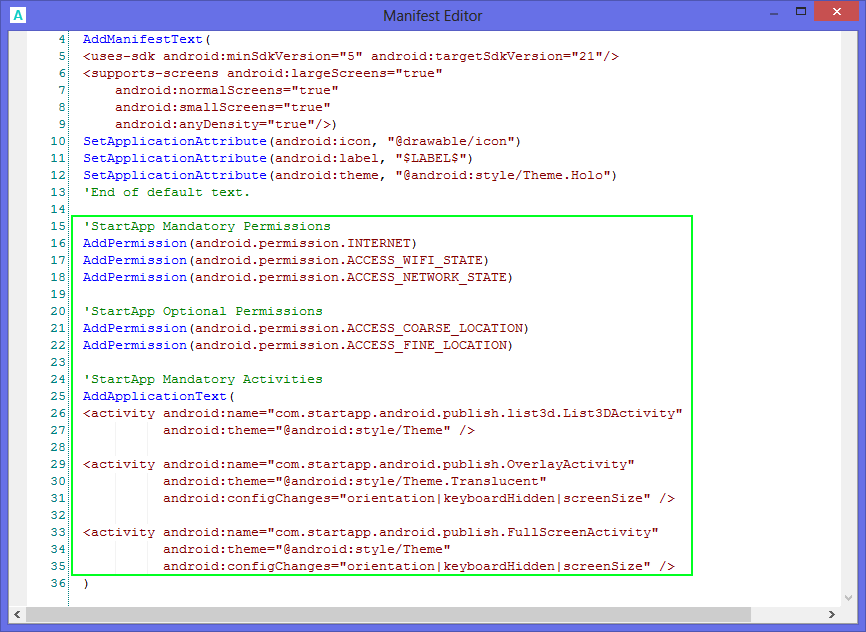
Open the "Manifest Editor" ("Project->Manifest Editor") and add the following permissions and activities at the end of your manifest file.
####Permissions Mandatory Permissions:
AddPermission(android.permission.INTERNET)
AddPermission(android.permission.ACCESS_WIFI_STATE)
AddPermission(android.permission.ACCESS_NETWORK_STATE)
Optional Permissions (allow StartApp to show higher eCPM Geo-targeted ads):
AddPermission(android.permission.ACCESS_COARSE_LOCATION)
AddPermission(android.permission.ACCESS_FINE_LOCATION)
StartApp SDK doesn't request location updates proactively but only uses the last known location.
####Activities
AddApplicationText(
<activity android:name="com.startapp.android.publish.list3d.List3DActivity"
          android:theme="@android:style/Theme" />

<activity android:name="com.startapp.android.publish.OverlayActivity"
          android:theme="@android:style/Theme.Translucent"
          android:configChanges="orientation|keyboardHidden|screenSize" />

<activity android:name="com.startapp.android.publish.FullScreenActivity"
          android:theme="@android:style/Theme"
android:configChanges="orientation|keyboardHidden|screenSize" /> ) ##Step 3, Initialization
> **IMPORTANT:**
> - This is a mandatory step
1. Add the following line to the Sub Globals section
Dim sdk As StartAppSDK2. Call the SDK init method under the Sub Activity_Create(FirstTime As Boolean) method
sdk.init("Your App ID", True)Replace "Your App ID" with your own value provided in the Publishers’ Portal.
To find your application ID, click on the "Apps and Sites" tab on the left pane and choose the relevant ID from your app list:

The last True parameter enables the "Return Ads" feature as explained in the next section. If you want to disable this feature, simply pass False instead.
Return ads are enabled and activated by default. If you want to disable this feature, simply pass "False" as the 2th parameter of the sdk.init method:
sdk.init("Your App ID", False)StartApp Splash Ad is a top performing ad unit, presenting the industry's highest CPM's
####Adding the Splash Screen
1. Add the following line to the Sub Globals section
Dim startAppSplash As StartAppAd2. Initialize and create the splash screen under Activity_Create(FirstTime As Boolean):
startAppSplash.initialize
startAppSplash.showSplash(FirstTime)
If you wish to customize the splash screen, please refer to the Advanced Usage.
##Showing Exit Ads StartApp Exit ad is displayed when the user leaves your application (usually by pressing the BACK button on the app's main activity).####Adding an exit ad to your project
1. Add the following line to the Sub Globals section
Dim startAppInterstitial As StartAppAd2. Create the following method inside your main activity
Sub Activity_KeyPress(KeyCode As Int) As Boolean
    If KeyCode = KeyCodes.KEYCODE_BACK Then
       startAppInterstitial.onBackPressed
    End If
End SubYou can choose to show the interstitial ad in several locations within your application. This could be upon entering the app, between stages, when pressing a button, while waiting for an action and more.
We do, however, recommend showing the ad upon exiting the application by using the ‘Back’ button, as explained in the previous section.
1. Add the following line to the Sub Globals section
Dim startAppInterstitial As StartAppAd2. Update your Activity_Resume and Activity_Pause
Sub Activity_Resume
 startAppInterstitial.onResume
End Sub

Sub Activity_Pause (UserClosed As Boolean)
 startAppInterstitial.onPause
End Sub
3. Initialize and create the ad under Activity_Create(FirstTime As Boolean):
startAppInterstitial.initialize
startAppInterstitial.loadAd
4. Show the ad where you want it to be displayed
startAppInterstitial.showAd####Showing Rewarded Video Ads Rewarded Ads are interstitial video ads that provide a reward to the user in exchange for watching an entire video ad. The reward might be in-app goods, virtual currency or any premium content provided by the application. Because users actually opt-in to watch a rewarded video and are granted with something valuable in return, Rewarded Ads are an effective and clean monetization solution for stronger user retention and keeping users engaged in your application for a longer amount of time.
In order to show a Rewarded Ad, follow the following steps:
1. add the following line to the Sub Globals section
Dim startAppRewardedVideo As StartAppAd2. Under Activity_Create(FirstTime As Boolean), initialize a video listener and load the rewarded video ad:
Dim rewardedAd As AdMode
startAppRewardedVideo.initialize
startAppRewardedVideo.setVideoListener("VideoListener")
startAppRewardedVideo.loadAdWithAdMode(rewardedAd.REWARDED_VIDEO)
3. Implement the VideoListener in order to get a callback when the user completes watching the video and is eligible for getting the reward:
Sub VideoListener_VideoCompleted
 'Grant user with the reward
End Sub
4. Show the ad where you want it to be displayed
startAppRewardedVideo.showAd##Showing Banners **1.** Add the following line to the ``Sub Globals`` section ```vb Dim autoBanner As Banner Dim bannerPositionToSet As BannerPosition ```IMPORTANT: Loading an ad might take a few seconds especially in the case of a video, so it's important not to show the ad immediately after loading it. In case you call showAd() while the ad hasn't been successfully loaded yet, nothing will be displayed. It is recommended to use the "onReceiveAd" callback which is triggered when an ad was loaded and ready to use (see Adding a Callback when an Interstitial Ad is loaded).
2. Create the banner in the appropriate location, for example under Activity_Create(FirstTime As Boolean)
autoBanner.addBannerWithPosition(bannerPositionToSet.BOTTOM)Parameters
BannerPosition - position of the banner. Can receive one of the following:
 bannerPositionToSet.BOTTOM
 bannerPositionToSet.TOP
For advanced usage, such as showing a specific banner type or hiding the banner, please refer to the Advanced Usage.
##Enjoy Higher eCPM with Demographic-Targeted Ads If you know your user's gender or age, StartApp can use it to serve better-targeted ads which can increase your eCPM and revenue significantly.####Set Age and Gender
1. Add the following line to the Sub Globals section
Dim sdkPrefs As SDKAdPreferences2. Under Activity_Create(FirstTime As Boolean), set the user's age and gender and pass it to the initWithSDKPreferences() method (which replaces the original init() method)
Dim genderToSet As Gender
sdkPrefs.initialize
sdkPrefs.setGender(genderToSet.MALE)
sdkPrefs.setAge(18)
sdk.initWithSDKPreferences("Your App ID", sdkPrefs, True)-
setAgecan take an integer -
setGendercan take one of the following values: genderToSet.FEMALE or genderToSet.MALE
####Set Location The location of the user is a dynamic property which is changed constantly. Hence, you should provide it every time you load a new Ad:
Dim adPrefs As AdPreferences
adPrefs.initialize
adPrefs.setLatitude(31.776719)  'replace with the actual latitude
adPrefs.setLongitude(35.234508) 'replace with the actual longitude
startAppInterstitial.loadAdWithAdPreferences(adPrefs)