Critical flows ‐ Instructions - woocommerce/woocommerce-gateway-stripe GitHub Wiki
- Manual plugin installation and setup
- Express Checkout setup
- Webhooks setup
- Enable the Optimized Checkout Suite
- Change the Optimized Checkout element title
- Checkout with normal credit card
- Save card at checkout
- Checkout with saved card
- Checkout failures (with various cards)
- Checkout with SCA card
- Checkout failure with SCA card
- Checkout with Express Checkout
- Add a new payment method
- Delete a saved payment method
- Checkout via the Pay for Order page
- Cards - Checkout form validation
- Cards - Add Payment Method form validation
- Purchase subscription product
- Purchase free trial subscription
- Purchase multiple subscriptions (same schedule)
- Purchase multiple subscriptions (differing schedules)
- Renew subscription
- Change payment method to new card
- Change payment method to saved card
- Set default payment method
- Change default payment method
- Purchase subscriptions using SEPA
⚠️ New Stripe accounts can't use APMs with the Legacy experience.To test APMs with the Legacy experience, use a Stripe account that processed a payment with the Legacy experience before March 1st, 2024.
Otherwise, the payment will fail with a "The Sources API has been deprecated, and we are no longer allowing new integrations" error message.
- Checkout with iDEAL
- Checkout with Sofort
Checkout with giropay- Checkout with EPS
- Checkout with Bancontact
- Checkout with Przelewy24
- Checkout with SEPA (Direct debit payment)
- SEPA - Checkout form validation
- SEPA - Add Payment Method form validation
- Checkout with Multibanco
- Checkout with Alipay
- Checkout with Boleto
- Checkout with OXXO
- Checkout with Link
- Create a new site, install WooCommerce, and finish the setup wizard using United States address as a store address without selecting Stripe on Business Details step.
- If you don't have one already, create a Stripe account. You don't have to enter details to verify the account because we only use test data for testing.
- Follow the instructions in the docs Connecting to a Stripe account to manually install and set up the Stripe Payment Gateway.
- Click on the Create or connect a test account button.

- Select or create an account.
- Go through the Stripe onboarding steps. At the end, you should be automatically redirected back to the store.
- Once you're back on the site, click the Configure connection button.
- On the Test tab, confirm your account is connected.

-
Import test products to your store. Instructions. CSV with sample products to import.
-
Create a page with the Classic Checkout block on it.
- Go to Pages > Add New.
- Under the available blocks, select the "Classic Checkout" one.
- Publish the page.

-
Create a page with the Classic cart block on it.
- Go to Pages > Add New.
- Under the available blocks, select the "Classic Cart" one.
- Publish the page.
- As a merchant, go to Stripe settings > Payment Methods tab > Express checkouts, at
siteurl/wp-admin/admin.php?page=wc-settings&tab=checkout§ion=stripe&panel=methods.
- Enable Apple Pay / Google Pay.
- If the Updated Checkout Experience is enabled, enable Link too.
- Go to the Express Checkout customization options, under Express checkouts > Apple Pay / Google Pay > Customize at
siteurl/admin.php?page=wc-settings&tab=checkout§ion=stripe&panel=methods&area=payment_requests. - Under Show express checkouts on, enable all options: Checkout, Product page, and Cart.
- Ensure that the store is accessible via public HTTPS URL (e.g. with Jurassic Ninja).
- Add a credit card to Chrome Payment settings. It can be a Stripe test card: 4242 4242 4242 4242, any cardholder name, valid expiration date and any CVV will work.
Note: Link is only available when the Updated Checkout Experience is enabled.
In version 8.6.0 Webhooks are now automatically configured when you onboarded. If you need to reconfigure your webhooks you can follow this guide.
- Go to WooCommerce → Settings → Payments → Stripe
- Go to the settings tab.
- Click the Configure connection button.
- Click the Reconfigure webhooks button to automatically set up your webhooks.
 |
 |
|---|
Legacy checkout was deprecated in 9.6.0, and is being fully removed in 10.0.
The Optimized Checkout Suite feature has been available since version 9.8.0. It automatically displays the most relevant payment methods using Stripe's AI-driven Dynamic Payment Methods.
To test scenarios for flows using the Optimized Checkout Suite, you will need to enable it:
- Go to the Stripe extension settings page > Settings tab, at
siteurl/wp-admin/admin.php?page=wc-settings&tab=checkout§ion=stripe&panel=settings. - Scroll down to "Advanced settings".
- Check the checkbox labeled "Automatically display the most relevant payment methods" and save

We removed this feature.
- Add a product to the cart and proceed to checkout.
- Fill in form details and checkout using one of the test cards (e.g. 4242 4242 4242 4242).
- Do not save card details.
- Place the order.
- Confirm the order is submitted successfully.
This flow applies to:
| Stripe's experience | WC's block checkout | WC's shortcode checkout |
|---|---|---|
| Legacy | ✔ | ✔ |
| Updated (UPE) | ✔ | ✔ |
| Optimized Checkout | ✔ | ✔ |
-
Log in to the store as a shopper.
-
Add a product to the cart and proceed to checkout.
-
Fill in form details and checkout using one of the test cards (e.g. 4242 4242 4242 4242).
-
Check the "Save payment information" checkbox.
Block checkout Classic checkout 

-
Place the order.
-
Confirm the order is submitted successfully.
-
Confirm the card was saved in the store. It must be listed under My account > Payment methods.
This flow applies to:
| Stripe's experience | WC's block checkout | WC's shortcode checkout |
|---|---|---|
| Legacy | ✔ | ✔ |
| Updated (UPE) | ✔ | ✔ |
- Save a card in the store. Follow the testing instructions under Save card at checkout if in doubt.
- Add a product to the cart and proceed to checkout.
- Select the previously saved card from the list and place the order.
- Confirm the order is submitted successfully.
This flow applies to:
| Stripe's experience | WC's block checkout | WC's shortcode checkout |
|---|---|---|
| Legacy | ✔ | ✔ |
| Updated (UPE) | ✔ | ✔ |
Follow the steps from Checkout with normal credit card but using the following test cards:
| Card number | Expected error message | Reason |
|---|---|---|
| 4000000000000002 | The card was declined. | declined |
| 4000000000009995 | The card was declined. | insufficient funds |
| 4000000000009987 | The card was declined. | declined (lost) |
| 4000000000000069 | The card has expired. | expired |
| 4000000000000127 | The card's security code is incorrect. | CVC incorrect |
| 4000000000000119 | An error occurred while processing the card. | processing error |
| 4242424242424241 | The card number is invalid. | invalid number |
This flow applies to:
| Stripe's experience | WC's block checkout | WC's shortcode checkout |
|---|---|---|
| Legacy | ✔ | ✔ |
| Updated (UPE) | ✔ | ✔ |
- Add a product to the cart and proceed to checkout.
- Use one of the SCA test cards (e.g. 4000002760003184).
- Place the order.
- Confirm that the 3D Secure verification dialog is displayed.
- Click on "Complete" to complete the authorization.
- Confirm the order is submitted successfully.
This flow applies to:
| Stripe's experience | WC's block checkout | WC's shortcode checkout |
|---|---|---|
| Legacy | ✔ | ✔ |
| Updated (UPE) | ✔ | ✔ |
- Add a product to the cart and proceed to checkout.
- Use the SCA failing card with the number 4000008260003178.
- Place the order.
- On the 3D Secure verification dialog that's displayed, click on "Complete" to complete the authorization.
- Confirm an error message saying "Your card has insufficient funds." is displayed.
- Use a SCA successful card, like 4000002500003155.
- Place the order.
- On the 3D Secure verification dialog that's displayed, click on "Fail" to mimick a failed authorization.
- Confirm that an error message saying "We are unable to authenticate your payment method. Please choose a different payment method and try again." is displayed.
- Place the order again.
- On the 3D Secure verification dialog, click on "Complete".
- Confirm the order is submitted successfully.
This flow applies to:
| Stripe's experience | WC's block checkout | WC's shortcode checkout |
|---|---|---|
| Legacy | ✔ | ✔ |
| Updated (UPE) | ✔ | ✔ |
Prior to 10.0, Payment Request buttons were also supported.
This table will guide you on how to load Express Checkout buttons for specific payment options such as Google Pay, Apple Pay, or Link.
Update/New checkout (UPE)
| Provider | Browser | Other requirements |
|---|---|---|
| Apple Pay | Safari | Apple Wallet is set up on device |
| Google Pay | any modern browser | - |
| Link | any modern browser | - |
Notes: Express Checkout buttons ( Apple Pay, Google Pay, Link ) will be disabled for subscriptions with free trial if the product isn't virtual or downloadable. This is a limitation of checkout flow and not an issue.
- Go to product page and select product options (quantity and other params if required by product).
- Click Pay now button.
- Pick saved card from Chrome payment UI.
- Order should be completed successfully.
| Stripe's experience | Single product page |
|---|---|
| Legacy | ✔ |
| Updated (UPE) | ✔ |
- Add several products to cart and go the cart page.
- Adjust cart settings if needed.
- Click Pay now button.
- Pick saved card from Chrome payment UI.
- Order should be completed successfully.
This flow applies to:
| Stripe's experience | WC's block cart | WC's shortcode cart |
|---|---|---|
| Legacy | ✔ | ✔ |
| Updated (UPE) | ✔ | ✔ |
- Set up Payment Express Checkout as described above.
- Add a 3DS test card like 4000002500003155 to Chrome Payment settings. Any cardholder name, valid expiration date and any CVV will work.
- Try to pay with that card using the Express Checkout button.
- Order should be completed successfully.
- As a shopper, navigate to My account > Payment methods
- Click on the "Add payment method" button.
- Fill the form in with card number
4242424242424242, expiration date in future, and any CVC code.
- Click on the "Add payment method" button.
- Confirm a "Payment method successfully added" success message is displayed.
- Confirm the payment method you just added is listed under My account > Payment methods

This flow applies to:
| Stripe's experience | Payment methods page |
|---|---|
| Legacy | ✔ |
| Updated (UPE) | ✔ |
- Follow the steps under Add a new payment method if none is already saved.
- Go to My account > Payment methods.
- Locate the payment method you just added. Click on its "Delete" button.
- Confirm a "Payment method deleted" success message is displayed.
- Confirm the payment method is not listed anymore.

This flow applies to:
| Stripe's experience | Payment methods page |
|---|---|
| Legacy | ✔ |
| Updated (UPE) | ✔ |
Repeat this flow using the following payment methods to check out:
- Debit/credit card
- SEPA
- As a merchant, go to the create a new order page at
siteurl/wp-admin/admin.php?page=wc-orders&action=new - Set the order status to
Pending paymentand add a product to the order. - On the sidebar at the right, click on "Create".
- On the edit order page, click on "Customer payment page →".
- Place the order.
- Confirm that the order status gets updated to "Processing".
This flow applies to:
| Stripe's experience | Pay for Order page |
|---|---|
| Legacy | ✘ |
| Updated (UPE) | ✔ |
- Add a product to the cart and proceed to checkout.
- Confirm that an error message is displayed and no console errors are shown when clicking on the "Place order" button for the following scenarios:
- Don't add any payment information.
- Enter a full CC number (e.g. 4242 4242 4242 4242), but don't enter any expiration or CVV number.
- Enter a partial CC number
| Stripe's experience | WC's block checkout | WC's shortcode checkout |
|---|---|---|
| Legacy | ✘ | ✘ |
| Updated (UPE) | ✔ | ✔ |
- Log in as a shopper.
- Go to the My Account > Payment Methods page > Add Payment Method button.
- Select Cards as the payment method to be added.
- Confirm that an error message is displayed and no console errors are shown when clicking on the "Add payment method" button for the following scenarios:
- Don't add any payment information.
- Enter a full CC number (e.g. 4242 4242 4242 4242), but don't enter any expiration or CVV number.
- Enter a partial CC number
| Stripe's experience | Add Payment Method page |
|---|---|
| Legacy | ✘ |
| Updated (UPE) | ✔ |
Note: Webhooks must be set up for this flow.
- As a Merchant, go to WooCommerce > Settings > Payments > Stripe > Settings tab > Payments & transactions.
- Check off the checkbox for Issue an authorization on checkout, and capture later to enable capture later.
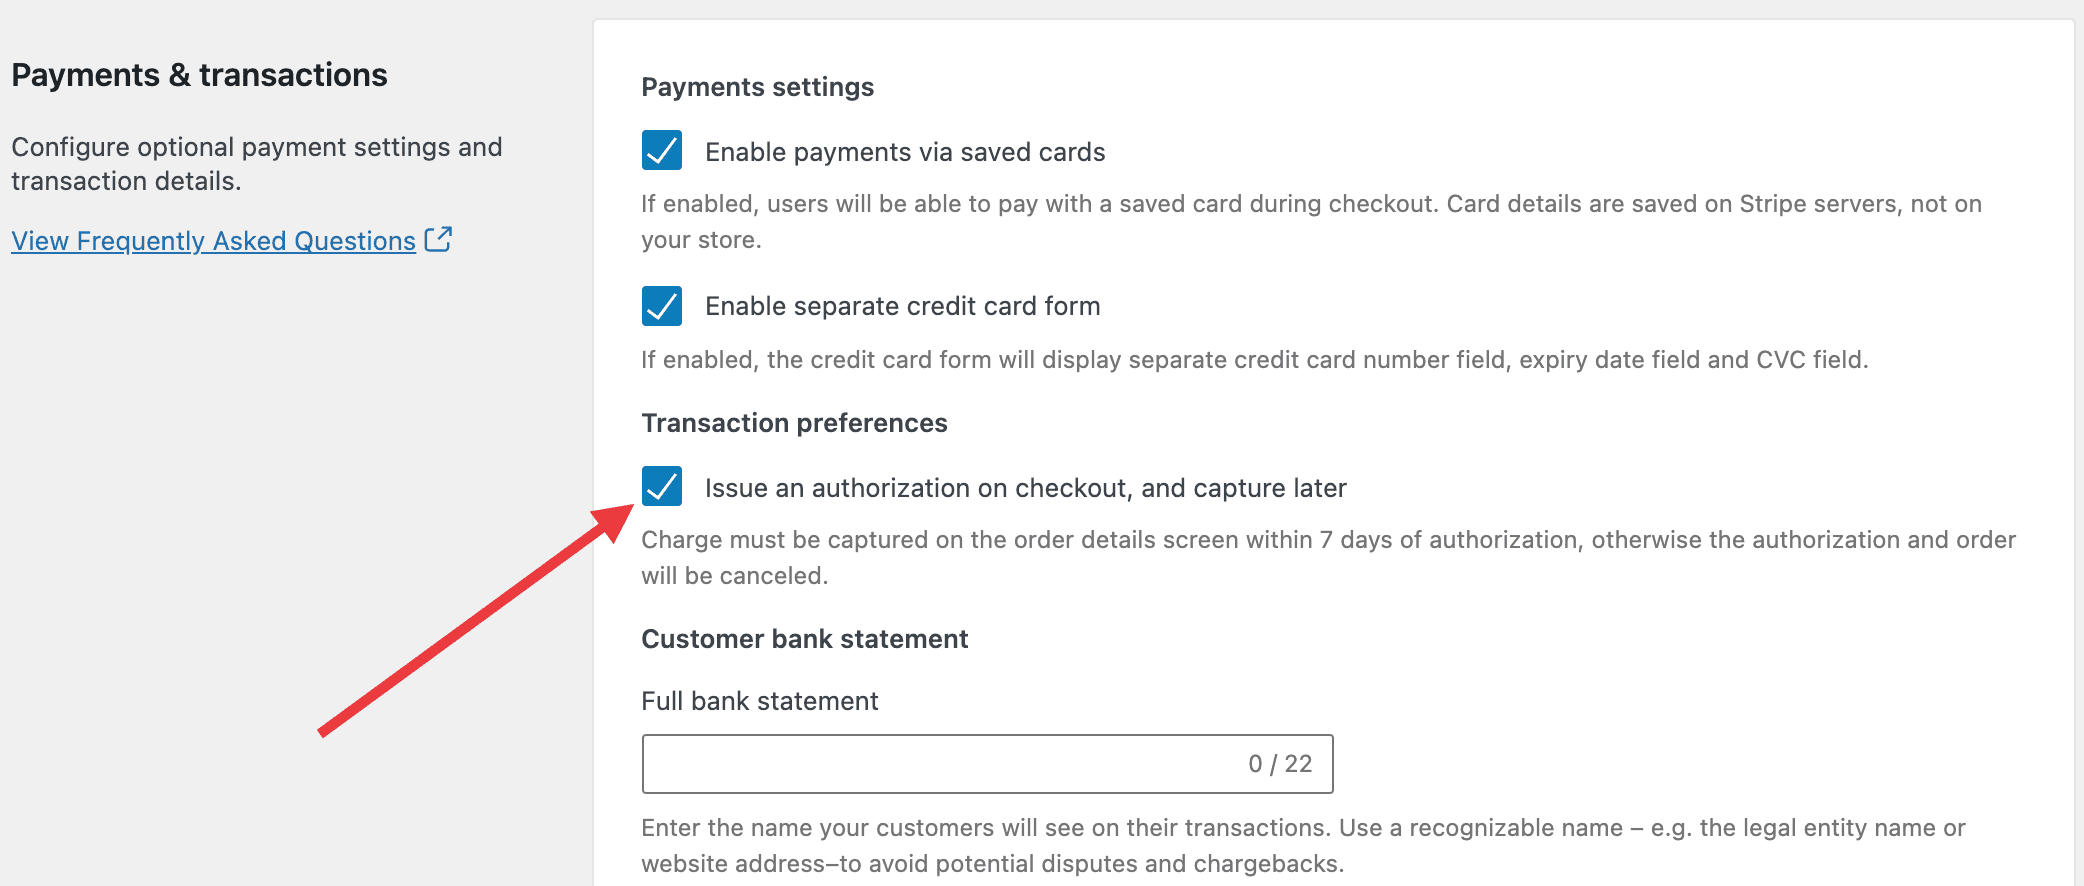
- Save the settings.
- Follow normal card checkout flow as a Shopper to make a purchase. Take a note of the order number created.
- Using Merchant account go to the WooCommerce > Orders page and open the order created above. The order should have the status
On Hold. - Go to your Stripe's account dashboard
- Make sure Viewing test data is enabled and navigate to the Payments page.
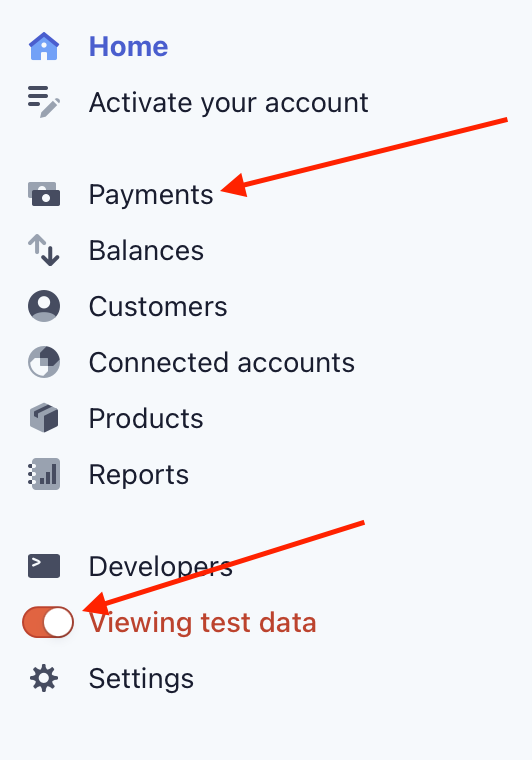
- Locate the payment for the order you just made.

- Open the order details, click the Capture button, and capture the full amount.

- Go back to the order detail screens in your WooCommerce store and observe that the payment should now be captured (the order notes will say Stripe charge complete (Charge ID: ch_abc...)), and the order status should be set to Processing.
- Go to the order page for an order purchased with the Stripe Payment Gateway. You might need to create one using steps from the normal card checkout flow.
- Click the
Refundbutton to activate the refund UI. - Update
QtyandRefund amountfields to make sure all products and fees are refunded. - Click the
Refund via Stripebutton to issue refund. - After page reload check order status (
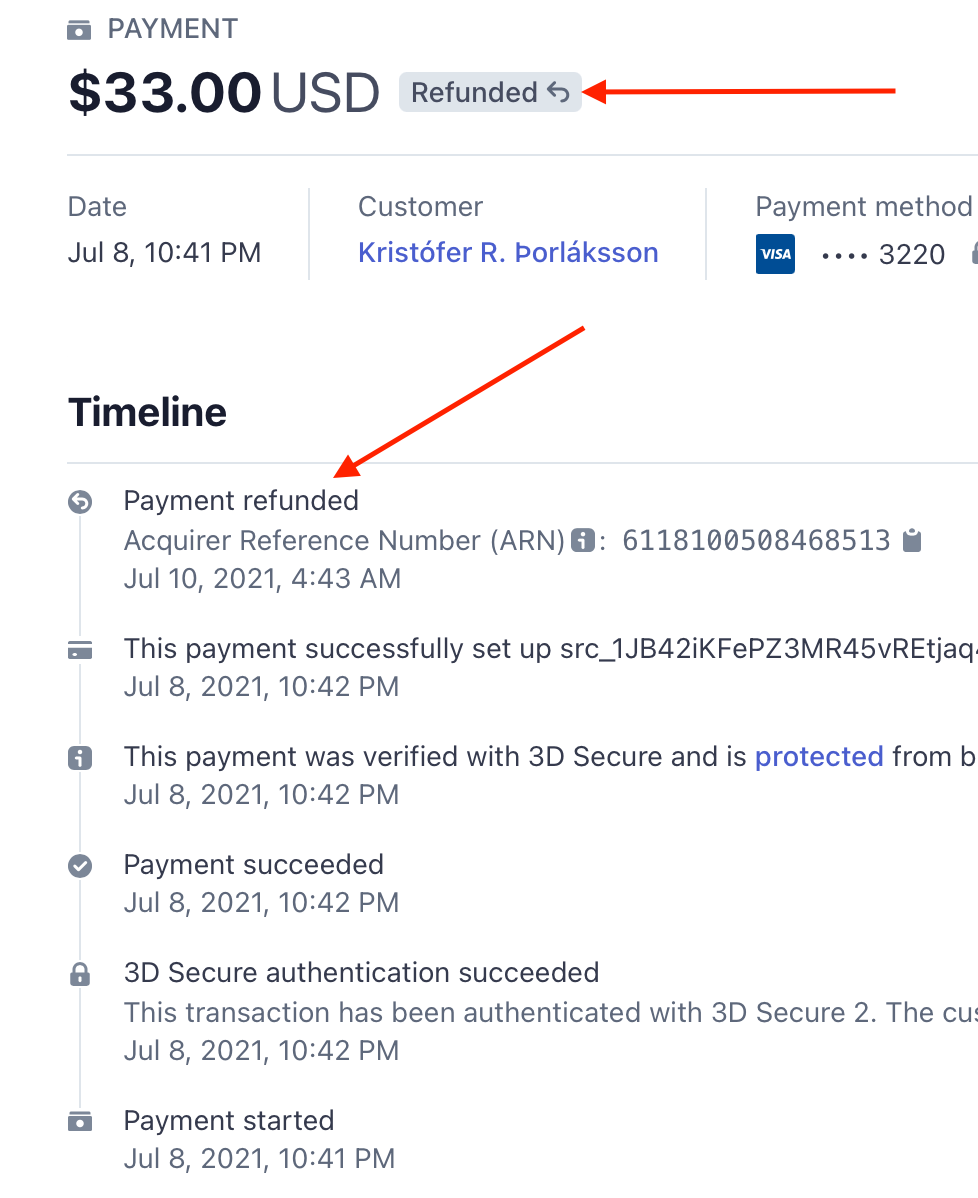
Refunded) and notes in the right sidebar. Successful refund notes should be added. - Go to your Stripe's account dashboard.
- Locate the payment for the order you just made.
- Check transaction summary, timeline, and payment details. It should reflect status
Refundedand refunded amounts.
- Go to the order page for an order purchased with the Stripe Payment Gateway. You might need to create one using steps from the normal card checkout flow.
- Click
Refundbutton to activate refund UI. - Update
QtyandRefund amountfields to make sure only part (not all) products and fees are refunded. - Click
Refund via Stripebutton to issue refund. - After page reload check order status (
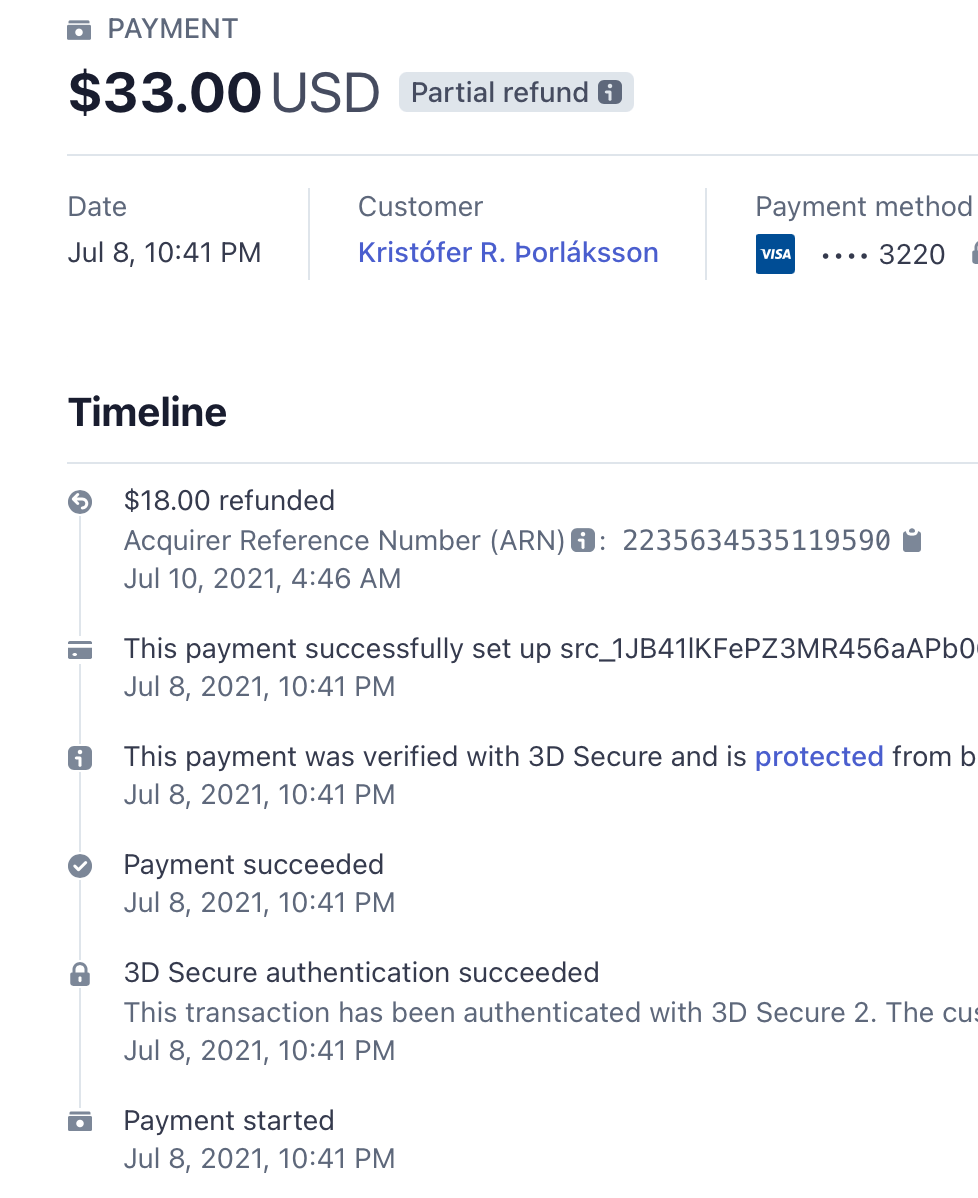
Processing) and notes in the right sidebar. Successful refund notes should be added. - Go to your Stripe's account dashboard.
- Locate the payment for the order you just made.
- Check transaction summary, timeline, and payment details. It should reflect status
Partial refundand refunded amounts.
- Repeat steps 2-9. Make sure following partial refunds work well and reflected in your Stripe's account dashboard.
- As a Shopper make a purchase using test card 4000000000005126 and make a note of order number.
- As a Merchant go to the order page for the created order.
- Click
Refundbutton to activate refund UI. - Update
QtyandRefund amountfields to make sure all or part of the products and fees are refunded. - Click
Refund via Stripebutton to issue refund. - After page reload check order status (
Refunded) and notes in the right sidebar. Successful refund notes should be added. - Reload the order page, check that refund failure notes added to the order.
- Go to your Stripe's account dashboard.
- Make sure Viewing test data is enabled and navigate to the Payments page.
- Locate the payment for the order you just made.
- Observe that the transaction has the
Succeededstatus, but the timeline shows the refund failure.

- As a Merchant create a subscription product (see official documentation for more details).
- As a Shopper purchase the product using a test card.
- Navigate to 'My account -> My Subscription'.
- Ensure the new subscription is listed there:

- Ensure 'Subscription' link and 'View' button are opening.
This flow applies to:
| Stripe's experience | WC's block checkout | WC's shortcode checkout |
|---|---|---|
| Legacy | ✔ | ✔ |
| Updated (UPE) | ✔ | ✔ |
- As a Merchant create a subscription product (see official documentation for more details).
- Modify the subscription: set 'Free trial' to e.g. 14 days, click 'Update' button in the top-right block on the product edit page.
- As a Shopper add the product to the cart and start the checkout.
- Ensure the total is '$0.00' and the product price includes e.g. ' with a 14-day free trial'.
- Ensure the order items have 'Recurring totals' section with correct subscription price.
- Complete the checkout and navigate to 'My account -> Subscriptions'.
- Ensure the new subscription is listed.
Note: "Payment Request" option ( Apple Pay, Google Pay, etc. ) will be disabled for subscriptions with free trial if the product isn't virtual or downloadable. This is a limitation of checkout flow and not an issue.
This flow applies to:
| Stripe's experience | WC's block checkout | WC's shortcode checkout |
|---|---|---|
| Legacy | ✔ | ✔ |
| Updated (UPE) | ✔ | ✔ |
- As a Merchant create 2 subscription products (see official documentation for more details).
- The subscription products should use an identical schedule, e.g. both daily, both weekly, both monthly, etc.
- As a Shopper add both products to the cart and complete checkout.
- Navigate to 'My account -> Subscriptions'.
- Ensure the listing contains only one new entry, click the 'View' button on the right side of the entry.
- Ensure 'Subscription totals' section lists the subscription products with the correct price.
This flow applies to:
| Stripe's experience | WC's block checkout | WC's shortcode checkout |
|---|---|---|
| Legacy | ✔ | ✔ |
| Updated (UPE) | ✔ | ✔ |
- As a Merchant create 2 subscription products (see official documentation for more details).
- The subscription products should use differing schedules, e.g. one weekly and one monthly.
- As a Shopper add both products to the cart and complete checkout.
- Navigate to 'My account -> Subscriptions'.
- Ensure the listing contains two new entries, click the 'View' button on the right side of each entry.
- Ensure 'Subscription totals' section lists the subscription product with the correct price.
This flow applies to:
| Stripe's experience | WC's block checkout | WC's shortcode checkout |
|---|---|---|
| Legacy | ✔ | ✔ |
| Updated (UPE) | ✔ | ✔ |
- Follow steps from 'Purchase subscription product'.
- As a Shopper, navigate to 'My account -> My Subscription'.
- Note the newly created subscription and click the 'View' button located on the right side of the corresponding list entry.
- Note the content of the 'Related orders' section (after renewing a new entry expected to be listed there).
- Note the 'Renew now' button and click it.
- You expected to land on the checkout page.
- Ensure the 'Complete checkout to renew now.' success message is shown up.
- Complete the checkout and ensure the 'Related orders' section in the subscription has a new entry.
This flow applies to:
| Stripe's experience | Subscription renewal |
|---|---|
| Legacy | ✔ |
| Updated (UPE) | ✔ |
- Follow steps from 'Purchase subscription product'.
- As a Shopper, navigate to 'My account -> Subscriptions' and open the newly created subscription entry.
- Observe a 'Change payment' button for 'Actions'. Click the 'Change payment' button.
- In the second block, select 'Use a new payment method' option.
- Provide 4242424242424242 as the test card number, future expiration date, and a CVC code.
- Click 'Change payment method' button.
- Observe the 'Payment method updated.' success message.
- Ensure the 'Payment' line in the very first block is reflecting the card data you have provided.
- Follow steps from 'Add new payment method'.
- Follow steps from 'Purchase subscription product'.
- As a Shopper, navigate to 'My account -> Subscriptions' and open the newly created subscription entry.
- Observe a 'Change payment' button in 'Actions'.
- Click 'Change payment' button.
- In the second block, select the method created at the first step.
- Click 'Change payment method' button.
- Observe the 'Payment method updated.' success message.
- Ensure the 'Payment' line in the very first block is reflecting the card data you have provided.
Follow steps from 'Change payment method to saved card', except:
- Make 2 purchases of subscription products, so you get 2 entries in the subscription listing.
- Make sure to mark 'Update the payment method used for all of my current subscriptions (optional)' checkbox when changing the payment method.
- Ensure both subscription entries are using the selected payment method.
After completing steps from 'Set default payment method' change payment method again:
- Make sure to mark 'Update the payment method used for all of my current subscriptions (optional)' checkbox when changing the payment method.
- Ensure both subscription entries are using the new payment method.
- Follow the instructions in checkout with SEPA to be able to listen to webhooks and accept SEPA orders.
- Repeat the Shopper (subscriptions) tests with SEPA instead of card.
- Repeat the Merchant (subscriptions) tests with SEPA instead of card.
This flow applies to:
| Stripe's experience | WC's block checkout | WC's shortcode checkout |
|---|---|---|
| Legacy | ✘ | ✘ |
| Updated (UPE) | ✔ | ✔ |
- As a Merchant create a subscription product (see official documentation for more details).
- As a Merchant navigate to 'WooCommerce -> Settings -> Subscriptions'
- Enable 'Display the auto renewal toggle' and click 'Save changes' button on page bottom.
- As a Shopper add the subscription product to the cart and complete checkout.
- As a Shopper, navigate to 'My account -> Subscriptions' and open the newly created subscription entry.
- Ensure 'Auto renew' toggle is available and enabled.
- Ensure 'Payment' states the selected payment method.
- Copy the subscription ID (#) for your newly created subscription.
- As a Merchant, navigate to 'WooCommerce -> Status -> Scheduled Actions'.
- As a Merchant, use the subscription ID in the 'Search hook, args and claim ID' field, on the top-right corner of the page.
- Search for a 'Pending' hook named 'woocommerce_scheduled_subscription_payment' and which argument states
'subscription_id' => {SUBSCRIPTION_ID}. - Hover over the table row and click 'Run' to simulate an automatic renewal for the newly created subscription.
- As a Shopper, navigate to 'My account -> Subscriptions', and ensure the given subscription is updated and another order entry is attached to it under 'Related orders'.
- Note the 'Next payment date' should remain the same (i.e. one month ahead).
- As a Merchant create a subscription product (see official documentation for more details).
- As a Merchant navigate to 'WooCommerce -> Settings -> Subscriptions'
- Enable 'Accept Manual Renewals', ' Turn off Automatic Payments ' and click 'Save changes' button on page bottom.
- As a Shopper add the subscription product to the cart and complete checkout.
- As a Shopper, navigate to 'My account -> Subscriptions' and open the newly created subscription entry.
- Ensure 'Payment' states 'Via Manual Renewal'.
- Observe a 'Renew now' button displayed for 'Actions'. Click the 'Renew now' button.
- Ensure you are landed to the checkout page and can complete the checkout.
- Navigate to 'My account -> Subscriptions -> View Subscription' and ensure the subscription is updated and a new order entry is attached under 'Related orders'.
- Note the 'Next payment date' should be up-to-date (i.e. two months ahead).
⚠️ New Stripe accounts can't use APMs with the Legacy experience.To test APMs with the Legacy experience, use a Stripe account that processed a payment with the Legacy experience before March 1st, 2024.
Otherwise, the payment will fail with a "The Sources API has been deprecated, and we are no longer allowing new integrations" error message.
- Go to WooCommerce > Settings > General.
- Select Euro (€) in the Currency drop-down.
- Click Save changes.
- Go to WooCommerce > Settings > Payments > Stripe > Payment Methods tab > iDEAL.
- Toggle the Enable/Disable checkbox to on.
- Click Save changes.
- Add a product to the cart and proceed to checkout.
- Select iDEAL and click Place order.
- You'll be brought to Stripe's iDEAL test payment page. Click Authorize test payment to continue.
- You'll be brought to the store's Order received page. Note the Order number.
- Go to WooCommerce > Orders.
- Find the order you just created (see order number from step 10) and make sure the status is set to Processing.
- Note: If the product you purchased is digital the order should be set to Completed.
This flow applies to:
| Stripe's experience | WC's block checkout | WC's shortcode checkout |
|---|---|---|
| Legacy * | ✘ | ✔ |
| Updated (UPE) | ✔ | ✔ |
Note: Webhooks must be set up for this flow.
Note: You'll need an address in Germany to pay via Sofort. You can use the following one or generate a fake address that will work here.
Street: Leipziger Strasse 36
City: Osnabrück
State: Niedersachsen
Zip Code: 49074
Phone Number: 05416327741
- Go to WooCommerce > Settings > General.
- Select Euro (€) in the Currency drop-down.
- Click Save changes.
- Go to WooCommerce > Settings > Payments > Stripe > Payment Methods tab > Sofort.
- Toggle the Enable/Disable checkbox to on.
- Click Save changes.
- Add a product to the cart and proceed to checkout.
- Enter the address you generated here as the billing details.
- Select SOFORT and click Place order.
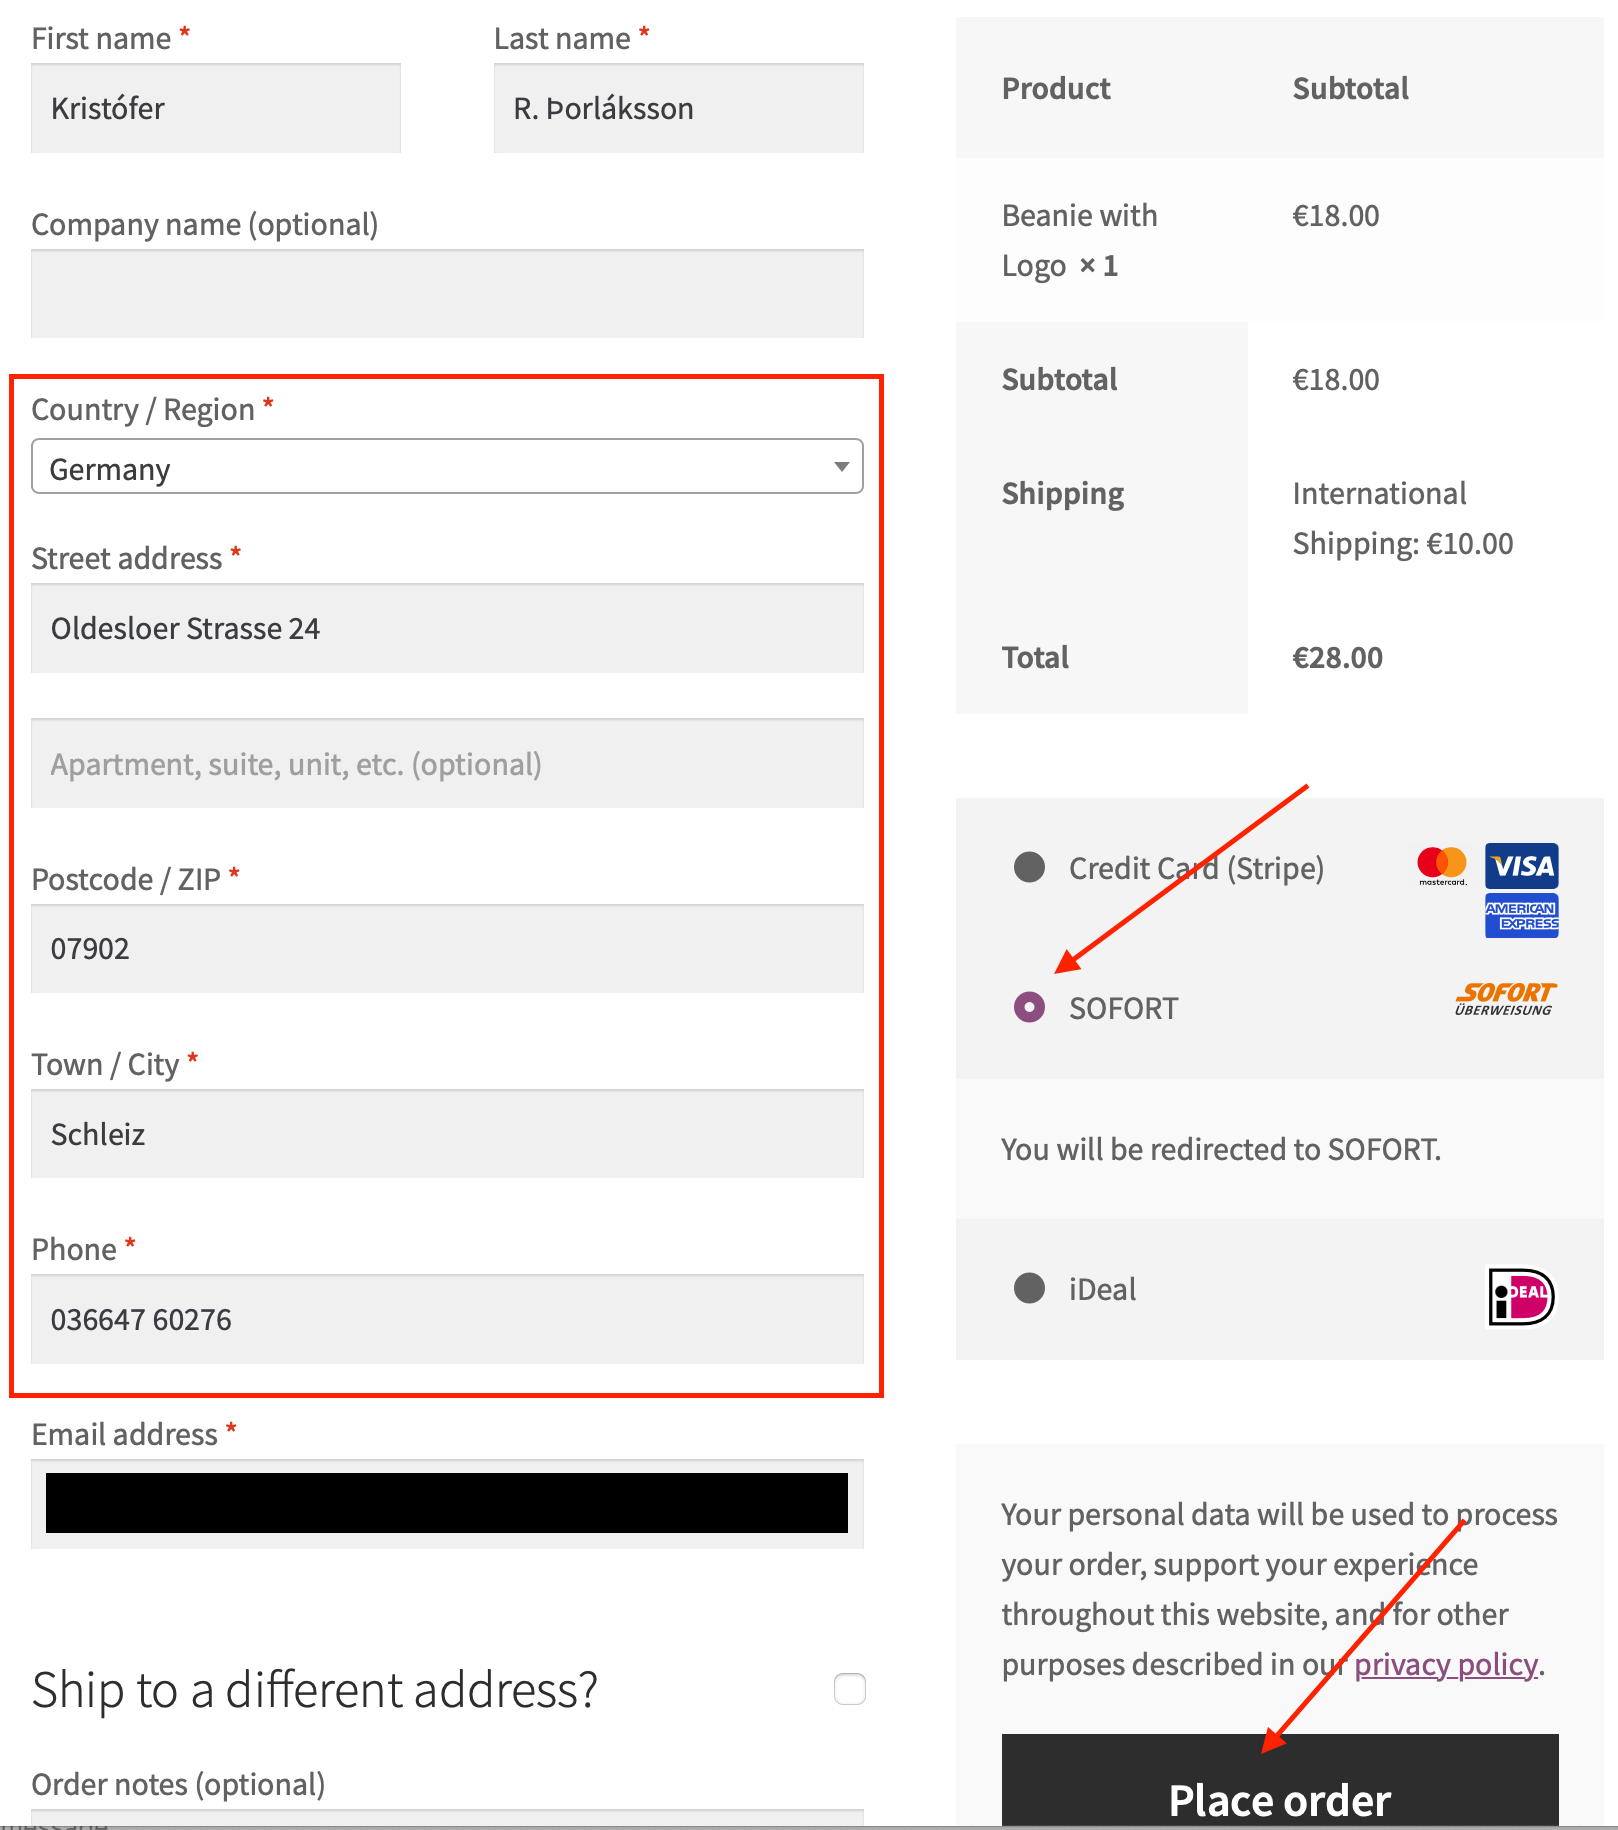
- You'll be brought to Stripe's Sofort test payment page. Click Authorize test payment to continue.
- You'll be brought to the store's Order received page. Note the Order number.
- Go to WooCommerce > Orders.
- Find the order you just created (see order number from step 11) and make sure the status is set to On Hold.
- Wait 3 minutes.
- Reload the WooCommerce > Orders page.
- Find the order you just created (see order number from step 11) and make sure the status is set to Processing.
- Note: If the product you purchased is digital the order should be set to Completed.
This flow applies to:
| Stripe's experience | WC's block checkout | WC's shortcode checkout |
|---|---|---|
| Legacy * | ✘ | ✔ |
| Updated (UPE) | ✔ | ✔ |
Giropay was removed from the Stripe extension on 8.5.0. Giropay was deprecated by Stripe on June 30, 2024
- Go to WooCommerce > Settings > General.
- Select Euro (€) in the Currency drop-down.
- Click Save changes.
- Go to WooCommerce > Settings > Payments > Stripe > Payment Methods tab > EPS.
- Toggle the Enable/Disable checkbox to on.
- Click Save changes.
- Add a product to the cart and proceed to checkout.
- Select EPS and click Place order.
- You'll be brought to Stripe's EPS test payment page. Click Authorize test payment to continue.
- You'll be brought to the store's Order received page. Note the Order number.
- Go to WooCommerce > Orders.
- Find the order you just created (see order number from step 10) and make sure the status is set to Processing.
- Note: If the product you purchased is digital the order should be set to Completed.
This flow applies to:
| Stripe's experience | WC's block checkout | WC's shortcode checkout |
|---|---|---|
| Legacy * | ✘ | ✔ |
| Updated (UPE) | ✔ | ✔ |
- Go to WooCommerce > Settings > General.
- Select Euro (€) in the Currency drop-down.
- Click Save changes.
- Go to WooCommerce > Settings > Payments > Stripe > Payment Methods tab > Bancontact.
- Toggle the Enable/Disable checkbox to on.
- Click Save changes.
- Add a product to the cart and proceed to checkout.
- Select Bancontact and click Place order.
- You'll be brought to Stripe's Bancontact test payment page. Click Authorize test payment to continue.
- You'll be brought to the store's Order received page. Note the Order number.
- Go to WooCommerce > Orders.
- Find the order you just created (see order number from step 10) and make sure the status is set to Processing.
- Note: If the product you purchased is digital the order should be set to Completed.
This flow applies to:
| Stripe's experience | WC's block checkout | WC's shortcode checkout |
|---|---|---|
| Legacy * | ✘ | ✔ |
| Updated (UPE) | ✔ | ✔ |
- Go to WooCommerce > Settings > General.
- Select Euro (€) in the Currency drop-down.
- Click Save changes.
- Go to WooCommerce > Settings > Payments > Stripe > Payment Methods tab > Przelewy24.
- Toggle the Enable/Disable checkbox to on.
- Click Save changes.
- Add a product to the cart and proceed to checkout.
- Select Przelewy24 (P24) and click Place order.
- You'll be brought to Stripe's Przelewy24 test payment page. Click Authorize test payment to continue.
- You'll be brought to the store's Order received page. Note the Order number.
- Go to WooCommerce > Orders.
- Find the order you just created (see order number from step 10) and make sure the status is set to Processing.
- Note: If the product you purchased is digital the order should be set to Completed.
This flow applies to:
| Stripe's experience | WC's block checkout | WC's shortcode checkout |
|---|---|---|
| Legacy * | ✘ | ✔ |
| Updated (UPE) | ✔ | ✔ |
Note: Webhooks must be set up for this flow.
- Go to WooCommerce > Settings > General.
- Select Euro (€) in the Currency drop-down.
- Click Save changes.
- Go to WooCommerce > Settings > Payments > Stripe > Payment Methods tab > Direct debit payment.
- Toggle the Enable/Disable checkbox to on.
- Click Save changes.
- Add a product to the cart and proceed to checkout.
- Select SEPA Direct Debit.
- Enter
DE08370400440532013003as the IBAN Number and click Place order. - You'll be brought to the store's Order received page. Note the Order number.
- Go to WooCommerce > Orders.
- Find the order you just created (see order number from step 10) and make sure the status is set to On hold.
- Wait 3 minutes.
- Reload the WooCommerce > Orders page.
- Find the order you just created (see order number from step 10) and make sure the status is set to Processing.
- Note: If the product you purchased is digital the order should be set to Completed.
This flow applies to:
| Stripe's experience | WC's block checkout | WC's shortcode checkout |
|---|---|---|
| Legacy * | ✘ | ✔ |
| Updated (UPE) | ✔ | ✔ |
- Add a product to the cart and proceed to checkout.
- Select SEPA as the payment method to be used.
- Confirm that an error message is displayed and no console errors are shown when clicking on the "Place order" button for the following scenarios:
- Don't enter any payment information.
- Add a partial IBAN number.
| Stripe's experience | WC's block checkout | WC's shortcode checkout |
|---|---|---|
| Legacy | ✘ | ✘ |
| Updated (UPE) | ✔ | ✔ |
- Log in as a shopper.
- Go to the My Account > Payment Methods page > Add Payment Method button.
- Select SEPA as the payment method to be added.
- Confirm that an error message is displayed and no console errors are shown when clicking on the "Add payment method" button for the following scenarios:
- Don't enter any payment information.
- Add a partial IBAN number.
| Stripe's experience | Add Payment Method page |
|---|---|
| Legacy | ✘ |
| Updated (UPE) | ✔ |
Note: Webhooks must be set up for this flow.
- Go to WooCommerce > Settings > General.
- Select Euro (€) in the Currency drop-down.
- Click Save changes.
- Go to WooCommerce > Settings > Payments > Stripe > Payment Methods tab > Multibanco.
- Toggle the Enable/Disable checkbox to on.
- Click Save changes.
- Add a product to the cart and proceed to checkout.
- Select Multibanco and click Place order.
- You'll be brought to Stripe's Multibanco test payment page. Click Return to site to continue.
- You'll be brought to the store's Order received page. Note the Order number.
- Go to WooCommerce > Orders.
- Find the order you just created (see order number from step 10) and make sure the status is set to Processing.
- Note: If the product you purchased is digital the order should be set to Completed.
- Open the order details page for the order you just created.
- Make sure there are 3 notes associated with the order:
- "Awaiting Multibanco payment Order status changed from Pending payment to On hold."
- "Order status changed from On hold to Processing."
- "Stripe charge complete (Charge ID: py_xxx)"
This flow applies to:
| Stripe's experience | WC's block checkout | WC's shortcode checkout |
|---|---|---|
| Legacy * | ✘ | ✔ |
| Updated (UPE) | ✘ | ✔ |
- Go to WooCommerce > Settings > Payments > Stripe > Payment Methods tab > Alipay.
- Toggle the Enable/Disable checkbox to on.
- Click Save changes.
- Add a product to the cart and proceed to checkout.
- Select Alipay and click Place order.
- You'll be brought to Stripe's Alipay test payment page. Click Authorize test payment to continue.
- You'll be brought to the store's Order received page. Note the Order number.
- Go to WooCommerce > Orders.
- Find the order you just created (see order number from step 10) and make sure the status is set to Processing.
- Note: If the product you purchased is digital the order should be set to Completed.
This flow applies to:
| Stripe's experience | WC's block checkout | WC's shortcode checkout |
|---|---|---|
| Legacy * | ✘ | ✔ |
| Updated (UPE) | ✔ | ✔ |
Note: Webhooks must be set up for this flow.
Note: You'll need to set Brazil as your country in the Stripe account. If it's not possible you'll need to create a new account and set Brazil and use the account for this test.
- Go to WooCommerce > Settings > General.
- Select Brazilian real (R$) in the Currency drop-down.
- Click Save changes.
- Go to WooCommerce > Settings > Payments > Stripe > Payment Methods tab > Boleto.
- Toggle the Enable/Disable checkbox to on.
- Click Save changes.
- Add a product to the cart (> R$5.00) and proceed to checkout.
- Type in a valid Brazilian address.
- Select Boleto, use
81200558022in the CPF/CNPJ field and click Place order. - A modal containing a voucher must show up. Close it.
- You'll be brought to the store's Order received page. Note the Order number.
- Go to WooCommerce > Orders.
- Find the order you just created (see order number from step 11) and make sure the status is set to On hold.
- Wait 3 minutes.
- Reload the WooCommerce > Orders page.
- Find the order you just created (see order number from step 11) and make sure the status is set to Processing.
- Note: If the product you purchased is digital the order should be set to Completed.
This flow applies to:
| Stripe's experience | WC's block checkout | WC's shortcode checkout |
|---|---|---|
| Legacy * | ✘ | ✔ |
| Updated (UPE) | ✔ | ✔ |
Note: Webhooks must be set up for this flow.
Note: You'll need to set Mexico as your country in the Stripe account. If it's not possible you'll need to create a new account and set Mexico and use the account for this test.
- Go to WooCommerce > Settings > General.
- Select Mexican peso ($) in the Currency drop-down.
- Click Save changes.
- Go to WooCommerce > Settings > Payments > Stripe > Payment Methods tab > OXXO.
- Toggle the Enable/Disable checkbox to on.
- Click Save changes.
- Add a product to the cart (> $10.00) and proceed to checkout.
- Type in a valid Mexican address.
- Select OXXO and click Place order.
- A modal containing a voucher must show up. Close it.
- You'll be brought to the store's Order received page. Note the Order number.
- Go to WooCommerce > Orders.
- Find the order you just created (see order number from step 11) and make sure the status is set to On hold.
- Wait 3 minutes.
- Reload the WooCommerce > Orders page.
- Find the order you just created (see order number from step 11) and make sure the status is set to Processing.
- Note: If the product you purchased is digital the order should be set to Completed.
This flow applies to:
| Stripe's experience | WC's block checkout | WC's shortcode checkout |
|---|---|---|
| Legacy * | ✘ | ✔ |
| Updated (UPE) | ✔ | ✔ |
- Go to WooCommerce > Settings > Payments > Stripe > Payment Methods tab > Express checkouts > Link.
- Toggle the Enable/Disable checkbox to on.
- Click Save changes.
- Add a product to the cart and proceed to checkout.
- Get a test email from https://10minutemail.com/ or a similar service. This can be skipped if you're fairly certain that your test email has not been registered with Stripe Link yet.
- Enter your name, billing/shipping details, and test credit card info.
- After typing the test credit card info, a section asking you to register with Stripe Link should appear.
- Make sure the checkbox "Save your info for secure 1-click checkout with Link" is checked.
- The email address field should have been auto-filled with the email address you entered in the checkout form
- Enter any phone number, e.g.
(800) 555-0175. - Complete the purchase.
- You'll be brought to the store's Order received page. Note the Order number.
- Verify that the Payment Method is "Link".
- Go to WooCommerce > Orders.
- Find the order you just created (see order number from step 6) and make sure the status is set to Processing.
- Note: If the product you purchased is digital the order should be set to Completed.
- Enter an already-registered Link email address in checkout. You may use the one you used for the "New Email" scenario.
- In the payment box, choose "Credit / Debit Card". You will either be:
- already signed in, in which case your saved credit card(s) will be loaded and displayed, -or-
- asked to authenticate by entering a one-time code. Enter "000000".
- Use a saved credit card by clicking the button that says "Use ****".
- Complete the purchase.
- You'll be brought to the store's Order received page. Note the Order number.
- Verify that the Payment Method is "Link".
- Go to WooCommerce > Orders.
- Find the order you just created (see order number from step 6) and make sure the status is set to Processing.
- Note: If the product you purchased is digital the order should be set to Completed.