New GM's and Players Guide - foundryvtt-starfinder/foundryvtt-starfinder GitHub Wiki
This guide is aimed towards players who are either new to Foundry, or new to the SFRPG system in Foundry. Depending on how your table is handled, you might not need to know everything in the guide. It’s not a bad idea to be acquainted with what a custom modifier is, but it’s not something you need to know how to do if someone else is setting up your character for you.
If you’re joining a game for a one-shot or just a few sessions, at a minimum I’d recommend reading Foundry Basics, Sheet components under SFRPG character sheet, Using Skills, items and abilities, Your token, Combat Tracker and Initiative. Maybe glance over the Modules section just to see what a module can do and how it might change some of the things in this guide.
Foundry is a self-hosted VTT that requires a one-time purchase by only one of the players. The hosting player provides login address, username and password. There’s no need to register or create an account if you’re joining a hosted game. A game can either be hosted locally or on a cloud service, but that doesn’t matter to a player joining a game. Foundry offers a lot of customization through modules (plugins / addons) that can change both flavor and behavior of the platform.
What Foundry does for a player (may vary depending on the GM’s settings):
- Shows a scene, customizable with grid, audio, dynamic lighting, fog of war and walls.
- Allows players to control a token and access journal entries (handouts) and compendiums, change local volume, view and edit their character sheet.
- Measure distances on the scene with waypoint movement and shape size.
- Chat with the other players
- Make custom rolls and decide who gets to see them
- Make custom macros with JavaScript
What Foundry doesn’t do (by default, though in some cases they can be done with modules)
- Automatically resolve rolls (hit or miss, deal damage, etc)
- ??
There is an excellent player guide on the Foundry website which is the best place for someone brand new to Foundry to start.
The sidebar tab and layer controls are important and it’s recommended you get acquainted with them. The default player layer controls are basic controls, measurement controls, and journal notes.
Any button on the sidebar tab can be popped out by right-clicking it. So if you want to see the Chat and the Combat Tracker at the same time, right-click one of them.

To measure the distance between two points, either use the Measure Distance tool, or CTRL and drag. To create a waypoint for drag distance, hold CTRL and left-click where you want the waypoint (e.g. where you’re making a turn). To undo the last waypoint, right-click. The first number on the end point shows the distance from the last waypoint, the second number shows the total distance of the path.
If you start by CTRL and drag from your token, you can click space to make your character move across the selected path. To measure an area, choose the shape you want from Measurement Controls, then click and drag from the source point.

To delete a measuring point, hover over the point with the mouse cursor and press delete or backspace.
How the measuring tools work can change depending on which game system is being used.
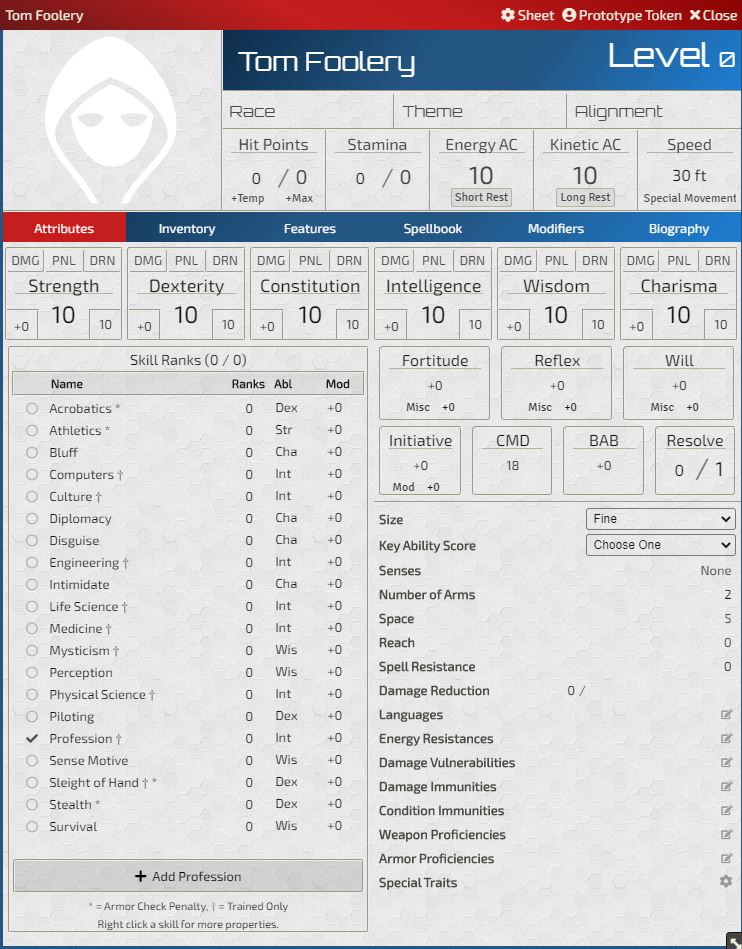
The sheet consists of six pages. Attributes, Inventory, Features, Spellbook, Modifiers, Biography.
Attributes have the basic character information; name, level, race, ability scores and modifiers, skills, speed, EAC, KAC, remaining HP/SP/RP, etc. Most things are calculated automatically based on other information.
Inventory is the character’s inventory. It also lets you use items from the inventory.
Features shows your class, class features, feats, race, theme, and abilities.
Spellbook has your spells listed by their spell level, and also tracks how many spell slots you have per level.
Modifiers lets you toggle conditions (flat-footed, blinded, dazzled, etc), but also has two sub-pages, called Permanent and Temporary, which you can use to set modifiers for buffs and debuffs.
Biography is a page with a text editor where you can write whatever you want. Note that it’s the permission settings set by the GM that decides whether other players can see your sheet, and by extension what has been written here.
HP/SP/AC/Speed

You can manually edit current Hit Points and Stamina. If you want to take a short or long rest, press the corresponding buttons under EAC/KAC. Short rest automatically consumes a resolve point and gives you max SP. Long rest automatically recharges your spell slots, resolve points, stamina and 1HP per character level.
To change ability score, change the value in the bottom right corner of the ability score.

The number in the bottom left shows the ability score modifier. You can add ability damage, penalty and drain in the boxes above the ability score name.
To change ranks in a skill, edit skill’s Ranks column. It automatically caps your ranks to your character level, and tells you how many skill ranks you have. If the Skill Ranks shows the incorrect amount (e.g. if you’re a human with additional skills), check the custom modifiers section.

Check mark before the skill’s name indicates whether it’s a class skill.
Asterisk after the skill’s name indicates whether it’s affected by armor check penalties.
Cross after the skill’s name indicates whether it’s a trained skill.
To edit a skill’s properties, right-click the skill. Besides changing class skill / armor check penalty / trained properties, you can also change which ability score the skill uses.
Saves, Initiative, CMD, BAB, Resolve

You can manually add modifiers by entering them in the misc window, as well as modify your current resolve points.

You can manually enter information for all rows, either by clicking the number or the edit button on the far right side. None of the information is used to automatically calculate anything.
Opening Special Traits by clicking the cog allows you to enable tracking Solarian Attunement in combat. This has been removed from the system, and replaced with the much more robust Actor Resources.

The inventory window automatically calculates wealth based on all items’ combined value, but does not take credits or UPBs into account. You can change your available credits and UPBs in the top right.
You can equip an item by clicking the checkbox on the far right (Laser pistol, azimuth is not equipped, but the Knife, survival is). You edit an item by clicking the edit button next to the checkbox, and delete an item by clicking the trash can. Clicking an item’s name expands the item’s description and shows basic information about the item; type, properties, range, etc.
If a weapon is equipped, you can make attack and damage rolls from the inventory sheet. If an armor is equipped, its AC values and armor penalties are automatically added to your character.
You can split a stack by right-clicking it.
Move items into containers by dragging them to the container. Weapons are considered containers for weapon fusions and armors are considered containers for armor upgrades.
The blue bar at the bottom of the page shows how much you’re currently carrying, and what your total limit is. The halfway point marked on the bar is when you’re encumbered.

You can see, and edit, individual classes’ levels and what type of actions abilities are. Clicking an item’s name shows descriptions and details about the item.

You can see spells’ levels and edit how many spell slots you have for a specific level, both current and total. Clicking a spell’s name shows its descriptions and some basic details about the spell. In this case, Acidic Mist shows its area size and type, what kind of action it is, range, and duration.

The modifiers page lets you toggle the common conditions, and it applies the appropriate modifiers. You can also add custom modifiers under the temporary and permanent pages.

Click the button in the upper right corner to enter edit mode.
By default SFRPG comes with the following compendiums.
- Alien Archives: Various NPCs and monsters. Fairly up to date, but data entry is still needed. Largely irrelevant to a player.
- Class Features: Most class features exist, but need data entry. Things added from here will need to have custom modifiers added.
- Classes: CRB, COM and TR classes are in here.
- Conditions: CRB conditions added.
- Equipment: There are some things missing (some personal, magical and technological items come to mind), but nearly all weapons and armor are in here.
- Feats: Most feats are added.
- Races: Most races are added.
- Spells: Very nearly all spells are added.
- Starship Actions: All added.
- Starship Components: Most starship components are added.
- Themes: All themes but the most recent are added.
- Universal Creature Rules: Unsure. Irrelevant to a player.
- SFRPG Rules: Used to make lists which are easier to read, sorting weapons and armor by type, spells by class, etc. Not up to date. Missing most things added after CRB.
- Tables / Rolltables: Has a rollable table that lets you roll for the confusion condition.

Click Compendium Packs in the sidebar and pick a compendium. Drag and drop an item to your character sheet. It’s now on your character.
You can search for an item in the compendium window that opens. At the bottom of the compendium sidebar, there is also an alternative to open the equipment, spells and starship components compendiums in a window that lets you filter on certain properties, like weapon type and subtype.

If you want to modify an object on your character sheet, you click the edit button on the right side. It opens a new window where you can edit the object’s description, details and modifiers. If you want to change a class’s level, you do that under details.

Most things can be changed here about objects, and each object’s details mage will be different based on its type; a weapon will let you change attack and damage modifiers, an armor will let you change its ACs and dex cap, a spell will let you change damage and DCs. There are more things that can be edited on each of those types, but it gives you a general idea.
Clicking something that is “rollable” opens up a roll dialogue window. You can add any situational bonus (or penalties) in the Situational Bonus window. You can choose Roll Mode to either be public, privately to only GM, privately for yourself.

Clicking an object’s icon posts the item to chat, along with some nifty things; description, some information details, and buttons for attack, damage and saving throws.

Clicking any of the buttons makes the relevant roll. Note that if you have several tokens that you control in the current scene, make sure you have the one you want to be rolling to be targeted - this won’t be relevant to most players, since they’ll only have access to their own token. The person getting targeted by the effect clicks the save button, and it will roll that actor’s save instead of the one making the attack.
To make a skill roll, click the skill you want to use on the character sheet.
Either click the weapon or attack’s icon to post it to chat and click from there, or click the Attack or Damage buttons on it from the inventory. If the weapon doesn’t have the Attack or Damage buttons in the inventory, it’s probably not equipped.
An attack roll has several options in the roll window by default.

Check the box with the modifier you want to use. If you’re making a full attack, you need to make two separate rolls with Full Attack checked.

The damage roll lets you choose between a normal and critical. Critical roll will roll the damage twice.
Consumables are used the same way as attacks, but can be set to automatically consume the item when clicked.
To resolve rolled damage dealt to a character you’re controlling, you have a few options.
- Change it in your character sheet.
- Apply it to your token. You can use either flat values, which changes it to that number (writing just 5 makes the value 5), or add/remove by writing +X (writing +5 in the window with 20, makes it 25).

- Right-click the damage roll in the chat window and click the effect you want in the window that pops up.

This is where it can get a bit fiddly, but also where the SFRPG system shows one of its best features. For items or features you can add a custom modifier that is active either constantly, or as a roll formula that can be used contextually.
Using an android operative with the ghost specialization as an example, they wouldn’t get Constructed racial trait bonus to all saving throws, but would get it to some. They also wouldn’t get Trick Attack damage added to all damage rolls, but would get it to some. They would also want their operative weapons to use dex for attack but strength for damage. They would also get a free skill rank to Acrobatics and Stealth from Ghost, and their Trick Attack roll gets a bonus to its check. Let’s make those changes.
Most things on the character sheet show what its variables are called in the tooltip that pops up when you hover over it. For what we’re interested in, we want to know how to find the strength modifier.

Hover over Strength and it shows @abilities.str.value. Hover over the strength modifier and it shows @abilities.str.mod. First we fix the Survival Knife, keeping @abilities.str.mod in mind.

Change Ability Modifier to Dexterity. Then make the Damage Formula 1d4 + @abilities.str.mod. The weapon now works as an operative weapon.
Adding Trick Attack as a custom modifier.
Add Trick Attack to your character sheet. Edit, then go to Modifiers. Click +Add, then Edit on the new modifier that popped up.


Add a relevant Name and a Note that makes sense to you - they will be shown on the roll dialogue for damage. The Name will be what it’s called in the list and Notes will be the tooltip.
Type is what kind of bonus type it is. Stacking works largely as intended, with a known issue on how it compares rolls with static modifiers. As an example, an Envoy that has added an insight Skill Expertise for Sense Motive, but also has another insight bonus to Sense Motive, will take the insight roll over the static roll even if the result was lower than the static bonus.
Effected Attribute is most of the commonly used things you want to change; attacks, damage, saves, hp/sp/rp, ac, skills, skill ranks, etc.
Trick Attack can either be added with Effected Attribute as Specific Weapon Damage and then choosing Small Arms for Specific Affected Value. If you do it that way, you’ll also want to add another similar modifier for Basic Melee (and maybe Advanced Melee if your operative is using that). That way the additional roll modifier will only show up on attacks with weapons of those types. Alternatively, you can add it with Effected Attribute as All Weapon Damage, but you’ll have to remember to not use it for weapons that can’t do Trick Attack. If you do it with Small Arms, as the example above, the damage roll with a Small Arms weapon will look like this.

If the box is checked, it’ll add 3d8 to the damage roll.
Next thing with Trick Attack is that we want to add the +1 bonus the Ghost specialization gives. We could either do that by doing a Stealth roll and adding +1 as a Situational Bonus, we could do it as a macro, or we could add it to Trick Attack. It’s a bit of a hack, but let’s add it as a damage roll to Trick Attack, even if it’s not actually a damage roll.
- Go to Trick Attack
- Edit
- Details
- Scroll down to Feature Attack and change it to something else - I personally use Utility
- Click + on the Damage Formula line
- Add the roll as you want it.
- Hovering over the Stealth skill (Ghost specialization’s Trick Attack skill), it says that it’s @skills.ste.mod.
- In Damage Formula we write 1d20 + @skills.ste.mod + 1 ← the +1 is the bonus Ghost gives.

The result is that the Trick Attack feature now has a Damage button that does the roll we want.
Let’s do Constructed as well, with a custom feature and modifier.
- Go to the Features page
- Click +Add under Passive Features
- Click Edit on the newly added feature
- Modifiers
- +Add
- Edit

When you make a saving throw, Constructed will show up the same way Trick Attack did for a damage roll. It’s particularly useful that hovering over where it says Constructed shows what you wrote in Notes as a tooltip.

Finally, let’s add the two free skill ranks Ghost gives. Make a new feature (or add it to the Ghost specialization itself if you’ve dragged it to your sheet).
- +Add a passive feature
- Go to Modifiers tab
- +Add
- Edit
- Add a Name and Notes that make sense.
- Under modifier, write @classes.operative.levels - since we don’t want it to go up if we add a level of another class, we’ll have to specify which class it is. This way it will scale with every operative level you take.
- Make it Modifier Type Constant, and make sure it’s enabled.

Expanding on the custom modifiers in the section above, here are some common modifiers (Work In Progress).
Since there are four values of Weapon Specialization (0.5 per level, 1 per level, 1.5 per level and 2 per level), adding them has to be done with care, particularly as they can overlap. Adding the 1 per level weapon specialization is easy enough. The modifier is @details.level.value, the Effected Attribute is Specific Weapon Damage, and Specific Affected Value is the weapon type you want to add.

But what if you want to use a Basic Melee Weapon that is also Operative? Since you only add half a level to those, and you’ve already added full level to Basic Melee Weapon, you have to subtract half a level from Operative Weapons.
This time the modifier is -ceil(@details.level.value/2). Ceil means it rounds up, which is correct for our way of dealing with Operative Weapons. Since we’ve already added Basic Weapons to add 1 per level, if we want Operative to be added at 0.5 level (rounded down), we need to remove 0.5 from 1 but rounded up.
The Effected Attribute is Weapon Property Damage and Specific Affected Value is Operative.

Adding Weapon Specialization for natural Unarmed Weapons is trickier since there is no Specific Affected Value we can use to target only Unarmed Weapons.
Instead, add a Roll Modifier for all Melee Weapon Damage and only tick the box when you’re doing an unarmed attack.
You’ll have to make a custom Unarmed Weapon item, let it be Weapon Type: Basic Melee. Add a new modifier for Basic Melee, like the first one, but make it add half level and as a Modifier Type: Roll Modifier. This time, use floor(@details.level.value/2) as a Modifier, so it rounds down.

What that does is it gives you the option to add half your level to damage when rolling a Basic Melee weapon.

What this does to the damage is that it adds +1 per level from Basic Melee Weapon specialization, and another +0.5 if the box is ticked. The player just has to make sure the box isn’t ticked when they’re using a melee weapon that isn’t Unarmed.
There is a pitfall with setting up Weapon Specialization this way, that there’s no real, non-hacky, way around at the moment. If you have a character that uses an Advanced Weapon without having the Weapon Specialization for it, if it’s also Operative it will add the 0.5 Weapon Specialization from the Operative Weapon modifier. If that’s the use case, consider adding the Operative modifier as a Roll Modifier.
Actor Resources are a way to track actor-specific things. Those resources can then be used to set up scaling modifiers (such as negative levels) or toggling modifiers on and off. Very handy.
Under the Features page, click +Add on the Actor Resources line.

Type and subtype are just its name, but also allows you to set it up as a way to track modifiers elsewhere. @type.subtype.base or @type.subtype.value lets you use the actor resource as a modifier - just like you would use @details.level.value to get a character’s level - and is also what you’d use to show it in Token Tooltip Alt. Base is its current value. Value range is its minimum and maximum value. Look in the macro section for a quick and easy way to change resource values.

Setting up one resource for each attunement mode would look roughly like this. Value range is 0 (unattuned) to 3 (fully attuned). The Conditional Visualization is interesting as it’ll change the icon and name of the resource in the combat tracker depending on its value.

Photon mode adds damage whenever it’s active, and thanks to the Actor Resources we can add that as a modifier.
In the modifier field, you can start with: max(0, sign(@resources.attunement.photon.value)) What it does is, simply put, “do the mathy stuff if resources.attunement.photon.value is 1 or more”. Less simply put, sign() returns -1, 0, or 1, depending on whether the parentheses value is negative, 0 or positive. max() returns the larger numbers of the two. So if sign() is -1 or 0, max(0,sign()) will return 0. So if you put max(0, sign(ANYTHING 1 OR GREATER)) you can multiply it with whatever comes after to keep the value: it’s simply multiplied by 1. This needs examples.
Photon Mode insight bonus is 1, and increases by 1 at 6 and every sixth level. You can either set it manually to just be the value you know it will be, or you can set it to automatically scale.
Manually update: max(0, sign(@resources.attunement.photon.value))*1 Change the 1 at the end to be the value you want it to be when attunement.photon is positive. The line means “if photon mode is on, add the value at the end”.
Automatically scale: max(0, sign(@resources.attunement.photon.value))*(1+(floor(@classes.solarian.levels/6))) Same thing, it’ll multiply with whatever is after the first part of the line, and floor(@classes.solarian.levels/6) will handle the scaling at every sixth level (solarian levels divided by 6, rounded down).
Put this into practice by making a new modifier under Attunement (or under any feat you prefer). Name and notes to something descriptive. Type insight, Effected Attribute to all attack damage. Constant modifier.

Now it’ll only add the insight damage if the character is attuned to Photon.
If you want to, you can have the same resource handle both of the Attunement modes. Set the range to -3 to 3. Let’s say we’re making Graviton active on -3 to -1. The start of the modifier would then be: max(0, 0 - sign(@resources.attunement.photon.value))
It works exactly the same way, but by adding 0 - in front of sign(), it’ll now check for if the resource value is -1 or less.
Another way to use actor resources is as a basis for scaling modifiers. Let’s use negative levels as an example. Each negative level adds some penalties, and they stack with the number of negative levels on the character. This example will focus on the AC penalty, but it works the same for the other ones as well.
New Actor Resource called Negative Levels, i called it type: negative and subtype: levels, range 0-20. In the modifier window, we can now reference @resources.negative.levels. Set up a new modifier. Name and notes as something descriptive. Modifier [email protected]. Effected Attribute to Armor Class Both. Constant modifier. For every value of the negative level resource, the character’s AC will go down by 1.

Set up each of the modifiers you need for the Effected Attribute.
Right-clicking your token brings up a few buttons. By default, on the left side from top to bottom is Elevation, Configuration and Targeting. On the right side it’s Assign Status Effects and Toggle Combat State.

Elevation is neat for keeping track of elevation in zero-g situations or during flight. Write a number and hit enter, and it’ll show just above the token.

Configuration opens up the token settings, which has a bunch of different settings, many of which are mostly up to the GM to set.

Token Name is what is displayed under your token.
Display Name changes under which conditions the name is visible, with options like Always, Hovered By Anyone, Hovered By Owner, Never Displayed, etc. Represented Actor is which character sheet the token pulls its information from.
Link Actor Data is whether changes made to the token, once placed on a scene, will modify things on the character sheet it represents, and vice versa. As a player, you likely want Link Actor Data enabled all the time. But for a bit of an explanation, when an Actor is placed on a scene, it creates a token that is not the same object as the Actor. This is helpful for things like if a GM wants to have four enemies of the same type but don’t want all of them to have their hp reduced when one takes damage. When you double-click a token, the character sheet opens, and it’ll say which sheet is opened at the top left. It’s either [Token] Actor Name or just Actor Name. Modifications made to the character sheet that says [Token] Actor Name (or Token resource bars) will not carry over to the Actor itself. Basically, as a player, check if the setting is enabled by either going into the configuration or double-clicking your token and checking what name it says in the top window frame.
Token Disposition changes the outline color of the token. Green for friendly, orange for neutral, red for hostile.
Another important tab is Resources.

This is for the resource bars that can be above and below the token. Display Bars have the same settings as Display Name under the Character tab; Always For Everyone, Hover for Everyone, Hover for Owner, Never Displayed, etc.
Bar Attribute has a bunch of things you can track on your character. For ease of use, I recommend Stamina Points and Hit Points, since that lets you change it easily by editing the windows. But it can also show things like how many spell slots you have available for a specific spell, EAC/KAC, or plenty of other things. Just pick what you want from the drop-down menu (attributes.hp for Hit Points and attributes.sp for Stamina Points) and it’ll pull the information into Bar Data. Bar 1 is at the bottom, Bar 2 is at the top.

Assign Status Effects allows you to toggle conditions the same way you can from the character sheet’s modifiers page.
Toggle Combat State adds the token to the Combat Tracker, or removes it if it’s already there.
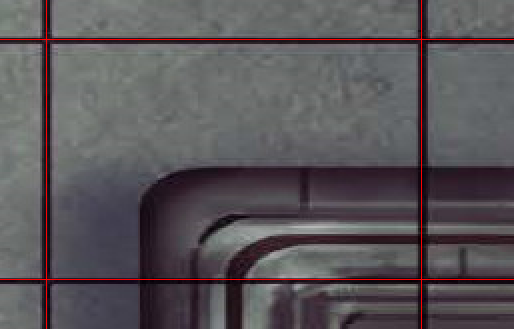
When the GM has added an encounter, as a player you can add yourself to the combat tracker, assuming you have a token on the scene where the combat is activated. Click the die next to your character to roll for initiative.

During your turn, the combat tracker gets an extra button at the bottom, End Turn, which you can click to end your turn.

Macros are made with JavaScript and there are a lot of good resources out there that can help you with that. I’ll give a quick example, though.
Let’s say you’re a mechanic that picked up the Energy Shield mechanic trick. It takes your mechanic level and adds your int modifier as temp hp.
let playerActor = canvas.tokens.controlled[0].actor;
let actorLevel = playerActor.data.data.classes.mechanic.levels;
let actorIntMod = playerActor.data.data.abilities.int.mod;
let energyShield = actorLevel + actorIntMod;
playerActor.update({
  data: {
    attributes: {
      hp: {
        temp: energyShield
      }
    }
  }
});
ChatMessage.create({
  user: playerActor,
  speaker: ChatMessage.getSpeaker({token: actor}),
  content: `Activating Energy Shield. Beep-beep-boop.`
});
It gets the target token (or, if you only have owner permission for one token, it gets that one), gets your mechanics level, gets your int mod. Updates the temp hp attribute. Then spit out a chat message.
A very useful macro is the one that lets you change Actor Resource values with a single click. It’s a rather large block, grab it all.
/*
Adds or Subracts 1 usage from a listed Starfinder resource.
Change "TYPE" and "SUBTYPE" to those listed in the resource details, keeping " "
    • SELECT A TOKEN FIRST
    • Click to subtract
    • Shift-Click to add
    • Alt-Click to reset
    • Ctrl-Click for minimum value
    • Ctrl-Shift-Click for maximum
*/
(()=> {
    if (!token)
    {
        return ui.notifications.error("Please select a token first");
    }

    // Set the type and subtype of the resource
    const resourceType = "solarian"; // e.g. solarian
    const resourceSubtype = "stellarMode"; // e.g. stellarMode

    const resource = token.actor.getResource(resourceType, resourceSubtype);
if (!resource)
    {
        return ui.notifications.error("Token does not have this resource available.");
    }

    const base = resource.data.data.base;
    const min = resource.data.data.range.min;
    const max = resource.data.data.range.max;


    let newBase = base;
    if (event.altKey)
    {
        // Reset
        return token.actor.setResourceBaseValue(resourceType, resourceSubtype, 0);
    }

    if (event.ctrlKey)
    {
        if (event.shiftKey) {
            // Maximum
            return token.actor.setResourceBaseValue(resourceType, resourceSubtype, max);
        } else {
            // Minimum
            return token.actor.setResourceBaseValue(resourceType, resourceSubtype, min);
        }
    }

    if (event.shiftKey)
    {
        // Increment
        if ((max || max === 0) && base >= max)
        {
            return ui.notifications.error(`${resource.name} already at the maximum value of ${Math.abs(max)} for resource`);
        }

        newBase = Math.min(base + 1, max);
    }
    else
    {
        // Decrement
        if ((min || min === 0) && base <= min)
        {
            return ui.notifications.error(`${resource.name} already at the maximum value of ${Math.abs(min)} for resource`);
        }

        newBase = Math.max(base - 1, min);
    }

    return token.actor.setResourceBaseValue(resourceType, resourceSubtype, newBase);
})();Foundry VTT is easily modifiable through modules, which are community-made addons/plugins. Some of them are specific to certain game systems, some of them are system agnostic.
I’ll list a few examples of modules that might make a difference for you as a player. Some of the modules come with settings for you as a player, which you can access from the Sidebar, Game Settings, Configure Settings, Module Settings.

Adds rolling 3d Dice. As a player, change color, sounds and feel of the dice.
Adds the ability for a custom tooltip for tokens. Personally I set them to show HP/SP/RP, ACs and movement speed, but can be customized to show almost anything you want from your character sheet. The GM sets up what is shown, but as a player you can change the way it looks. The tooltip size is a bit on the large side by default. I recommend lowering the Font Size, increasing the Max Rows, and, of course, enabling Dark Mode.
Adds color to a chat message’s frame, showing who made the chat message. A player can make some visual changes for it.
Changes behavior of dragging a token, automatically adding a ruler to it. Drag, click space to place a waypoint, release to move along the path.
If a player moves when it’s not their turn, this mod can either prevent movement altogether, or post a warning letting you know it’s not your turn. GM changes settings for this, but good to know in case you can’t move or get a warning about movement.
Adds buttons for actions that you’d otherwise need to access your character sheet to do. Want to make a reflex saving throw? Hover over Saves and click Reflex. Want to attack with a weapon? Hover over Equipment, choose your weapon and it’ll get posted to the chat as if you’d clicked the icon, and can roll attack/damage from there. Want to roll a specific skill? Hover over Skills and click the one you want. Default location is at the top of the screen, but it can be moved to where you want it.

Normally you rotate a token by pressing SHIFT and clicking the arrow keys or scrolling the mouse wheel. Alternative Rotation allows for a smoother rotation by holding shift and dragging from a token towards the direction you want to face. Depending on how the GM has set up vision, it might be necessary to turn to see things, and this module makes that smoother.
Adds a symbol underneath the token whose turn it is during combat. As a player you can change toggle its animation and set the animation speed.
GM basics - prepping the game
The minimum to run a Starfinder game in Foundry is a scene to play on and actors to use. There are extra layers of fluff that can be added on top of that for visuals, sound and QoL improvements, but let’s start with the basics. There are many different ways to do this, but this is just an example.
A general Foundry guide to scenes can be found here: https://foundryvtt.com/article/scenes/
Paizo maps are generally not very easy to import. The grid is uneven and they need to be stretched a different amount in each direction. A handy tool for doing that is the brilliant tool Map Align (which can be found here: https://www.fantasygrounds.com/forums/showthread.php?19813-Map-Align-Utility-to-scale-and-align-map-to-grid ). You’ll want the LAA aware version, so make sure you grab the right zip. There is also a good video guide in that post.
Step 1: Get the map from the PDF. I use Adobe Acrobat Reader for it, click the image, ctrl+c, open it up in Gimp, ctrl+shift+v (import), ctrl+shift+e (export), save it as jpg. The image is, unfortunately, unusable as a map because of how stretched it is. Note: There are other ways to get an image file from a PDF, and some that will get all the images in the file, but I personally find this method to be fine.
Step 2: Open the map image file in Map Align. Zoom in on the map in the top left corner, where you have a clear grid square.

Click the Draw new grid with the mouse button.

Draw the box as close as you can to the grid. The closer you get it, the easier it is to align in the next step.

Once that’s done, the red grid overlay should line up quite well with the map grid, but not quite right. Check the bottom right corner of the map.

As you can see, height is good, but width isn’t right. Increase and decrease the tile width by 1/8 until you get it as close as you can for a square close to the bottom right corner. If it’s still not quite right, click the 1/6 once and then try again with 1/8.

Because we started with the top left corner, and then aligned it with the bottom right corner, we shouldn’t have to do more adjustments. For some maps, there’s no grid square you can see in the corner - most commonly for starship maps - and you’ll have to use something closer to the middle. It gets more difficult and you’ll have to check the different areas of the map as you change the tile width or tile height.
Save the map, and you now have a grid that is easily aligned in Foundry.
Step 3: Upscaling. Map Align doesn’t do so well on image quality. A solution is to upscale the image. It’s entirely optional, but if it’s a map with lots of details I personally think it’s worth it. For this example, I used https://bigjpg.com/ (and lots of yelling ENHANCE! at my monitor). I haven’t done comparisons on the different available upscaling sources, but I think this one suits my purposes. It has a few different settings, is free, and lets you do more than one image. It’s difficult to show a fair comparison in this document, since the format used to show the comparison will make a difference. The differences are clearer than the example shown, but for the purposes of giving you an indication of what it might look like, it works.

Original (size: 3.13MB): You can see Paizo’s terrible grid in action.
After Map Align (size: 515KB): Grid is good, but lots of detail is lost. It’s quite grainy.
Upscaled art highest noise reduction (size: 2.2MB): Least grain. Changes the style slightly.
Upscaled photo medium noise reduction (size: 2.03 MB): Not as good as maximum noise reduction, but same size.
Upscaled photo maximum noise reduction (size: 2.11 MB): Doesn’t change the style, looks closest to the original.
Upscaled converted to webp (size: 900KB: The upscaled photo maximum noise, exported from Gimp as webp. The quality is as good as, or better, than the original, while still being fairly small. This is the end product I use.
Step 4: Load it into Foundry, as per Foundry’s own guide. The image file from Map Align will tell you the grid size. Default is 70, so if you set it to that when making the scene, it should be aligned right away. Occasionally, the upscaling will change the grid size. This example map I used gave me four Foundry grids per map grid. So I set the grid size in configuration to double the default size (140), and the grid was perfectly aligned.

You can use the module Grid Scale Menu to make aligning grids easier if they’re the right size, but not exactly aligned.

When the module is active, click the wrench and then the ruler. Click as close to a corner of the map grid as you can, and then choose the other ruler and do the same thing.
Step 5: Add walls and lighting. Lots of good guides on how to do that. I suggest Encounter Library. Walls: https://www.youtube.com/watch?v=rXytTcZrGNo. Lighting: https://www.youtube.com/watch?v=nvv0GJINMoE
The scene is done. All in all, it takes me about 5-10 minutes for the steps before adding walls and lighting, about half of which is waiting for upscaling.
Three words: Starfinder Statblock Parser. It is, by far, the best module for the Starfinder system on Foundry. Most of the non-named NPCs in Starfinder are added to the Alien Archives compendium, but it’s not a catch-all by any means.
Once the Starfinder Statblock Parser is running, under the Actors Directory you have a new button at the bottom.

Copy a statblock (from a PDF, aonsrd.com, or one made by the monster builder on sfrpgtools.com). Click the Parse Statblock button, and paste it into the dialog that pops out. Click Ok, and it’ll make the NPC for you. Yes, it really is as easy as that.
Note: Some things will disrupt the parsing. If an item is specified as coming from a book with superscript, such as the AR in Warfanᴬᴿ, it won’t find the proper item. It’s not a big deal, but it’s easier to just remove the superscript from the statblock before you paste it, than it is to enrich the item object with information afterwards.
When you parse a statblock, the NPC will have a loot bag under its Inventory.
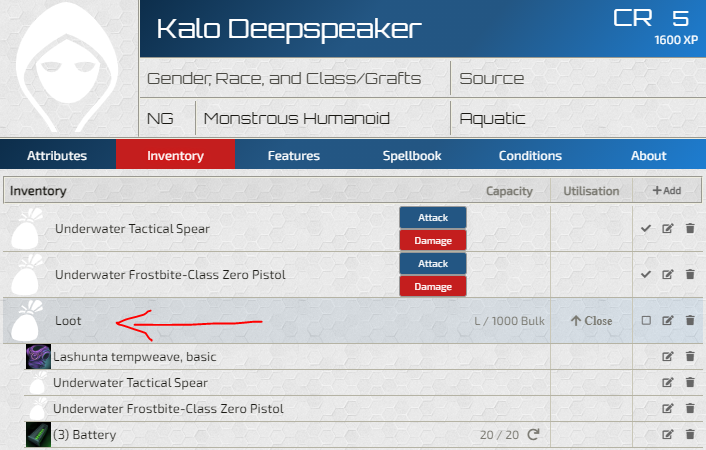
If you want to let your players loot the enemy, all you have to do is drag that bag to the map scene/canvas. The players can then double-click it on the map and get a “loot sheet”, from which they can take the items by dragging it to their inventory.
It’s important to note that the NPC attack bonus and damage comes from the weapons. Looking at the Underwater Tactical Spear.

If you give a player the weapon that isn’t in the loot bag, or if you give a player a weapon from an NPC in Alien Archives that doesn’t have a loot bag, they will also get the bonus to attack rolls and the NPC’s damage bonus. You don’t want that. (Work in progress - more to come)