Finding blocks of text in an image using Python, OpenCV and numpy 中文 - wanghaisheng/awesome-ocr GitHub Wiki
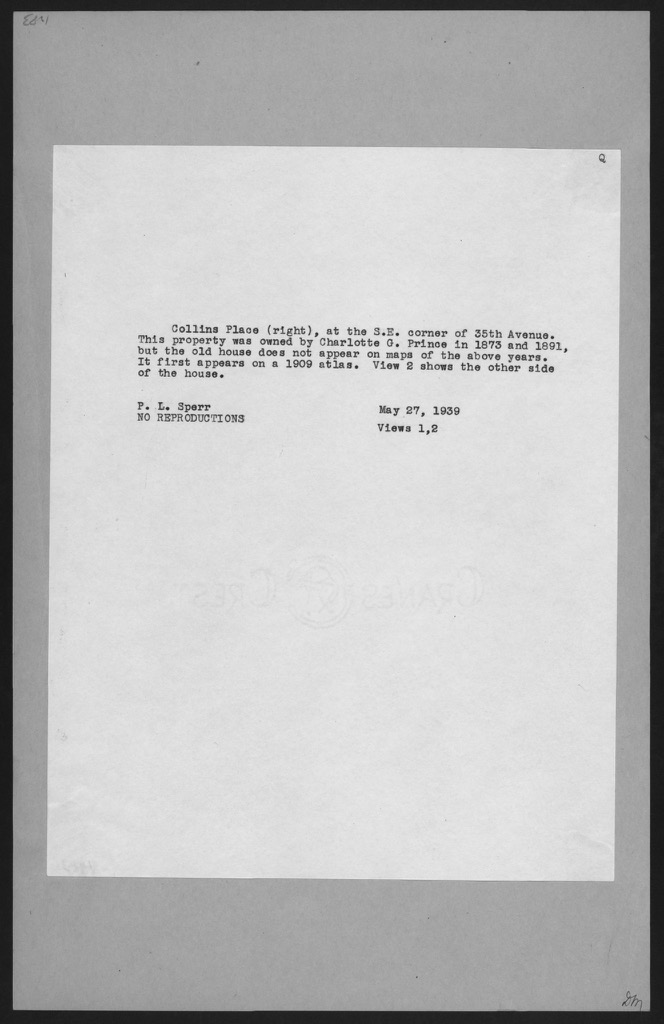
As part of an ongoing project with the New York Public Library, I've been attempting to OCR the text on the back of the Milstein Collection images. Here's what they look like:
A few things to note:
- There's a black border around the whole image, gray backing paper and then white paper with text on it.
- Only a small portion of the image contains text.
- The text is written with a tyepwriter, so it's monospace. But the typewriter font isn't always consistent across the collection. Sometimes a single image has two fonts!
- The image is slightly rotated from vertical.
- The images are ~4x the resolution shown here (2048px tall)
- There are ~34,000 images: too many to affordably turk.
OCR programs typically have to do some sort of page-layout analysis to find out where the text is and carve it up into individual lines and characters. When you hear "OCR", you might think about fancy Machine Learning techniques like Neural Nets. But it's a dirty secret of the trade that page layout analysis, a much less glamorous problem, is at least as important in getting good results.
The most famous OCR program is Tesseract, a remarkably long-lived open source project developed over the past 20+ years at HP and Google. I quickly noticed that it performed much better on the Milstein images when I manually cropped them down to just the text regions first:
So I set out to write an image cropper: a program that could automatically find the green rectangle in the image above. This turned out to be surprisingly hard!
Computer Vision problems like this one are difficult because they're so incredibly easy for humans. When you looked at the image above, you could immediately isolate the text region. This happened instantaneously, and you'll never be able to break down exactly how you did it.
The best we can do is come up with ways of breaking down the problem in terms of operations that are simple for computers. The rest of this post lays out a way I found to do this.
First off, I applied the canny edge detector to the image. This produces white pixels wherever there's an edge in the original image. It yields something like this:
This removes most of the background noise from the image and turns the text regions into bright clumps of edges. It turns the borders into long, crisp lines.
The sources of edges in the image are the borders and the text. To zero in on the text, it's going to be necessary to eliminate the borders.
One really effective way to do this is with a rank filter. This essentially replaces a pixel with something like the median of the pixels to its left and right. The text areas have lots of white pixels, but the borders consist of just a thin, 1 pixel line. The areas around the borders will be mostly black, so the rank filter will eliminate them. Here's what the image looks like after applying a vertical and horizontal rank filter:
The borders are gone but the text is still there! Success!
While this is effective, it still leaves bits of text outside the borders (look at the top left and bottom right). That may be fine for some applications, but I wanted to eliminate these because they're typically uninteresting and can confuse later operations. So instead of applying the rank filter, I found the contours in the edge image. These are sets of white pixels which are connected to one another. The border contours are easy to pick out: they're the ones whose bounding box covers a large fraction of the image:
With polygons for the borders, it's easy to black out everything outside them.
What we're left with is an image with the text and possibly some other bits due to smudges or marks on the original page.
At this point, we're looking for a crop (x1, y1, x2, y2) which:
- maximizes the number of white pixels inside it and
- is as small as possible.
These two goals are in opposition to one another. If we took the entire image, we'd cover all the white pixels. But we'd completely fail on goal #2: the crop would be unnecessarily large. This should sound familiar: it's a classic precision/recall tradeoff:
- The recall is the fraction of white pixels inside the cropping rectangle.
- The precision is the fraction of the image outside the cropping rectangle.
A fairly standard way to solve precision/recall problems is to optimize the F1 score, the harmonic mean of precision and recall. This is what we'll try to do.
The set of all possible crops is quite large: W2H2, where W and H are the width and height of the image. For a 1300x2000 image, that's about 7 trillion possibilities!
The saving grace is that most crops don't make much sense. We can simplify the problem by finding individual chunks of text. To do this, we apply binary dilation to the de-bordered edge image. This "bleeds" the white pixels into one another. We do this repeatedly until there are only a few connected components. Here's what it looks like:
As we hoped, the text areas have all bled into just a few components. There are five connected components in this image. The white blip in the top right corresponds to the "Q" in the original image.
By including some of these components and rejecting others, we can form good candidate crops. Now we've got a subset sum problem: which subset of components produces a crop which maximizes the F1 score?
There are 2N possible combinations of subsets to examine. In practice, though, I found that a greedy approach worked well: order the components by the number of white pixels they contain (in the original image). Keep adding components while it increases the F1 score. When nothing improves the score, you're done!
Here's what that procedure produces for this image:
The components are ordered as described above. Component #1 contains the most white pixels in the original image. The first four components are accepted and the fifth is rejected because it hurts the F1 score:
- Accept #1, F1 Score → 0.886
- Accept #2, F1 Score → 0.931
- Accept #3, F1 Score → 0.949
- Accept #4, F1 Score → 0.959
- Reject #5 (F1 Score → 0.888)
Applying this crop to the original image, you get this:
That's 875x233, whereas the original was 1328x2048. That's a 92.5% decrease in the number of pixels, with no loss of text! This will help any OCR tool focus on what's important, rather than the noise. It will also make OCR run faster, since it can work with smaller images.
This procedure worked well for my particular application. Depending on how you count, I'd estimate that it gets a perfect crop on about 98% of the images, and its errors are all relatively minor.
If you want to try using this procedure to crop your own images, you can find the source code here. You'll need to install OpenCV, numpy and PIL to make it work.
I tried several other approaches which didn't work as well. Here are some highlights:
-
I ran the image through Tesseract to find areas which contained letters. These should be the areas that we crop to! But this is a bit of a chicken and the egg problem. For some images, Tesseract misses the text completely. Cropping fixes the problem. But we were trying to find a crop in the first place!
-
I tried running the images through unpaper first, to remove noise and borders. But this only worked some of the time and I found unpaper's interface to be quite opaque and hard to tweak.
-
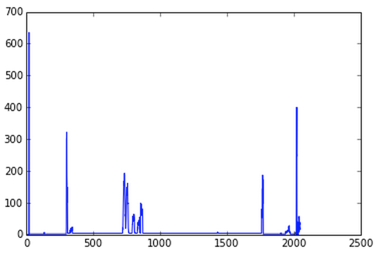
I ran canny, then calculated row and column sums to optimize the x- & y-coordinates of the crop independently. The text regions did show up clearly in charts of the row sums:
The four spikes are the tops and bottoms of the two borders. The broad elevated region in the middle is the text. Making this more precise turned out to be hard. You lose a lot of structure when you collapse a dimension—this problem turned out to be easier to solve as a single 2D problem than as two 1D problems.
In conclusion, I found this to be a surprisingly tricky problem, but I'm happy with the solution I worked out.
In the next post, I'll talk about my experience running OCR tools over these cropped images.
Please leave comments! It's what makes writing worthwhile.
作为纽约公共实验室的一个正在开展的项目的一部分,我试图使用ocr来处理Milstein Collection 图片,他们是下面这个样子
有以下一些特点
整个图片外面有一圈黑色的边框,灰色背景纸张,文本在白色纸上
图片只有一小部分包含文本
文本为印刷体,所以是等宽字体,但是印刷体不一定都与语料库相同,有时候单张图片包含两种字体
图片与水平线相比有轻微偏转
手动裁剪成以下形式
计算机如何做
1、canny edge detector canny edge detector 精确的边缘检测
在原始图片任何有边缘的地方产生白色像素
这样就去掉了大多数的背景噪音,将文本区域变成白色边块,将边框变成长的线,所以图片的边信息就包含边框和文本,如何去掉边框呢
rank filter.
它的本质是从左到右将一个素用用像素的 中位数表示,文本区域有很多白色像素,但边缘只有窄窄的一个像素线,边缘的区域大部分是黑色的,所以rank filter可以去掉边缘,在水平方向和垂直方向应用rank filter后
但是右上方和左下方还是有未清除干净的,而且会影响后续的操作,采用了另外的方法 contours in the edge image
里面白色像素的数量越大越好
外面的框越小越好
这两点有点像召回率和精度的关系,解决二者问题的就是F1 score
简化问题,直接找单独的文本块,对de-bordered 边框图像应用binary dilation This "bleeds" the white pixels into one another. We do this repeatedly until there are only a few connected components
根据白色像素的数量给各个部门排序
第一部份在原始图片中包含最多的白色像素,第四部门被接受,第五部门被拒绝,因为它将降低F 1 score
最后得到图片如上
source code here.
如果你需要运行这个程序,你需要安装OpenCV, numpy 和 PIL
作者尝试了其他很多方法效果都不尽人意
Tesseract   对于有些图片,完全遗失文本文件

unpaper   利用这个去噪音和边缘,但这个只在某些时候起作用,unpaper接口非常不透明,难以tweak

计算列和行的和,分别来优化crop的x和y坐标,下面是行和的结果
四个高峰值spikes分别代表两条边的上边缘和下边缘,中间部分就是文本,要更精确的话很困难,当你collapse a dimension你会丢失很多结构,但是作为单独的2维的问题比解决两个1维问题要简单


