Milestone #1 Hypervisor Setup - wAlber47/Tech-Journal GitHub Wiki
EXSI Install
On the cyber.local network, navigate to super-ipmi4.cyber.local and \\rackstation.cyber.local\isos\F21.
From there, log in to the IPMI with the credentials provided, and navigate to Virtual Media -> CD-ROM Image.
Enter the share host as rackstation, and then the path to the image relative to rackstation, then enter your cyber.local credentials. This can be seen here:

Restart the IPMI, and use Remote Control -> iKVM/HTML5 to remotely manage the server. Once the machine posts, click F11 and select ATEN Virtual CDROM YS0J as the boot device. ESXi should begin installing.
After the first phase of installation completes, follow the prompts and select the smaller disk. You should then enter the password for root, mine is paSS12345!.
Complete the remaining prompts and ESXi should finish installing. Once this process completes, you should remove the image and reboot.
EXSi Configuration
The system should come set with a DHCP address within the Foster network, this should be changed to our assigned static address.
Click F2 and enter root password to go to the Initial System Customization Menu.
Firstly, select Management Network should be configured, then set up IPv4 Configuration and DNS Configuration. The configuration should be set as follows:


Hit Escape, and select Yes to Restart Network Management.
After this, we should connect to https://super4.cyber.local and sign in using our created credentials.
Uploading Initial ISOs
Navigate to Storage, and Rename the Datastores as follows:

From there, navigate to datastore2's browser. There should be nothing in there. Create a directory named isos.
Using the Upload option, we should select vyos and xubuntu from Rackstation. Datastore2 should now look like this:

Creating Virtual Switch
This will hold the 480-WAN which will hold the firewall and the management virtual machine, as well as some other things.
To start, go to Networking -> Virtual Switches -> Add Standard Virtual Switch. It should be configured as follows:

Now that the virtual switch is created, a port group needs to be created. The configuration for that can be found here:

From here, we can create a firewall using VyOS.
Firewall Configuration
A virtual machine for VyOS needs to be created. For this, select Virtual Machines -> Create/Register VM in ESXi. The following screenshots display the configuration settings to be followed:


For Virtual Hardware:
| Device | Configuration |
|---|---|
| CPU | 1 |
| Memory | 1024 MB |
| Hard Disk #1 | 8 GB (Thin) |
| Network Adapter #1 | VM Network |
| Network Adapter #2 | 480-WAN |
| CD/DVD Drive #1 | VyOS ISO |
Once the VM has been created, we can Power On and Open a Console. Select Live Version and let the VM boot. Login to VyOS with vyos/vyos.
To install the VyOS image, type install image and confirm the default options. For the administrator password, use ENcERiciDEr.
Next, Power Off the system, poweroff. Back in ESXi, remove the CD drive, and deselect Power On. From there, take a snapshot on ESXi. Name this Base.
Back on VyOS, log back in. We are now going to configure the interfaces, the commands for this is:
set interfaces ethernet eth0 address 192.168.3.44/24set interfaces ethernet eth1 address 10.0.17.2/24set interfaces ethernet eth0 description FOSTER-CYBER.LOCALset interfaces ethernet eth1 description 480-WAN
Now, it should be able to ping the room gateway, (192.168.3.250).
After this, we need to set the default gateway for the interfaces. This can be done with:
set protocols static route 0.0.0.0/0 next-hop 192.168.3.250.
Next, set the name servers and DNS forwarding using:
set system name-server 192.168.4.4set system name-server 192.168.4.5.set service dns forwarding listen-address 10.0.17.2set service dns forwarding allow-from 10.0.17.0/24set service dns forwarding system.
Following this, we need to masquerade the IP addresses:
set nat source rule 10 source address 10.0.17.0/24set nat source rule 10 source outset nat source rule 10 outbound-interface eth0set nat source rule 10 translation address masquerade
Then, set the host name:
set system host-name 480-fw4
With all that done, we can commit and save, and double check the interfaces.
Ubuntu Configuration
We want to first create a new virtual machine within ESXi. This can be done from the Navigator menu by right click Virtual Machines -> Create/Register VM.
The following screenshots display how it should be configured:


For Virtual Hardware:
| Device | Configuration |
|---|---|
| CPU | 2 |
| Memory | 3 GB |
| Hard Disk #1 | 30 GB (Thin) |
| Hard Disk #2 | Default (Thin) |
| Network Adapter #1 | VM Network |
| CD/DVD Drive #1 | xubuntu |
From here, you can power on the Virtual Machine. You can follow the default option up until the Who are you? page. Those configurations should look like this, with the password set as password123:

You should then wait while the Virtual Machine installs.
Once the installation finishes, you should remove the ISO file from the CD Drive. Once that is complete you can sign in.
After that, install git with sudo apt install git and download the 480 Share with git clone https://github.com/gmcyber/480share. Double check that the repository installed correctly. It should include the ubuntu-sealer.sh. This will do a lot of things to help up prepare to clone the Virtual Machine. After this script runs, shutdown the Virtual Machine with sudo shutdown -h now.
Back in ESXi, take a snapshot named "Base".
Now that it's been completely configured, we can change the Network Adapter to 480-WAN. Power on the VM.
Next, create a new user named william, with the password paSS12345. Make this user an administrator. After this, remove champuser.
To fix the connection, we go to Network Settings -> Edit Wired Connections -> IPv4, change the method to manual and add in this configuration:
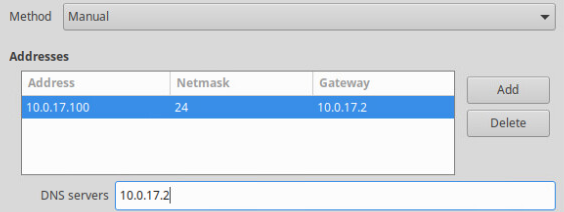
This should hopefully connect the Ubuntu virtual machine to the network. Once it connects to the network the steps for this lab are complete.