getReal3D overview for CAVE2 - uic-evl/omicron-unity GitHub Wiki
Last revision: 12 September 2016 (WIP)
Latest Supported Unity Version: 5.3.6
getReal3D Version: 3.3
Synchronization is done using getReal3D developed by Mechdyne. getReal3D consists of the following components:
- getReal3D for Unity Plugin - Imported into your Unity project. This will be the focus of this guide.
- getReal3D for Unity Launcher - Configures Unity to run and display across the CAVE2 computing cluster.
- getReal3D for Unity Daemon - Service controlling getReal3D for Unity applications
- getReal3D for Unity Configuration Editor - User interface for editing configuration files
getReal3D for Unity for use on CAVE2 requires the following:
- Microsoft Windows XP or Windows 7 (preferred)
- DirectX 9.0c or above
- Unity 4.6 (Pro) or Unity 5.x (Personal/pro) - getReal3D is a native code plugin requiring a Unity 4.x Pro license. The Free/Personal version of Unity 5.x includes native code plugin support.
For development on a personal machine:
-
In general you can develop your Unity application without having to add the getReal3D plugin until you are ready to build to CAVE2. There are two options for offline development:
-
Acquire a getReal3D developer license from Mechdyne to directly test getReal3D on your own machine (Windows only)
-
Use the Omicron-Unity package to simulate the CAVE2 environment (multi-platform, no 4.x pro required)
-
When preparing an application for deployment on CAVE2 (or using the getReal3D plugin in general), there are a few considerations to keep in mind (these will be explained in detail below):
- The getReal3D CameraUpdater script will duplicate the Main Camera so custom camera setup is required.
- Any Inputs will need to be remapped for use in CAVE2.
- CAVE2 will be running 19 instances of Unity and will be synchronized using the getReal3D plugin. However in certain cases inputs other than the wand (keyboard, mobile, etc.) can cause different behaviors across the cluster. RPC calls will be needed to generate the number on the master node and send the result to the other 18 instances.
-
A getReal3D developer license is required it you want to use the getReal3D launcher to test cluster synchronization.
-
You can still develop a CAVE2 application without a Unity Pro license or Windows operating system (you will still need a copy of the getReal3D plugin).
-
Most getReal3D functions will work fine without a valid getReal3D environment (i.e. Windows with Unity Pro) such as getReal3D.Cluster.isMaster.
To setup a Unity application to display correctly in CAVE2, you will need to import a getReal3D plugin.
- Open your Unity project and go to Assets/Import Package/Custom Packages and select the getReal3D .unitypackage and import.
- You should now have a getReal3D folder in your assets
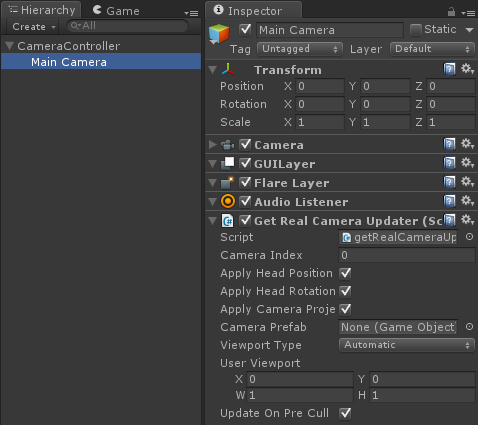
- Add the getRealCameraUpdater.cs script to your main camera
- You should not attached anything or directly move the Main Camera GameObject or create any child objects.
- If you need to have something attached to the camera, create a new GameObject and make the Main Camera GameObject a child of that one. You can safely add scripts or move the parent GameObject of the Main Camera.
- Also you should not use 'Camera.main' in your scripts. I suggest you tag your parent 'CameraController' object as MainCamera and use GameObject.FindGameObjectWithTag("MainCamera") instead.
At this point you should have a viewable application in CAVE2. You won't be able to interact or move in the environment, but you should be able to view your scene across all 72 displays.
The following button mappings can be customized based on how the respective systems are configured, but these are the defaults for getReal3D and CAVE2 in general. Xbox mappings are based on default Windows XInput configurations. PS3 is based on XInput 360 mapping via BetterDS3.
| PS3 | Xbox | TrackD | getReal3D | Omicron |
|---|---|---|---|---|
| Left Analog -L +R | Same as PS3 | 1 | Yaw | Analog 2 |
| Left Analog -U +D | Same as PS3 | 2 | Forward | Analog 1 |
| Right Analog -L +R | Same as PS3 | 3 | Strafe | Analog 0 |
| Right Analog -U +D | Same as PS3 | 4 | Pitch | Analog 3 |
| Square | X | 1 | NavSpeed** | Button4 |
| Cross | A | 2 | WandButton** | Button3 |
| Circle | B | 3 | ChangeWand** | Button2 |
| Triangle | Y | 4 | Jump** | Button1 |
| L1 | LB | 5 | WandLook** | Button5 |
| R1 | RB | 6 | Reset** | Button8 |
| L2 | LT | 7 | WandDrive** | Button7 |
| R2 | RT | 8* | - | - |
| L3 | L3 | 9* | - | Button6 |
| R3 | R3 | 10* | - | Button9 |
| Select | Back | 11* | - | SpecialButton1 |
| Start | Start | 12* | - | SpecialButton2 |
| DPad Up | DPad Up | Analog 6* | - | ButtonUp |
| DPad Down | DPad Down | Analog 6* | - | ButtonDown |
| DPad Left | DPad Left | Analog 5* | - | ButtonLeft |
| DPad Right | DPad Right | Analog 5* | - | ButtonRight |
-
- Additional inputs added to the CAVE2 config that are not part of the default getReal3D configuration.
- ** Changed from the default getReal3D config to better match CAVE2's PS3 Navigation controller vs a full gamepad
These can be added using the Input Editor under the getReal3D toolbar. CAVE2 uses the following mappings:
Buttons
- Name: RT - trackd Button: 8
- Name: L3 - trackd Button: 9
- Name: R3 - trackd Button: 10
- Name: Back - trackd Button: 11
- Name: Start - trackd Button: 11
Axis
- Name: DPadLR - trackd Valuator: 5 - Deadzone: 0.1
- Name: DPadUD - trackd Valuator: 6 - Deadzone: 0.1
To quickly fly around your scene in CAVE2, you can use getReal3D's provided character controller prefab (Assets/getReal3D/Prefabs/getRealPlayerController.prefab).
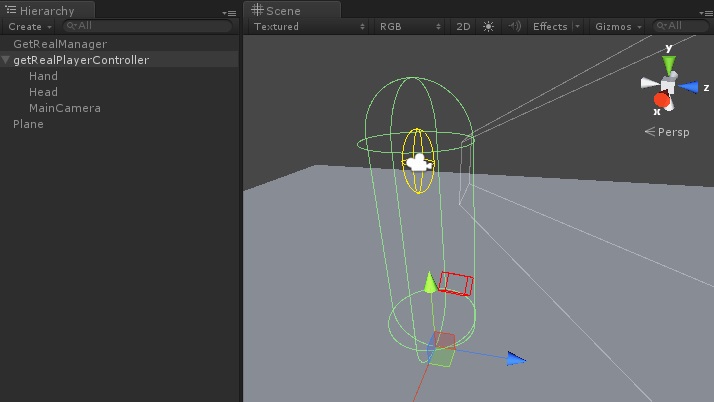
getRealPlayerController in the Unity editor showing the head (yellow) and wand (red)
There are a number of scripts to handle getReal3D's standard navigation:
- getRealWalkthruController - Joystick FPS style navigation with collision detection and gravity
- getRealAimAndGoController - Free fly version of the getRealWalkthruController
- getRealWandDriveController - Uses the controller mocap to drive (Standard CAVE2 Wand navigation)
- getRealWandLook
- getRealJoyLook
More details on these can be found in Mechdyne's getReal3D Developer Guide
If you already have an existing player controller you want to convert for use in getReal3D, there are two basic steps - mapping the controls and managing the camera look.
For this example, we're going to look at the Unity Character Controller Standard Asset.
getReal3D has its own copy of CharacterMotor.js, so if you made modifications to that file create a backup
In order to use the controller in getReal3D/CAVE2 you'll need to replace Unity's Input functions with getReal3D versions. The functions are the same so you just need to replace Input with getReal3D.Input. Here are some suggestions - see the getReal configuration or the above table to make adjustments depending on what interaction you're looking for.
In FPSInputController.js:
- Change Input.GetAxis(“Horizontal”) to getReal3D.Input.GetAxis(“Strafe”)
- Change Input.GetAxis(“Vertical”) to getReal3D.Input.GetAxis(“Forward”)
- Change Input.GetButton(“Jump”) to getReal3D.Input.GetButton(“Jump”)
In MouseLook.js (Assets/Standard Assets/Character Controllers/Sources/Scripts)
- Change Input.GetAxis(“Mouse X”) to getReal3D.Input.GetAxis(“Yaw”)
- Change Input.GetAxis(“Mouse Y”) to getReal3D.Input.GetAxis(“Pitch”)
Button Mappings:
- Change Input.GetKeyDown(“q”) to getReal3D.Input.GetButtonDown(“ChangeWand”)
- Change Input.GetKeyDown(“e”) to getReal3D.Input.GetButtonDown(“Reset”)
- Input.GetMouseButtonDown(0) to getReal3D.Input.GetButtonDown(“WandButton”)
Like Unity's Input API, there are also corresponding GetButton for hold and GetButtonUp for release events.
[getReal3D launcher image + config description]
CAVE2 is essentially running 19 different instances of Unity. A major function of getReal3D is synchronizing anything in the game that could potentially behave differently between machines. This includes user inputs, objects that move, anything that uses a random function, physics collision detection, and particle systems.
getReal3D prior to v3.0 provided synchronization through two methods using the ClusterView script: Serialization and Remote Procedure Calls (RPC). Details on this has been left as Appendix B later in this document.
Version 3.x handles most synchronizations automatically. A few exceptions are 2D GUI windows and keyboard/mouse inputs from the master node game window. Specific synchronization issues like this can be handed using RPC calls.
- *Note as of version 3.2, this is handled automatically by getReal3D and is not necessary to use.
As system clocks can differ across cluster nodes, Unity's Random function can have different results per machine causing synchronization issues such as objects appear/disappearing between display nodes. One solution to this is to specify the random seed in Unity.
void Start()
{
   Random.seed = 13;
}
It may also be useful to make sure the script which sets the Random seed is called before a script that uses it. This can be done using the Script Execution Order Settings under Edit > Project Settings > Script Execution Order.
Classes using RPC calls must inherit the getReal3D.MonoBehaviourWithRpc class. Unlike v2.0, RPC function names must be unique across your entire application.
public class ToggleUsingKeyboard : getReal3D.MonoBehaviourWithRpc
{
  public GameObject target;
  public KeyCode keyCode;
  void Update()
  {
    if(target != null && getReal3D.Cluster.isMaster &&
       UnityEngine.Input.GetKeyDown(keyCode)) {
      getReal3D.RpcManager.call("toggleActive"); // RPC call with no parameters

      getReal3D.RpcManager.call("setParam", true, Vector3.up); // RPC call with two parameters
    }
  }
  [getReal3D.RPC]
  void toggleActive()
  {
    target.SetActive(!target.activeSelf);
  }

  [getReal3D.RPC]
  void setParam(bool b, Vector3 v)
  {
    ....
  }
}
RPC allow the following types to be passed as parameters:
- Primitive types: enum, bool, byte, char, short, int, uint, float, string
- Unity types: Vector2, Vector3, Quaternion, Color, Color32
- Enum is a new type supported in v3.0
This section has a few useful tips for testing either on development system, or just testing the application on the CAVE2 head node.
The editor_config.xml (Assets/getReal3D/Resources) contains the getReal configuration used when running you Unity application from the editor. At least while testing on just the head node using the tracking system (with the head tracker typically on a tripod in CAVE2), the default editor config has a number of offsets that moves the camera perspective away from the head position.
This can be found on ~line 28 under Devices:
<devices>
    <tracker key="4126">
      <head index="0" y="5.5"/>
      <left_eye  x="-1.375"/>
      <right_eye x=" 1.375"/>
      <wand index="1" y="3.5" z="1"/>
    </tracker>
    <controller key="4127"/>
</devices>
At least for CAVE2 testing, it may be useful to set the head y ="0" as well as the wand y and z. Also that for CAVE2 the current tracking objects are as follows:
- Head_Tracker (Head 0)
- Xbox360 (Wand 1)
- Wand_Batman (Wand 2 - Default PS3 Navigation controller for CAVE2)