Guide for running Unity in CAVE2 - uic-evl/omicron-unity GitHub Wiki
Last revision: 30 August 2022
getReal3D Version: 4.0.5
Currently Supported Unity Versions:
- 2019.2.11 (Recommended)
- 2017.4.10
Contents
- Overview of CAVE2
- Tracking System and Input
- CAVE2 Unity Quick Start Guide
- Appendix A: Creating a CAVE2 Player Controller
Introduction
The purpose of this guide is to provide an overview of using the Unity3D game engine on the CAVE2(TM) Hybrid-Reality Environment. This guide will provide step-by-step instructions for building a simple Unity3D environment on a desktop/laptop development machine for deployment on a CAVE2(TM) system using the Omicron-Unity package.
In general, you do not need Omicron-Unity to deploy to CAVE2. The core of this uses the getReal3D plugin by Mechdyne described in the getReal3D Overview for CAVE2. The Omicron-Unity is designed to streamline development workflow by proving a series of tools to simulate the CAVE2 environment using stock Unity3D (no pro license or platform dependences)
Using either the getReal3D plugin directly or Omicron-Unity, the main things to consider when porting an existing Unity application to CAVE2 are:
- Modifications to the Main Camera setup needed to create the stereoscopic 3D, 320-degree view for CAVE2.
- Replacing Unity Inputs commands with the CAVE2 version. For example:
A simple Unity movement code snippet:
void Update() {
  float forward = Input.GetAxis("Vertical") * 5;
  float strafe = Input.GetAxis("Horizontal") * 5;

  transform.Translate( forward * Vector3.forward * Time.deltaTime );
  transform.Translate( strafe * Vector3.right * Time.deltaTime );

  if( Input.GetButtonDown("Fire1") )
  {
    // Fire
  }
}
The CAVE2-Omicron Equivalent:
void Update() {
  float forward = CAVE2.GetAxis(CAVE2.Axis.LeftAnalogStickUD) * 5;
  float strafe = CAVE2.GetAxis(CAVE2.Axis.LeftAnalogStickLR) * 5;

  transform.Translate( forward * Vector3.forward * Time.deltaTime );
  transform.Translate( strafe * Vector3.right * Time.deltaTime );

  if( CAVE2.GetButtonDown(CAVE2.Button.Button3) )
  {
    // Fire
  }
}
Overview of CAVE2
The CAVE2 Hybrid-Reality Environment consists of 6 display nodes, one master node, and a tracking computer. Each display node is connected to twelve screens. Each display node runs a separate instance of Unity which is controlled and synchronized by the Unity instance running on the master node. CAVE2 also uses a 18 camera infrared tracking system and supports 7.1 channel audio output from Unity.
Tracking System and Input Devices
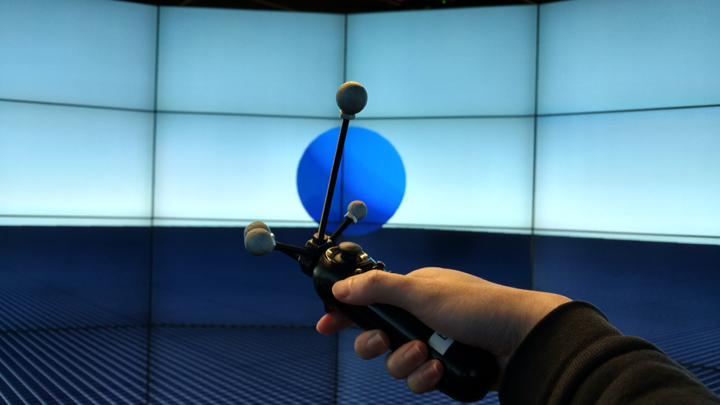
CAVE2 using a Vicon infrared optical tracking system to track one or more tracked objects. Each object consists of a unique arrangement of retro-reflective markers. These markers allow the tracking system to determine the position and orientation of the object within CAVE2.
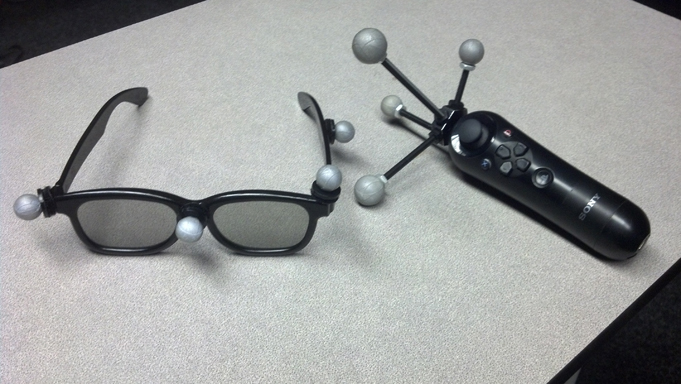
Typically there are at least two objects that are tracked in CAVE2: The head and a wand controller. The head tracker is used to calculate the viewing perspective in CAVE2 allowing for an immersive virtual reality experience. Objects within the virtual space will be drawn at 1:1 scale (1 unit in Unity = 1 meter) and displayed based on the position of the tracked user.
The wand consists of a similar tracked pattern to allow the game to know the position and orientation of the user's hand. The wand can also has a series of buttons and analog controls for user input. Currently CAVE2 uses Xbox 360, PS3 Six-axis, or the PS3 Navigation controllers. CAVE2 uses the Omicron Input Abstraction Library to combine mocap and controller data into a single 'wand' event. Additional details on Omicron's XInputService which manages the button mappings.
A full list of input mappings is available under Basic Interaction in the getReal3D overview for CAVE2.
- In more complex situations, you may need to use RPC calls to calculate a result on the master node and send that result to the display nodes instead of the display nodes calculating their own result and potentially behaving differently across displays.
- These will be described in detail later.
CAVE2 Quick Start Guide
Getting your application to display in CAVE2 is relatively easy. Adding basic navigation controls require some code modifications or use of the provided prefabs. The more complex interactions in your project, the more potential synchronization issues that may occur.
The general steps of this guide:
- Configure a Unity project for use with the CAVE2 Simulator
- Add the CAVE2Manager prefab
- Add the CAVE2PlayerController prefab
- Note this replaces any existing Player Controllers your scene might be using
- Prepare your project to build
- Enabling Spatialized Audio to use CAVE2's 7.1 surround sound output from Unity
- Adding the getReal3D Plugin and configuring to build to CAVE2
- Building an executable, adding to the getReal3D Launcher, and starting your project in CAVE2!
As of January 21, 2020, Unity 2017.4.10f1 and 2019.2.11f1 are supported by getReal3D (v4.0.5) and tested for use in CAVE2. Older versions of Unity are available at https://unity3d.com/get-unity/download/archive.
It is strongly recommended that you start developing on a supported version of Unity rather than downgrading to 2019.2.11. While in most cases you may only need to replace scripting function changes, a newer .scene file may not properly convert to an older version of Unity. For example scenes and prefabs in Unity 5.5 will not open at all in Unity 5.4.
The following tutorial can be downloaded from Omicron-Unity GitHub repository which contains a complete Unity project and all the steps as separate scenes in the Tutorial folder.
Configure a Unity project for use with the CAVE2 Simulator
-
Create new project or open existing one. If you downloaded the full omicron-unity example project, skip to step 3
- Project Template Error: See Appendix E: Unity Hub 3.0.0 and Unity 2019.2.11
- UPDATE August 2022: Alternate workaround - After getting the 'Failed to resolve project template' error:
- Click Quit, go to the project folder
- Create a new folder 'Assets'
- Go back to Unity Hub and open that project
- Click 'Continue' on the 'Opening Project in Non-Matching Editor Installation' window that opened.
-
Download a release binary or git clone of module-omicron from https://github.com/arthurnishimoto/module-omicron
- Place the module-omicron folder into Assets
-
Install the Unity Multiplayer HLAPI from the Package Manager if necessary
- If you see the following error messages after importing module-omicron:
- error CS0246: The type or namespace name 'MessageBase' could not be found
- error CS0246: The type or namespace name 'NetworkLobbyPlayer' could not be found
- error CS0246: The type or namespace name 'NetworkMessageDelegate' could not be found
- error CS0103: The name 'Channels' does not exist in the current context

- From the Unity Editor, go to Window/Package Manager
- Change the view from packages 'In Project' to 'All Packages' (may take a few seconds to load package list)
- Scroll down and select Multiplayer HLAPI
- Click Install
- If you see the following error messages after importing module-omicron:
-
Remove some of the default Unity input key bindings (Edit/Project Settings/Input)
- If using Unity 2018+, an Input Preset has been provided in module-omicron releases v3.7+.

- Manual configuration
- Under Axes/Horizontal and Axis/Vertical:
- Set the Negative and Positive Buttons to blank as the CAVE2 simulator uses the arrow keys for the DPad
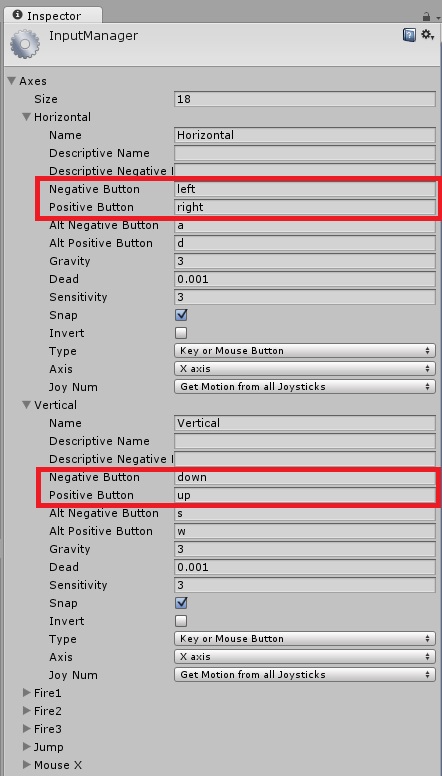
- If using Unity 2018+, an Input Preset has been provided in module-omicron releases v3.7+.
-
Delete the main camera from the scene
-
Add the CAVE2-Manager prefab (module-omicron/CAVE2/Prefabs/CAVE2-Manager.prefab) to the scene
-
Add the provided CAVE2 Player controller prefab (module-omicron/CAVE2/Prefabs/CAVE2-PlayerController.prefab)
- If you would like an in-depth tutorial to understand how the CAVE2 Player Controller is designed and operates see Appendix A: Create a CAVE2 Player Controller
CAVE2 Player Controller
We've developed our own player controller with similar functionality to the getRealPlayerController. This was done so we could more easily integrate custom interactions with our player controller as well as provide some useful tools for CAVE2 development that does not require Unity Pro or platform dependent functions until building on CAVE2.
The CAVE2 Player Controller also includes the CAVE2 screen geometry, allowing users to preview what parts of the scene will be viewable on the CAVE2 system.
One of the child objects of the CAVE2 Player Controller is the CAVE2ScreenMask. Clicking on this in the Hierarchy and looking at the inspector will show the CAVE2 Screen Mask Renderer script. This controls how the screen mask, representing the area of the scene not visible on the CAVE2 displays. There are 3 options for rendering in the editor:
- None - completely hides the overlay
- Background - shows the screen frame, but objects inside the CAVE2 space are still visible (default)
- Overlay - hides any objects not visible in CAVE2.
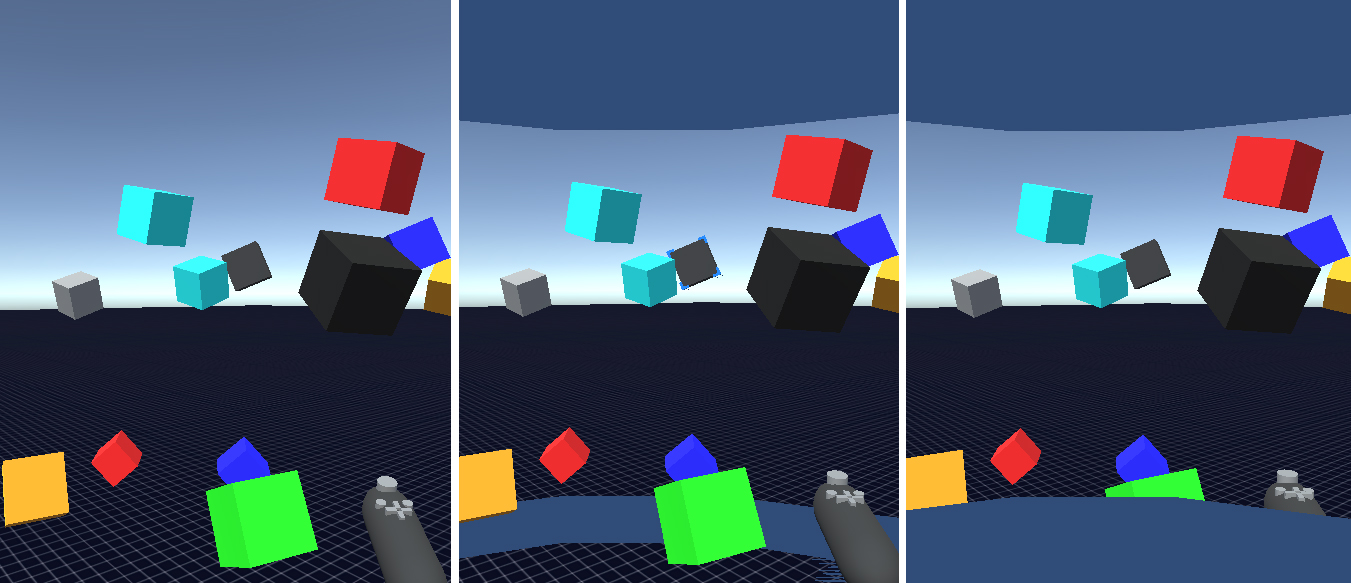 CAVE2 Screen Mask (Left to Right): None, Background, Overlay
Building on CAVE2
Once you're ready to build your project on CAVE2 you have to copy your project to the CAVE2 master node.
All project files should be placed in the following location in the DATA drive (D:):
D:/[Your name or Course/Team Number]/
You should add your project into a subfolder of that directory with your name. Students in a class using CAVE2 should add their projects into the directory with their course number and team/group number (i.e. 'CS 426 Spring 2019/Team1')
Spatialized Audio
By default, Unity projects output Stereo (2-channel) audio. CAVE2 is capable of spatialized audio using Unity's 7.1 surround output. To enable this in your project:
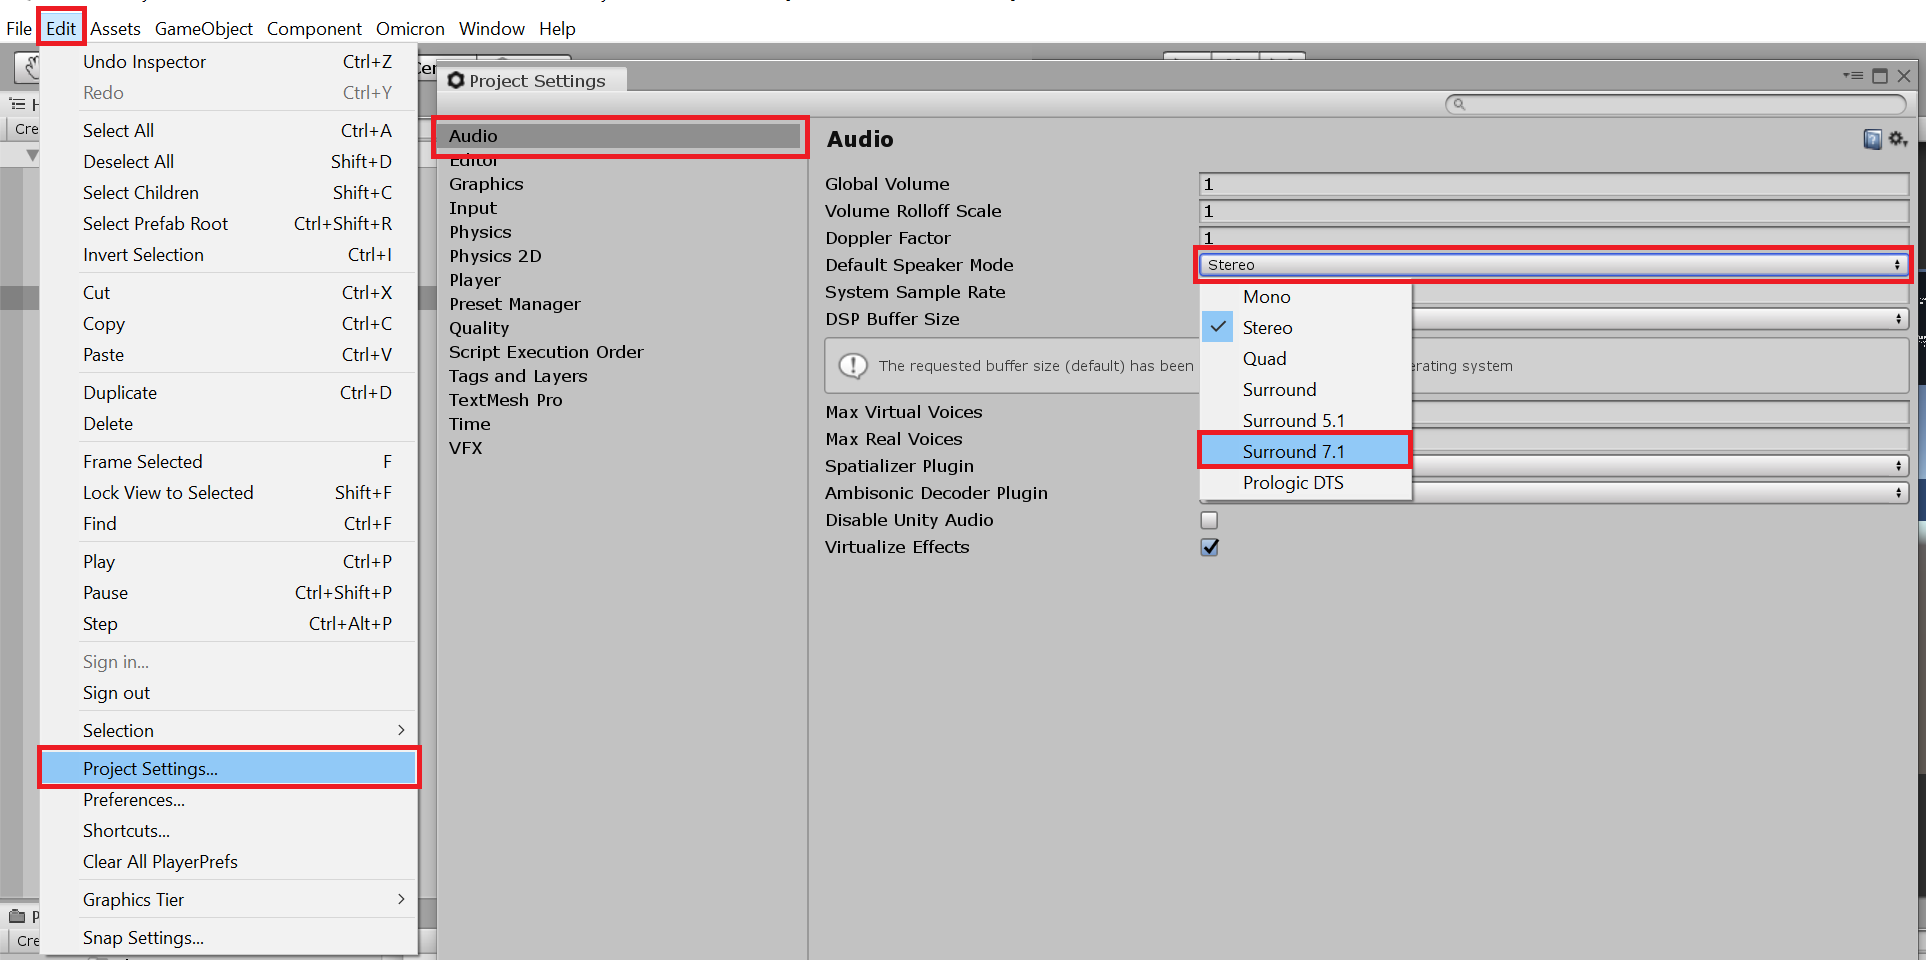
- From the Unity editor's main menu, select Edit/Project Settings
- Select Audio
- Click on 'Default Speaker Mode' and select '7.1 Surround'
Additional details and troubleshooting are described in CAVE2 Unity Tips and Examples.
Adding the getReal3D Plugin
The getReal3D plugin has to be installed before creating a build for CAVE2. In preparing for this you must enable the USING_GETREAL3D define flags present in the omicron-unity code. This is accomplished through the following steps:
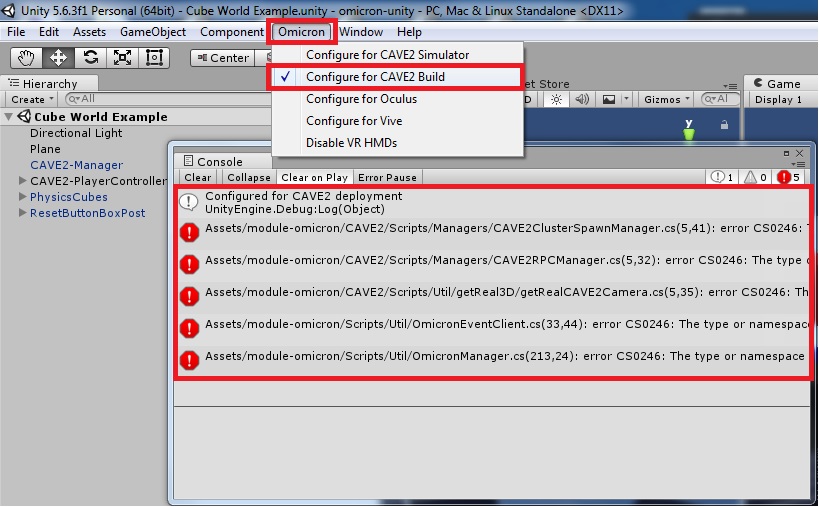
- From the Unity editor, go to Omicron/Configure for CAVE2 Build
- Technical note: This essentially sets 'USING_GETREAL3D as a Scripting Define Symbol under File/Build Settings/Player Settings/PC, Mac & Linux Standalone/Other Settings
- You should now see some Errors related to 'getReal3D' not being found.

- From the Unity editor, go to Assets/Import Package/Custom Package
- Navigate to
D:/Unity Packages - Select the latest getReal3D plugin. As of Feb. 2020: 'getReal3D_Plugin_4.0.5.1382.unitypackage'
Warning: If you already have a Standard Assets folder with Character Controllers, getReal3D contains its own CharacterMotor.js (under Standard Assets/Character Controllers/Sources/Scripts) so if you made modifications to that script, be sure you have a backup and uncheck that file from the import.
At this point those 'getReal3D not found' errors should be gone. You may have some warnings, but that is normal.
You are now ready to build!
Building
Building the executable for CAVE2 is no different than any other Desktop build.
Unity 2018 and later
Versions of Unity after 2017 changed the way Unity builds binaries, instead of specifying the application/exe name on build, the user is now prompted for a destination folder and the exe name is determined by the 'Product Name' found in Build Settings/Player Settings. This is the name that will appear in the getReal3D launcher game list so be sure to make this a unique name.
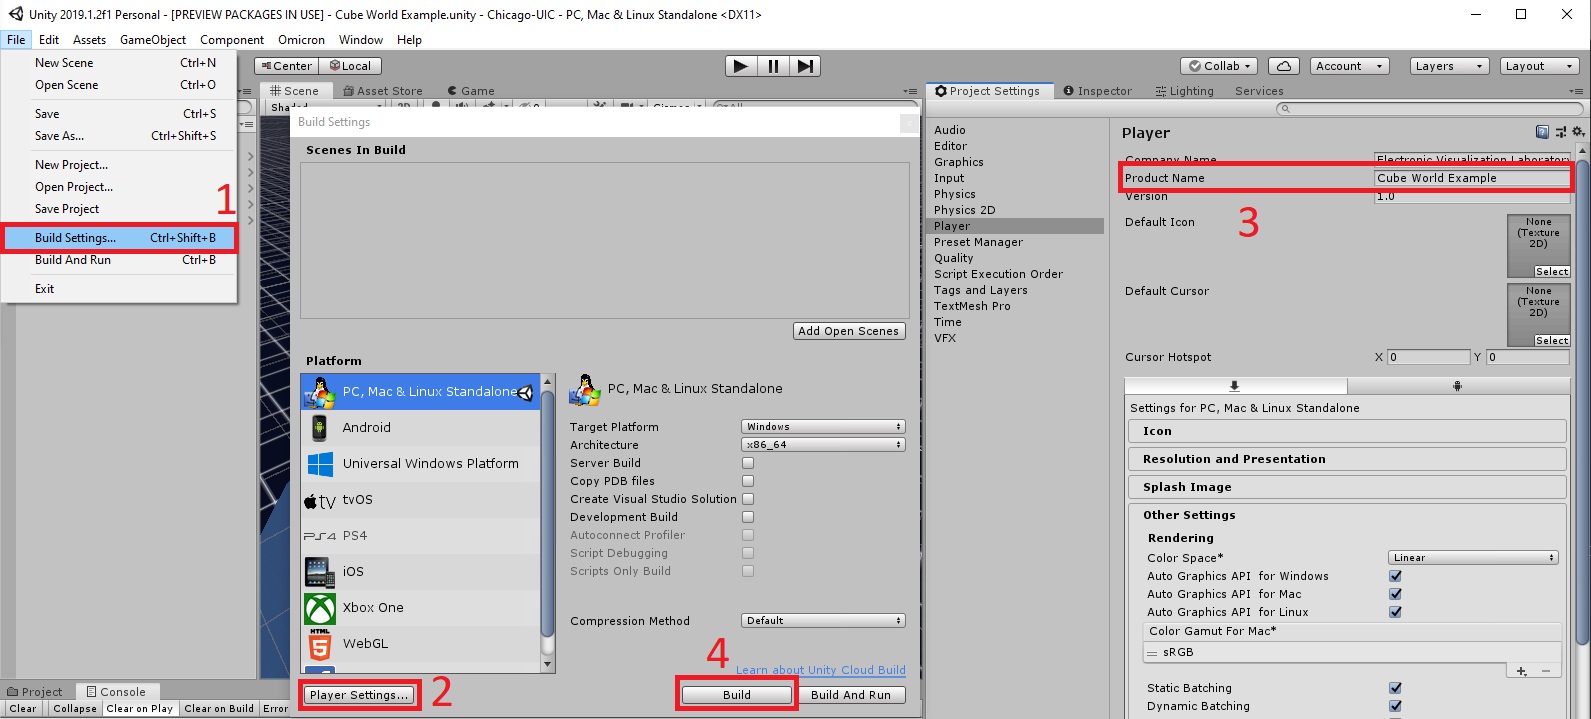
- From the Unity editor, go to File/Build Settings
- Select Player Settings
- Set the name of your exe/project in 'Product Name'
- Select Build
- Save your build in the following location
D:/Unity Binaries/[Name/CourseNumber]
- This is also linked to Favorites on the left toolbar of the Windows Explorer window
- As before, create a directory with your name or if part of a class [class number]/[Team name]
Running on CAVE2
After your executable is built, open up the getReal3D 4.x Launcher (1). This is usually always open on the desktop, but if not check the task bar of the getReal3D icon (2) or open the shortcut on the desktop or in Start by pressing the Windows key (3).
Also make sure trackD is running (4). If you find head tracking isn't working, it may not be running. In this case open the Start shortcut for trackD (5).
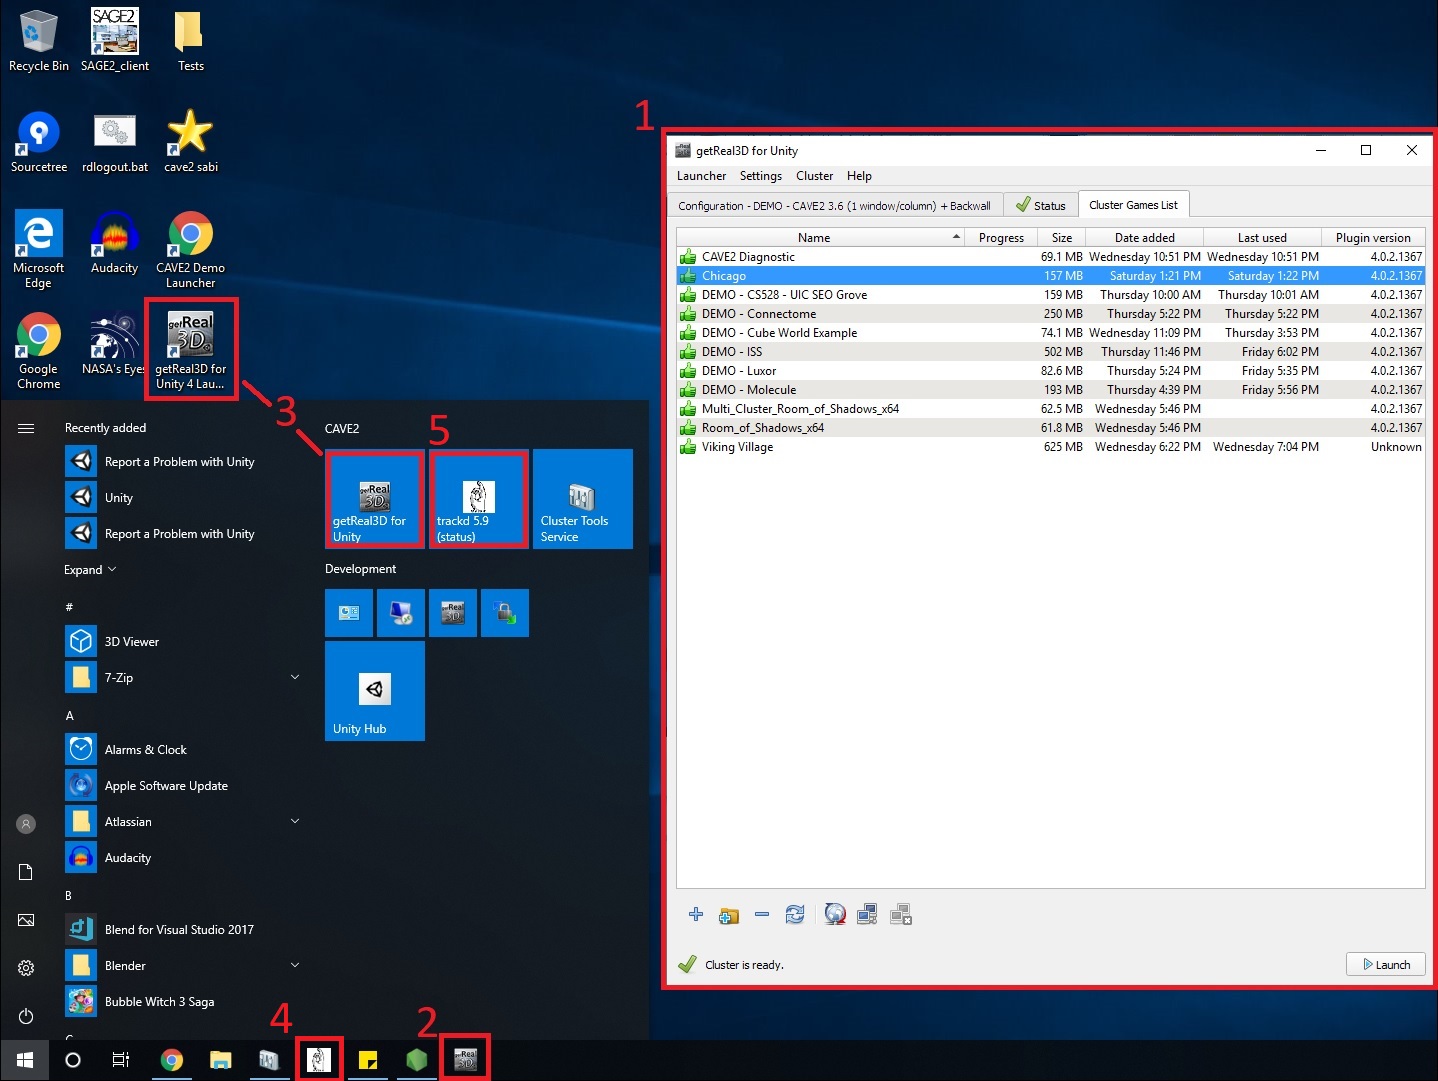
There are three tabs in the getReal3D launcher: Configuration, Status, and Cluster Games List.
Status
The status window should show green checkboxes for all 6 nodes. If all of the screens are showing the Windows desktop in the CAVE and some checkboxes are red, wait a minute for the network to reinitialize. Closing and restarting the Launcher may help the status window refresh.
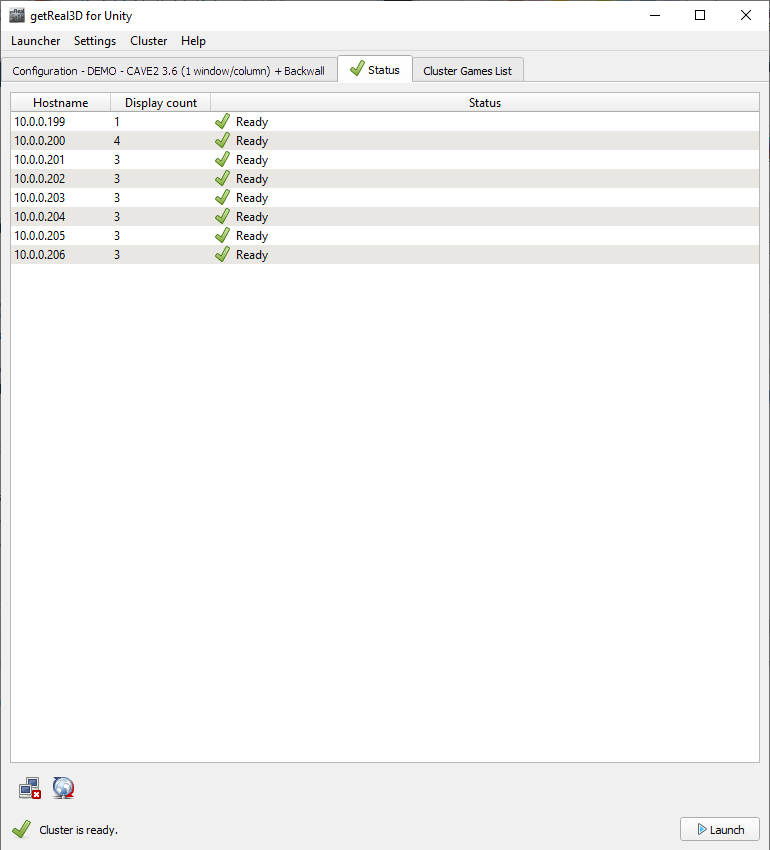
After all nodes are green you will be able to modify the Cluster Games List.
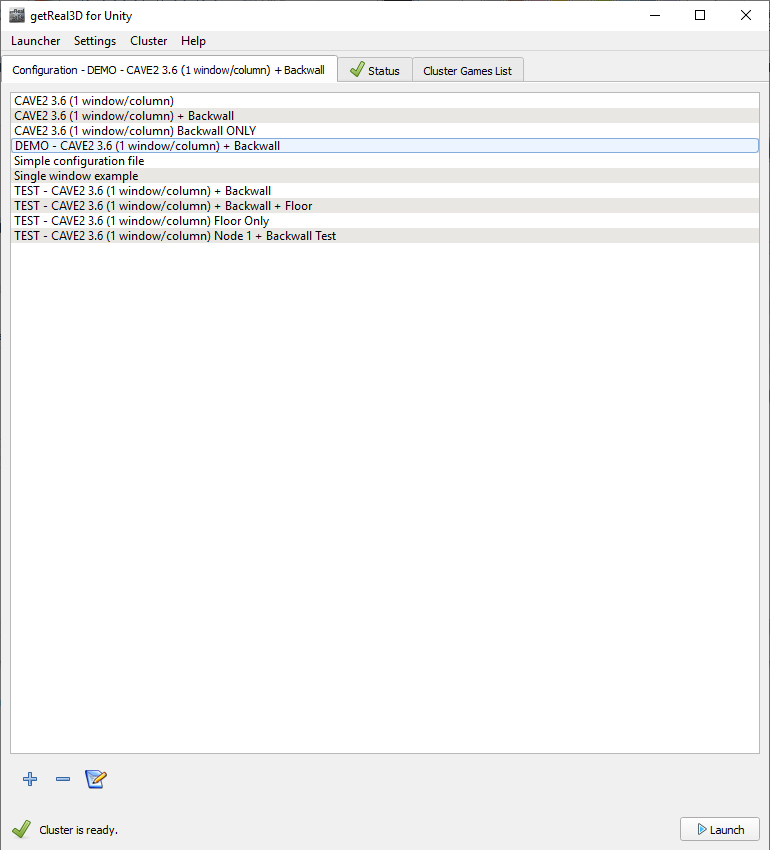
Configuration
Before running your application, make sure the correct configuration file is loaded. In general there are three different config files that could be used - all dealing with which mocap marker is used as the primary controller.
- By default the PS3 Navigation Wand is used in CAVE2, but the tracked Xbox360 or PS3 SixAxis controller are also options.
- The typically used configs will be listed at the top as 'DEMO - ....'
- As of Jan. 2020 the recommended configuration is 'DEMO - CAVE2 3.6 (1 window/column) + Backwall'
Make sure the controller you want is selected before moving on to the Cluster Games List.
Cluster Games List
This windows lists all the currently loaded games on the CAVE2 cluster. A green thumbs up denotes that the game is up to date and synchronized on the cluster. Red thumbs down shows that the version of the plugin on that game is either out of date or not current across the cluster.
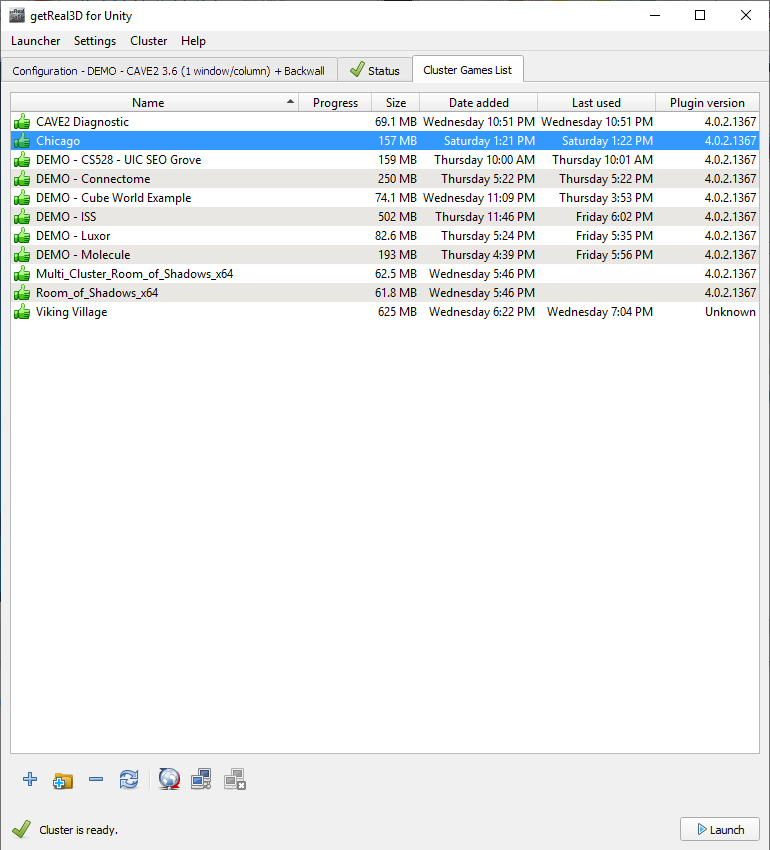
To add you game to the list:
- Click on the blue plus at the bottom of the launcher and select your game in the explorer window.
- Depending on the size of your application this will take a several seconds to a few minutes to load and copy the game across the cluster.
- Once the game is loaded, you game should be listed with a green thumbs up and the Launch button in the lower left should be active
- Click launch to start your game in CAVE2!
Specific Examples
See CAVE2 Unity Tips and Examples for useful tips for working with getReal3D / Unity on the CAVE2 cluster. Covers topics like correcting particle rendering, custom menus, loading different scenes, and other special cases that have come up over the years.
Appendix A: Create a CAVE2 Camera Controller
The purpose of this exercise is to get you familiar with the various components of the CAVE2-Unity interface: How the camera works, how to map CAVE2 input controls, and how to map tracked objects to virtual objects.
To setup a Unity application to display correctly in CAVE2, you will need to configure your camera setup:
- Create a new scene
- Add the CAVE2-Manager prefab to the scene by dragging and dropping the prefab into the Hierarchy (module-omicron/CAVE2/Prefabs)
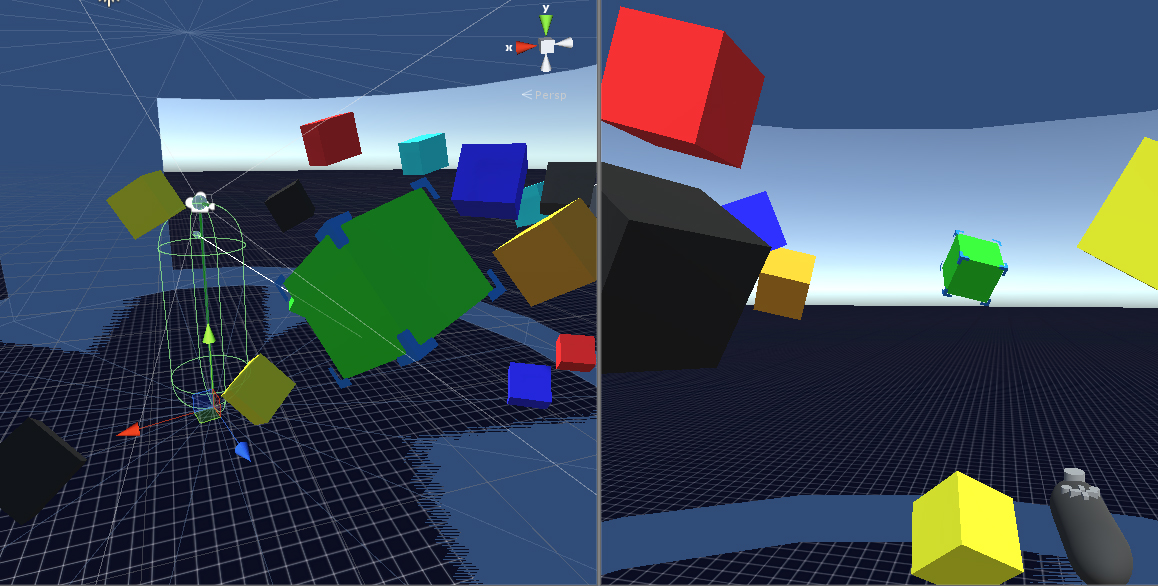
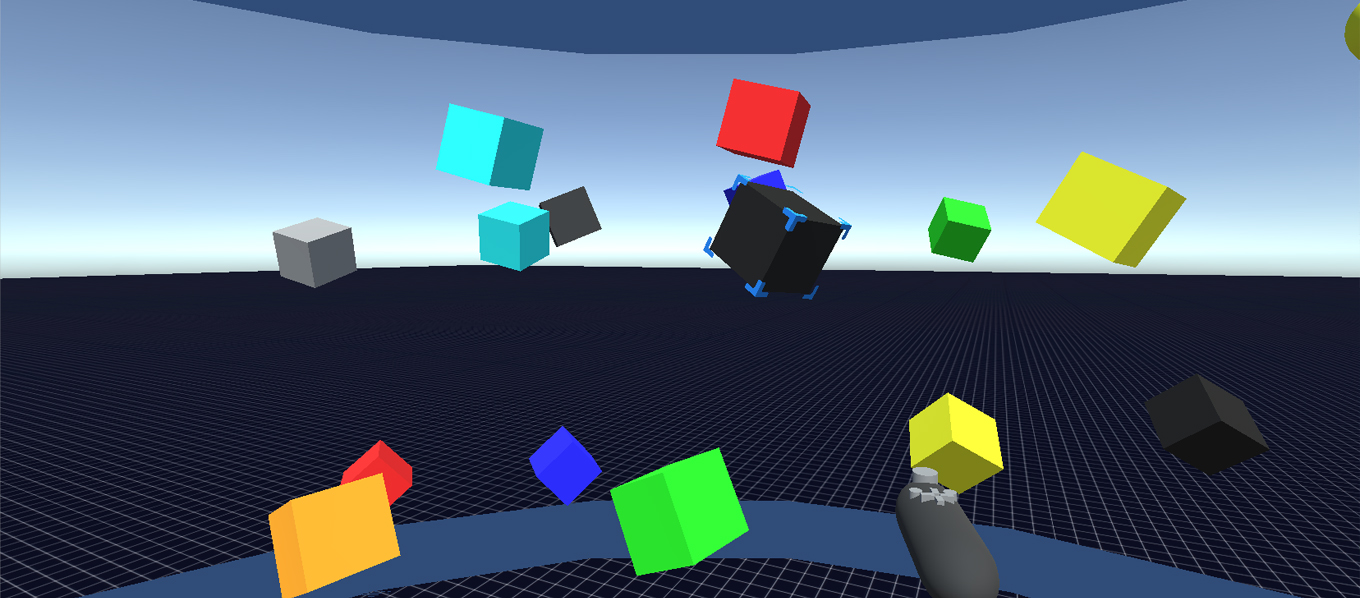
- Build a test environment. Try adding the Ground Plane and PhysicsCube prefabs (module-omicron/CAVE2/Tutorial/Prefabs)
- Drag and drop the prefabs into the Hierarchy
- Create a new empty GameObject (GameObject/3D Object), set the transform position to 0, 0, 0 and rename it CameraController.
- Drag the Main Camera object to make it a child of the CameraController. Set the position of the camera to 0, 0, 0.
- Add the CAVE2CameraController.cs script (module-omicron/CAVE2/Scripts/Util) to your CameraController GameObject
- Technical note: When getReal3D is enabled, this script is used to automatically add the getReal3D cameraUpdater script to your main camera
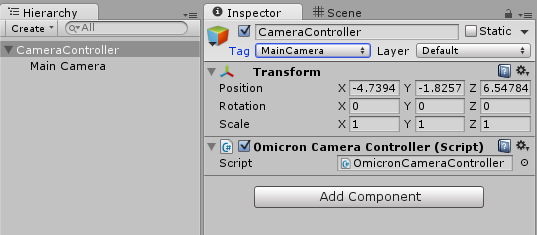
- Keep in mind that the CameraController position now represents the CAVE2 tracking origin (Center of the floor in CAVE2). So when inside CAVE2, the local position of the camera will be an offset of the CameraController's position.
- Try running the scene. Notice that the Camera child object jumps to 0, 1.6, 0. This is the simulated head tracking position of the user in the center of CAVE2 with a height of 1.5 meters. This can be changed on the CAVE2Manager script on the CAVE2-Manager object under Head Emulated Position.
-
For positioning your player controller in the editor, you may want to set the Camera's position to 0, 1.6, 0 in the Inspector while the game is not running. It will be overridden when the game starts, but you'll have a better sense of the general perspective when the game starts.
-
You can use the IJKL keys to move the head around the space. This simulates the tracked user walking in CAVE2. UO keys will rotate the head and HN will move up/down.
-
You should not attached anything or directly move the Main Camera GameObject.
-
If you need to have something attached to the camera, add it as a child of the camera controller.
-
Technical note: Which displaying on CAVE2, the getReal3D cameraUpdater script will duplicate the main camera several times and use a custom viewport. Moving an individual camera manually will result in the stereoscopic view and/or seamless windows across CAVE2 to break. There are limited customization you can do the camera, but that will require some special setup which is described in the CAVE2 Unity Tips and Examples.
- A completed scene of this tutorial can be found under (module-omicron/CAVE2/Tutorial/CAVE2 Tutorial 1 - Camera Controller.scene)
Build a simple head-tracked player controller for CAVE2
Next we will setup a green marker to represent the head position of the player. Note that this is separate from the camera position as there is no one single camera when Unity is running in CAVE2.
- Create a new empty GameObject. Rename it PlayerController. Set the transform position to 0, 0, 0
- Set the CameraController as a child of PlayerController
- Alternatively we could make the CameraController as the PlayerController, but this separation allows for quick jumping of the camera for say cinematics where player control is not needed.
- Create a new 3D Sphere. Rename it 'Head'. Set the scale to 0.1, 0.1, 0.1 and make it a child of PlayerController
- Set the local position of the Head to 0, 0.9, 0
- Change the Material of the Head (Head/MeshRenderer/Materials/Element 0) from Default-Material to Default-Green
- Add the CAVE2MocapUpdater.cs script (module-omicron/CAVE2/Scripts/Updaters) to the Head
- Set the sourceID to 0 (Primary head tracker)
- Run the Unity scene
- Note that the head jumps to the camera position at 0, 1.6, 0.
- A completed scene of this tutorial can be found under (module-omicron/CAVE2/Tutorial/CAVE2 Tutorial 2 - Head Tracking.scene)
SourceIDs used to identify all tracked objects registered with CAVE2. These can be accessed in your scripts by using the following:
// From CAVE2MocapUpdater.cs ------------------------------------------
public void Update()
{
	// Mocap source IDs can correspond to any tracked object such as
	// common head/wand or custom objects
	transform.localPosition = CAVE2.GetMocapPosition(sourceID);
	transform.localRotation = CAVE2.GetMocapRotation(sourceID);

	// For convience, you can use GetHead(), GetWand() to get the
	// default head and wand trackers
	// Primary head tracker (Head 1 == sourceID 0)
	transform.localPosition = CAVE2.GetHeadPosition(1);
	transform.localRotation = CAVE2.GetHeadRotation(1);

	// Primary wand tracker (Wand 1 == sourceID 1)
	transform.localPosition = CAVE2.GetWandPosition(1);
	transform.localRotation = CAVE2.GetWandRotation(1);

	// Secondary head tracker (Head 2 == sourceID 2)
	transform.localPosition = CAVE2.GetHeadPosition(2);
	transform.localRotation = CAVE2.GetHeadRotation(2);

	// Secondary wand tracker (Wand 2 == sourceID 3)
	transform.localPosition = CAVE2.GetWandPosition(2);
	transform.localRotation = CAVE2.GetWandRotation(2);

	// The Head/Wand IDs are mapped to mocap sourceIDs
	// in CAVE2Manager.cs
}
// ----------------------------------------------------------------------------
Add basic movement to the player controller using the CAVE2 simulator
At this point you probably want to move in the virtual world beyond the physical size of CAVE2. As previously mentioned, you might be familiar with basic movement in Unity using the following:
void Update() {
  float forward = Input.GetAxis("Vertical") * 5;
  float strafe = Input.GetAxis("Horizontal") * 5;

  transform.Translate( forward * Vector3.forward * Time.deltaTime );
  transform.Translate( strafe * Vector3.right * Time.deltaTime );

  if( Input.GetButtonDown("Fire1") )
  {
    // Fire
  }
}
This works great on with a keyboard or a gamepad on a single machine, but to run on CAVE2, you'll need to use some special calls to make sure the entire cluster receives the movement command from the wand controller.
// From SimpleWalkController.cs (module-omicron/CAVE2/Scripts/Examples)

void Update() {
  float forward = CAVE2.GetAxis(CAVE2.Axis.LeftAnalogStickUD) * 5;
  float strafe = CAVE2.GetAxis(CAVE2.Axis.LeftAnalogStickLR) * 5;

  transform.Translate( forward * Vector3.forward * Time.deltaTime );
  transform.Translate( strafe * Vector3.right * Time.deltaTime );

  if( CAVE2.GetButtonDown(CAVE2.Button.Button3) )
  {
    // Fire
  }
}
If you're working with multiple CAVE2 wand controllers, your can specify the wand ID after the Axis/Button parameter:
void Update() {

  int wandID = 1; // (Typically 1 or 2. Default = 1)

  float forward = CAVE2.GetAxis(CAVE2.Axis.LeftAnalogStickUD, wandID) * 5;
  float strafe = CAVE2.GetAxis(CAVE2.Axis.LeftAnalogStickLR, wandID) * 5;

  transform.Translate( forward * Vector3.forward * Time.deltaTime );
  transform.Translate( strafe * Vector3.right * Time.deltaTime );

  if( CAVE2.GetButtonDown(CAVE2.Button.Button3, wandID) )
  {
    // Fire
  }
}
Add a basic wand controller to have a virtual object appear where the wand is
If you want to have a GameObject mapped to a tracked marker like the wand, the most basic way to do that would be similar to how we added a sphere for the head:
- Create a new 3D Sphere. Rename it 'Wand'. Set the scale to 0.2, 0.2, 0.2 and make it a child of PlayerController
- Set the local position of the Wand to 0, 0.9, 0
- Change the Material of the Wand (Head/MeshRenderer/Materials/Element 0) from Default-Material to Default-Blue
- Add the CAVE2MocapUpdater.cs script (module-omicron/CAVE2/Scripts/Updaters) to the Wand
- Set the sourceID to 1 (Primary wand tracker)
- A completed scene of this tutorial and the basic movement one can be found under (module-omicron/CAVE2/Tutorial/CAVE2 Tutorial 3 - Simple Walk Controller.scene)
Testing this in CAVE2, you should now have a blue sphere floating at the position of the wand controller (more specifically the center of the markers). We'll apply an offset so we can accurately place an object; say a model of the wand in the exact position of the wand so that it looks like you're gripping the handle of the virtual object.
The CAVE2 simulator also provides a wand prefab designed to match the size and shape of CAVE2's wand. Wand.prefab can be found in (module-omicron/CAVE2/Prefabs) and can be added as a child of the PlayerController. Recalling how the head was constructed, the Wand prefab is designed as follows:
- Root 'Wand' object
- Contains the WandMocapUpdater.cs, which is similar to the CAVE2MocapUpdater.cs but has a reference to the visible wand model. This script gets the offset between the tracking center and the wand model stored in CAVE2InputManager to correctly offset the Wand handle with the physical wand in your hand.
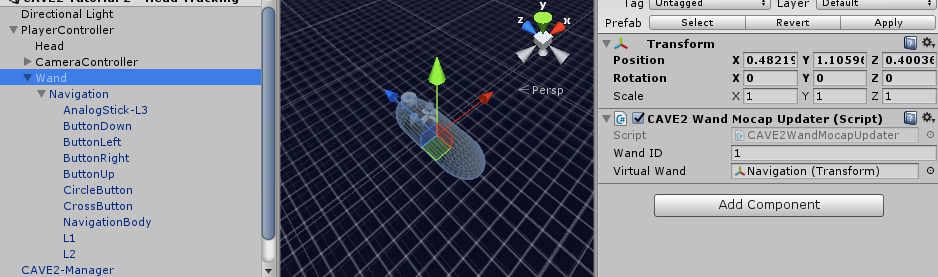
- The 'Navigation' child object contains the CAVE2WandVisualUpdater.cs script. This grabs the inputs from the CAVE2 Input Manager and highlights the appropriate buttons which are its children.
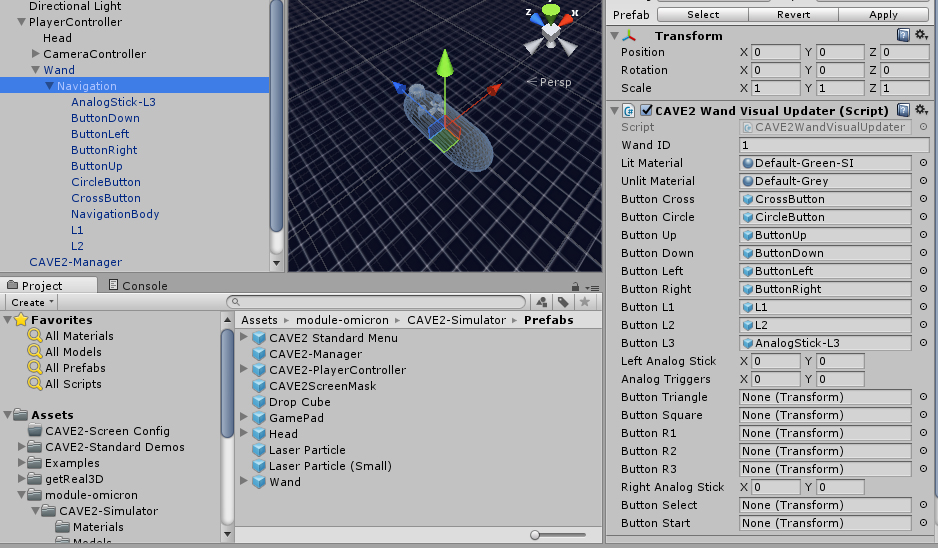
The convenient part of this setup is that attaching an object as a child of Navigation which has its handle at its local origin will appear to be in the user's hand.
A scene with the wand prefab which will let you point and drag the cubes can be found under (module-omicron/CAVE2/Tutorial/CAVE2 Tutorial 3A - Simple Walk Controller (Wand prefab).scene)
- For this scene, we modified the camera near clipping plane to 0.1 (from 0.3) to allow the wand (or any object) to be viewable from the camera if it is 0.1 meters from the camera or farther. A part of the wand prefab would be clipped at with the default at 0.3 meters.
Appendix B: Omicron-Unity package
OmicronManager and CAVE2Manager
The OmicronManager script handles connection with an Omicron input server, parses events and then broadcast those events to registered Omicron clients (OmicronEventClient.cs). The current Omicron-Unity package can handle the following Omicron inputs:
- Mocap
- Wand/Controller
- Kinect
The Omicron Manager also works with the CAVE2Manager to help simplify event handling for head and wand inputs. The CAVE2Manager also provides some basic keyboard emulation of tracking and wand inputs for development systems.
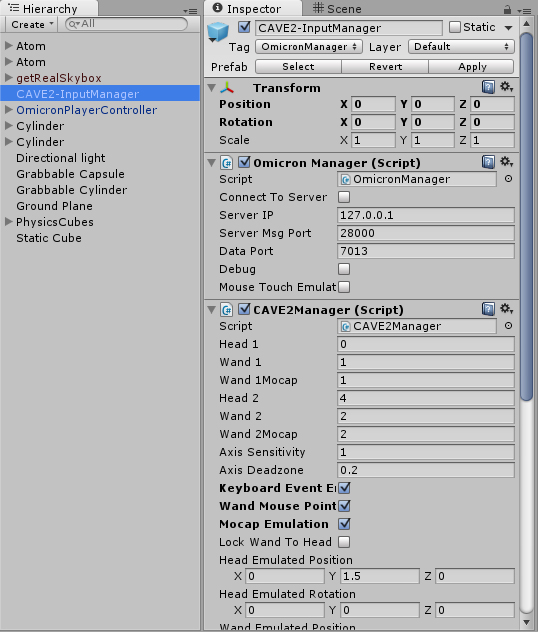
Both OmicronManager and CAVE2Manager are packaged into the CAVE2-InputManager prefab for easy integration into a CAVE2 Unity project. Other than toggling CAVE2 simulator mode no other setup is required when using this prefab.
Appendix C: Synchronizing Unity Components (getReal3D v2.x)
CAVE2 is essentially running 37 different instances of Unity. A major function of getReal3D is synchronizing anything in the game that could potentially behave differently between machines. This includes user inputs, objects that move, anything that uses a random function, physics collision detection, and particle systems.
getReal3D provides synchronization through two methods using the ClusterView script: Serialization and Remote Procedure Calls (RPC).
Serialization
// Standard getReal3D Code Block ----------------------------------------------
getReal3D.ClusterView clusterView;
public void Awake()
{
	// Adds a cluster view to this script
	clusterView = gameObject.AddComponent<getReal3D.ClusterView>();
	clusterView.observed = this;
}
public void OnSerializeClusterView(getReal3D.ClusterStream stream)
{
	// These variables are constantly synced across the cluster
	// and are based on input events handled in Update()
	stream.Serialize( ref myVariable);
}
// ----------------------------------------------------------------------------
Above is my generic cut-and-paste code block for adding scripting synchronization. In Awake() the getReal3D ClusterView object is added to this gameobject and observed is set to this (i.e. the script). If this object also moves in the world, you may also want to add an additional ClusterView observing this object's transform.
gameObject.AddComponent<getReal3D.ClusterView>().observed = transform;
Note: If you have multiple scripts that need to be synchronized in the same gameObject, it may be better to manually add a ClusterView to the gameObject from the Inspector.
OnSerializeClusterView() streams the state of serialized variables from the master node to the client nodes. This is the easiest and quickest way to make sure variables in your scripts are synchronized across CAVE2. The drawback of this is that these variables are updated multiple times per frame and can reduce performance. The alternative is using RPC calls to send messages from the master to the clients as needed.
The following variable types and be serialized:
- Primitive types: bool, byte, char, short, int, uint, float, string
- Unity types: Vector2, Vector3, Quaternion, Color, Color32
- getReal3D types: ClusterView
RPC Calls
Note: The following code example is using Omicron input rather than getReal3D, but the syntax is similar.
void Update()
{
	if( getReal3D.Cluster.isMaster )
	{
		// Checking inputs should only be done on master node
		// The getReal3D equivalent would look like:
		// if( getReal3D.Input.GetButton("Fire")	)
		if( cave2Manager.getWand(wandID).GetButtonDown(CAVE2Manager.Button.Button3) )
		{
			// Check if getReal3D is enabled (i.e. Running on a getReal3D supported platform)
			if( Application.HasProLicense() && Application.platform == RuntimePlatform.WindowsPlayer )
				clusterView.RPC ("Fire",0);
			else
				Fire(0);
		}
	}
}

[getReal3D.RPC]
void Fire( int weaponType )
{
	...
}
The previous code block shows how you should organize your scripts for CAVE2. In Update functions and Physics callbacks (i.e. OnCollisionEnter or OnTriggerEnter), you should have two sections of code. One that only runs on the master node (contained in the isMaster if) and the other than runs on all nodes.
In that example on Update() we're checking the input of the wand on the master node. If the button 3 is pressed, we call the Fire() function one of two ways. The first one checks if Unity is currently running with a Unity Pro license and on Windows. As getReal3D is a Windows-based native library, clusterView.RPC() will only be called on a Windows platform using Unity Pro. The else allows you to still test your scripts on a non-Windows machine or the free version of Unity.
RPC allow the following types to be passed as parameters:
- Primitive types: bool, byte, char, short, int, uint, float, string
- Unity types: Vector2, Vector3, Quaternion, Color, Color32
- getReal3D types: ClusterView
Appendix D: CAVE2 prior to 2019
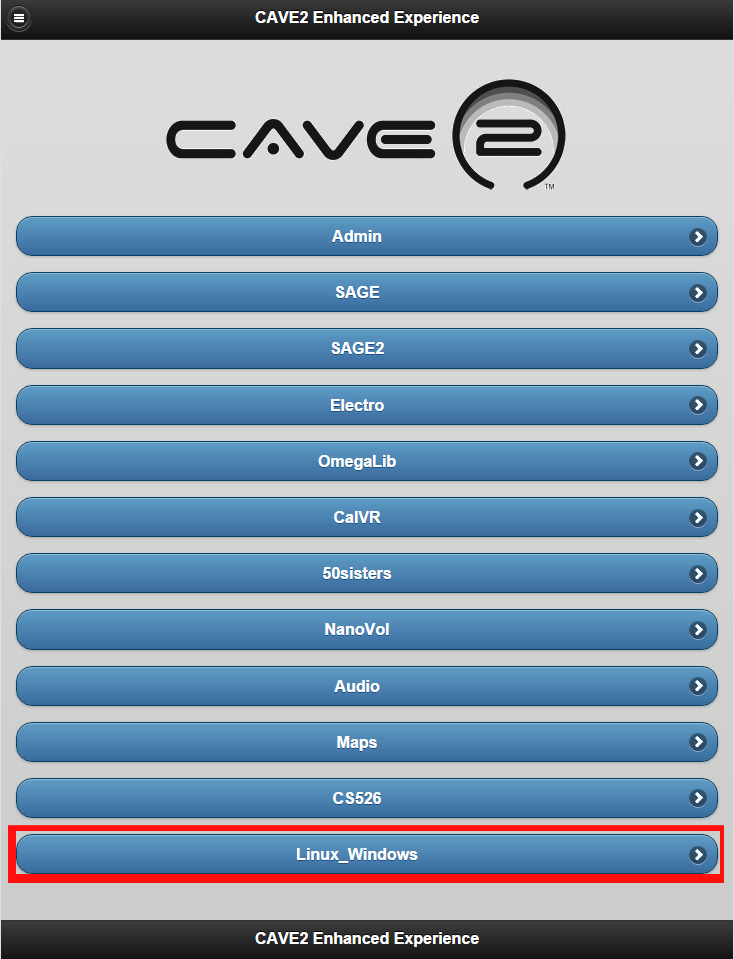
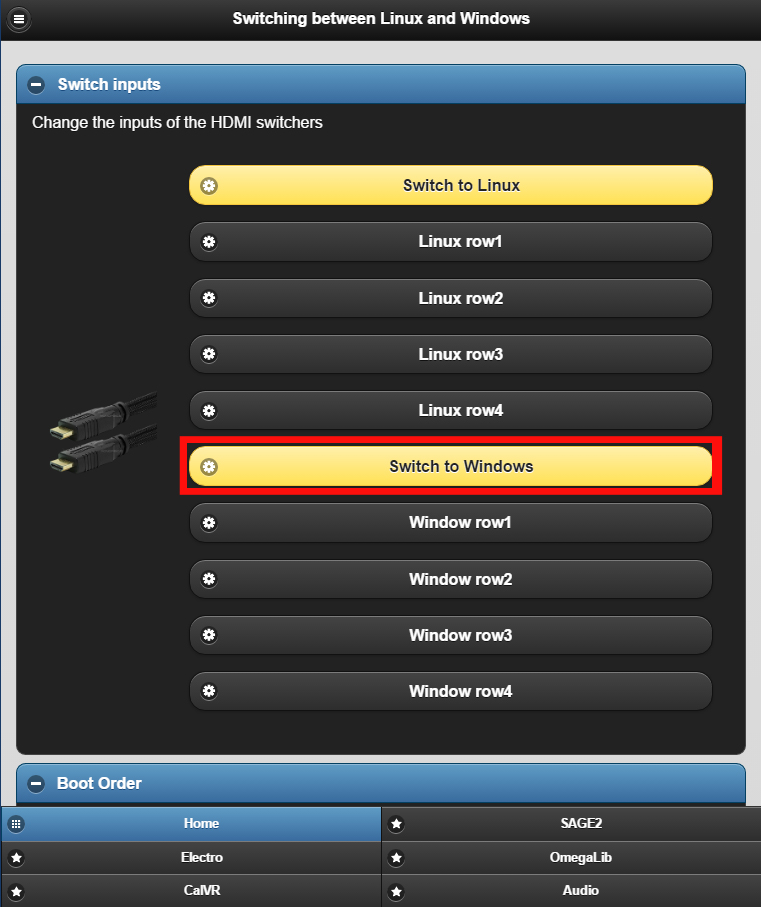
Switching the CAVE2 Cluster to Windows
CAVE2 is typically running in Linux. Before you can run your Unity application, you will have to switch the inputs on the displays to Windows. This is done by the iPad interface on the left of the CAVE2 entrance.
-
If not already on the Home page, click Home
-
Click Linux_Windows at the bottom of the Home page
-
Click Switch to Windows
- The cluster will now switch the displays to windows one row at a time starting from the top.
- This should only take about 30 seconds.
- The displays will flicker until all 4 rows have switched (Grey background with CAVE2 & EVL logos, blue Lyra text)
- Occationally a screen will stay in Linux mode (Metallic background, CAVE2 image, Orange Lyra text), if this is the case press the Windows row button for the row that screen is on.
getReal3D Launcher
Appendix E: Unity Hub 3.0.0 and Unity 2019.2.11
Following the release of Unity Hub 3.0.0 in January 2022, project templates in some versions of Unity no longer work and will throw an error when creating a new project:
- Failed to resolve project template: [com.unity.template.3d] is not a valid project template.
The current workaround as of Jaunary 13, 2022 is to create a project using the 2D project template and re-adjust the scene view to use 3D mode:
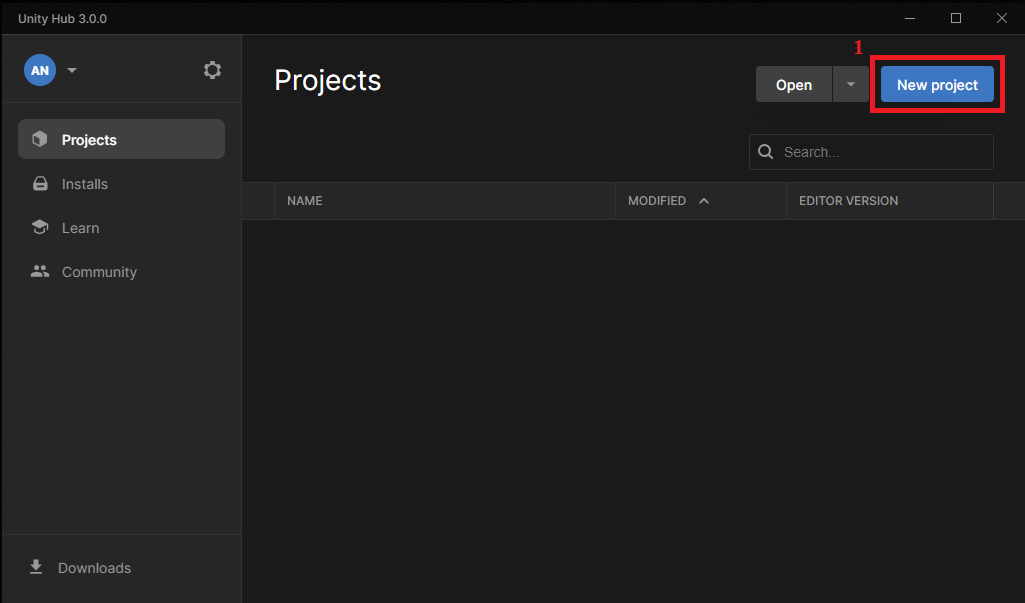
- Create a New Project from Unity Hub
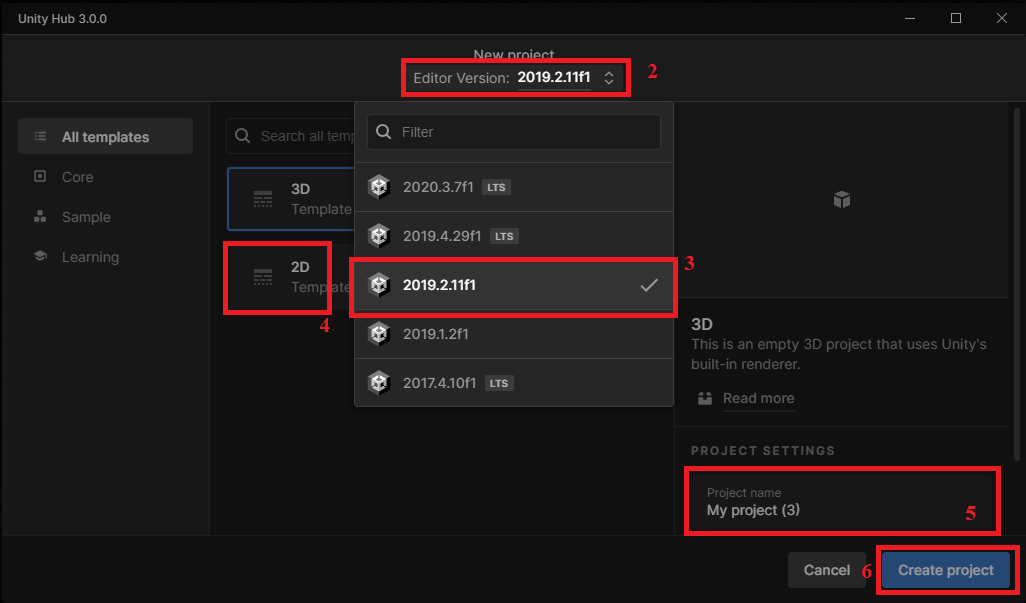
-
Change Editor Version
-
Select '2019.2.11f1' from the dropdown menu
-
Select '2D Template'
-
Give a unique name to your project (Probably including course number and team/group number)
-
Create project
-
Click Continue if given a 'Non-Matching Editor' message
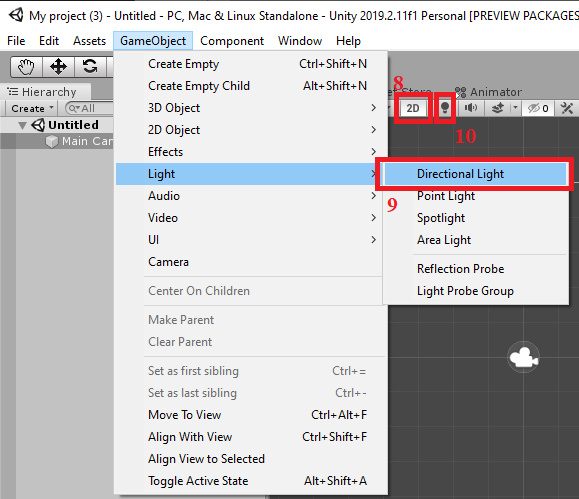
-
Un-select '2D' from the Scene view menu
-
From GameObject/Light add a 'Directional Light' to the scene
-
Enable 'Scene Lighting' on the Scene view menu
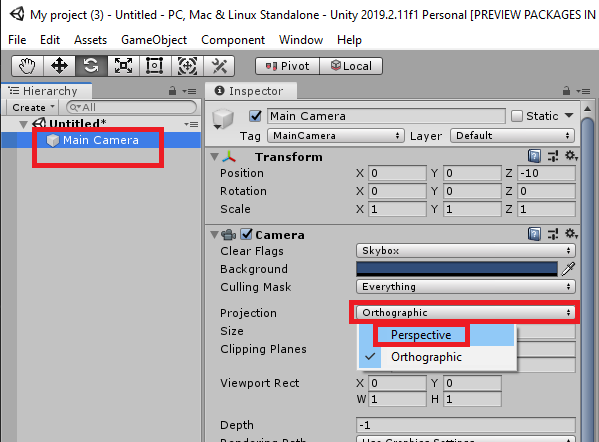
- Change the 'Main Camera' Projection from 'Orthographic' to 'Perspective'
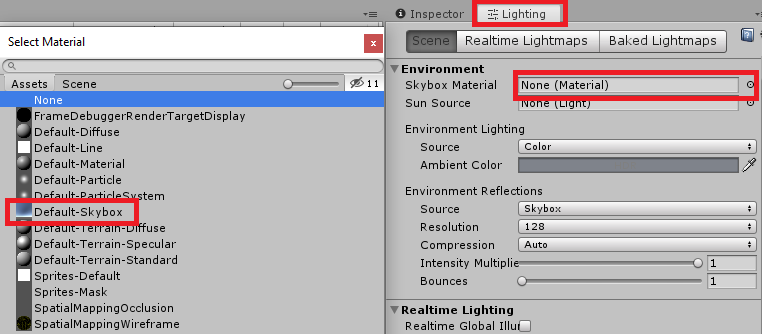
- On the Lighting tab (Window/Rendering/Light Settings) set the 'Skybox Material' to 'Default-Skybox'