CAVE2 Unity Tips and Examples - uic-evl/omicron-unity GitHub Wiki
Last revision: 1 March 2022
Unity Version: 2017.4.10 / 2019.2.11
getReal3D Version: 4.0.5
- Customizing the Menu
- Collisions with Self
- LoadScene
- Spatialized Audio
- Particle Systems
- Cluster Sync Using SendMessage/BroadcastMessage
- Customizing the Camera
The CAVE2-PlayerController prefab contains a menu which can be opened using the Circle wand button (simulator: right mouse). The Circle button also doubles as select, DPad (simulator: arrow keys) to navigate menu, and Cross button (simulator: left mouse) to go back and close menu.
The standard main menu contains a single button, System which leads to a second screen for controlling the CAVE2 Wand Navigation script (Movement mode, nav speed, etc.).

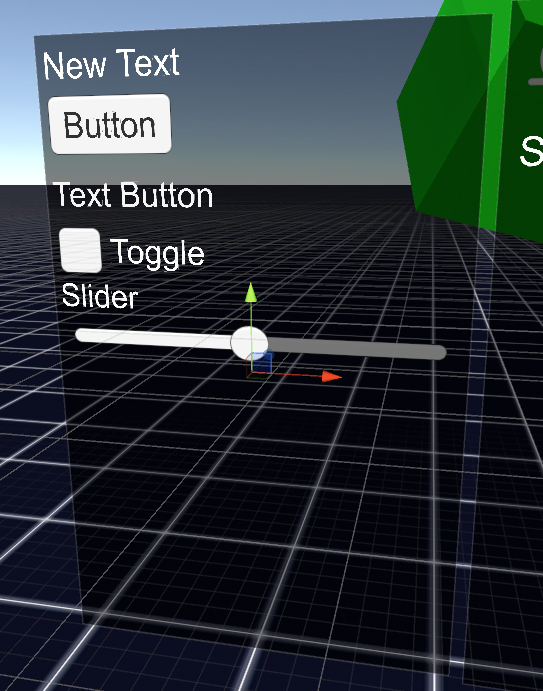
In general when creating a new UI GameObject, note that the size and position values are generally meant for a screen space user interface with units in pixels. The CAVE2 menu is a world space menu where the units are meters. Keep this in mind when adding your own UI elements to the menu. It is suggested that you duplicate one of the existing menu items or use the provided menu template (set inactive by default) in the CAVE2 standard menu which is already scaled for the world space menu. All the existing menu items use the 'UI Images' or 'UI Text' materials this allows the UI to draw on top of all objects in the scene even if they are closer to the user than the menu (which by default is drawn on the CAVE2 display plane).
To customize the menus system, the menu 'window' must have an OMenu.cs. This controls all menu items inside it. Note this is a simple linear menu system where items are stacked in a single row and navigated to using up or down on the DPad. Left and right on the DPad are only used to move the slider.
For this example we will add a button to the main menu that will open the template window then explain how the linear menu items can be added and used to trigger scripts in your scene.
- Open 'Cube World Example.scene'.
- Select the 'CAVE2-PlayerController' GameObject in the Hierarchy.
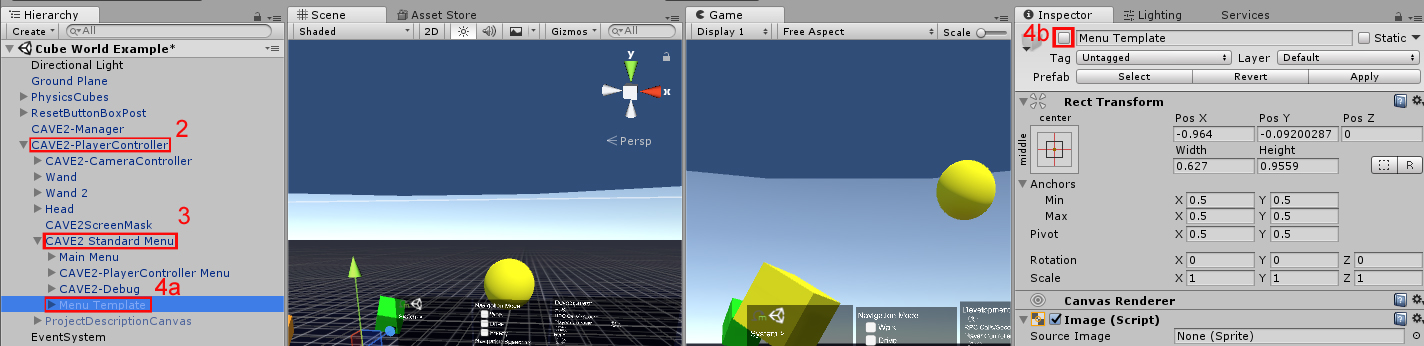
- Expand the 'CAVE2-PlayerController' and its child object 'CAVE2 Standard Menu'.
- Enable the 'Menu Template' object by clicking on it and enabling the top checkbox in the Inspector..
- The menu should now be visible. Next we will add a button to open in from the main menu
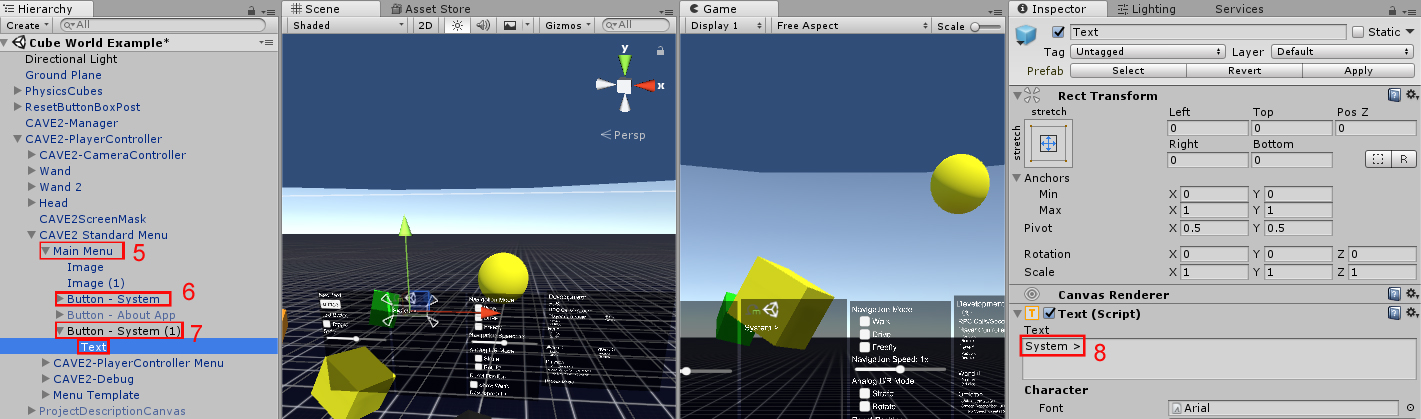
- Expand the 'Main Menu' GameObject (child of 'CAVE2 Standard Menu').
- Duplicate the 'Button - System' GameObject and rename it 'Button - Template'.
- Ctrl-D or right-click and select 'Duplicate'
- Single click on name or right-click and select 'Rename'
- Expand 'Button - Template' and select the 'Text' child object.
- In the Inspector rename the Text field in the Text (Script) to "Template >"
- The general convention if a button opens a new menu is to append a ">" to the end of the name
- Click back on 'Button - Template' and in the Inspector examine the On Click() function in the Button (Script)
- This will call a function on a script when the button is clicked on
- Currently it calls the ToggleMenu() on the OMenu script attached to 'CAVE2-PlayerController Menu'
- Click and drag the 'Menu Template' GameObject from the Hierarchy and drag it to the 'Object' field under On Click()
- Click on the 'No Function' dropdown under On Click(), select OMenu, and then ToggleMenu()
- This lists all scripts attached to this gameobject (like OMenu) and then all public functions in that script (like ToggleMenu())
- See the Unity UI manual for more details

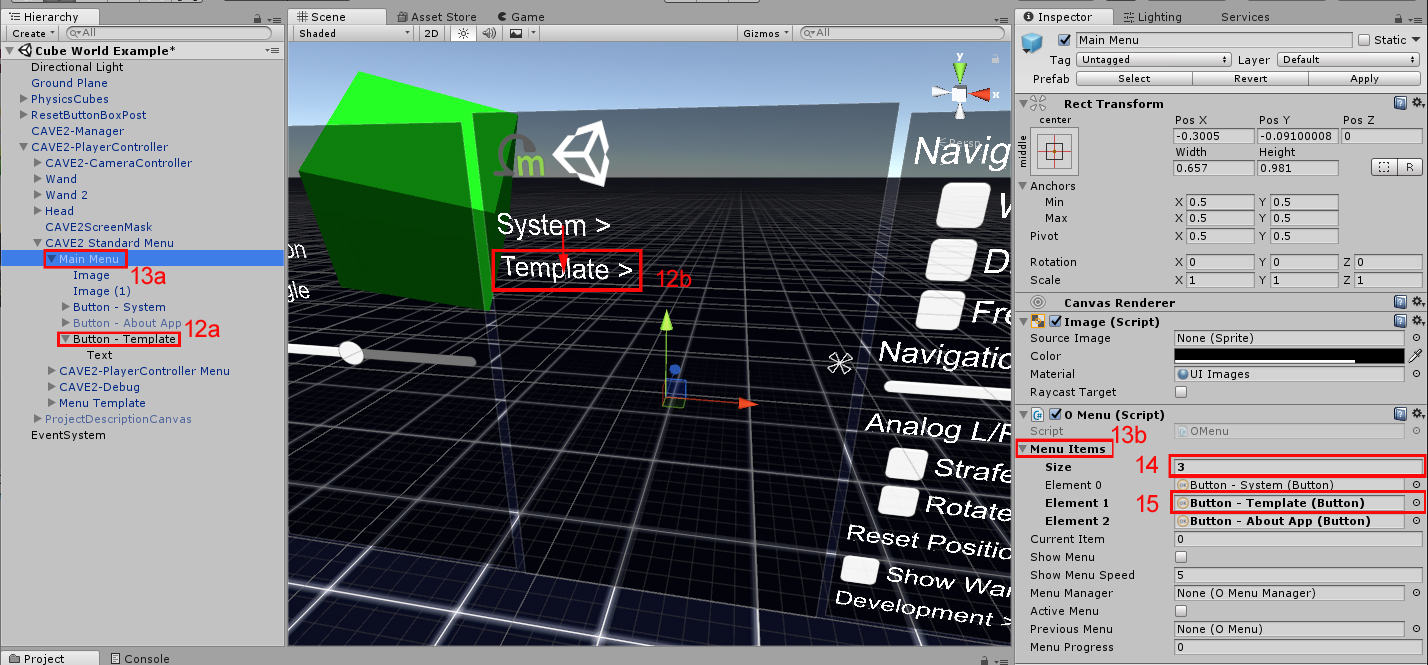
- In the scene view drag the 'Button - Template' object down so it's below 'System >"
- Or change the Pos Y field in the Inspector to something like 0.238
- Click on the 'Main Menu' GameObject and examine the O Menu (Script) and expand the 'Menu Items' list.
- This is the list in which menu items are navigated to in order
- Change the size of the 'Menu Items' to 3
- Drag and drop the 'Button - Template' GameObject into Element 1
- This adds 'Button - Template' to the list
- Run the game in the editor, open the menu, and examine how the template menu is now accessible!
In module-omicron/CAVE2/Tutorial/CAVE2 Tutorial 6 - Custom Menu.scene is the completed tutorial.
The CAVE2 Player Controller has 4 main colliders: Head, Body, Wand 1, and Wand2. Each of these colliders allows the player to interact with the virtual world through direct contact.
However one known side effect of how this is currently implemented is when one of these colliders interact with one another. You might see this as a sudden sliding of the player when you hold the wand to your side or otherwise near your head or body*.
- In this context, the player's body is a cylinder collider from below the player's head and extending to the floor.
In order to correct this, we use Unity's physics layers by placing the entire CAVE2-PlayerController object under its own 'Interactor' layer.
- Click on your 'CAVE2-PlayerController' object
- In the inspector, click the dropdown next to 'Layers' (This will either be 'Default' or blank)
- If it says 'Interactor' you're probably already set
- Click on 'Add Layer' from the dropdown
- Under one of the blank User Layers, add one called 'Interactor'
- Click on 'CAVE2-PlayerController' again and select your new 'Interactor' layer from the dropdown and click 'Yes, apply to children'
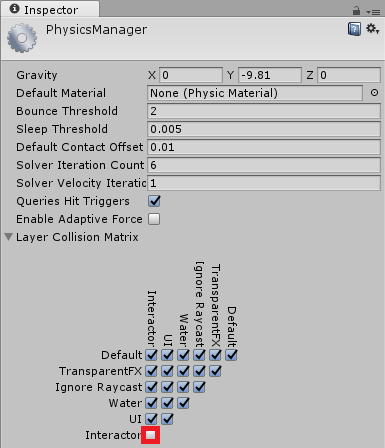
- Next set the physics layers. (Edit/Project Settings/Physics)
- In the Layer Collision Matrix, find the one where Interactor and Interactor intersect and uncheck that box.
When loading a different scene file in Unity, typically you use something like this:
UnityEngine.SceneManagement.SceneManager.LoadScene("Scene Name");
However since CAVE2 is a cluster of machines, running just this code can cause the level to load only on a few machines or just on the master node. Instead you can use the following code which is also included in the tutorial scripts (module-omicron/CAVE2/Tutorial/Scripts):
using UnityEngine;
using System.Collections;

public class CAVE2LoadScene : MonoBehaviour {

    [SerializeField]
    string nextLevelName = "Cube World Example";
    private void OnTriggerEnter(Collider other)
    {
        // When using the CAVE2 Player Controller, the Head Sphere (child of Head)
        // is the trigger, not the body/capsule collider or center of CAVE2
        if(other.CompareTag("Player"))
        {
            // Normally to load a scene in Unity use use this:
            // UnityEngine.SceneManagement.SceneManager.LoadScene("Cube World Example"); // Or using the scene build index (int)

            // To properly load a scene on the CAVE2 cluster use this instead:
            CAVE2.LoadScene(nextLevelName);
        }
    }
}
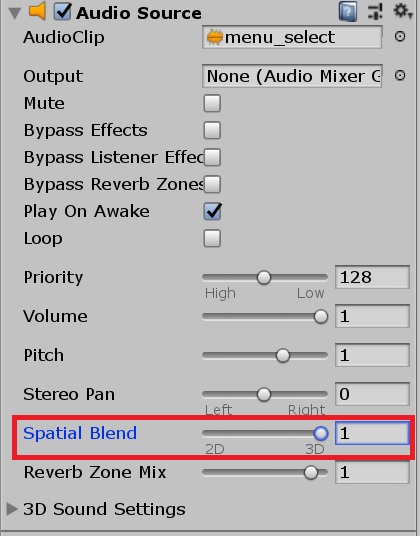
CAVE2 and Unity supports up to 7.1 surround sound for any spatialized or 3D audio you may have in your scene. By default any Audio Source component's 'Spatial Blend' will be set to 2D. You will have to set this to 3D (or a value of 1) for full spatialization as shown below.
In addition to setting your Audio Sources, your will also need to set your Unity project's default speaker mode to '7.1 Surround:'
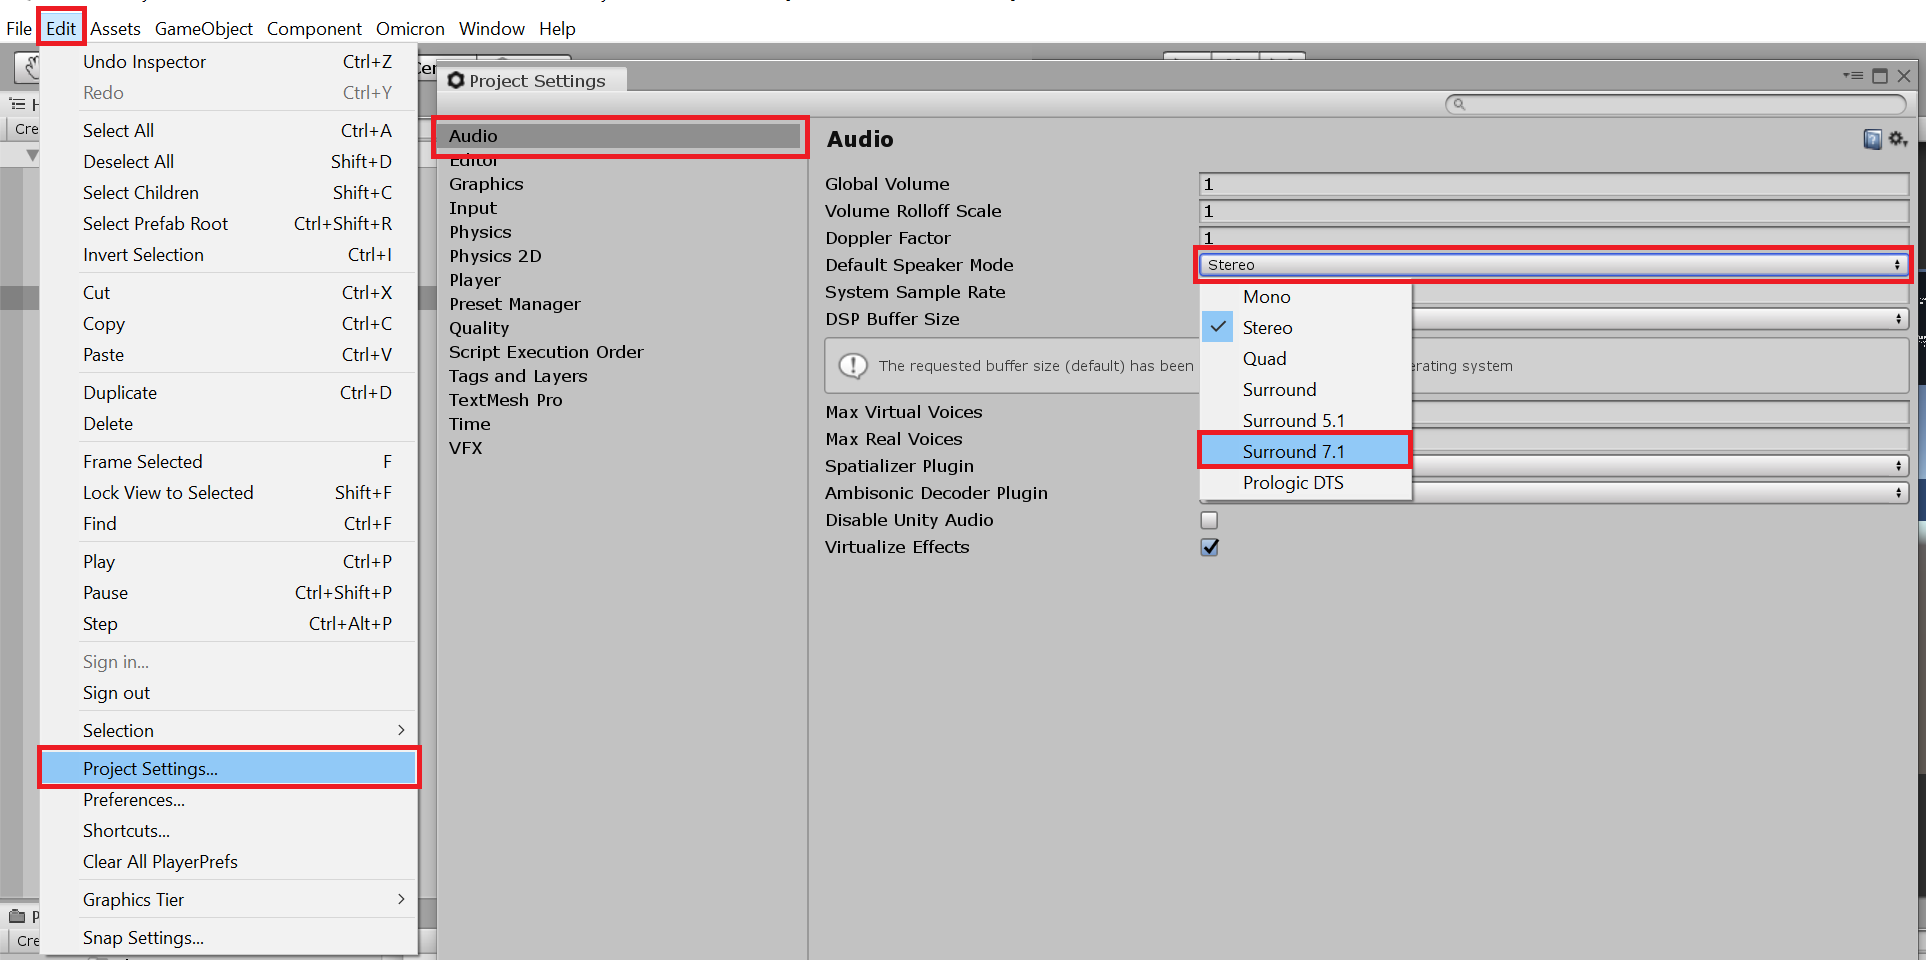
- From the Unity editor's main menu, select Edit/Project Settings
- Select Audio
- Click on 'Default Speaker Mode' and select '7.1 Surround'
Your are now ready to build your project with spatialized audio support!
A demo 7.1 surround project 'DEMO - Surround Sound Test' should be available on the main launcher to test the CAVE2 sound system. Follow the on screen instructions and you should hear the 3 audio sources from the front, back left, and back right speakers of CAVE2.
If audio still seems to only be coming from the front speakers check the Windows audio settings:
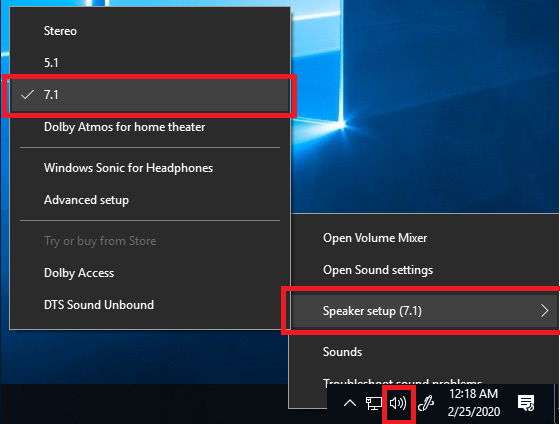
- Right click on the Speaker icon in the lower right corner next to the clock
- Select 'Speaker Setup'
- Select '7.1'
If only Stereo is available, make sure the proper Playback device is Set as Default Device.
- Right click on the Speaker icon in the lower right corner next to the clock
- Select 'Sounds'
- Click the 'Playback' tab
- As of February 2020, find the 'HDMI-DA' device
- Right click on that device and click 'Set as Default Device'
- You may have to restart your application if it is currently running
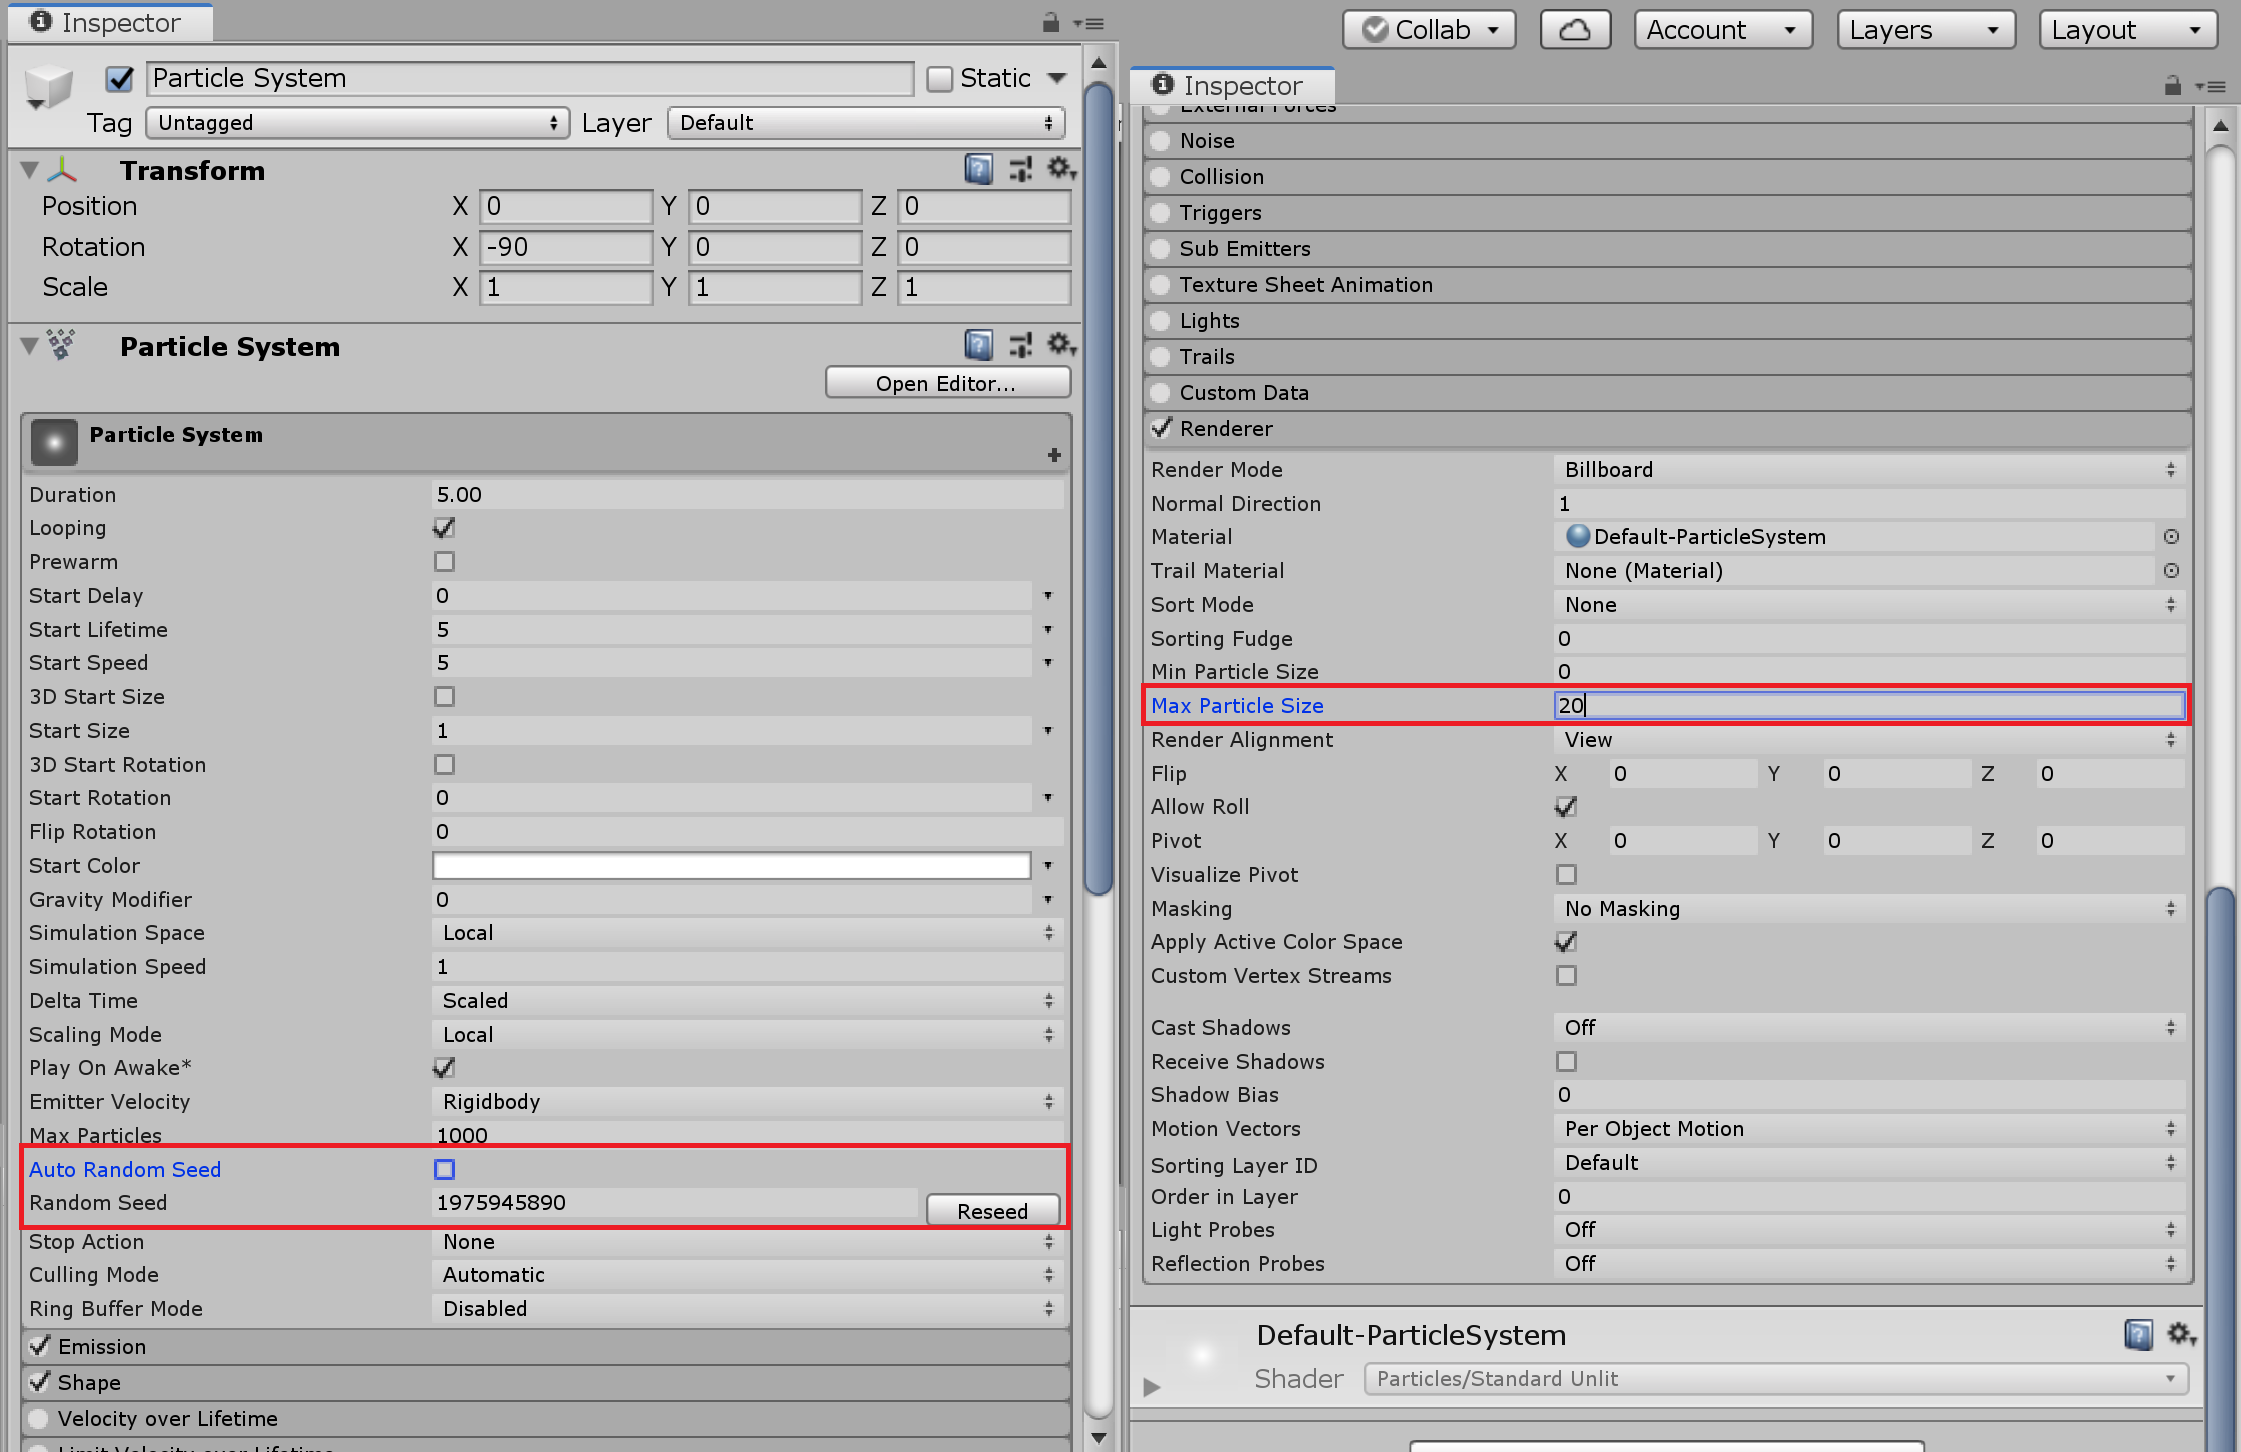
As each column in CAVE2 is a separate Unity instance, each instance will have a separate seed value for thing like Random or Particle Systems. In order to have the particles correctly animate across the cluster you need to uncheck 'Auto Random Seed'. You can also set the random seed value here or using ParticleSystem.randomSeed. Just remember if you want a different particle seed, you will have to make sure each instance has the same seed value. This can be accomplished using a CAVE2.SendMessage() in a script.
Also by default Unity's Particle System Renderer Max Particle Size is 0.5 (i.e. half the viewport). Considering a viewport is a single display in CAVE2, if you want a large particle cloud filling up the scene you will need to set this to a larger value like 20.
In general the camera perspective and field of view are completely overridden by the getReal3D plugin. Most of the other options such as clipping planes, culling mask, and clear background are duplicated by the getReal3D CameraUpdater on startup.
However if you want to change these settings at runtime, you will need to add some custom scripting. For some options like the Culling Mask, you can just add additional scripts. The Near/Far clipping planes are saved in the getReal3D CameraUpdater script and will require modifications to that script. Be careful when updating getReal3D as this will likely overwrite your changes.
The Culling Mask specifies which layers are visible to the camera. Check Layers in the Unity Manual for more details.
By controlling which layers are visible to a camera at a given time, you can save on rendering cost. For example lets say you have a large exterior scene and a building with a complex interior. You could use the Culling Mask to only draw the interior of the building once the player enters the building.
Since you cannot simply use Camera.Main to get the camera in CAVE2, one implementation would be to add a script to your main camera. This script will be duplicated with the Main Camera Game Object.
public class CameraLayerController : MonoBehaviour {
    RequireComponent Camera;
    void SetCameraCullingMask( int layerMask )
    {
    	GetComponent<Camera>().cullingMask = layerMask;
    }
}
You would then control the culling mask using the following call from another script:
void SetExteriorCameraCullingMask( int layerMask )
{
    if( currentLocationType == LocationType.Exterior )
        GameObject.FindGameObjectWithTag("CameraController").BroadcastMessage("SetCameraCullingMask", layerMask);
}
In some cases, you may want the head node to do trigger a certain action and make sure that it triggers on all display node instances. While most of the common cases are done behind the scenes (menus, button presses). Similar to how Unity sends messages to other GameObjects using GameObject.BroadcastMessage or GameObject.SendMessage, you can send messages from a GameObject on the head node to the same GameObject on all display nodes - assuming the gameobject has a unique name.
Just for quick review:
- GameObject.BroadcastMessage("Function Name", paramater) will call the function called "Function Name" on any script on that GameObject or any of its children.
- GameObject.SendMessage("Function Name", paramater) will call the function called "Function Name" on any script on ONLY that GameObject.
Similarly to send a message across the cluster:
- CAVE2.BroadcastMessage("gameObject name", "Function Name", paramater) will call the function called "Function Name" on any script on a GameObject named "gameObject name" or any of its children.
- CAVE2.SendMessage("gameObject name", "Function Name", paramater) will call the function called "Function Name" on any script on ONLY on a GameObject named "gameObject name".
Unlike Unity's SendMessage (or BroadcastMessage), CAVE2.SendMessage supports multiple parameters. You can think of these as Remote Procedure Call (RPC) commands.
For example if you wanted the head node to calculate three numbers and send them to each display node:
void SendNumbers(float a, float b, float c)
{
   // Remember that the name of the function you're calling 'ReceiveNumbers' is
   // different from the name of the function that sends the call 'SendNumbers'
   // Otherwise this will cause an infinite loop!
   CAVE2.SendMessage(gameObject.name, "ReceiveNumbers", a, b, c);
}

void ReceiveNumbers(object[] values)
{
   // For multiple parameters you must use an object array and cast back to desired type
   float a = (float)values[0];
   float b = (float)values[1];
   float c = (float)values[2];
}

// If you only have one or zero parameters, you don't use an object array:
void SendNumber(float a)
{
   CAVE2.SendMessage(gameObject.name, "ReceiveNumber", a);
}

void ReceiveNumber(float a)
{

}

void TriggerSomething()
{
   CAVE2.SendMessage(gameObject.name, "TriggerSomethingOnCluster");
}

void TriggerSomethingOnCluster()
{

}
Some applications may require multiple depth layers on their cameras to deal with z-fighting or viewing a very large scene. For example a space scene where there's a space ship 10 meters from the camera and a full scale planet 100,000,000 meters in the background.
For a regular Unity application you would use multiple camera with different clipping planes, depth layers, and clear flags. Since getReal3D's camera updater controls the viewer centered perspective and stereoscopic, there are limited things you can do with the camera. However, we've come up with a few tools to help with some of these issues.
[clippy and depth stuff]