前端安装 - tsuihwau/ss-panel-v3-mod_Uim GitHub Wiki
本Wiki参考于@zircon所写的安装魔改前端教程
宝塔用户可能会在超过某一数量节点的时候出现 Undefined offset :0 in 你的网站路径 这个错误,
这个问题会导致后端无法进行连接,可以按照以下方法解决
在宝塔面板中找到php,点击设置
在禁用函数一栏找到 system proc_open proc_get_status 去除它
在性能调整中,把 PHP 运行模式设置为 静态
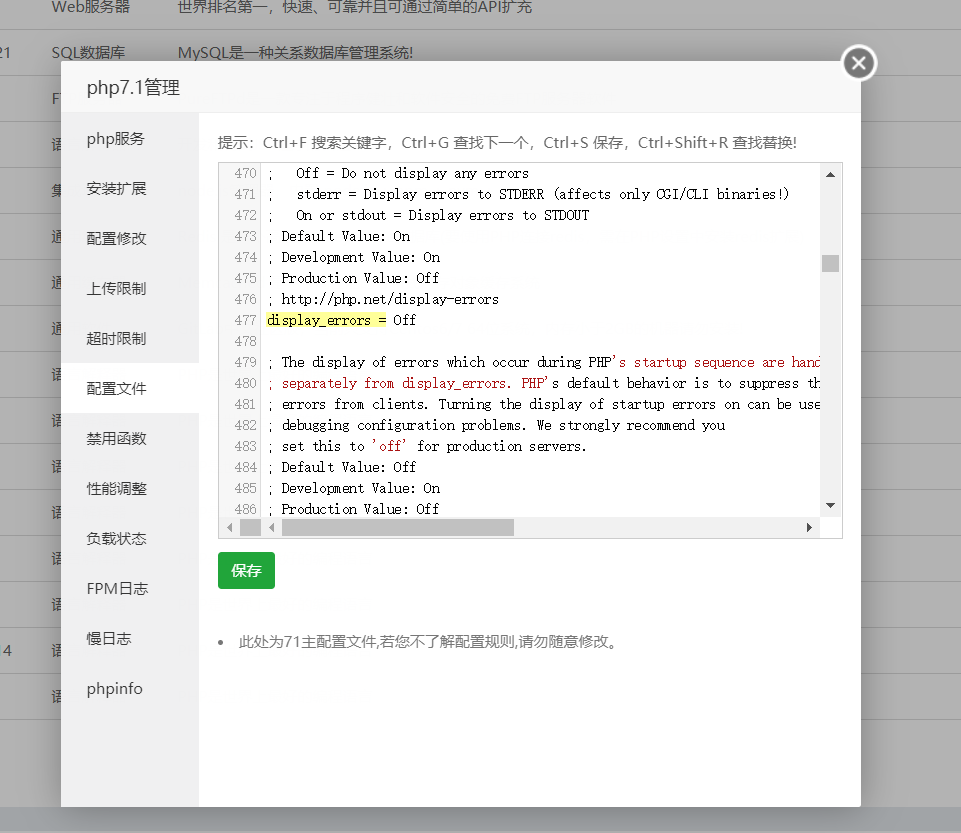
在配置修改中 按 Ctrl+F 搜索 display_errors = 改为 Off 后保存
web环境配置好后
cd /你的网站目录  例:cd /www/wwwroot/你的网站目录
yum update
yum install git -y
git clone -b master https://github.com/Anankke/ss-panel-v3-mod_Uim.git tmp && mv tmp/.git . && rm -rf tmp && git reset --hard
chown -R root:root *
chmod -R 755 *
chown -R www:www storage
php composer.phar install
该工具可以快速的移除防跨目录的限制
cd lnmp1.4/tools && ./remove_open_basedir_restriction.sh
sed -i 's/,scandir//g' /usr/local/php/etc/php.ini
location / {
    try_files $uri /index.php$is_args$args;
}
Ensure your .htaccess and index.php files are in the same public-accessible directory. The .htaccess file should contain this code:
<IfModule mod_rewrite.c>
RewriteEngine On
RewriteCond %{REQUEST_FILENAME} !-f
RewriteCond %{REQUEST_FILENAME} !-d
RewriteRule ^ index.php [QSA,L]
</IfModule>
Make sure to enable Apache’s mod_rewrite module and your virtual host is configured with the AllowOverride option so that the .htaccess rewrite rules can be used:
AllowOverride All
Ensure the Web.config and index.php files are in the same public-accessible directory. The Web.config file should contain this code:
<?xml version="1.0" encoding="UTF-8"?>
<configuration>
    <system.webServer>
        <rewrite>
            <rules>
                <rule name="slim" patternSyntax="Wildcard">
                    <match url="*" />
                    <conditions>
                        <add input="{REQUEST_FILENAME}" matchType="IsFile" negate="true" />
                        <add input="{REQUEST_FILENAME}" matchType="IsDirectory" negate="true" />
                    </conditions>
                    <action type="Rewrite" url="index.php" />
                </rule>
            </rules>
        </rewrite>
    </system.webServer>
</configuration>
/你的网站目录/public;
登陆数据库
mysql -u root -p                           // 这里需要输入密码
mysql>CREATE DATABASE database_name;       // 新建数据库
mysql>use database_name;                   // 选择数据库
mysql>source /网站目录/sql/glzjin_all.sql;  // 导入.sql文件
cd /网站目录
cp config/.config.php.example config/.config.php
vi config/.config.php
lnmp restart
php xcat createAdmin          //创建管理员
php xcat syncusers            //同步用户
php xcat initQQWry            //下载IP解析库
php xcat resetTraffic         //重置流量
php xcat initdownload         //下载ssr程式
执行 crontab -e命令, 添加以下四条
30 22 * * * php /网站目录/xcat sendDiaryMail
0 0 * * * php -n /网站目录/xcat dailyjob
*/1 * * * * php /网站目录/xcat checkjob
*/1 * * * * php /网站目录/xcat syncnode
如果需要自动备份,可模仿以下两例,自行添加一条
例1:每20分钟备份1次(若间隔大于60分钟,看例2):
*/20 * * * * php -n /网站目录/xcat backup

例2:每20小时备份1次(若间隔大于24小时,自行Google):
0 */20 * * * php -n /网站目录/xcat backup
如果需要财务报表,可选添加以下三条
5 0 * * * php /网站目录/xcat sendFinanceMail_day
6 0 * * 0 php /网站目录/xcat sendFinanceMail_week
7 0 1 * * php /网站目录/xcat sendFinanceMail_month
如果需要检测被墙,添加以下一条
*/1 * * * * php /网站目录/xcat detectGFW
如果要用到radius,需要添加下面这三条
*/1 * * * * php /网站目录/xcat synclogin
*/1 * * * * php /网站目录/xcat syncvpn
*/1 * * * * php -n /网站目录/xcat syncnas
教程:https://github.com/nodesource/distributions/blob/master/README.md
安装NodeJS后才可以使用php xcat npmbuild进行构建