Running JAWS in an AWS Workspace - trussworks/accessibility GitHub Wiki
Summary
The most popular desktop screen reader applications, NVDA and JAWS, both run exclusively on Windows. While you can get pretty far using VoiceOver on a Mac to perform accessibility audits, there are enough discrepancies in behavior that it is vital to also perform checks with those screen readers.
We recommend using a Windows desktop-in-the-cloud for a few reasons:
- The performance of local virtual machines is hit or miss
- There is less to maintain: AWS handles all Windows updates, etc.
- Setup of these machines can be fully automated
Time
It will take about two hours to complete the steps defined below, plus any time needed to sort out accounts or permissions beforehand.
Requirements
- An AWS account with the permissions to create and access a new Workspace
- A JAWS license (optional, but without it you have to restart the VM frequently)
- An invitation to the Truss Tailscale account (if you need to access programs running on your local machine)
Cost
AWS Workspaces are billed on a monthly or hourly basis based on their “bundle” (a combination of instance size and bundled software). Hourly billing (or on-demand) is the default and a good choice for occasional use. However, if you’re using the Workspace daily, you might find it less expensive to use a monthly subscription.
Setup for testing deployed systems
If you’re going to be performing audits of software that is publicly accessible on the internet, follow these steps.
Create a Virtual Desktop
Use the AWS console to create a new AWS Workspace by following steps in this article. A few things to keep in mind during the process:
- Using a “Standard” Windows bundle is a good default that provides adequate performance to run screen reading software.
- AWS Workspaces is now available in other availability regions, so using us-east isn’t a requirement.
- It takes a while for the machine to be spun up the first time. You can use this time to install the AWS Workspace app on your work machine and take a nice walk.
Install software on the Virtual Desktop
You’ll need to download these programs within the virtual desktop and run their installers.
- Google Chrome (https://www.google.com/chrome/)
- JAWS (https://support.freedomscientific.com/Downloads/JAWS)
Authorizing JAWS
You can use the JAWS demo to get started, but it requires the computer it is installed on to be restarted every 40 minutes. In practice this means that the first thing you do whenever going to use JAWS is restart the virtual desktop and wait for it to come back up. It is highly recommended (and legally necessary) to purchase a license for JAWS.
By default JAWS uses an internet-based authorization system that doesn’t work properly on AWS Workspaces (it erroneously reports that there isn’t an internet connection.)
Instead, use the manual/phone-based authorization option. It will provide you with a locking code. Go to this website and enter the locking code along with the authorization code you received with your JAWS license (it will be a few dozen characters long and contains letters and numbers). This can be done on your work computer. Then copy the license code back into the virtual machine and paste it into the JAWS input.
Using JAWS
By default JAWS will start when the Windows machine starts up. You might want to print out this guide and keep it nearby when doing audits.
Freedom Scientific has a tutorial series that covers the basics of browsing the internet with JAWS.
Sharing Files with the Virtual Desktop
You can log into AWS WorkDocs on your local machine and within the virtual desktop to transfer files back and forth. An example use case is auditing a locally generated PDF file with JAWS under Windows.
Sharing Workspace Audio with Zoom
A common workflow to audit work for accessibility concerns is to pair, especially as a way to share knowledge about decent patterns. Part of this being effective when a screen reader is involved is everyone on the call having the ability to hear its output.
The AWS Workspace client will use whatever audio device is selected in the Mac’s system preferences when the Workspace session is opened (confirmed through experience and by the internet). Zoom shares audio by creating a virtual audio output device and changing the system audio output to that device. This means that normally, you’d need to start a Zoom screen sharing session first and then start a new AWS Workspaces session to get it to use the virtual Zoom audio device. Womp womp.
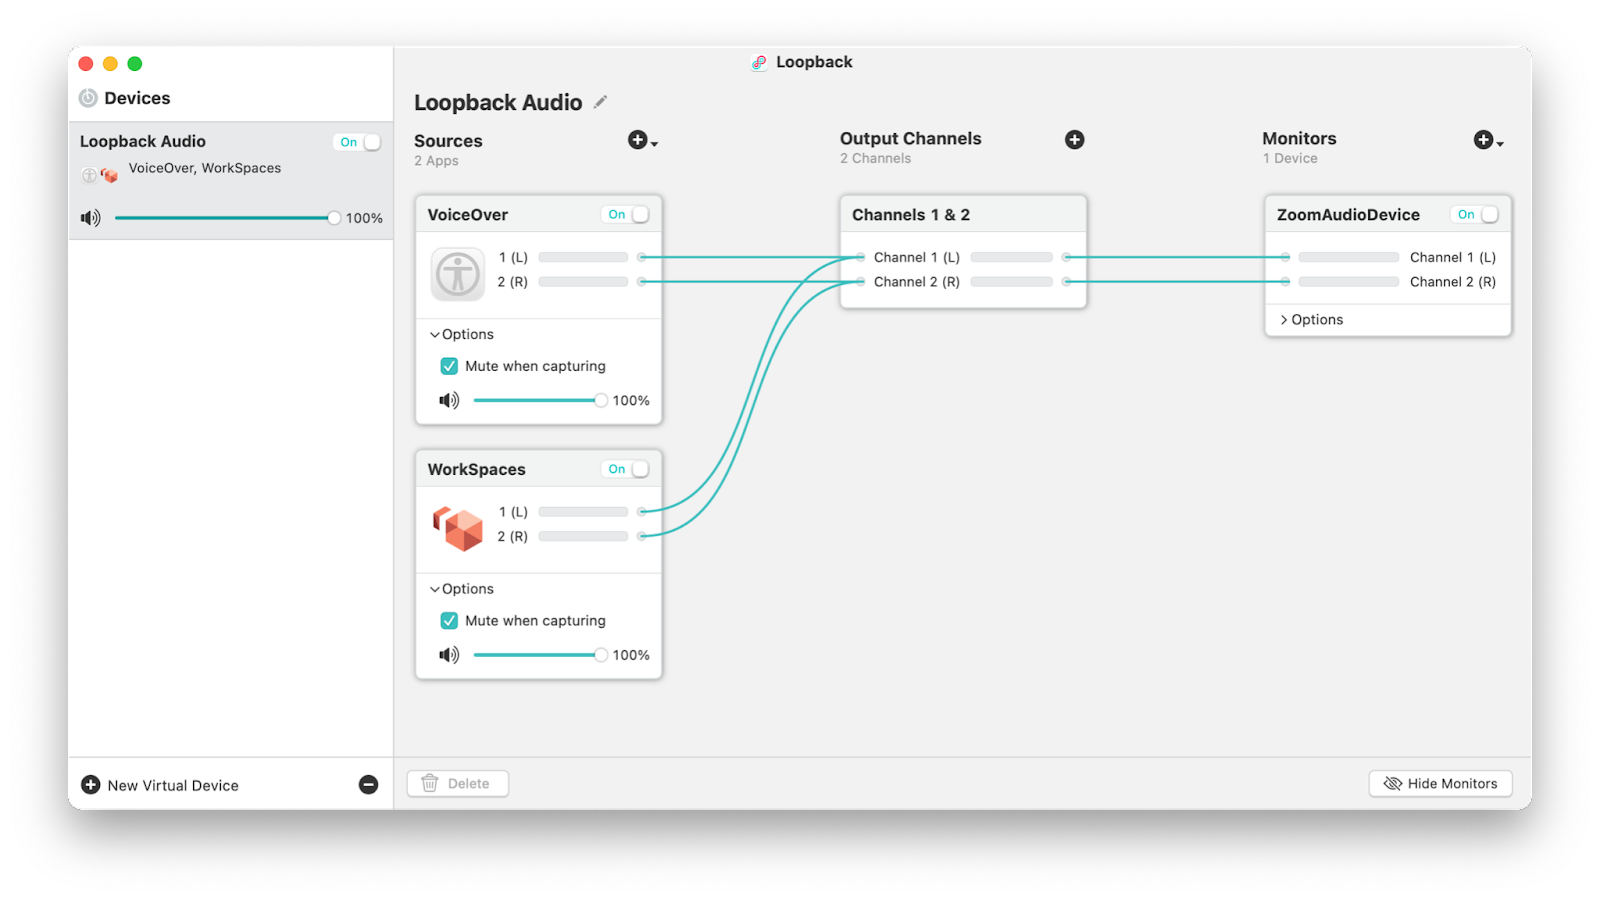
A better approach is to use Loopback to redirect the sound from AWS Workspaces to the Zoom audio device at any time. It can also be used to gain control over the audio output of Voiceover for the purpose of screen sharing or recording video walkthroughs. Here is an example Loopback configuration:
A restart is required after installation before using Loopback.
Setup for testing software running locally
If you’re going to be performing audits of software that is running locally on a team member’s machine, follow the steps above and then the following steps.
Tailscale
To access a locally-running application from the Workspaces VM, you’ll need to make a local port accessible from the VM. We’ve opted for using Tailscale to accomplish this for ease-of-use.
- Install Tailscale on both the Windows VM and your development machine.
- Log in to Tailscale on both machines.
- Configure your application to use your Tailscale hostname. It will look like machine-name.beta.tailscale.net. Here is some example code to determine your default Tailscale hostname. You might wish to use a docker-compose file to tweak some environment variables, but that is not required. You will likely need to at least configure your application to accept requests sent to a new hostname.
- You should now be able to visit a page from your local machine from within the Windows VM.
Known Issues
It appears that JAWS is using some kind of “hardware” machine detection as a basis for their authorization strategy. We’ve observed JAWS needing to be reauthorized (with a different locking code) after the VM is restarted (but not every time).
Variations
While this guide uses AWS Workspaces, most of the steps will translate easily to other virtualized Windows providers.
Similarly, NVDA could be installed on the virtual desktop to perform audits with that software as well.
References
How to build a cloud-hosted accessibility testing Windows computer using Amazon WorkSpaces