Android Custom Notification Layout - transistorsoft/capacitor-background-geolocation GitHub Wiki
On Android, the BackgroundGeolocation SDK tracks from a foreground service, and Android requires a foreground service to show a persistent notification. If the default notification doesn't suit your needs (eg: you want to add custom buttons), you can design your own notification layout:
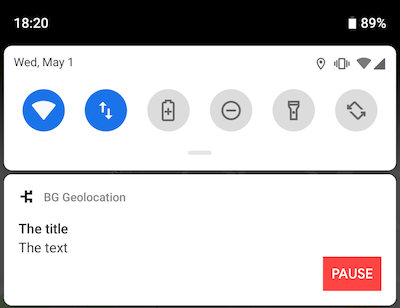
All the notification options on this page live under app.notification in your config.
Open your app's Android project in Android Studio (npx cap open android). Select File->New->XML->Layout XML File:

Enter any layout name (eg: notification_layout). Your file will be created in the folder android/app/src/main/res/layout:

Even if you have no experience with Android Layouts, it doesn't take much to figure out the basics. You'll mostly be adding <TextView />, <ImageView /> and <Button /> elements inside a <LinearLayout />. Android draws a notification layout with RemoteViews, which supports only a limited set of views (for example LinearLayout, FrameLayout, RelativeLayout, TextView, ImageView and Button). Other views, such as ConstraintLayout or your own custom views, aren't supported.
The key thing to be aware of is each element's android:id, which is how the plugin finds it:
- A few special ids are filled in by the plugin automatically (see the table below).
- Your own elements can use any
android:idyou like. You refer to them by that id inapp.notification.strings(text) andapp.notification.actions(buttons).
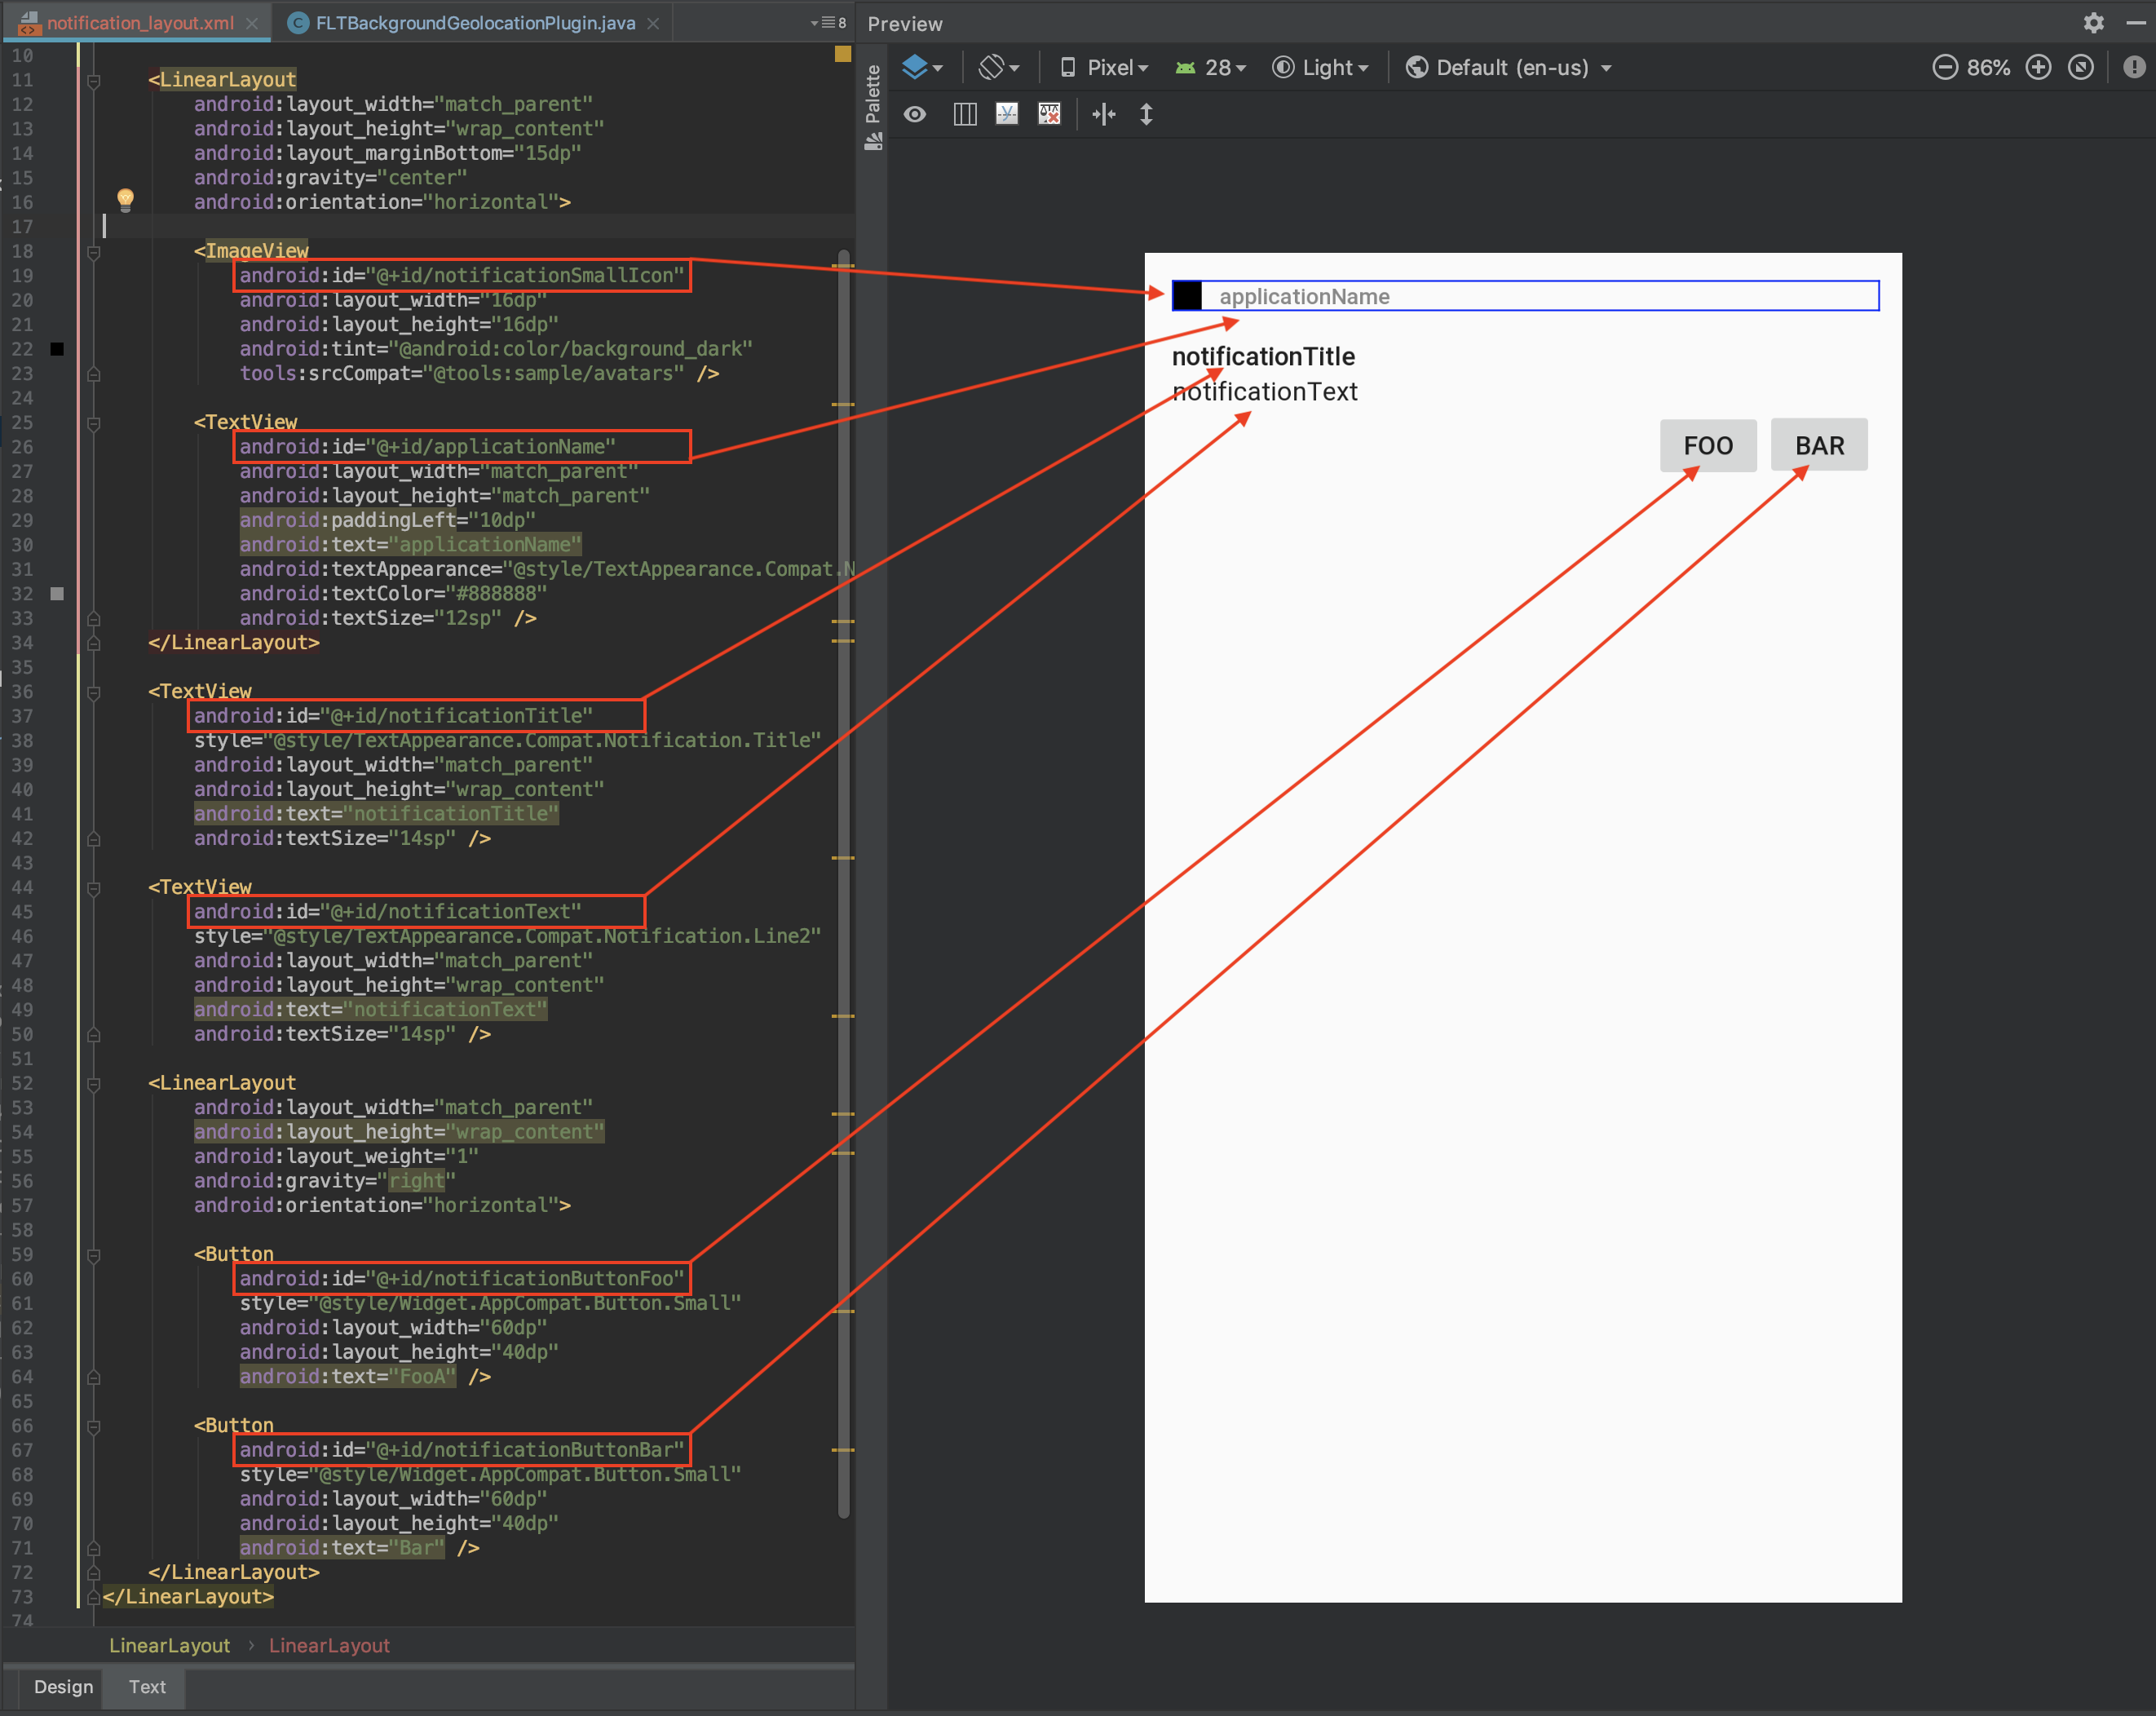
When BackgroundGeolocation renders your custom notification layout, it queries for the following elements by their android:id. When it finds one, it fills that element from the corresponding data source:
Layout element android:id
|
Data source |
|---|---|
applicationName |
Your app's name (android:label in AndroidManifest.xml) |
notificationTitle |
app.notification.title |
notificationText |
app.notification.text |
notificationSmallIcon |
app.notification.smallIcon (defaults to your app icon) |
notificationLargeIcon |
app.notification.largeIcon (filled only when you set largeIcon) |
BackgroundGeolocation.ready({
  app: {
    notification: {
      layout: 'notification_layout',     // <-- your layout file, without .xml
      title: 'The Notification Title',   // --> @+id/notificationTitle
      text: 'The Notification Text',     // --> @+id/notificationText
      smallIcon: 'mipmap/my_small_icon', // --> @+id/notificationSmallIcon (defaults to your app icon)
      largeIcon: 'mipmap/my_large_icon'  // --> @+id/notificationLargeIcon
    }
  }
});You can declare your own custom <TextView /> elements and render text into them using the app.notification.strings parameter.
<!-- Its id, myCustomElement, is the key you'll use in app.notification.strings -->
<TextView
    android:id="@+id/myCustomElement"
    style="@style/TextAppearance.Compat.Notification.Line2"
    android:layout_width="match_parent"
    android:layout_height="wrap_content"
    android:text="myCustomElement"
    android:textSize="12sp" />
Provide the text for your custom elements with app.notification.strings. Each key is the android:id of a <TextView />:
BackgroundGeolocation.ready({
  app: {
    notification: {
      layout: 'notification_layout',
      strings: {
        myCustomElement: 'My Custom Element Text'  // --> @+id/myCustomElement
      }
    }
  }
});You can declare your own custom <Button /> elements and register click-listeners upon them using the app.notification.actions parameter:
<!-- Its id, notificationButtonFoo, is the name you'll list in app.notification.actions -->
<Button
    android:id="@+id/notificationButtonFoo"
    style="@style/Widget.AppCompat.Button.Small"
    android:layout_width="60dp"
    android:layout_height="40dp"
    android:text="Foo" />
Register listeners for your buttons using app.notification.actions, and receive the clicks with onNotificationAction. The callback receives the android:id of the button that was clicked:
BackgroundGeolocation.ready({
  app: {
    notification: {
      layout: 'notification_layout',
      actions: [  // <-- the android:id of each button to listen to
        'notificationButtonFoo',
        'notificationButtonBar'
      ]
    }
  }
});

// Listen to custom button clicks:
BackgroundGeolocation.onNotificationAction((buttonId) => {
  console.log('[onNotificationAction]', buttonId);
  switch (buttonId) {
    case 'notificationButtonFoo':
      break;
    case 'notificationButtonBar':
      break;
  }
});
While your app is terminated, there is no JavaScript to receive the click. With app.stopOnTerminate: false and app.enableHeadless: true, the click is delivered instead to your Android headless task as a notificationaction event. (With the default stopOnTerminate: true, terminating your app stops tracking and removes the notification.) See Android Headless Mode.
As a starting-point for your custom layout, copy the following content into your new file:
<?xml version="1.0" encoding="utf-8"?>
<LinearLayout xmlns:android="http://schemas.android.com/apk/res/android"
    xmlns:tools="http://schemas.android.com/tools"
    android:layout_width="match_parent"
    android:layout_height="135dp"
    android:gravity="start"
    android:orientation="vertical"
    android:padding="15dp">

    <LinearLayout
        android:layout_width="match_parent"
        android:layout_height="wrap_content"
        android:layout_marginBottom="15dp"
        android:gravity="center"
        android:orientation="horizontal">

        <ImageView
            android:id="@+id/notificationSmallIcon"
            android:layout_width="16dp"
            android:layout_height="16dp"
            android:tint="@android:color/background_dark"
            tools:srcCompat="@tools:sample/avatars" />

        <TextView
            android:id="@+id/applicationName"
            android:layout_width="match_parent"
            android:layout_height="match_parent"
            android:paddingLeft="10dp"
            android:text="applicationName"
            android:textAppearance="@style/TextAppearance.Compat.Notification.Title"
            android:textColor="#888888"
            android:textSize="12sp" />
    </LinearLayout>

    <TextView
        android:id="@+id/notificationTitle"
        style="@style/TextAppearance.Compat.Notification.Title"
        android:layout_width="match_parent"
        android:layout_height="wrap_content"
        android:text="notificationTitle"
        android:textSize="14sp" />

    <TextView
        android:id="@+id/notificationText"
        style="@style/TextAppearance.Compat.Notification.Line2"
        android:layout_width="match_parent"
        android:layout_height="wrap_content"
        android:text="notificationText"
        android:textSize="14sp" />

    <TextView
        android:id="@+id/myCustomElement"
        style="@style/TextAppearance.Compat.Notification.Line2"
        android:layout_width="match_parent"
        android:layout_height="wrap_content"
        android:text="myCustomElement"
        android:textSize="12sp" />

    <LinearLayout
        android:layout_width="match_parent"
        android:layout_height="wrap_content"
        android:gravity="end"
        android:orientation="horizontal">

        <Button
            android:id="@+id/notificationButtonFoo"
            style="@style/Widget.AppCompat.Button.Small"
            android:layout_width="60dp"
            android:layout_height="40dp"
            android:text="Foo" />

        <Button
            android:id="@+id/notificationButtonBar"
            style="@style/Widget.AppCompat.Button.Small"
            android:layout_width="60dp"
            android:layout_height="40dp"
            android:text="Bar" />
    </LinearLayout>
</LinearLayout>
The screenshot below maps the elements of a similar layout to the rendered notification:
BackgroundGeolocation.ready({
  app: {
    notification: {
      layout: 'notification_layout',  // <-- the name of your file (without .xml)
      title: 'The title',
      text: 'The text',
      strings: {
        myCustomElement: 'custom TextView element'
      },
      actions: [
        'notificationButtonFoo',  // <-- register button click-listeners
        'notificationButtonBar'
      ]
    }
  }
});

// Listen to custom notification button clicks (app.notification.actions)
BackgroundGeolocation.onNotificationAction((buttonId) => {
  console.log('[onNotificationAction]', buttonId);
  switch (buttonId) {
    case 'notificationButtonFoo':
      // Handle button click on [Foo]
      break;
    case 'notificationButtonBar':
      // Handle button click on [Bar]
      break;
  }
});If something doesn't appear, set logger: { logLevel: BackgroundGeolocation.LogLevel.Warning } (or higher, such as Verbose) and watch adb logcat -s TSLocationManager. These messages are warnings and errors; at the default logLevel, Off, none of them reach logcat. The plugin reports a layout problem with one of these messages:
| Message | Cause |
|---|---|
Could not find custom notification layout '<layout>' in app/src/main/res/layout |
No layout file with that name. Use the file name without .xml. The plugin falls back to its default notification. |
Failed to find TextView resource: <key> |
A key in app.notification.strings doesn't match any android:id in your app. |
Failed to find Button resource in notification_layout for notification-action: <id> |
An entry in app.notification.actions doesn't match any android:id in your app. |
Failed to find ImageView id: notificationLargeIcon in notification layout |
You set largeIcon, but no element in your app has the android:id notificationLargeIcon. |
Failed to decode app.notification.largeIcon (vector/xml requires Drawable): <name> |
No drawable or mipmap resource matches app.notification.largeIcon, or it couldn't be loaded. |
Failed to resolve app.notification.smallIcon: <name> |
No drawable or mipmap resource matches app.notification.smallIcon. The SDK uses your app icon instead. |