external_dataset - tprelog/iocage-homeassistant GitHub Wiki
Create an external dataset for configuration
The goal of this page is to offer a basic and relatively easy approach for moving the configuration to an external dataset.
Once you have successfully completed the entire setup outlined on this page, you will have moved your configuration directories for the Home Assistant Core plugin, to an external dataset. Your configuration files will be safely separated from the jail! Most import, having a separate dataset allows for the plugin to be destroyed and recreated at any time. If configured, you will retain access to the configuration using a SMB share, even when the jail is destroyed!
Configuration can be restored by simply adding the dataset to a new jail.
Create the group
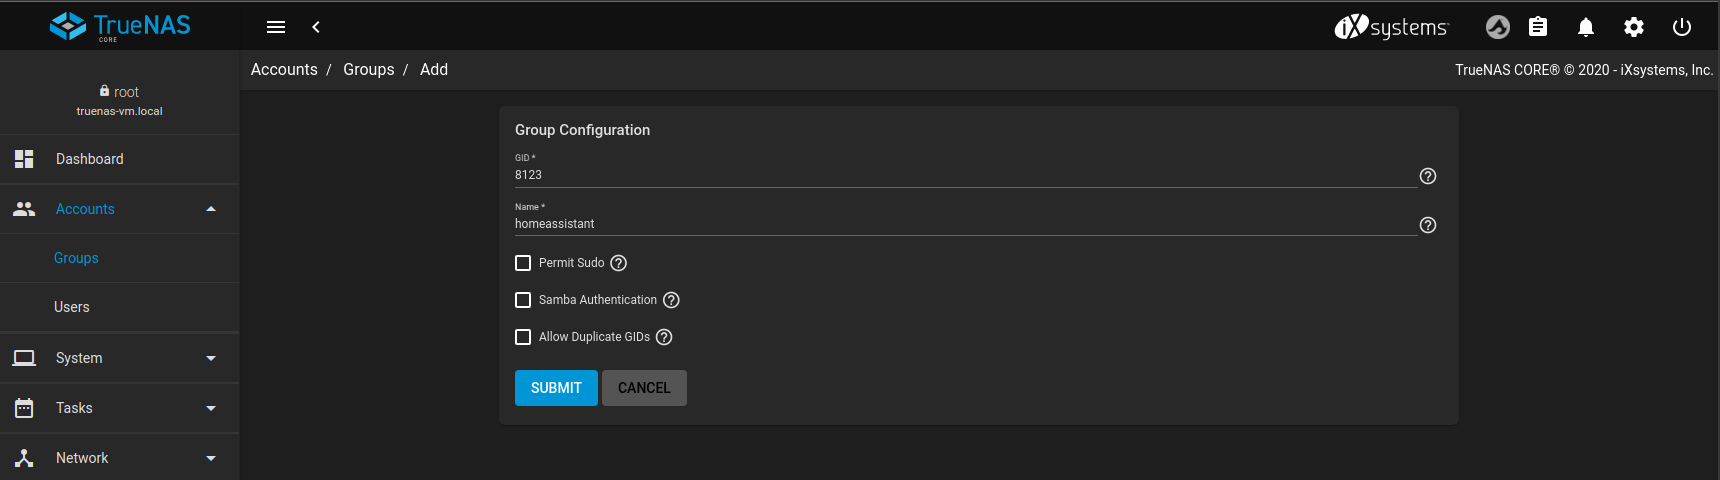
To ensure the group is created using the desired GID, it must be created before adding the user.
Create the homeassistant group with a GID of 8123 as shown below. This should match the group inside the jail.
[img/v5_1-add_group.png]add_group_raw
TrueNAS Docs: Managing Groups
Add the user
The Username and User ID should match the user inside the jail. Typically, the Username is similar to the name of the primary service and the User ID usually matches the default port being used. Create the homeassistant user with a UID of 8123 as shown below. Be sure to select, or deselect all check boxes, so they match what is shown in the screen shot.
I recommend this homeassistant is created with a /nonexistent Home Directory and the Shell set to nologin.
To ensure the desired GID is used, it is important, the check box to create a New Primary Group should not be checked. You must assign the Primary Group by selecting the existing homeassistant group you created in the first step.
[img/v5_2-add_user.png]add_user_raw
TrueNAS Docs: Managing Users
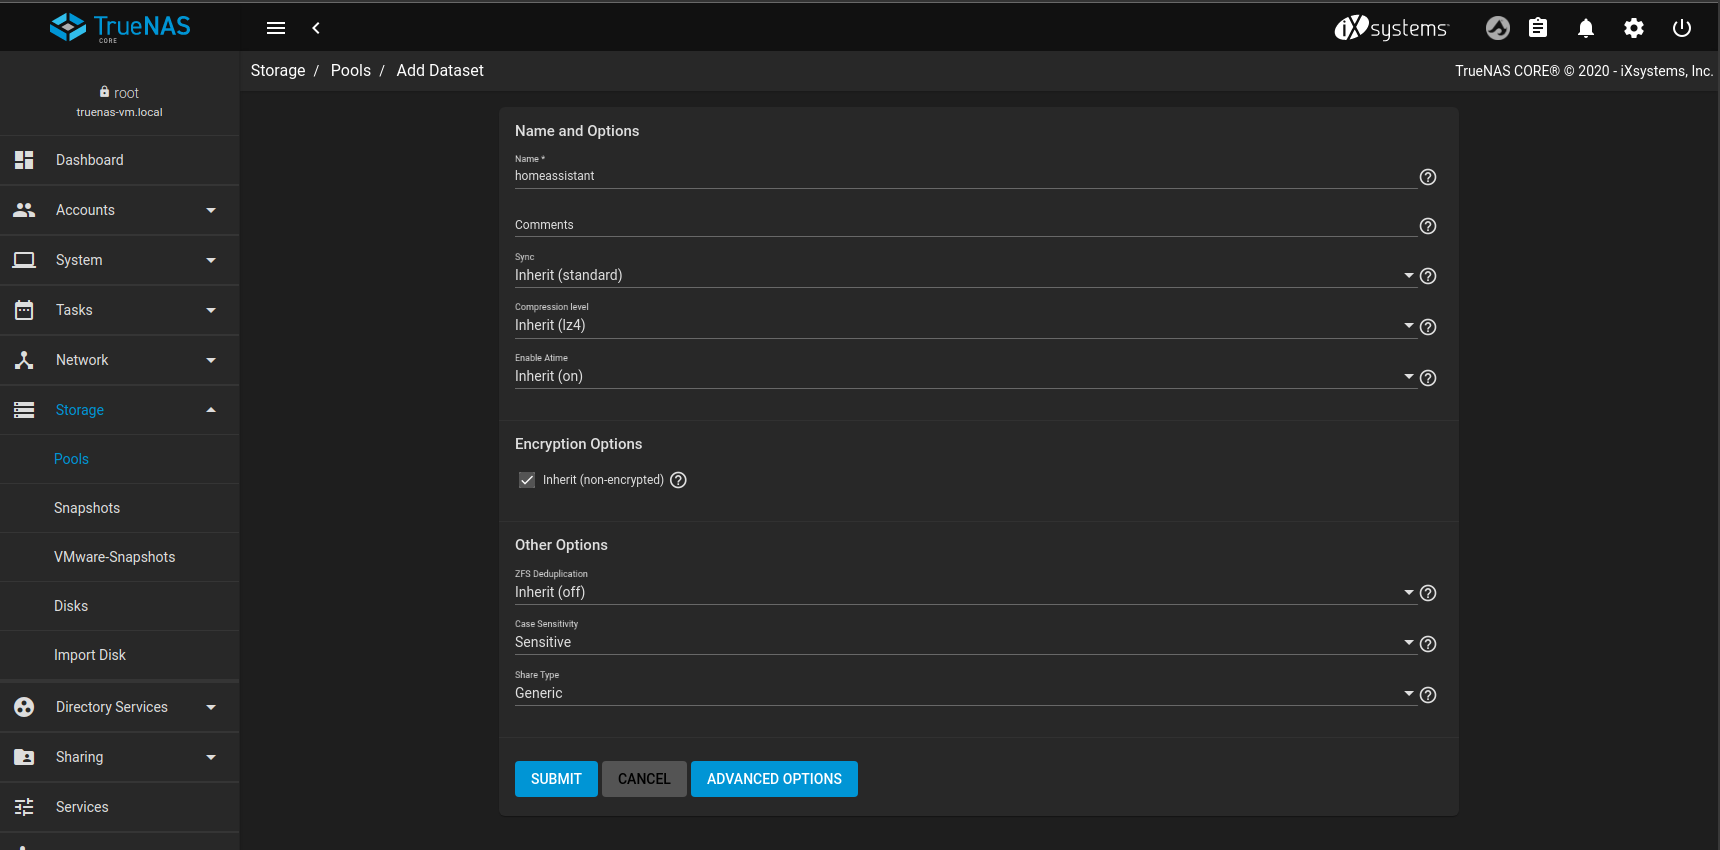
Create the dataset
Create a new dataset to store the jail's configuration directories.
Here, I have named the dataset homeassistant, matching the name of the directory where it will be mounted inside the jail, but the name of this dataset does not matter.
It is important, this dataset should be created with the Share Type set to Generic, as shown in the screen shot. Other setting were left at the default values.
[img/v5_3-create_dataset.png]create_dataset_raw
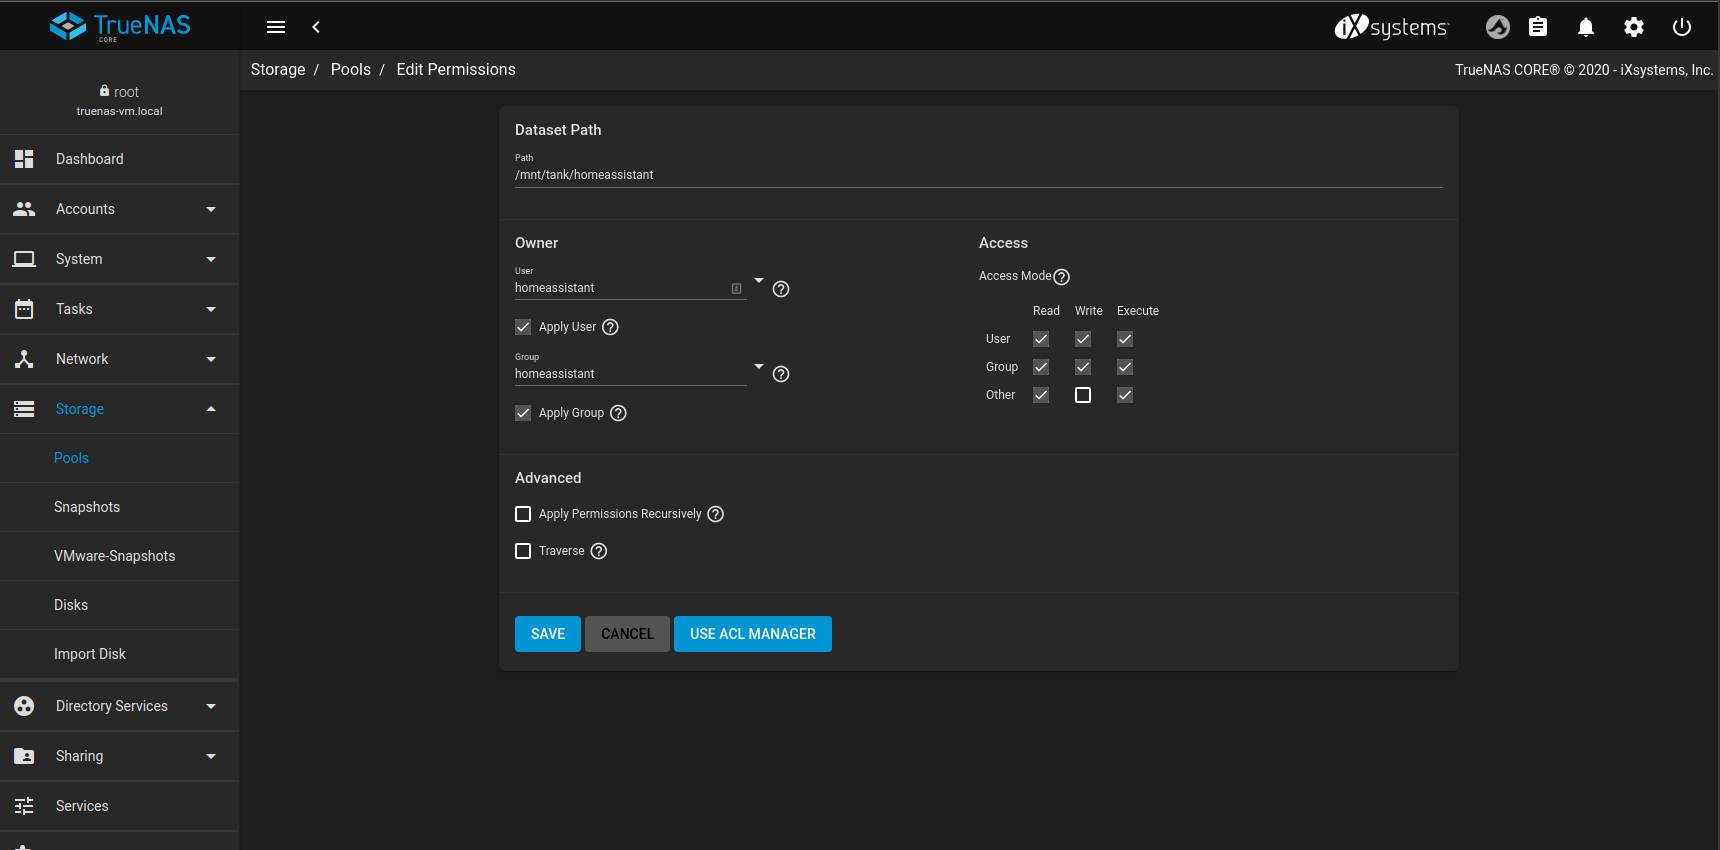
Edit the dataset permissions
Under Owner, set both user and group to homeassistant, check the boxes to apply. Under Access, set the permissions as shown in the screen shot, then press save.
Do not use the ACL Manager unless you already know what your are doing.
[img/v5_4-dataset_permissions.png]dataset_permissions_raw
TrueNAS Docs: ZFS Datasets
Copy existing configuration
From the TrueNAS console, copy the contents of the jail's existing /home/homeassistant/ directory to the new dataset.
- This is likely the most tricky part
The full path to the existing homeassistant directory will vary depending on your setup.
- Replace
$ZPOOLwith the name of the zpool where iocage has been activated - Replace
$JAILwith the name of your Home Assistant jail - Note, this is the only time on this page, paths should include a trailing forward slash (
/) at the end
cp -a /mnt/$ZPOOL/iocage/jails/$JAIL/root/home/homeassistant/ /mnt/path/to/dataset/
Adding a mount point
We are finally ready to add the dataset to the jail! I have intentionally left this for last. When ever there is a need to destroy and recreate this jail in the future, only these remaining steps will be needed to restore your configuration to the new jail.
We will need an empty directory to mount the dataset. First, stop the jail and move (or delete) the existing directory out of the way. Then use the install command to create an empty directory with the correct permissions.
The full path to the existing directory will vary depending on your setup.
- Replace
$ZPOOLwith the name of the zpool where iocage has been activated - Replace
$JAILwith the name of your Home Assistant jail
iocage stop $JAIL
mv /mnt/$ZPOOL/iocage/jails/$JAIL/root/home/homeassistant /mnt/$ZPOOL/iocage/jails/$JAIL/root/home/homeassistant_old
install -d -g homeassistant -m 775 -o homeassistant -- /mnt/$ZPOOL/iocage/jails/$JAIL/root/home/homeassistant
If you know the /mnt/path/to/dataset with your jail's configuration you can quickly finish from here, or, you can use the TrueNAS UI instead. To finish in the console, simply add the mount point to the jail. Finally, start the jail.
iocage fstab -a $JAIL "/mnt/path/to/dataset /home/homeassistant nullfs rw 0 0"
iocage start $JAIL
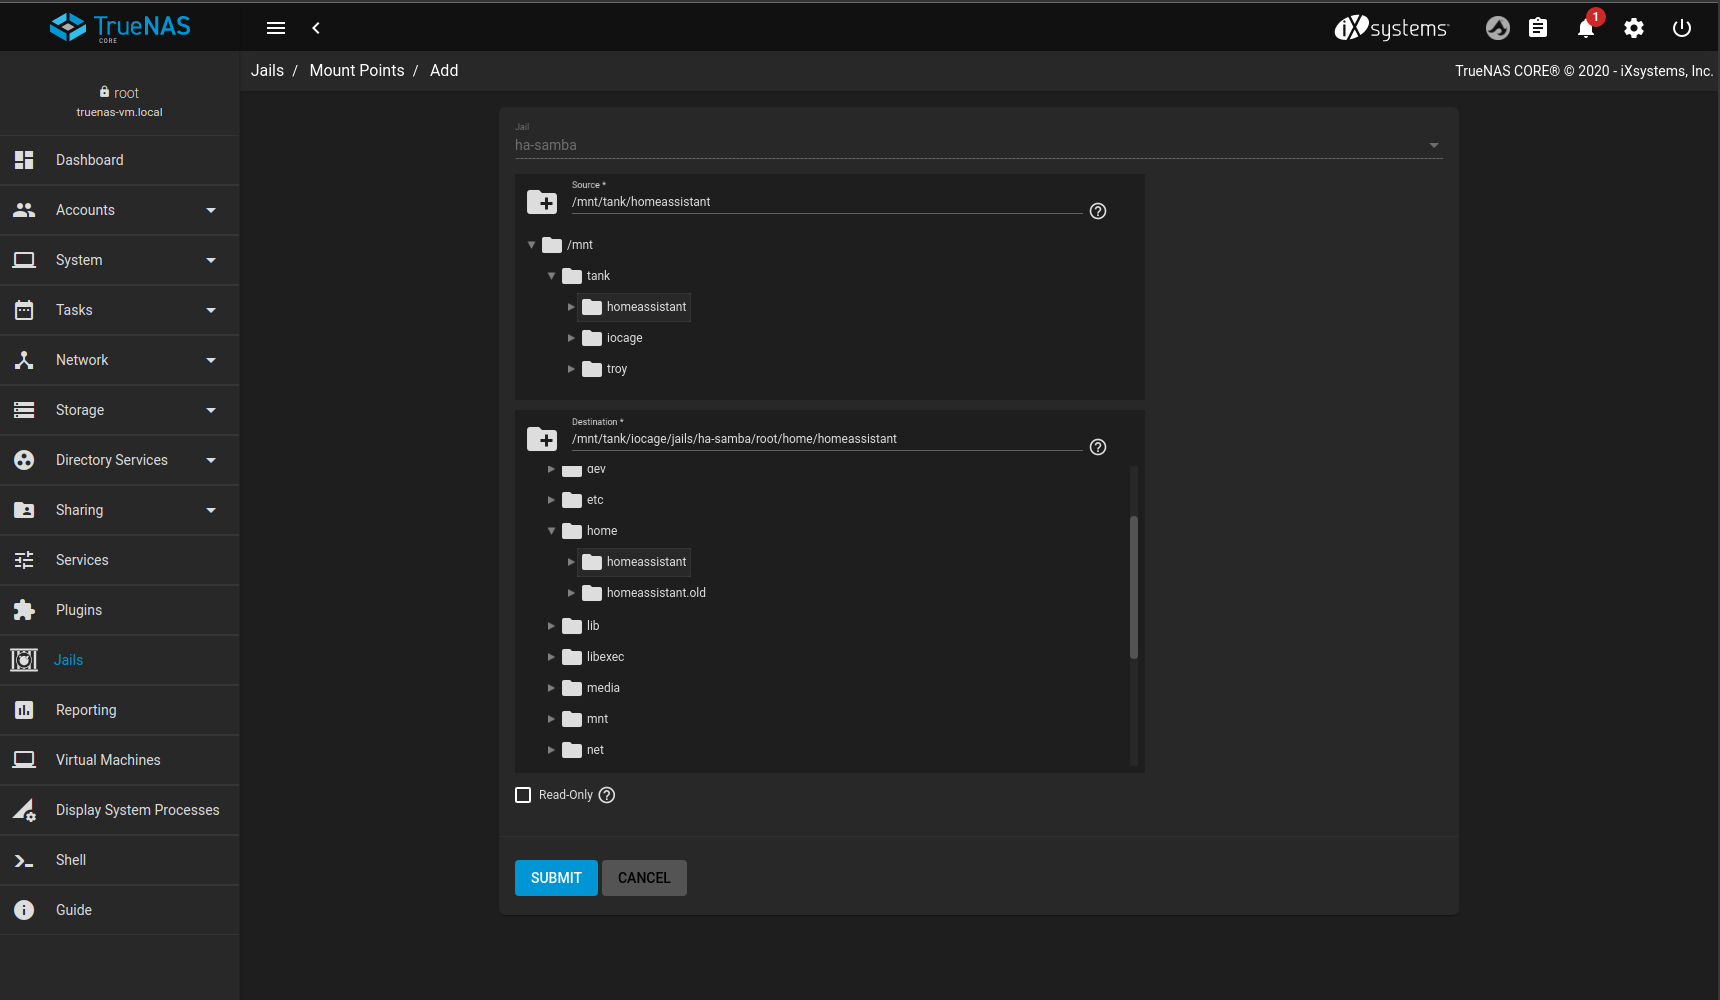
Using the TrueNAS UI
Mount the dataset with your configuration, to the empty /home/homeassistant directory you created inside the jail.
[img/v5_7-mount_point.png]mount_point_raw
Finally, start the jail.
TrueNAS Docs: Additional Storage
Reset permissions
I have included these commands but still need brief explanation.
Generally speaking, resetting the permissions should be safe for everyone, however I will point out certain files for example, if you have any shell scripts, they will need to made executable again.
If you do not know what these commands are for, you should skip this section unless otherwise told.
For reference only
chown -R homeassistant:homeassistant /mnt/path/to/dataset
find /mnt/path/to/dataset -exec setfacl -b {} \;
find /mnt/path/to/dataset -type d -exec chmod 775 {} \;
find /mnt/path/to/dataset -type f -exec chmod 664 {} \;