How to implement your design to target device in ISE - tomas-fryza/vhdl-course GitHub Wiki
- Create a new porting file Project > New Source... > Implementation Constraints File with file name
coolrunner, click on Next > and Finish buttons. Copy/paste the following code to your emptycoolrunner.ucffile.
#-----------------------------------------------------------------------
#
# Constraints file with pin assignments.
# CoolRunner-II CPLD starter board, ISE Design Suite 14.7
#
# Copyright (c) 2017-2020 Tomas Fryza
# Dept. of Radio Electronics, Brno University of Technology, Czechia
# This work is licensed under the terms of the MIT license.
#
#-----------------------------------------------------------------------

#-----------------------------------------------------------------------
# Buttons & switches
#-----------------------------------------------------------------------
# Two push buttons
#NET BTN1        LOC = P94;
#NET BTN0        LOC = P143;

# Two slide switches
#NET SW1         LOC = P124;
#NET SW0         LOC = P39;

#-----------------------------------------------------------------------
# Four discrete LEDs
#-----------------------------------------------------------------------
#NET LD3         LOC = P64;
#NET LD2         LOC = P66;
#NET LD1         LOC = P68;
#NET LD0         LOC = P69;

#-----------------------------------------------------------------------
# Four-digit time-multiplexed seven-segment LED display
#-----------------------------------------------------------------------
# LED segments
#NET disp_seg_o<6>   LOC = P56;  # segment a
#NET disp_seg_o<5>   LOC = P53;  # segment b
#NET disp_seg_o<4>   LOC = P60;  # segment c
#NET disp_seg_o<3>   LOC = P58;  # segment d
#NET disp_seg_o<2>   LOC = P57;  # segment e
#NET disp_seg_o<1>   LOC = P54;  # segment f
#NET disp_seg_o<0>   LOC = P61;  # segment g

# Digits
#NET disp_dig_o<3>   LOC = P130;
#NET disp_dig_o<2>   LOC = P129;
#NET disp_dig_o<1>   LOC = P128;
#NET disp_dig_o<0>   LOC = P126;

# Decimal point
#NET disp_dp         LOC = P59;

#-----------------------------------------------------------------------
# Clock
#-----------------------------------------------------------------------
#NET clk_i           LOC = P38;
Uncomment inputs/outputs you are using in your design and save all files in menu File > Save All.
-
Connect CoolRunner-II CPLD starter board with computer via mini USB connector and Xilinx Platform Cable USB programmer via USB B connector. To generate programming file, select Implementation view, choose source file in Hierarchy part
top - Behavioral (top.vhd), and double click on Generate Programming File (part of Implement Design in Processes window).
-
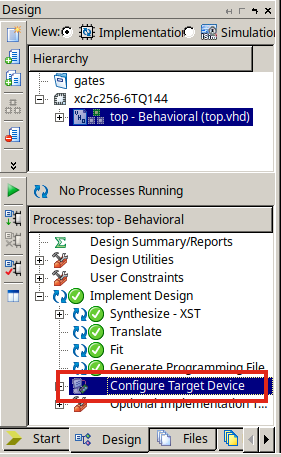
If process "Generate Programming File" completed successfully, double click on Configure Target Device (also part of Implement Design in Processes window).
-
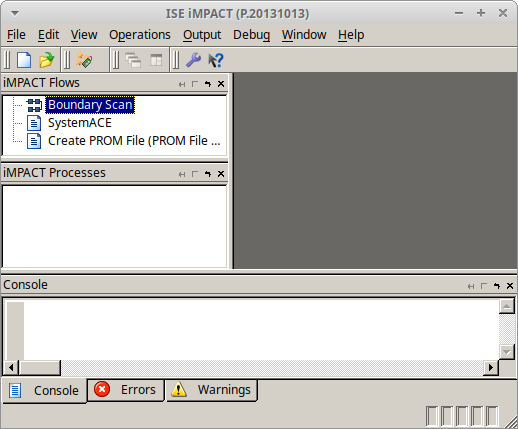
In new ISE iMPACT window, double click at Boundary Scan,
right click at Boundary Scan window and select Initialize Chain Ctrl+I. Choose Yes in Auto Assign Configuration Files Query Dialog, select
top.jedfrom your current project folder, click on Open button, and confirm OK in Device Programming Properties dialog.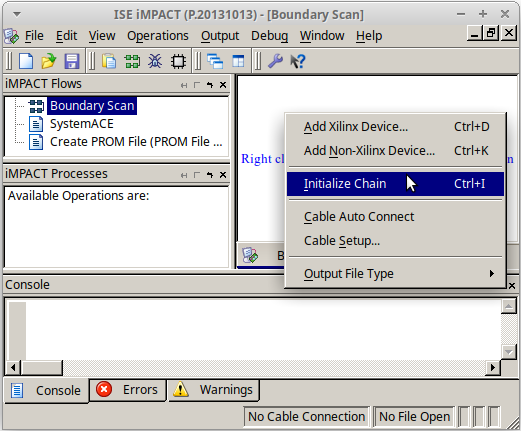
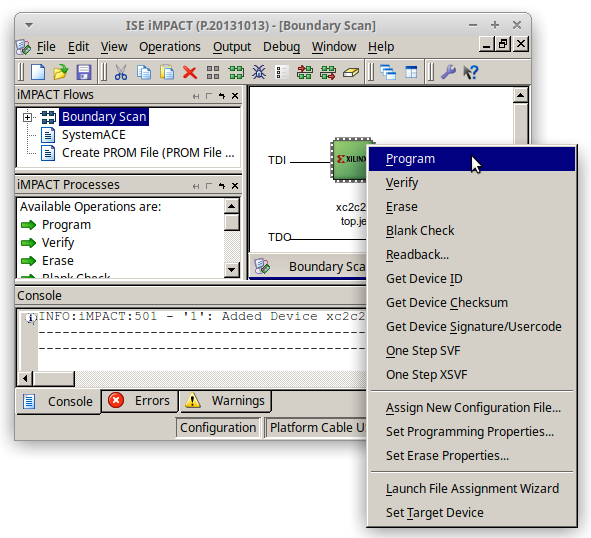
Right click on Xilinx package symbol (make it green) and select Program.
Note: If configuration process seems to be successful, but application does not run, do not close programming ISE iMPACT window, switch window to ISE Project Navigator, clean generated files in menu Project > Cleanup Project Files..., and double click on Generate Programming File again. Then in ISE iMPACT window right click on Xilinx package symbol (make it green) and select Program.
Do not close ISE iMPACT window. If you want to reprogram target device, make sure you save all files and generate a new programming file, right click on Xilinx package symbol (make it green) and select Program. There is no need to create a new Boundary Scan again. To erase the project, use File > Close configuration of target device, right click to Xilinx package, and select Erase.