Fanpico HTTP Server - tjko/fanpico GitHub Wiki
If a Raspberry Pi Pico W is installed on FanPico PCB then there is basic Web Interface available for monitoring.
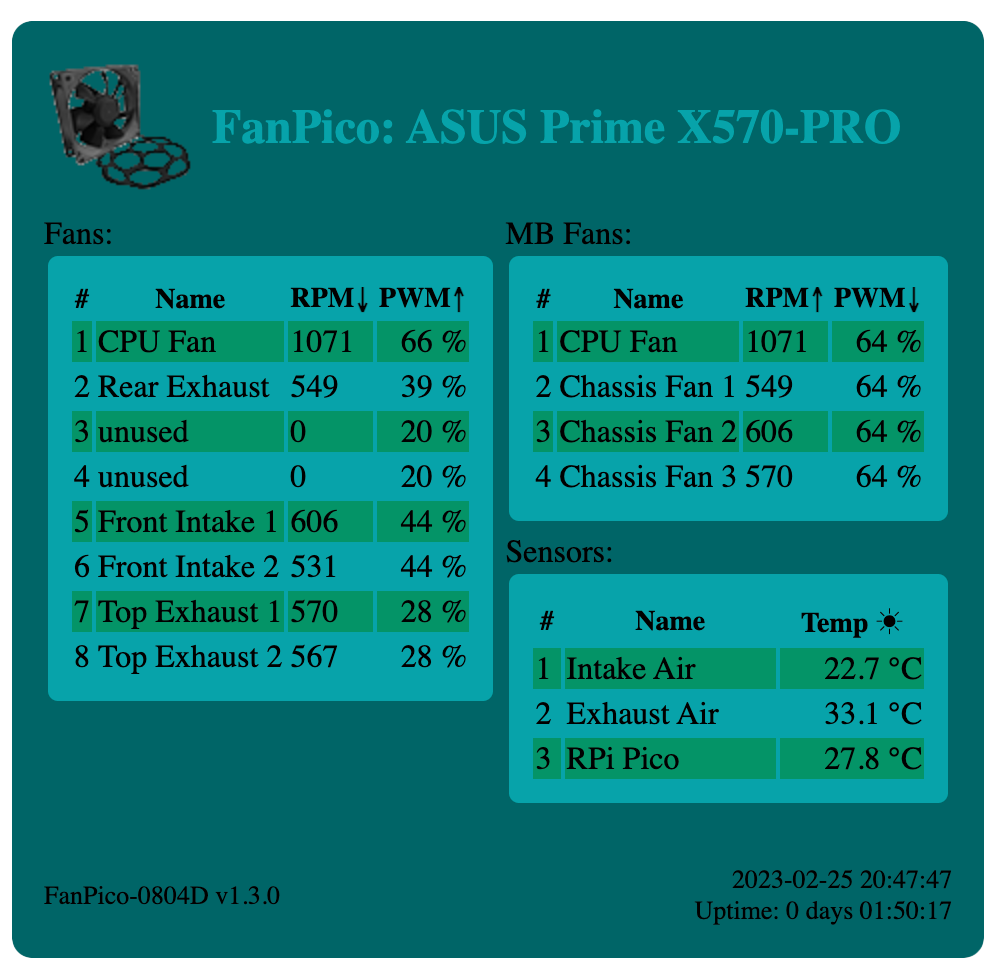
Web interface provides CSV and JSON formatted status output as well, to make it easier to automate status monitoring.
FanPico status in comma separated values (CSV) format returns same output as Read? command from console.
URL: http://x.x.x.x/status.csv
For example:
$ curl http://192.168.1.200/status.csv
fan1,"CPU Fan",606,20.20,35.0
fan2,"Rear Exhaust",483,16.10,31.5
fan3,"unused",0,0.00,35.0
fan4,"unused",0,0.00,35.0
fan5,"Front Intake 1",519,17.30,35.0
fan6,"Front Intake 2",456,15.20,35.0
fan7,"Top Exhaust 1",474,15.80,22.8
fan8,"Top Exhaust 2",462,15.40,22.8
mbfan1,"CPU Fan",606,20.20,35.0
mbfan2,"Chassis Fan 1",483,16.10,35.0
mbfan3,"Chassis Fan 2",519,17.30,35.0
mbfan4,"Chassis Fan 3",474,15.80,35.0
sensor1,"Intake Air",23.6
sensor2,"Exhaust Air",29.0
sensor3,"RPi Pico",28.2
FanPico status in JSON format is availabe using following URL:
URL: http://x.x.x.x/status.json
For example:
$ curl http://192.168.1.200/status.json
{
	"fans":	[{
			"fan":	1,
			"name":	"CPU Fan",
			"rpm":	606,
			"frequency":	20.200000763000000,
			"duty_cycle":	35
		}, {
			"fan":	2,
			"name":	"Rear Exhaust",
			"rpm":	480,
			"frequency":	16,
			"duty_cycle":	31.5000000000000
		}, {
			"fan":	3,
			"name":	"unused",
			"rpm":	0,
			"frequency":	0,
			"duty_cycle":	35
		}, {
			"fan":	4,
			"name":	"unused",
			"rpm":	0,
			"frequency":	0,
			"duty_cycle":	35
		}, {
			"fan":	5,
			"name":	"Front Intake 1",
			"rpm":	516,
			"frequency":	17.200000763000000,
			"duty_cycle":	35
		}, {
			"fan":	6,
			"name":	"Front Intake 2",
			"rpm":	450,
			"frequency":	15,
			"duty_cycle":	35
		}, {
			"fan":	7,
			"name":	"Top Exhaust 1",
			"rpm":	468,
			"frequency":	15.600000381000000,
			"duty_cycle":	22.7500000000000
		}, {
			"fan":	8,
			"name":	"Top Exhaust 2",
			"rpm":	459,
			"frequency":	15.300000191000000,
			"duty_cycle":	22.7500000000000
		}],
	"mbfans":	[{
			"mbfan":	1,
			"name":	"CPU Fan",
			"rpm":	606,
			"frequency":	20.200000763000000,
			"duty_cycle":	35
		}, {
			"mbfan":	2,
			"name":	"Chassis Fan 1",
			"rpm":	480,
			"frequency":	16,
			"duty_cycle":	35
		}, {
			"mbfan":	3,
			"name":	"Chassis Fan 2",
			"rpm":	516,
			"frequency":	17.200000763000000,
			"duty_cycle":	35
		}, {
			"mbfan":	4,
			"name":	"Chassis Fan 3",
			"rpm":	468,
			"frequency":	15.600000381000000,
			"duty_cycle":	35
		}],
	"mbfans":	[{
			"sensor":	1,
			"name":	"Intake Air",
			"temperature":	22.925205231000000
		}, {
			"sensor":	2,
			"name":	"Exhaust Air",
			"temperature":	28.996854782000000
		}, {
			"sensor":	3,
			"name":	"RPi Pico",
			"temperature":	28.244960785000000
		}]
}
There is limited TLS support starting firmware v1.6.0. In general, TLS on MQTT Client works fine. But enabling HTTPS support on the Web interface is rather slow if using RSA based certificates. HTTPS works "ok" with 1024bit RSA keys, but with 2048bit (or longer) RSA keys TLS handshake takes several seconds.
However, using ECDSA based certificates seems to work much better (but requires relatively new Browser/OS on client side).
This is short example on generating test (dummy) ECDSA certificate to test with.
First we need to generate private key (here we use NIST-P256 curve):
openssl ecparam -name prime256v1 -genkey -out key.pem
openssl ec -in key.pem -pubout -out pubkey.pem
First, we need to generate CSR (Certificate Signing Request):
openssl req -new -key key.pem -out csr.pem -subj "/CN=fanpico.mydomain.com"
Next we create self-signed certificate using the private key and the certificate request:
openssl req -x509 -days 3650 -key key.pem -in csr.pem -out cert.pem -addext "subjectAltName=DNS:fanpico.mydomain.com,IP:192.168.1.42"
This is short example on generating test (dummy) RSA certificate to test with.
First we need to generate private key (we use only 1024bit key as longer keys cause TLS handshake to take several seconds):
openssl genrsa 1024 > key.pem
First, we need to generate CSR (Certificate Signing Request):
openssl req -new -key key.pem -out csr.pem -subj "/CN=fanpico.mydomain.com"
Next we create self-signed certificate using the private key and the certificate request:
openssl req -x509 -days 3650 -key key.pem -in csr.pem -out cert.pem -addext "subjectAltName=DNS:fanpico.mydomain.com"
Both certificate and the matching private key must be installed on FanPico for HTTPS server to work.
Install private key (paste contents of "key.pem" after issuing SYS:TLS:PKEY command):
SYS:TLS:PKEY
Paste private key in PEM format:
Private key successfully saved. (length=891)
(system does not "echo" back the pasted PEM file)
Verify that key is correct by viewing the installed key:
SYS:TLS:PKEY?
-----BEGIN CERTIFICATE-----
MIIBvDCCAWOgAwIBAgIUUwnhkl3BWqwoEAeBGWlZyo5QA9wwCgYIKoZIzj0EAwIw
IDEeMBwGA1UEAwwVZmFucGljbzEubXlkb21haW4uY29tMB4XDTI1MDgwODAyMjAz
NVoXDTM1MDgwNjAyMjAzNVowIDEeMBwGA1UEAwwVZmFucGljbzEubXlkb21haW4u
Y29tMFkwEwYHKoZIzj0CAQYIKoZIzj0DAQcDQgAE5JmbfVtzvwIE+XPaMW9MT4lG
glE0xyodoEaKTNwuG8VsNnjNvMZUflLO62OT+hHzXZRuvIFi5Ji/YEi0cJ8el6N7
MHkwHQYDVR0OBBYEFIZ6veeRKVUNo4msT60XoH1e4ATvMB8GA1UdIwQYMBaAFIZ6
veeRKVUNo4msT60XoH1e4ATvMA8GA1UdEwEB/wQFMAMBAf8wJgYDVR0RBB8wHYIV
ZmFucGljbzEubXlkb21haW4uY29thwTAqAEqMAoGCCqGSM49BAMCA0cAMEQCIAY+
ml1NpaJBBIcMSOmtTQdaCn0yl61PSg8vjMTSrXv2AiAkbFYL+/HtZCYQgP7Je4J6
ypf+Gw1eYjDwo9kDAnuutg==
-----END CERTIFICATE-----
Install certificate (paste contents of "cert.pem" after issuing SYS:TLS:CERT command):
SYS:TLS:CERT
Paste certificate in PEM format:
Certificate successfully saved. (length=834)
Verify that certificate is correct:
SYS:TLS:CERT?
-----BEGIN EC PRIVATE KEY-----
MHcCAQEEIPDvvSMZKV8PXvuaS5JVM/pL/sDitnOGHUCra8m1huVfoAoGCCqGSM49
AwEHoUQDQgAE5JmbfVtzvwIE+XPaMW9MT4lGglE0xyodoEaKTNwuG8VsNnjNvMZU
flLO62OT+hHzXZRuvIFi5Ji/YEi0cJ8elw==
-----END EC PRIVATE KEY-----
After installing (or updating) certificate, FanPico must be rebooted (reset) as it only checks for certificate during boot.
To reset unit use *RST command:
*RST
(alternatively reset unit using the RESET button)