Add an RF controlled power socket to TinyPilot - tiny-pilot/tinypilot GitHub Wiki
Being able to cycle power to your remote device can be an extremely useful tool. This page describes how to use an RF controlled power socket to perform this function for under £10/$10 per socket (if you buy several).
Please note that many of the modifications described below will be lost if use the quick-install script to upgrade TinyPilot so keep copies of your files.
This guide is based on version 1.1.3 of TinyPilot - my versions of new and modified files can be found here https://github.com/UEA-envsoft/TinyPilot-RF-Socket-Control
There are 2 sections to this guide. The first covers enabling control of an RF socket from a Pi, the second covers adding this to the TinyPilot browser interface.
This is based on the work of G Kristiansen on instructables: https://www.instructables.com/Super-Simple-Raspberry-Pi-433MHz-Home-Automation/ You will need a 433 MHz RF transmitter. I bought a 5 pack of transmitter and receivers, but I recommend looking at reviews closely before making your selection as quality seems to vary greatly.
The following are example links (the one I actually used doesn’t seem to be there anymore)
UK: https://www.amazon.co.uk/kwmobile-transmitter-receiver-wireless-Raspberry/dp/B01H2D2RH6/ref=sr_1_4
US: https://www.amazon.com/DAOKI-Transmitter-Receiver-Raspberry-Wireless/dp/B00XAGRLRG/ref=pd_di_sccai_3/139-1509791-3213041
It might be useful if anyone who follows this guide could recommend or warn against particular suppliers!
You will need 3 female to female jumper wires
UK: https://www.amazon.co.uk/QuickShop-Female-Jumper-Dupont-Arduino/dp/B081F7X94V/ref=sr_1_5
US: https://www.amazon.com/Antrader-Breadboard-Dupont-Arduino-Raspberry/dp/B07S2RH6Q4/ref=sr_1_3
You will need a 433MHz RF learning socket. I had a 5 pack of Etekcity sockets lying around already
UK: https://www.amazon.co.uk/Programmable-Electrical-Household-Appliances-Operating/dp/B01FX9U0WA/ref=sr_1_2
US: https://www.amazon.com/Etekcity-Household-Appliances-Unlimited-Connections/dp/B00DQELHBS/ref=sr_1_2
I have also used Energenie sockets successfully
https://cpc.farnell.com/energenie/ener002-3/3-x-rc-socketscontroller/dp/PL13022.
Any 433MHz learning socket should work!
When I followed the instructables guide, I used the receiver to capture the control sequence for each of my 5 Etekcity sockets. However, with the Energenie sockets, I just used their learning function to use the Etekcity codes I already had available. So I believe you can use the codes I include with any learning socket and not have to go through the process of capturing the codes. If you want to do this part, it’s in the instructables guide referenced at the top of this guide.
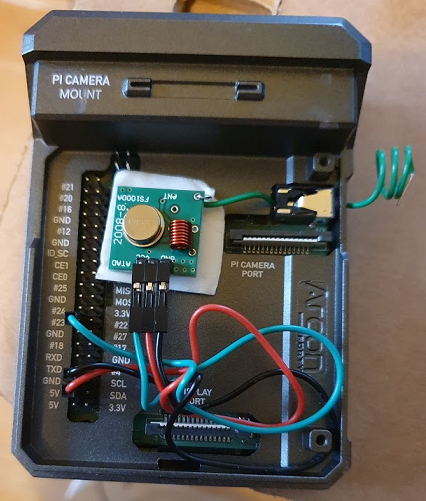
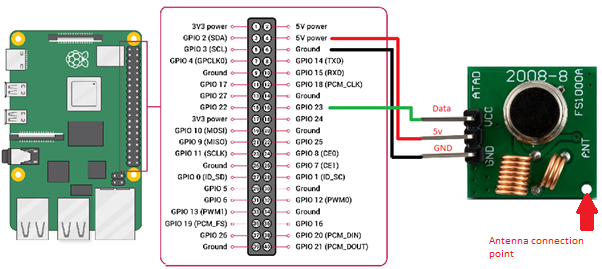
Now it’s time to add the transmitter. I have used GPIO 23 for data, if you choose to use a different GPIO pin you will need to edit the line ‘TRANSMIT_PIN = 23’ in the TransmitRF.py file (below) appropriately.

Add tinypilot to the gpio group.
sudo usermod -a -G gpio tinypilot
Reboot
sudo reboot now
Change user to tinypilot
sudo su tinypilot
Create a TransmitRF.py file in /opt/tinypilot/app/
nano /opt/tinypilot/app/TransmitRF.py
Add the following code to it
import time
import sys
import RPi.GPIO as GPIO
# codes decoded from etekcity sockets
a_on = '1111101110101010110011001'
a_off = '1111101110101010110000111'
b_on = '1111101110101010001111001'
b_off = '1111101110101010001100111'
c_on = '1111101110101000111111001'
c_off = '1111101110101000111100111'
d_on = '1111101110100010111111001'
d_off = '1111101110100010111100111'
e_on = '1111101110001010111111001'
e_off = '1111101110001010111100111'
# code invented on basis of codes a to e
f_on = '1111101110101010111111001'
f_off = '1111101110101010111100111'
short_delay = 0.00016
long_delay = 0.00056
extended_delay = 0.0056

NUM_ATTEMPTS = 10
TRANSMIT_PIN = 23

def transmit_code(code):
	'''Transmit a chosen code string using the GPIO transmitter'''
	GPIO.setmode(GPIO.BCM)
	GPIO.setup(TRANSMIT_PIN, GPIO.OUT)
	for t in range(NUM_ATTEMPTS):
		for i in code:
			if i == '1':
				GPIO.output(TRANSMIT_PIN, 1)
				time.sleep(short_delay)
				GPIO.output(TRANSMIT_PIN, 0)
				time.sleep(long_delay)
			elif i == '0':
				GPIO.output(TRANSMIT_PIN, 1)
				time.sleep(long_delay)
				GPIO.output(TRANSMIT_PIN, 0)
				time.sleep(short_delay)
			else:
				continue
		GPIO.output(TRANSMIT_PIN, 0)
		time.sleep(extended_delay)
	GPIO.cleanup()

if __name__ == '__main__':
	for argument in sys.argv[1:]:
		exec('transmit_code(' + str(argument) + ')')
Now it’s time to set up your socket. I did this with the transmitter circuit lying outside the pi case on my table and near the socket.
On the pi, as user tinypilot, have the command python /opt/tinypilot/app/TransmitRF.py a_on ready on the command line
Put the socket into learning mode and then hit return on the pi.
Hopefully the socket will now have learned this code. Repeating the command should now turn the socket on and python /opt/tinypilot/app/TransmitRF.py a_off should turn it off.
If you are controlling more than one socket within range of the transmitter, codes b to f are also available
We now have two simple python commands to control our socket. As the backend of the tinypilot interface is already written in python, adding these two commands should be fairly straight forward.
Sadly I failed utterly. I’m hoping that someone will update this wiki with the necessary solution.
My solution was stupidly complicated and deeply inelegant, but it did work.
I added php to the pi. I then created two php pages which called the power on or power off python routine and then used javascript to return to the tinypilot main page!
As user pi:
sudo apt-get update
sudo apt install php-fpm
Change user and group from www-data to tinypilot in the php www.conf file
sudo nano /etc/php/7.3/fpm/pool.d/www.conf
Change the user and group references:
user = tinypilot
group = tinypilot
Now we need to make some changes to the nginx site configuration
sudo nano /etc/nginx/sites-enabled/tinypilot.conf
add the following
location ~* ^/.+\.php$ {
  root "/opt/tinypilot/app/static";
  # pass the PHP scripts to FastCGI server listening on 127.0.0.1:9000
  #
  include snippets/fastcgi-php.conf;
  # With php-fpm (or other unix sockets):
  fastcgi_pass unix:/var/run/php/php7.3-fpm.sock;
  # With php-cgi (or other tcp sockets):
  #    fastcgi_pass 127.0.0.1:9000;
}
Reboot
sudo reboot now
A new icon for server power control
Copy rem-power-icon.png from https://github.com/UEA-envsoft/TinyPilot-RF-Socket-Control to /opt/tinypilot/app/static/img
Two php files to call the python routines
As user tinypilot create rempowoff.php and rempowon.php files in /opt/tinypilot/app/static
sudo su tinypilot
nano /opt/tinypilot/app/static/rempowon.php
<?php
echo exec('python /opt/tinypilot/app/TransmitRF.py a_on');
$loc = "http://" . $_SERVER['SERVER_ADDR'];
echo "<script>window.location.href = '$loc';</script>"
?>
nano /opt/tinypilot/app/static/rempowoff.php
<?php
echo exec('python /opt/tinypilot/app/TransmitRF.py a_off');
$loc = "http://" . $_SERVER['SERVER_ADDR'];
echo "<script>window.location.href = '$loc';</script>"
?>
If you have used one of b to f codes you will have to edit these files accordingly.
Add the new icon to the navigation bar
Modify navbar.html in /opt/tinypilot/app/templates/components
nano /opt/tinypilot/app/templates/components/navbar.html
Below
<li class="nav-icon source-link">
      <a href="https://github.com/mtlynch/tinypilot">
        <img src="/img/GitHub-Mark-Light-120px-plus.png" />
      </a>
</li>
add
<li class="nav-icon power">
      <a id="rem-power-btn" href="#" >
        <img src="/img/rem-power-icon.png" />
      </a>
</li>
Create rem-power-dialog
nano /opt/tinypilot/app/templates/custom-elements/rem-power-dialog.html
<template id="rem-power-dialog-template">
  <style>
	@import "css/button.css";

	.overlay {
	  display: none;
	  -webkit-touch-callout: none;
	  -webkit-user-select: none;
	  -khtml-user-select: none;
	  -moz-user-select: none;
	  -ms-user-select: none;
	  user-select: none;
	}

	:host([show="true"]) .overlay {
	  display: block;
	  position: fixed;
	  width: 100%;
	  height: 100%;
	  top: 0;
	  left: 0;
	  right: 0;
	  bottom: 0;
	  background-color: rgba(0, 0, 0, 0.8);
	  z-index: 2;
	}

	#rem-power-confirmation-panel > div {
	  background-color: rgb(252, 236, 223);
	  border: 1px solid rgb(139, 97, 62);
	  max-width: 800px;
	  margin: 100px auto 0rem auto;
	  padding: 2rem;
	}

	.btn-danger {
	  background-color: rgb(153, 8, 8);
	}

	.btn-danger:hover {
	  background-color: rgb(223, 48, 48);
	}
  </style>
  <div id="rem-power-confirmation-panel" class="overlay">
	<div>
	  <h3>Control Power on Remote Device?</h3>
	  <p>
		Note that this will power up or  down <strong>The Remote Device</strong>, not the Tiny Pilot Pi to which it is attached.
	  </p>
          <a href = "rempowon.php">
	  <button id="rem-power-on" class="btn-danger" type="button">
		Power On
	  </button></a>
          <a href = "rempowoff.php">
	  <button id="rem-power-off" class="btn-danger" type="button">
		Power Off
	  </button></a>
	  <button id="cancel-rem-power" type="button">Cancel</button>
	</div>
  </div>
</template>

<script>
  (function () {
	const doc = (document._currentScript || document.currentScript)
	  .ownerDocument;
	const template = doc.querySelector("#rem-power-dialog-template");

	customElements.define(
	  "rem-power-dialog",
	  class extends HTMLElement {
		constructor() {
		  super();
		}

		connectedCallback() {
		  this.attachShadow({ mode: "open" });
		  this.shadowRoot.appendChild(template.content.cloneNode(true));

		  this.shadowRoot
			.getElementById("cancel-rem-power")
			.addEventListener("click", () => {
			  this.show = false;
			});
		  this.shadowRoot
			.getElementById("rem-power-confirmation-panel")
			.addEventListener("click", (evt) => {
			  evt = window.event || evt;
			  if (evt.target.className === "overlay") {
				this.show = false;
			  }
			});
		}

		get show() {
		  return this.getAttribute("show") === "true";
		}

		set show(newValue) {
		  this.setAttribute("show", newValue);
		}


	  }
	);
  })();
</script>
Add the power dialog to the index page
Edit /opt/tinypilot/app/templates/index.html
nano /opt/tinypilot/app/templates/index.html
Below
<shutdown-dialog id="shutdown-dialog"></shutdown-dialog>
add
<rem-power-dialog id="rem-power-dialog"></rem-power-dialog>
Make sure that owner and group are tinypilot for all these files.
You should now be good to go.
Access your tinypilot website ,click on the new server power icon and see if it works!
I find that with the socket nearby I can put the cover back on my Neo case and the signal will still get through to control the socket.
If this doesn't work for you add a 17cm piece of wire to the antenna point (twist in place if you don't like soldering) in the corner of the board and poke it out the headphone socket!