HowTo Linux on Pano Logic G2 - timvideos/litex-buildenv GitHub Wiki
This how-to guide is for people who want to run Linux on Pano Logic G2 devices using LiteX BuildEnv.
You will need:
-
A second generation Panologic thin client (the one with a DVI port).
-
A PC running Linux natively or in a VM.
-
Xilinx ISE with support for the XC6SLX100/XC6SLX150 chip, there are three ways to obtain it (all of them involve a valid Xilinx account):
- download a VM image from the Xilinx website
- get the Xilinx ISE for Windows 10 with the free Webpack license
- get the Xilinx ISE for Linux with a regular (non-free) Xilinx license
All of these options should come with a valid license for the FPGA part on the Pano Logic G2. Note that a standard Webpack ISE download for Linux will most probably not support this part (please use the VM instead). Note the large download size (e.g. the VM is 6.9 GB).
-
USB-UART adapter.
All shell commands in this guide use bash.
To build Gateware for the board you need to use the pano_logic_g2 platform and the base target of LiteX BuildEnv.
On top of that you should use VexRiscv Soft CPU with CPU_VARIANT=linux and BUILD_BUILDROOT=1 exported.
By default the Gateware is built for the Rev A/B Pano (XC6SLX150 based), if you have a Rev C Pano (XC6SLX100 based) export MAKE_LITEX_EXTRA_CMDLINE="-Op device xc6slx100" before building the Gateware.
After building the Gateware you can use ./scripts/build-linux.sh to build a custom RootFS and Linux kernel for the board.
The Linux build script requires the device tree compiler (dtc) which you may need to install if you don't already have it.
For Ubuntu: sudo apt install device-tree-compiler
That should generate the following files:
<build_dir>/software/linux/firmware.bin<build_dir>/software/linux/riscv32-rootfs.cpio<build_dir>/software/linux/rv32.dtb<build_dir>/emulator/emulator.bin
To access the serial console and upload the Linux image you will need to use a USB-UART adapter compatible with 5 volt signal levels.
The default console baud rate is 115200. A different baud rate can be configured by exporting
MAKE_LITEX_EXTRA_CMDLINE="--uart-baudrate <baud rate>" prior to building the gateware. A baud rate of 1000000 has
been found to work well.
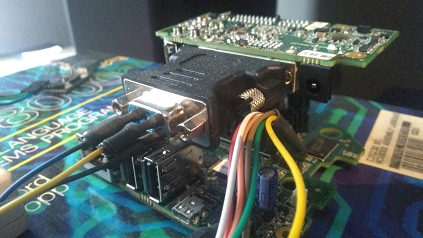
By default the UART is accessed via 2 DDC pins on the DVI connector:
| DVI Signal | PCB Pin | DVI Pin | VGA Pin | Serial signal | FPGA Pin |
|---|---|---|---|---|---|
| DDC SDA | Outside 21 | 7 | 12 | PC -> Pano | C17 |
| DDC SCL | Outside 20 | 6 | 15 | Pano -> PC | C14 |
| Ground | Outside 22 | 15 | 10 | Ground |
One easy way to make this connection is to use a DVI to VGA adapter and prototyping jumpers.
Alternately the micro HDMI connector can be used for the UART by exporting MAKE_LITEX_EXTRA_CMDLINE="-Op uart_connection hdmi"
| HDMI Signal | Pin | Serial signal | FPGA Pin |
|---|---|---|---|
| DDC SCL | 15 | PC -> Pano | AA21 |
| DDC SDA | 16 | Pano -> PC | AB19 |
| Ground | 17 | Ground |
This page offers some suggestions on how to connect a serial port to the micro HDMI port.
You can load files generated by build-linux.sh by creating an image.json file similar to this one:
{
        "build/pano_logic_g2_base_vexriscv.linux/software/linux/firmware.bin": "0x40000000",
        "build/pano_logic_g2_base_vexriscv.linux/software/linux/riscv32-rootfs.cpio": "0x40800000",
        "build/pano_logic_g2_base_vexriscv.linux/software/linux/rv32.dtb": "0x41000000",
        "build/pano_logic_g2_base_vexriscv.linux/emulator/emulator.bin": "0x41100000"
}
And then using lxterm --speed <configured_baud_rate> /dev/ttyUSB0 --images <path_to_created_image_json_file> you should be able to load the Linux kernel and the RootFS image into the DDR memory, and shortly after it finishes uploading, a Linux prompt should appear.
The Pano logic platform is not supported by linux-on-litex-vexriscv-prebuilt yet, but prebuilt images are available here.
