XenApp Essentials - thomaskrampe/CitrixCloud GitHub Wiki
Citrix XenApp Essentials
Product introduction
Microsoft Azure is a reliable and flexible cloud platform that allows quick deployment of applications in Microsoft-managed data centers. This paper provides guidelines for deploying the XenApp® Essentials Service on Azure and discusses decisions that impact deployment scenarios.
XenApp Essentials Service combines the power of the Citrix Cloud with Microsoft Azure to deliver Windows applications. XenApp Essentials Service replaces Microsoft RemoteApp and provides the same application access experience for users. It provides performance and flexibility by moving application delivery to the cloud, without sacrificing management or user experience.
Microsoft Azure Infrastructure as a Service makes it possible to create new virtual machines in minutes and adjust usage quickly when infrastructure requirements change. By provisioning XenApp Essentials workloads on Azure, businesses can avoid the acquisition and maintenance costs associated with expanding on-premises infrastructure. Instead, they can use Azure to supply the compute, storage, and networking resources to provision application sessions to meet demand.
This article describes Azure concepts and components, and basic Azure implementation using Azure Resource Manager. Azure Resource Manager deployment differs from the "classic" Service Management (ASM) model available previously about how Azure components are managed and monitored. Azure Resource Manager also provides security, auditing, and tagging features to allocate and control Azure resources. All new Azure deployments use the Azure Resource Manager model.
Deployment and Considerations
To deliver a successful XenApp Essentials proof of concept deployment, there are four key steps we must address:
- Preparing and linking your Azure subscription.
- Creating and uploading a master image.
- Creating catalogs and assigning applications to users.
- Accessing applications.
This document provides you with detailed information, example configurations of an Azure environment, and integration with XenApp Essentials. Keep in mind that there is currently no trial account for XenApp Essentials available. Citrix offer trial accounts for former ARA (Azure Remote Apps) customer only. All other customers have to buy XenApp Essentials at the Azure Marketplace. A detailed guide on how to buy XenApp Essentials via the Azure Marketplace is included in the Appendix of this document. Depending on the customer, Citrix Sales can provide help by setting up an “unofficial” trial account.
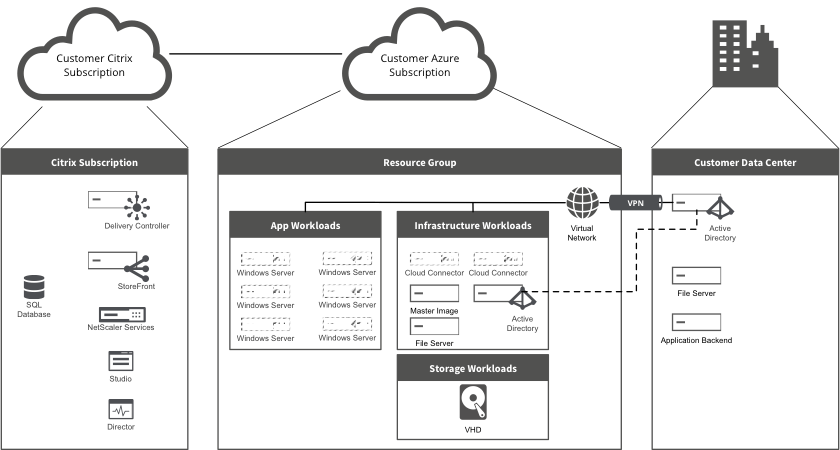
XenApp Essentials Basic Design Overview
Tasks & Prerequisites
The focus for the remainder of this document is on the detailed process of setting up and deploying the system. There are five major steps in the overall process:
- Set up an Azure account and configure the Azure Infrastructure as a Service topology (virtual networks, storage accounts, Resource Groups, Availability Sets, and infrastructure virtual machines).
- Prepare and deploy the XenApp Essentials workload master image. (Citrix-prepared images are available for use. Citrix recommends that you deploy a prepared image in a test or PoC environment only).
- Create a XenApp Essentials catalog.
- Publish applications to users.
- Access applications.
1. Preparing your Azure Subscription
In this step, we create the Azure topology, which includes virtual networks, storage accounts, resource groups, availability sets, load balancer and virtual machines. It’s assumed that the administrator created a Microsoft Azure account with Owner permissions for the subscription, and has some general experience with creating virtual machines in Azure. To configure the topology in Azure for a XenApp Essentials deployment, you must first establish these four prerequisites:
- Create an Azure resource group
- Create an Azure virtual network
- Create Azure storage accounts
- Create virtual machines for infrastructure servers including NIC's, Public IP-Address etc.
All the steps above are done by the provided ARM template. So you don't have to worry about creating all that stuff manually.
Active Directory Consideration
Integration of Active Directory is a major part in a successful PoC. We need AD for creating the machine accounts, not only for the infrastructure components. During the Cloud deployment, Citrix create two Cloud Connector VM's and of course an amount of worker or session host machines. All these VM's need an AD machine account. And don't forget your user accounts.
There are four valid option for Active Directory integration.
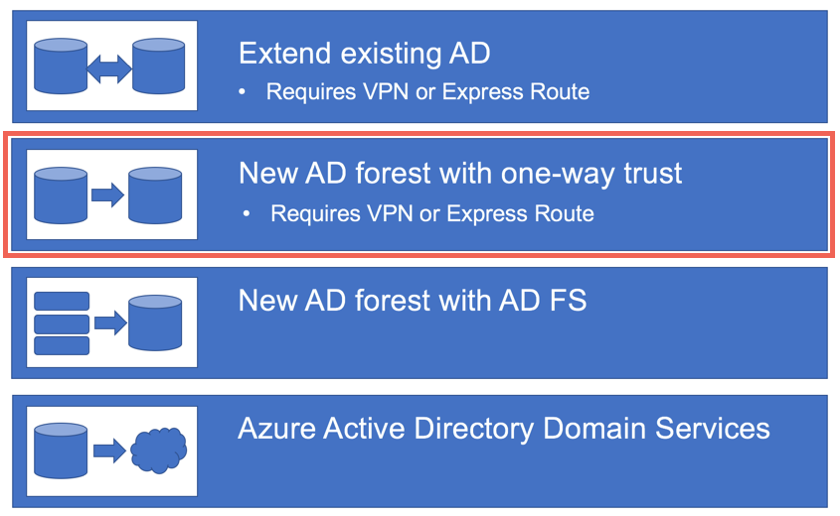
Extending existing AD
Just create a new domain controller (or two within an availability set) and add them to your existing AD. This requires VPN or Express Route configuration because these domain controllers are 100% part of your on-premise domain. If we take a look at security and replication this might not be the best solution. Because we can't use read-only domain controller this means a writeable domain controller infrastructure is in the cloud, keep that in mind when choosing this option.
New AD forest with one-way trust
A complete new and independent active directory forest in Azure (like I do it with the provided ARM template). This allows us full control without any security or replication issues. XenApp or XenDesktop Essentials can create machine accounts without permissions to our on-premise AD. For our user login’s we create a simple one-way trust to our on-premise AD. For this an Express Route or Site-2-Site VPN configuration is required as well. In a PoC use case we are able to create some test user in this "Cloud" Active Directory, so we don't need a trust yet. In my opinion, the best solution for the most use cases and included in this ARM template.
New AD forest with AD FS
This is very similar to the solution before but without a trust. This requires no Express Route or VPN but needs a lot of configurations regarding the Active Directory Federation Service. If the customer already use AD FS it might be a valid consideration but if not, use the one-way trust for a PoC instead.
Azure Active Directory Domain Services
First of all, this is not Azure AD. It’s more or less a Domain infrastructure as a service provided by Microsoft. That’s the best decision if the customer will run his entirely AD in Azure. In most cases this is good for a “Cloud-only” deployment without any on premise data center. Just for XenApp or XenDesktop Essentials it’s not the perfect solution.
Prepare the Master Image
This step isn't included in the ARM template (I just create the VM which acts as Master Image). I'm currently working on the VDA installation via DSC but LOB apps are a different story. Follow the steps to prepare the master image:
- Connect via RDP to the public IP address or DNS name of the Master Image VM
- Install necessary Line of Business (LOB) applications you want to test
- Install the Citrix XenApp server VDA (min. 7.13)
- Select Create a Master Image
- When prompted, How do you want to enter the locations of your Delivery Controllers? Select: Let Machine Creation Services do it automatically.
- Configure the default VDA features. For this deployment example, no options other than Optimize Performance are selected
- For this deployment example, Call Home is not required
- Don’t forget to stop the virtual machine in the Azure Portal (not only Windows shutdown) otherwise you can’t use the image later.
- [Optional] Connect to the domain controller again and create necessary GPO’s if you need them to configure the installed applications
Prepare the Citrix Cloud subscription
Before we can start make sure that you have a valid Citrix Cloud account with an activated XenApp Essentials trail. If not the customer must buy XenApp Essentials from the Azure Marketplace. These steps are currently not automated, but it's on my task list (one hint: Citrix Cloud API's).
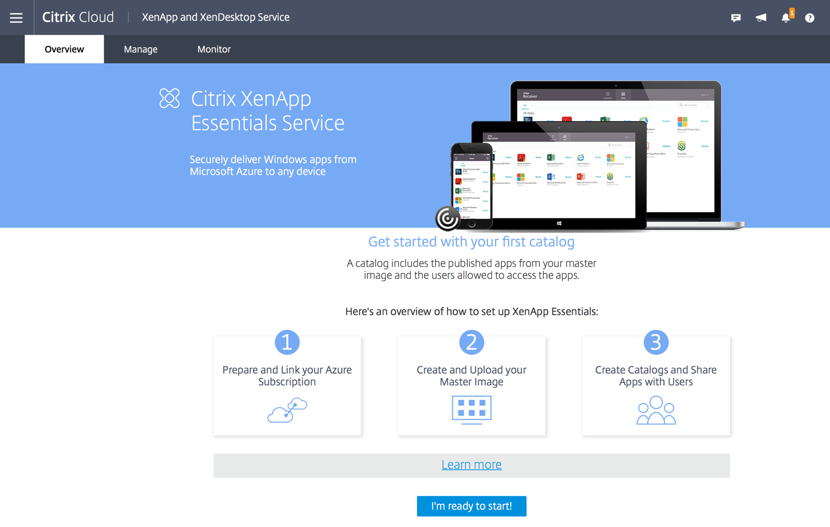
At this point you need an Account and a valid XenApp Essentials subscription. If not you have to buy it. Follow the Instruction on How to buy XenApp Essentials. Assuming you have a subscription we have the following tasks:
Create a Catalog
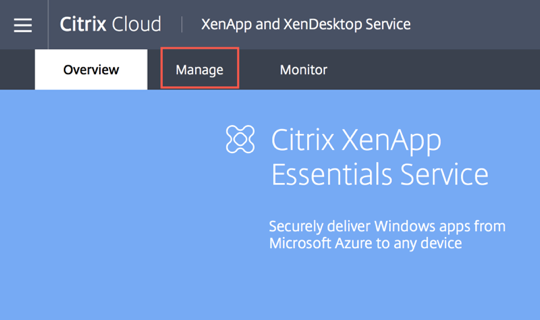
- Log on to Citrix Cloud at https://citrix.cloud.com/
- Navigate to the XenApp and XenDesktop Service and click Manage.
- After that click on Add Catalog
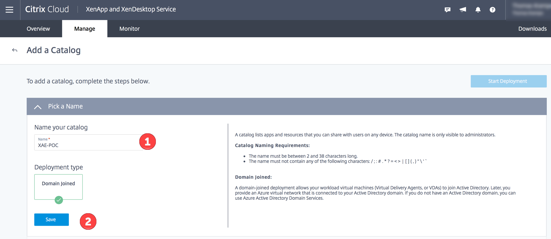
- Catalog creation starts with a catalog name and a deployment type.
- Choose a good name for your catalog (1).
- The only available deployment type is Domain joined.
- Click Save (2)
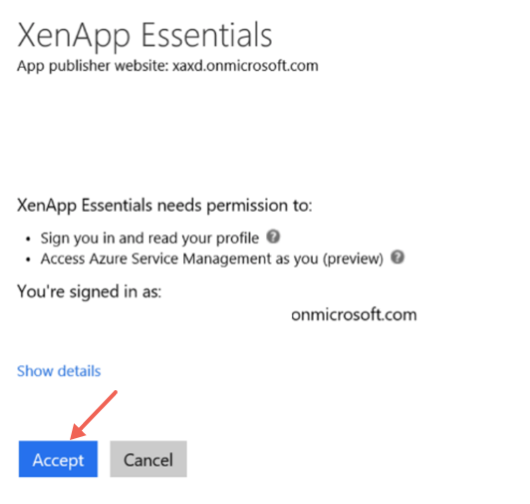
If you click on Link your Azure Subscription, you have to authenticate first. The Azure Login page appears and you have to enter the account credentials that have owner permissions for the Azure subscription.
Accept the required permissions.
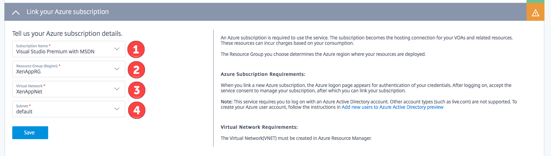
After successful authentication, you are able to select the subscription (1), the resource group (2), the virtual network (3) and the subnet (4). All of them we created earlier. Click Save.
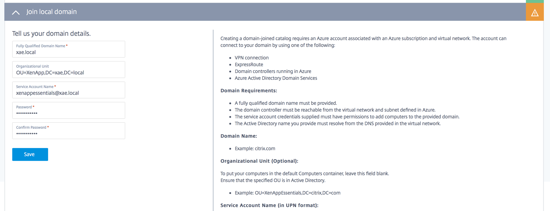
- Enter the information of your Domain created before.
- The organization unit field should point to your XAE-Computers OU.
- Click Save.
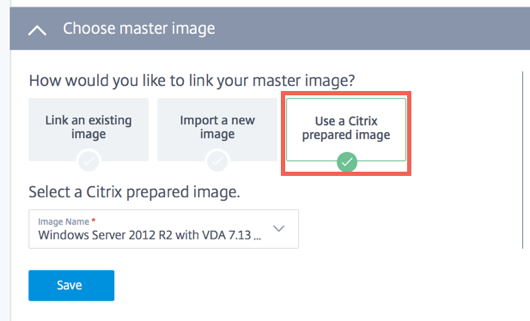
- Choose your master image.
- For a simple PoC we use the Citrix prepared image.
- For an extended PoC choose Link an existing Image and point to your master image created before.
- You can upload a new image, which should be a pepared VHD file as well.
- Click Save
In the capacity and manage costs section choose if you prefer standard HDD or SSD disks. For the XenApp session host, I prefer SSD’s. Then choose how many sessions you will run on a single host. Task worker is the best choice for a PoC.

Example configuration:
- Pick Compute:
- Task worker:
- Up to 16 users per D2v2 instance.
- Select scale settings:
- Maximum number of instances: 2
- Minimum number of running
- Instances: 1
- Set a schedule for peak time:
- Optional check box:
- Select days of the week
- Select Mon-Fri
- Start Time: 8:00 AM
- End Time: 5:00 PM
- Time zone "as appropriate"
- Minimum instances Running at Peak
- time: 2
- Set idle or disconnected time-out
- 1 hour Example configuration summary:
- Deploy two D2v2 instances that support a maximum of 16 users per instance for a total of 32 concurrent users.
- One instance is always running.
- At peak times, two instances run to support user demand.
- If the session is idle or the user disconnects, XenApp Essentials logs users off after one hour. Unused instances shut down during non-peak times and support management of capacity and costs.

After finishing that, click Start Deployment to deploy the catalog and configuration.
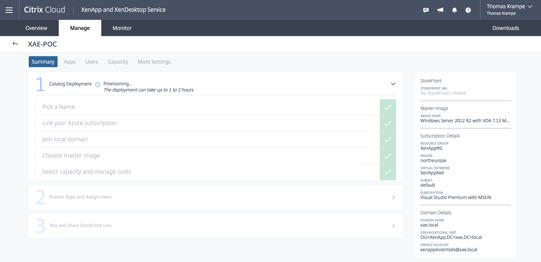
It can take 1–2 hours to deploy the catalog. The length of time depends on the number of virtual machines you selected for workloads. If anything goes wrong here please take a look at the Troubleshooting chapter.
Note: It’s absolute necessary that you have direct Internet access (no Proxy), otherwise deployment will fail.
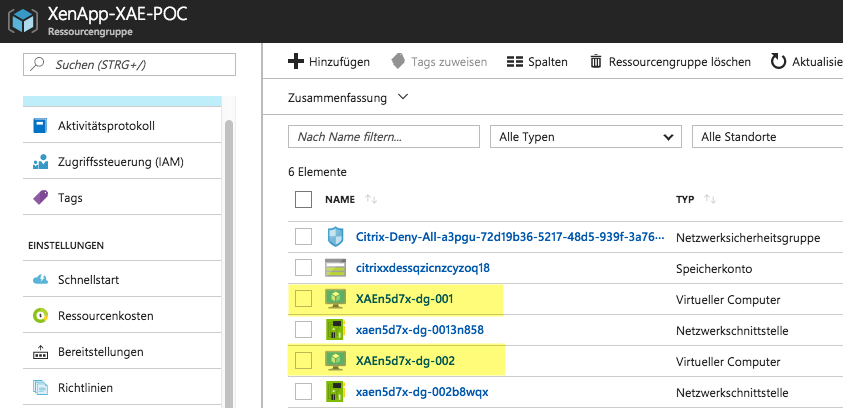
What's happen during this catalog deployment?
First of all Citrix deploys all the infrastructure components like Delivery Controller, Storefront and so on. This is more or less not visible for us. But in our Azure Resource Group we can see two new VM's with "Edge" in the VM name. These two machines are the Cloud Connector machines.
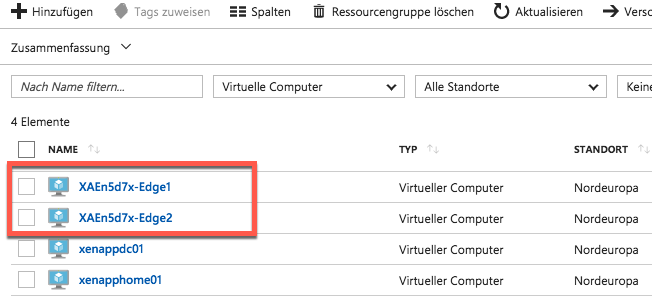
In addition we have a new Resource Group in our subscription which contains our XenApp Session Hosts.
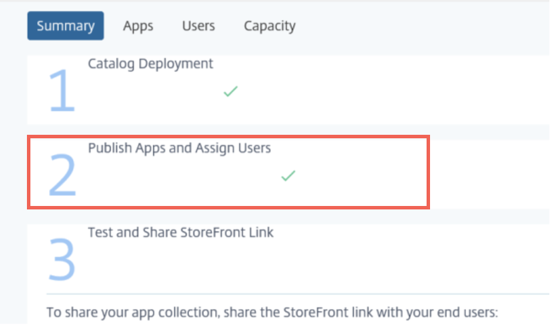
Publish Applications to Users
When catalog creation is complete, you then publish apps and assign users.
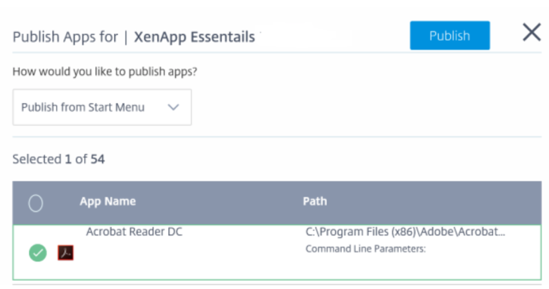
You can add apps to the catalog manually on the Catalogs tab. Click the ellipsis in the catalog that you want to update. In the context menu, click Manage Apps. Select Apps and then click + Publish Apps. When prompted, how would you like to publish apps select an option:
- Publish from Start menu
- Publish using path
In Select App, choose the apps that you want to publish. When you select the application, it publishes automatically.
On the catalog tab, click Users and then click + Add Users.
A dialog box appears asking for you to add either a user or group details.
Choose the domain (1) and mark user you want to add.

Remember: These user accounts are from your previously created AD or from your local AD, if you have configured the trust and a Site2Site VPN (or Express Route Configuration).
Configure Profile Management
Profile Management ensures that personal settings apply to user’s virtual applications, regardless of the location of the user device.
You can enable Profile Management by using the profile optimization service. This service provides a reliable way for managing these settings in Windows. Managing the profiles ensures a consistent experience by maintaining a single profile that follows the user. It consolidates automatically and optimizes user profiles to minimize management and storage requirements. The profile optimization service requires minimal administration, support, and infrastructure. Also, profile optimization provides users with an improved log on and log off experience.
The profile optimization service requires a file share where all the personal settings persist. You must specify the share as a UNC path. The path can contain system environment variables, Active Directory user attributes, or Profile Management variables.
- Click on the More Settings tab on the Catalog tab.
- Type the path to the profile share: \fileserver\share#sAMAccountName#
- Click Save.
You have to create the share on the File server created by the ARM template manually (this point is on my tasklist as well).

Note: When enabling Profile Management, consider further optimization of the user’s profile by configuring folder redirection to minimize the effects of the user profile size. Applying folder redirection complements the Profile Management Solution. For more information, see Microsoft Folder Redirection.
Accessing Applications
You can use Citrix Receiver to test application access by using the virtual infrastructure and workloads created. Validate the deployment internally and externally. To validate internally, connect to the Azure virtual machine by using an RDP session. To validate externally, connect with a public URL to the XenApp Essentials StoreFront site.
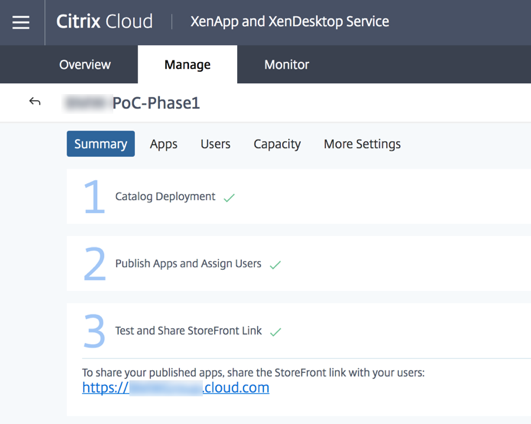
In the final step (3)
- A prompt appears to share the StoreFront link with your users:
- The shared link is unique to the organization.
Troubleshooting
There are several things which can go wrong during the catalog provisioning. Citrix put them all together in a single whitepaper. If you have any problems make sure you read CTX224151.