Migration Guide 5.9.0_ja - terasolunaorg/terasoluna-gfw GitHub Wiki
- 1. 5.9.0での主な変更点
-
2. 5.8.1から5.9.0への移行手順
- 2.1. [Step 1] 依存ライブラリを更新
- 2.2. [Step 2] LocalVariableTableParameterNameDiscovererが削除されたことに伴う対応
- 2.3. [Step 3] footer.jspの追加
- 2.4. [Step 4] aop:aspectj-autoproxyの追加
- 2.5. [Step 5] webdrivermanagerの追加
- 2.6. [Step 6] SimpleClientHttpRequestFactoryのSetterがオーバーロードされたことに伴う対応
- 2.7. [Step 7] 引数の数が同じコンストラクタが複数存在する場合の対応
- 2.8. [Step 8] TomcatのRFC9239準拠
- 2.9. [Step 9] RestTemplateがContent-lengthを出力しなくなった
- 2.10. [Step 10] リクエストパラメータ誤り時にスローされる例外の変更
- 2.11. [Step 11] Spring Framework 6.0から非推奨となったAPIへの対応
- 2.12. [Step 12] Spring Security 6.0 および 6.1 から非推奨となったAPIへの対応
- 2.13. [Step 13] Apache Commons DBCP 2.10.0 から非推奨となったAPIへの対応
- 2.14. [Step 14] Hibernate ORM 6.3 から非推奨となったAPIへの対応
- 3. JPSからThymeleafへの移行手順
- 4. XMLConfigからJavaConfigへの移行手順
|
Note
|
5.8.1.RELEASEから5.9.0.RELEASEの移行手順として説明します。 |
|
Note
|
当移行ガイドと合わせて を一読し、Spring Framework及びSpring Securityの変更を把握することを推奨します。 |
5.9.0での主な変更点は以下の通りです。
-
主要なライブラリのバージョンを更新
-
共通ライブラリの仕様を一部変更
-
ブランクプロジェクトの変更
-
ViewにThymeleafを追加
-
ConfigrationにJavaConfigを追加
-
Spring Boot Dependenciesを3.2.2へ更新
-
Spring Frameworkを6.1.3へ更新
-
Spring Securityを6.2.1へ更新
-
Spring Dateを3.2.2へ更新
-
Hibernate ORMを6.4.1.Finalへ更新
-
-
MyBatisを3.5.15、MyBatis Springを3.0.3へ更新
-
ブランクプロジェクトのライブラリ及びMavenプラグインのバージョンを変更
-
[single#583] [multi#637] update boot to 3.2.0
-
[single#592] [multi#648] Update the library version
-
[single#594] [multi#650] Set parameters to guess the parameter name
-
-
Thymeleafを使用したブランクプロジェクトを生成できるよう修正
-
[single#553] [multi#605] Added materials for Thymeleaf
-
-
JavaConfigを使用したブランクプロジェクトを生成できるよう修正
-
[single#567] [multi#619] HandlerExceptionResolverLoggingInterceptor does not work in JavaConfing
-
[single#577] [multi#632] The JavaConfig description method has been changed
-
[single#585] [multi#639] The JavaConfig description method has been unified
-
[single#598] [multi#654] Corrected withDefault settings
-
ViewとConfigrationの追加に伴いアーキタイプを新規追加しました。
詳しくは single blank、 multi blank を参照してください。
TERASOLUNA 5.8.1.RELEASEからJakartaEEのバージョンが上がったことにより、Tilesが使用できなくなりました。その影響により、JSPでTilesによる画面レイアウトができなくなっています。画面レイアウトが可能なViewを提供する目的で、ThymeleafをViewに追加しています。
JSPからThymeleafへの移行手順についてはJPSからThymeleafへの移行手順を参照してください。
この手順はXMLConfigのJSPからXMLConfigのThymeleafへの移行手順となります。XMLConfigのJSPからJavaConfigのThymeleafへの移行を行いたい場合は、XMLConfigからJavaConfigへの移行手順よりも先にJPSからThymeleafへの移行手順を実施してください。
Spring FrameworkがJavaConfigをメインで更新しており、徐々にXMLConfigがメンテナンスされなくなっています。TERASOLUNAにおいてもSpring Frameworkの開発動向に合わせJavaConfigに関するコンテンツを追加しました。
5.9.0.RELEASEではJavaConfigとXMLConfigについて対応していますが、XMLConfigに関しては次版以降削除する可能性があります。
XMLConfigからJavaConfigへの移行手順についてはXMLConfigからJavaConfigへの移行手順を参照してください。
移行手順は、以下の通りです。
|
Note
|
凡例 |
| ステップ | 手順 | MavenMultiple Projects | MavenSingle Project |
|---|---|---|---|
1. |
必須 |
必須 |
|
2. |
必須 |
必須 |
|
3. |
任意 |
任意 |
|
4. |
任意 |
任意 |
|
5. |
任意 |
任意 |
|
6. |
条件付き必須 |
条件付き必須 |
|
7. |
条件付き必須 |
条件付き必須 |
|
8. |
条件付き必須 |
条件付き必須 |
|
9. |
任意 |
任意 |
|
10. |
任意 |
任意 |
|
11. |
推奨 |
推奨 |
|
12. |
推奨 |
推奨 |
|
13. |
推奨 |
推奨 |
|
14. |
推奨 |
推奨 |
TERASOLUNA Server Framework for Java (5.x)の共通ライブラリと依存ライブラリを更新してください。
以下に、この手順により更新される代表的な依存ライブラリを示します。
| ライブラリ名 | 更新前バージョン | 更新後バージョン | 備考 |
|---|---|---|---|
TERASOLUNA Server Framework for Java (5.x) Common Library |
5.8.1.RELEASE |
5.9.0.RELEASE |
|
Spring Framework |
6.0.3 |
6.1.3 |
|
Spring Data |
3.0.0 |
3.2.2 |
|
Spring Security |
6.0.1 |
6.2.1 |
|
Spring Test |
6.0.3 |
6.1.3 |
|
MyBatis3 |
3.5.11 |
3.5.15 |
|
MyBatis3 Spring |
3.0.1 |
3.0.3 |
|
Hibernate ORM |
6.1.6.Final |
6.4.1.Final |
|
AOP |
1.9.19 |
1.9.21 |
|
Logback |
1.4.5 |
1.4.14 |
|
SLF4J |
2.0.6 |
2.0.12 |
|
Jackson |
2.14.1 |
2.15.3 |
|
Thymeleaf |
- |
3.1.2.RELEASE |
|
Hibernate Validator |
8.0.0.Final |
8.0.1.Final |
|
MapStruct |
1.5.3.Final |
1.5.5.Final |
|
Apache Commons Lang |
3.12.0 |
3.13.0 |
|
Apache Commons DBCP |
2.9.0 |
2.10.0 |
|
OpenPDF |
1.3.30 |
1.3.35 |
|
Apache POI |
5.2.3 |
5.2.5 |
|
Angus Mail |
1.0.0 |
2.0.2 |
|
Apache HttpClient |
5.1.4 |
5.2.3 |
|
Google Guava |
31.1-jre |
33.0.0-jre |
|
Apache Commons IO |
2.11.0 |
2.15.1 |
|
Lombok |
1.18.24 |
1.18.30 |
|
Mockito |
4.8.1 |
5.7.0 |
|
Bouncy Castle Provider |
1.72 |
1.77 |
[手順が必要なケース]
この手順の適用は必須です。
この更新手順は、Mavenをオンライン環境で使用しているプロジェクト向けです。
-
Maven Multiple Projectsを利用している場合
この更新手順は、 multi blank を使用して作成したマルチプロジェクト向けです。親プロジェクトのPOMファイルの
versionを5.9.0.RELEASEに修正してください。-
(
$YOUR_MULTIPLE_PROJECT_ROOT/pom.xml)<!-- omitted --> <parent> <groupId>org.terasoluna.gfw</groupId> <artifactId>terasoluna-gfw-parent</artifactId> <version>5.9.0.RELEASE</version> <!-- ### 修正箇所 ### --> </parent> <!-- omitted -->
-
-
Maven Single Projectを利用している場合
この更新手順は、 single blank を使用して作成したシングルプロジェクト向けです。プロジェクトのPOMファイルの
versionを5.9.0.RELEASEに修正してください。-
(
$YOUR_SINGLE_PROJECT/pom.xml)<!-- omitted --> <parent> <groupId>org.terasoluna.gfw</groupId> <artifactId>terasoluna-gfw-parent</artifactId> <version>5.9.0.RELEASE</version> <!-- ### 修正箇所 ### --> </parent> <!-- omitted -->
-
この更新手順は、依存ライブラリをインターネットにつながる環境でダウンロードし、ダウンロードした依存ライブラリをオフライン環境のプロジェクトに展開することで、Mavenをオフライン環境で使用しているプロジェクト向けです。
以下に記載する手順を実施してください。
-
オンライン環境
-
ブランクプロジェクトを作成
ガイドラインの記述を参考に、archetype:generateを実行し、5.9.0.RELEASEのブランクプロジェクトを作成してください。 -
依存関係の追加
現行アプリのpom.xmlを確認し、アプリ独自で設定しているdependencyをブランクプロジェクトのpom.xmlに追加してください。
アプリ独自で設定しているdependencyが不明な場合は、現行アプリで採用しているバージョンのブランクプロジェクトも作成して比較してください。 -
ローカルリポジトリへのダウンロード
以下のコマンドを実行し、依存ライブラリおよびMavenビルドに必要となるライブラリやプラグイン等をローカルリポジトリ(repositoryディレクトリ)へダウンロードしてください。mvn -P warpack clean install -Dmaven.repo.local=repository mvn dependency:go-offline -Dmaven.repo.local=repository
-
-
オンライン環境⇒オフライン環境
-
オフライン環境へのコピー
repositoryをオフライン環境の「ユーザのホームディレクトリ/.m2」へコピーしてください。
-
-
オフライン環境
-
POMの修正
オフライン環境のプロジェクトにて、[Step 1-1]に記載されている内容と同様に、pom.xmlのバージョン表記を修正してください。 -
ビルドの実行
-
envモジュールのjarファイルをwarファイルに含めない場合
以下のコマンドを実行してください。mvn -P warpack clean install
xxx-env配下に移動し以下のコマンドを実行してください。
mvn -P test-server clean package
-
envモジュールのjarファイルをwarファイルに含める場合
以下のコマンドを実行してください。mvn -P warpack-with-env,test-server clean package
-
-
Parameter Name Retention に記載されている通り、Spring Framewrok 6.1 からLocalVariableTableParameterNameDiscovererが削除されました。この影響によりバイトコードによるパラメータ名の推測がされなくなりましたが、Spring系の各機能は名前解決を前提とした作りとなっています。そのため、Java 8+のオプションである-parametersを使用しコンパイルする必要があります。
-parametersを設定しない場合、 Parameter Name Retention に記載されている通り、パラメータ名に依存した様々なケースで問題が発生する可能性があるため、5.9.0.RELEASEのブランクプロジェクトではデフォルトで設定しています。
[手順が必要なケース]
この手順の適用は必須です。
[修正方法]
pom.xmlに記載しているApache Maven Compiler Pluginにオプションを設定します。
-
(
$YOUR_PROJECT_ROOT/pom.xml)<plugin> <groupId>org.apache.maven.plugins</groupId> <artifactId>maven-compiler-plugin</artifactId> <configuration> <parameters>true</parameters> <!-- ### 追加箇所 ### --> <annotationProcessorPaths> <path> <groupId>org.mapstruct</groupId> <artifactId>mapstruct-processor</artifactId> <version>${mapstruct.version}</version> </path> <!-- REMOVE THIS LINE IF YOU USE MapStruct AND Lombok <path> <groupId>org.projectlombok</groupId> <artifactId>lombok</artifactId> <version>${lombok.version}</version> </path> <path> <groupId>org.projectlombok</groupId> <artifactId>lombok-mapstruct-binding</artifactId> <version>${lombok-mapstruct-binding.version}</version> </path> REMOVE THIS LINE IF YOU USE MapStruct AND Lombok --> </annotationProcessorPaths> <compilerArgs> <arg>-Amapstruct.defaultComponentModel=spring</arg> </compilerArgs> </configuration> </plugin>
blankプロジェクトにfooter.jspを追加しました。
[手順が必要なケース]
この手順の適用は任意です。
[修正方法]
マルチブランクプロジェクト を例に説明します。
-
footer.jspを作成layoutフォルダ配下に
footer.jspを作成します。以下は ガイドラインに記載のfooter.jspの例 となります。
-
(
$YOUR_PROJECT/src/main/webapp/WEB-INF/views/layout/footer.jsp)<p style="text-align: center; background: #e5eCf9;">Copyright © 20XX CompanyName</p>
-
-
footer.jspの読み込みfooter.jspを読み込むJSPでincludeします。以下は ガイドラインに記載のfooter.jspを読み込むJSPの例 となります。
<jsp:include page="../layout/header.jsp" />
<div id="wrapper">
    <h1 id="title">Hello world!</h1>
    <p>The time on the server is ${serverTime}.</p>
</div>
<!-- ### 追加箇所 開始 ### -->
<hr>
<jsp:include page="../layout/fotter.jsp" />
<!-- ### 追加箇所 終了 ### -->
XMLConfigベースのブランクプロジェクトにaop:aspectj-autoproxyを追加しました。
XMLConfigベースのブランクプロジェクトではアノテーションベースのAOPは必須ではありませんが、ConfigrationにJavaConfigを追加する対応の一環で、アノテーションベースのAOPを有効にするためweb層にEnableAspectJAutoProxyを追加しています。JavaConfigとXMLConfigの設定を統一する目的で、XMLConfigベースのブランクプロジェクトにもaop:aspectj-autoproxyを追加しました。
[手順が必要なケース]
この手順の適用は任意です。
[修正方法]
applicationContext.xmlおよびspring-mvc.xmlにaop:aspectj-autoproxyを追加します。
-
(
$YOUR_PROJECT/src/main/resources/META-INF/spring/applicationContext.xml)<?xml version="1.0" encoding="UTF-8"?> <beans xmlns="http://www.springframework.org/schema/beans" xmlns:xsi="http://www.w3.org/2001/XMLSchema-instance" xmlns:context="http://www.springframework.org/schema/context" xmlns:aop="http://www.springframework.org/schema/aop" <!-- ### 追加箇所 ### --> xsi:schemaLocation=" http://www.springframework.org/schema/beans https://www.springframework.org/schema/beans/spring-beans.xsd http://www.springframework.org/schema/context https://www.springframework.org/schema/context/spring-context.xsd http://www.springframework.org/schema/aop https://www.springframework.org/schema/aop/spring-aop.xsd <!-- ### 追加箇所 ### --> "> <!-- omitted --> <aop:aspectj-autoproxy /> <!-- ### 追加箇所 ### --> <!-- omitted --> </beans>
-
(
$YOUR_PROJECT/src/main/resources/META-INF/spring/spring-mvc.xml)<?xml version="1.0" encoding="UTF-8"?> <beans xmlns="http://www.springframework.org/schema/beans" xmlns:xsi="http://www.w3.org/2001/XMLSchema-instance" xmlns:context="http://www.springframework.org/schema/context" xmlns:mvc="http://www.springframework.org/schema/mvc" xmlns:util="http://www.springframework.org/schema/util" xmlns:aop="http://www.springframework.org/schema/aop" xsi:schemaLocation="http://www.springframework.org/schema/mvc https://www.springframework.org/schema/mvc/spring-mvc.xsd http://www.springframework.org/schema/beans https://www.springframework.org/schema/beans/spring-beans.xsd http://www.springframework.org/schema/util https://www.springframework.org/schema/util/spring-util.xsd http://www.springframework.org/schema/context https://www.springframework.org/schema/context/spring-context.xsd http://www.springframework.org/schema/aop https://www.springframework.org/schema/aop/spring-aop.xsd "> <!-- omitted --> <aop:aspectj-autoproxy /> <!-- ### 追加箇所 ### --> <!-- omitted --> </beans>
blankプロジェクトのPOMにwebdrivermanagerの依存関係を追加しました。
[手順が必要なケース]
この手順の適用は任意です。
seleniumを使用した試験を実施しない場合は適用する必要はありません。
[修正方法]
-
Maven Multiple Projectsを利用している場合
この更新手順は、 multi blank を使用して作成したマルチプロジェクト向けです。親プロジェクトのPOMファイルに
webdrivermanagerを追加してください。-
(
$YOUR_MULTIPLE_PROJECT_ROOT/pom.xml)<dependencyManagement> <dependencies> <!-- omitted --> <!-- == Begin Unit Test == --> <dependency> <groupId>junit</groupId> <artifactId>junit</artifactId> <scope>test</scope> </dependency> <!-- ### 追加箇所 開始 ### --> <dependency> <groupId>io.github.bonigarcia</groupId> <artifactId>webdrivermanager</artifactId> <version>${webdrivermanager.version}</version> <scope>test</scope> </dependency> <!-- ### 追加箇所 終了 ### --> <dependency> <groupId>org.mockito</groupId> <artifactId>mockito-core</artifactId> <scope>test</scope> </dependency> <!-- omitted --> </dependencies> </dependencyManagement> <properties> <!-- omitted --> <webdrivermanager.version>5.6.3</webdrivermanager.version> <!-- ### 追加箇所 ### --> <!-- omitted --> </properties>
-
-
Maven Single Projectを利用している場合
この更新手順は、 single blank を使用して作成したシングルプロジェクト向けです。プロジェクトのPOMファイルに
webdrivermanagerを追加してください。-
(
$YOUR_SINGLE_PROJECT/pom.xml)<dependencies> <!-- omitted --> <!-- == Begin Unit Test == --> <dependency> <groupId>junit</groupId> <artifactId>junit</artifactId> <scope>test</scope> </dependency> <!-- ### 追加箇所 開始 ### --> <dependency> <groupId>io.github.bonigarcia</groupId> <artifactId>webdrivermanager</artifactId> <version>${webdrivermanager.version}</version> <scope>test</scope> </dependency> <!-- ### 追加箇所 終了 ### --> <dependency> <groupId>org.mockito</groupId> <artifactId>mockito-core</artifactId> <scope>test</scope> </dependency> <!-- omitted --> </dependencies> <properties> <!-- omitted --> <webdrivermanager.version>5.6.3</webdrivermanager.version> <!-- ### 追加箇所 ### --> <!-- omitted --> </properties>
-
Spring Framework 6.1 から SimpleClientHttpRequestFactory#setConnectTimeout(Duration) や SimpleClientHttpRequestFactory#setReadTimeout(Duration) メソッドが追加されたことにより、XMLConfigでパラメータを設定する際に誤ったSetterにマッピングされてしまう事象が確認されています。なお、JavaConfigでは問題なく動作します。
当問題については Spring#31872 がcloseされていますが問題は解消されておらず、Spring Framework 6.1.4 以降の Spring#32159 および Spring#32329 で対応されています。当フレームワークが使用するSpring Frameworkのバージョンは6.1.3であり、想定外のSetterが使われる事象は解消されていないため、FactoryBeanを使用してJavaクラスでSetterを呼び出してください。
|
Note
|
|
[手順が必要なケース]
この手順の適用は条件付き必須です。
以下の両方のケースに当てはまる場合、修正を行ってください。
-
SimpleClientHttpRequestFactoryをXMLConfigでBean定義している -
setConnectTimeout(int)またはsetReadTimeout(int)を設定している
|
Note
|
Spring Framework 6.1 から追加された |
[修正方法]
SimpleClientHttpRequestFactoryをFactoryBean経由でBean定義します。
詳しくは 通信タイムアウトの設定のXML Configタグ を参照してください。
「HTTP Proxyサーバの指定方法」のXML Configタグ に記載のとおり、引数の数が等しいコンストラクタが存在する場合、想定していないコンストラクタが使用されるケースが存在しています。これは LocalVariableTableParameterNameDiscovererが削除されたことに伴う対応 に記載した通り、-parameterを設定していない場合に変数の名前を解決しなくなったことが原因ですが、HttpHostのように3rd-party製のライブラリが-parameterを設定せずにビルドしている場合は名前解決ができない状態のままとなっています。
[手順が必要なケース]
この手順の適用は条件付き必須です。
以下のケースに当てはまる場合、修正を行ってください。
-
3rd-party製のAPIで、オーバーロードされたコンストラクタを使用しており、誤ったコンストラクタが使用される場合
[修正方法]
コンストラクタ引数にtype属性を付与し、型を指定することで使用するコンストラクタを一意に特定できるようにします。
修正例は 「HTTP Proxyサーバの指定方法」のXML Configタグ を参照してください。
Tomcat 10.1.8 から RFC9239 に準拠するよう変更されました。この影響により、text/ecmascript、application/javascript、application/ecmascriptが非公開となりtext/javascriptが返却されるようになります。
[手順が必要なケース]
この手順の適用は条件付き必須です。
以下のケースに当てはまる場合、修正を行ってください。
-
リクエストを受け取るアプリケーションサーバにTomcat 10.1.8以上のバージョンを使用している
-
Content-Typeヘッダに
text/ecmascript、application/javascript、application/ecmascriptのいずれかを指定している
[修正方法]
Content-Typeヘッダに指定する値をtext/javascriptに変更する。
Web Applications に記載されている通り、Spring Framewrok 6.1 からRestTemplateを使用した通信ではContent-Lengthヘッダが設定されないよう修正されました。
Content-Lengthヘッダを設定したい場合は、使用しているClientHttpRequestFactoryを BufferingClientHttpRequestFactory でラップする必要があります。
[手順が必要なケース]
この手順の適用は任意です。
[修正方法]
ClientHttpRequestFactoryをBufferingClientHttpRequestFactoryでラップしてください。
以下は、SimpleClientHttpRequestFactoryを使用する場合の例となります。
<bean id="restTemplate" class="org.springframework.web.client.RestTemplate">
    <constructor-arg>
        <bean class="org.springframework.http.client.BufferingClientHttpRequestFactory">
            <constructor-arg>
                <bean class="org.springframework.http.client.SimpleClientHttpRequestFactory" />
            </constructor-arg>
        </bean>
    </constructor-arg>
</bean>リクエストパラメータが誤っている場合にスローされる例外がBindExceptionからMethodArgumentNotValidExceptionに変更されました。
[手順が必要なケース]
この手順の適用は任意です。
[修正方法]
MethodArgumentNotValidExceptionはBindExceptionのサブクラスであるため、BindExceptionをハンドリングしていればMethodArgumentNotValidExceptionがスローされた際にもハンドリングはされますが、より厳密にハンドリングを実施するためにはBindExceptionからMethodArgumentNotValidExceptionへ修正してください。
Spring Framework 6.0 から下記のAPIが非推奨となりました。
-
CookieLocaleResolver#setCookieName(String)メソッド -
CookieLocaleResolver#setCookieMaxAge(Integer)メソッド -
CookieGeneratorクラス
[手順が必要なケース]
この手順の適用を推奨します。
以下のケースに当てはまる場合、必要に応じて修正を行ってください。
-
上記の非推奨APIを利用している
[修正方法]
Javadocを参考に、非推奨APIを代替APIに置き換えてください。
Spring Security 6.0 および 6.1 から下記のAPIが非推奨となりました。
-
Pbkdf2PasswordEncoder(CharSequence, int, int, int)コンストラクタ -
<global-method-security/>タグ
[手順が必要なケース]
この手順の適用を推奨します。
以下のケースに当てはまる場合、必要に応じて修正を行ってください。
-
上記の非推奨APIを利用している
[修正方法]
Spring Security DocumentやJavadocを参考に、非推奨APIを代替APIに置き換えてください。
Apache Commons DBCP 2.10.0 から下記のAPIが非推奨となりました。
-
BasicDataSource#setMaxWaitMillis(long)メソッド
[手順が必要なケース]
この手順の適用を推奨します。
以下のケースに当てはまる場合、必要に応じて修正を行ってください。
-
上記の非推奨APIを利用している
[修正方法]
Javadocを参考に、非推奨APIを代替APIに置き換えてください。
Hibernate ORM 6.3 から下記のAPIが非推奨となりました。
-
@Whereアノテーション
[手順が必要なケース]
この手順の適用を推奨します。
以下のケースに当てはまる場合、必要に応じて修正を行ってください。
-
上記の非推奨APIを利用している
[修正方法]
Javadocを参考に、非推奨APIを代替APIに置き換えてください。
-
Where アノテーション
5.9.0.RELEASEから使用するViewにThymeleafを追加しました。
本手順では、5.8.1から5.9.0への移行手順を適用した資材を、Thymeleafへ変更する手順を記載しています。
5.9.0.RELEASEへの移行がまだの場合は、先に5.8.1から5.9.0への移行手順を参照してください。
本手順はXMLConfigベースの移行手順となります。
|
Note
|
本手順に記載しておらずガイドラインに記載されている内容に関しては、 ガイドライン にJSPとThymeleafをタブで併記しているため、そちらを参照してください。 |
以下、blankプロジェクトのarchtypeを
-
groupId : com.example.todo
-
artifactId : todo
として作成したblankプロジェクトを例に説明します。
なお、本手順については multi blank で説明します。 single blank に関してはtodo-webをtudoに読み替えてください。
JSP関連の依存関係を削除し、Thymeleaf関連の依存関係を追加します。
-
todo-web/pom.xml
    <dependencies>
        <dependency>
            <groupId>${project.groupId}</groupId>
            <artifactId>todo-domain</artifactId>
        </dependency>

        <!-- == Begin TERASOLUNA == -->
        <dependency>
            <groupId>org.terasoluna.gfw</groupId>
            <artifactId>terasoluna-gfw-web-dependencies</artifactId>
            <type>pom</type>
        </dependency>
        <!-- ### 削除箇所 開始 ### -->
        <dependency>
            <groupId>org.terasoluna.gfw</groupId>
            <artifactId>terasoluna-gfw-web-jsp-dependencies</artifactId>
            <type>pom</type>
        </dependency>
        <!-- ### 削除箇所 終了 ### -->
        <dependency>
            <groupId>org.terasoluna.gfw</groupId>
            <artifactId>terasoluna-gfw-security-web-dependencies</artifactId>
            <type>pom</type>
        </dependency>
        <dependency>
            <groupId>org.terasoluna.gfw</groupId>
            <artifactId>terasoluna-gfw-recommended-web-dependencies</artifactId>
            <type>pom</type>
        </dependency>
        <!-- == End TERASOLUNA == -->

        <!-- ### 削除箇所 開始 ### -->
        <!-- == Begin Tomcat == -->
        <!-- Servlet API & JSP API -->
        <dependency>
            <groupId>jakarta.servlet</groupId>
            <artifactId>jakarta.servlet-api</artifactId>
        </dependency>
        <dependency>
            <groupId>jakarta.servlet.jsp</groupId>
            <artifactId>jakarta.servlet.jsp-api</artifactId>
        </dependency>

        <dependency>
            <groupId>jakarta.servlet.jsp.jstl</groupId>
            <artifactId>jakarta.servlet.jsp.jstl-api</artifactId>
            <scope>runtime</scope>
        </dependency>
        <dependency>
            <groupId>org.glassfish.web</groupId>
            <artifactId>jakarta.servlet.jsp.jstl</artifactId>
            <scope>runtime</scope>
        </dependency>
        <!-- == End Tomcat == -->
        <!-- ### 削除箇所 終了 ### -->

        <!-- ### 追加箇所 開始 ### -->
        <!-- == Begin Thymeleaf == -->
        <dependency>
            <groupId>org.thymeleaf</groupId>
            <artifactId>thymeleaf</artifactId>
        </dependency>
        <dependency>
            <groupId>org.thymeleaf</groupId>
            <artifactId>thymeleaf-spring6</artifactId>
        </dependency>
        <dependency>
            <groupId>org.thymeleaf.extras</groupId>
            <artifactId>thymeleaf-extras-springsecurity6</artifactId>
        </dependency>
        <dependency>
            <groupId>jakarta.servlet</groupId>
            <artifactId>jakarta.servlet-api</artifactId>
            <scope>provided</scope>
        </dependency>
        <!-- == End Thymeleaf == -->
<!-- ### 追加箇所 終了 ### -->-
todo-web/src/main/resources/META-INF/spring/spring-mvc.xmlJSP関連の設定を削除し、Thymeleaf関連の設定を追加します。
    <!-- Settings View Resolver. -->
    <mvc:view-resolvers>
        <mvc:bean-name />
        <!-- ### 削除箇所 開始 ### -->
        <mvc:jsp prefix="/WEB-INF/views/" />
        <!-- ### 削除箇所 終了 ### -->
        <!-- ### 追加箇所 開始 ### -->
        <bean class="org.thymeleaf.spring6.view.ThymeleafViewResolver">
            <property name="templateEngine" ref="templateEngine" />
            <property name="characterEncoding" value="UTF-8" />
            <property name="forceContentType" value="true" />
            <property name="contentType" value="text/html;charset=UTF-8" />
        </bean>
        <!-- ### 追加箇所 終了 ### -->
    </mvc:view-resolvers>

    <!-- ### 追加箇所 開始 ### -->
    <!-- TemplateResolver. -->
    <bean id="templateResolver"
        class="org.thymeleaf.spring6.templateresolver.SpringResourceTemplateResolver">
        <property name="prefix" value="/WEB-INF/views/" />
        <property name="suffix" value=".html" />
        <property name="templateMode" value="HTML" />
        <property name="characterEncoding" value="UTF-8" />
    </bean>

    <!-- TemplateEngine. -->
    <bean id="templateEngine" class="org.thymeleaf.spring6.SpringTemplateEngine">
        <property name="templateResolver" ref="templateResolver" />
        <property name="enableSpringELCompiler" value="true" />
        <property name="additionalDialects">
            <set>
                <bean class="org.thymeleaf.extras.springsecurity6.dialect.SpringSecurityDialect" />
            </set>
        </property>
    </bean>
<!-- ### 追加箇所 終了 ### -->-
todo-web/src/main/resources/META-INF/spring/spring-security.xmlthymeleafでは直接viewファイルを参照させず、Controllerを経由させます。
    <!-- CSRF Protection -->
    <bean id="accessDeniedHandler"
        class="org.springframework.security.web.access.DelegatingAccessDeniedHandler">
        <constructor-arg index="0">
            <map>
                <entry
                    key="org.springframework.security.web.csrf.InvalidCsrfTokenException">
                    <bean
                        class="org.springframework.security.web.access.AccessDeniedHandlerImpl">
                        <property name="errorPage"
                            value="/WEB-INF/views/common/error/invalidCsrfTokenError" /> <!-- ### 修正箇所 ### -->
                    </bean>
                </entry>
                <entry
                    key="org.springframework.security.web.csrf.MissingCsrfTokenException">
                    <bean
                        class="org.springframework.security.web.access.AccessDeniedHandlerImpl">
                        <property name="errorPage"
                            value="/WEB-INF/views/common/error/missingCsrfTokenError" /> <!-- ### 修正箇所 ### -->
                    </bean>
                </entry>
            </map>
        </constructor-arg>
        <constructor-arg index="1">
            <bean
                class="org.springframework.security.web.access.AccessDeniedHandlerImpl">
                <property name="errorPage"
                    value="/WEB-INF/views/common/error/accessDeniedError" /> <!-- ### 修正箇所 ### -->
            </bean>
        </constructor-arg>
</bean>thymeleafでは直接viewファイルを参照させず、Controllerを経由させます。
以下のクラスを追加します。
-
todo-web/src/main/java/com/example/todo/app/common/error/CommonErrorController.java
package com.example.todo.app.common.error;

import org.springframework.stereotype.Controller;
import org.springframework.web.bind.annotation.RequestMapping;

@Controller
@RequestMapping("/common/error")
public class CommonErrorController {

    @RequestMapping("/accessDeniedError")
    public String accessDeniedError() {
        return "common/error/accessDeniedError";
    }

    @RequestMapping("/businessError")
    public String businessError() {
        return "common/error/businessError";
    }

    @RequestMapping("/dataAccessError")
    public String dataAccessError() {
        return "common/error/dataAccessError";
    }

    @RequestMapping("/invalidCsrfTokenError")
    public String invalidCsrfTokenError() {
        return "common/error/invalidCsrfTokenError";
    }

    @RequestMapping("/missingCsrfTokenError")
    public String missingCsrfTokenError() {
        return "common/error/missingCsrfTokenError";
    }

    @RequestMapping("/resourceNotFoundError")
    public String resourceNotFoundError() {
        return "common/error/resourceNotFoundError";
    }

    @RequestMapping("/systemError")
    public String systemError() {
        return "common/error/systemError";
    }

    @RequestMapping("/transactionTokenError")
    public String transactionTokenError() {
        return "common/error/transactionTokenError";
    }

}thymeleafでは直接viewファイルを参照させず、Controllerを経由させます。
-
todo-web/src/main/webapp/WEB-INF/web.xml
    <servlet>
        <servlet-name>appServlet</servlet-name>
        <servlet-class>org.springframework.web.servlet.DispatcherServlet</servlet-class>
        <init-param>
            <param-name>contextConfigLocation</param-name>
            <!-- ApplicationContext for Spring MVC -->
            <param-value>classpath*:META-INF/spring/spring-mvc.xml</param-value>
        </init-param>
        <load-on-startup>1</load-on-startup>
    </servlet>
    <servlet-mapping>
        <servlet-name>appServlet</servlet-name>
        <url-pattern>/</url-pattern>
    </servlet-mapping>

    <!-- ### 削除箇所 開始 ### -->
    <jsp-config>
        <jsp-property-group>
            <url-pattern>*.jsp</url-pattern>
            <el-ignored>false</el-ignored>
            <page-encoding>UTF-8</page-encoding>
            <scripting-invalid>false</scripting-invalid>
            <include-prelude>/WEB-INF/views/common/include.jsp</include-prelude>
        </jsp-property-group>
    </jsp-config>
    <!-- ### 削除箇所 終了 ### -->

    <error-page>
        <error-code>500</error-code>
        <location>/WEB-INF/views/common/error/systemError</location> <!-- ### 修正箇所 ### -->
    </error-page>

    <error-page>
        <error-code>404</error-code>
        <location>/WEB-INF/views/common/error/resourceNotFoundError</location> <!-- ### 修正箇所 ### -->
    </error-page>

    <error-page>
        <exception-type>java.lang.Exception</exception-type>
        <location>/WEB-INF/views/common/error/unhandledSystemError.html</location>
</error-page>unhandledSystemError.htmlはテンプレートHTMLではなく静的HTMLのため、直接参照させて問題ありません。
テンプレートエンジン(Thymeleaf) や Thymeleafにおける画面レイアウト 、関連機能を参考にJSPファイルをテンプレートHTMLへ修正してください。
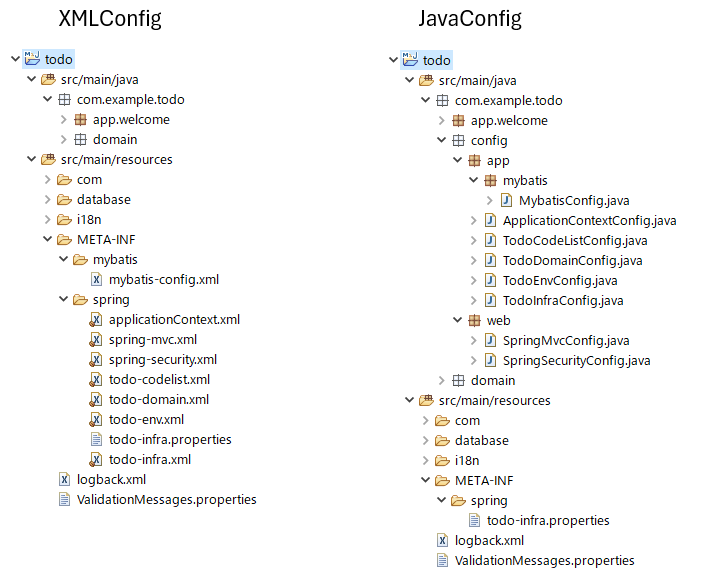
5.9.0.RELEASEからconfigrationにJavaConfigを追加しました。
本手順では、5.8.1から5.9.0への移行手順を適用した資材を、JavaConfigへ変更する手順を記載しています。
5.9.0.RELEASEへの移行がまだの場合は、先に5.8.1から5.9.0への移行手順を参照してください。
|
Note
|
本手順に記載しておらずガイドラインに記載されている内容に関しては、 ガイドライン にXMLConfigとJavaConfigをタブで併記しているため、そちらを参照してください。 |
以下、blankプロジェクトのarchtypeを
-
groupId : com.example.todo
-
artifactId : todo
として作成したblankプロジェクトを例に説明します。
この更新手順は、 multi blank を使用して作成したマルチプロジェクト向けです。
resource/META-INF配下の各定義ファイルをJavaのソースコードへ変更します。
配置先は以下のようになります。
-
todo-web
-
todo-domain
-
todo-env
-
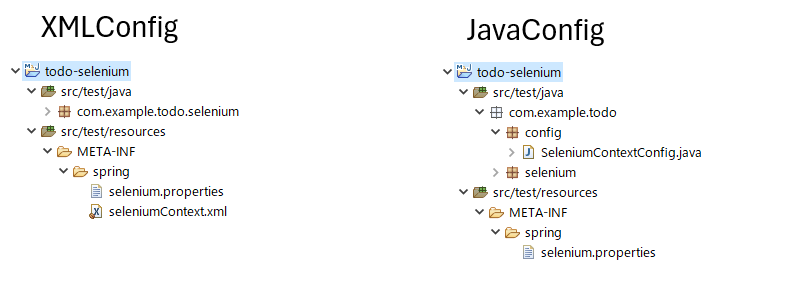
todo-selenium
ブランクプロジェクトで設定している各Configrationクラスを使用したい場合は、自身が使用しているアーキタイプと同様のJavaConfig用のアーキタイプを作成し、クラスをコピーしてご使用ください。
|
Note
|
JavaConfig用のアーキタイプは以下となります。
|
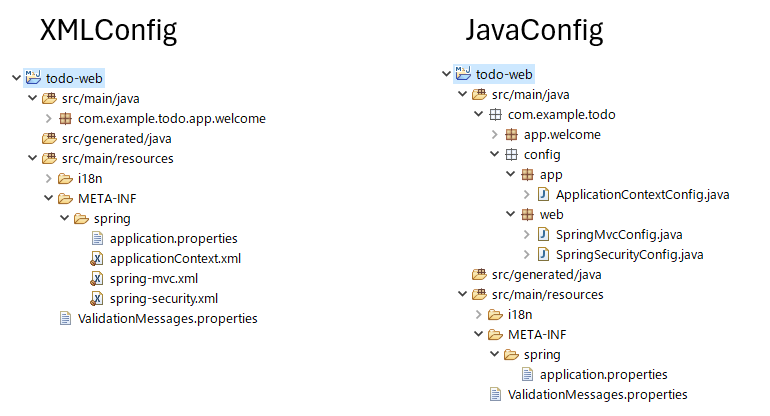
todo-web/com/example/todo/config/app配下にApplicationContextを配置します。
-
ApplicationContextConfig.java
todo-web/com/example/todo/config/web配下にSpring MVC及びSpring SecurityのConfigrationを配置します。
-
SpringMvcConfig.java
-
SpringSecurityConfig.java
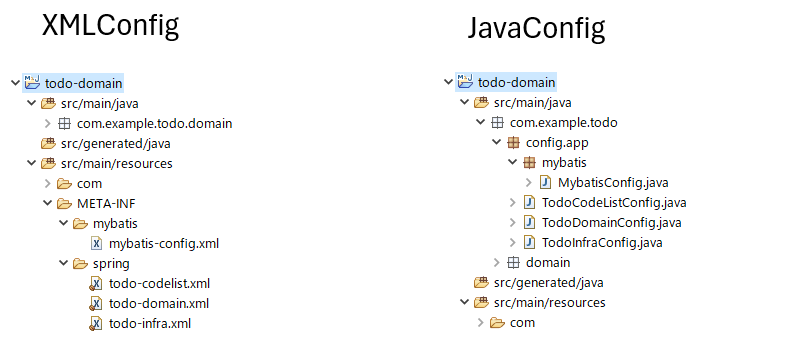
todo-domain/com/example/todo/config/app配下にドメイン層のConfigrationを配置します。
-
TodoDomainConfig.java
-
TodoCodeListConfig.java
|
Note
|
データベースにMybatis3を使用している場合の例となります。 |
todo-domain/com/example/todo/config/app配下にインフラストラクチャ層のConfigrationを配置します。
-
TodoInfraConfig.java
todo-domain/com/example/todo/config/app/mybatis配下にMybatis3用のConfigrationを配置します。
-
MybatisConfig.java
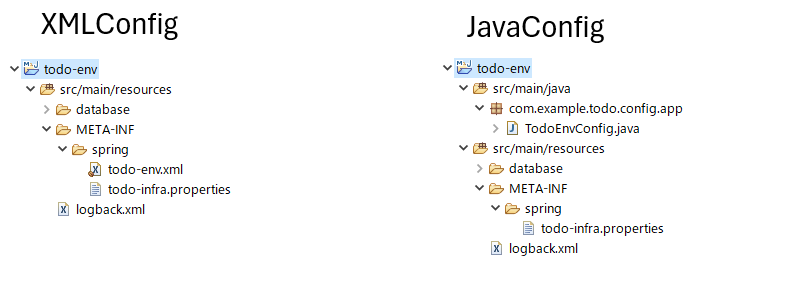
todo-env/com/example/todo/config/app配下にEnv用のConfigrationを配置します。
-
TodoEnvConfig.java
Javaクラスへ変更したConfigrationを読み込めるよう修正します。
-
todo-web/src/main/webapp/WEB-INF/web.xml
<?xml version="1.0" encoding="UTF-8"?>
<web-app xmlns="https://jakarta.ee/xml/ns/jakartaee"
    xmlns:xsi="http://www.w3.org/2001/XMLSchema-instance"
    xsi:schemaLocation="https://jakarta.ee/xml/ns/jakartaee https://jakarta.ee/xml/ns/jakartaee/web-app_6_0.xsd"
    version="6.0">

    <context-param>
        <param-name>logbackDisableServletContainerInitializer</param-name>
        <param-value>true</param-value>
    </context-param>

    <!-- ### 追加箇所 開始 ### -->
    <context-param>
        <param-name>contextClass</param-name>
        <param-value>
            org.springframework.web.context.support.AnnotationConfigWebApplicationContext
        </param-value>
    </context-param>
    <!-- ### 追加箇所 終了 ### -->

    <listener>
        <listener-class>ch.qos.logback.classic.servlet.LogbackServletContextListener</listener-class>
    </listener>

    <listener>
        <listener-class>org.springframework.web.context.ContextLoaderListener</listener-class>
    </listener>
    <context-param>
        <param-name>contextConfigLocation</param-name>
        <!-- Root ApplicationContext -->
        <param-value>
            com.example.todo.config.app.ApplicationContextConfig <!-- ### 修正箇所 ### -->
            com.example.todo.config.web.SpringSecurityConfig <!-- ### 修正箇所 ### -->
        </param-value>
    </context-param>

    <!-- omitted -->

    <servlet>
        <servlet-name>appServlet</servlet-name>
        <servlet-class>org.springframework.web.servlet.DispatcherServlet</servlet-class>
        <!-- ### 追加箇所 開始 ### -->
        <init-param>
            <param-name>contextClass</param-name>
            <param-value>
                org.springframework.web.context.support.AnnotationConfigWebApplicationContext
            </param-value>
        </init-param>
        <!-- ### 追加箇所 終了 ### -->
        <init-param>
            <param-name>contextConfigLocation</param-name>
            <!-- ApplicationContext for Spring MVC -->
            <param-value>com.example.todo.config.web.SpringMvcConfig</param-value> <!-- ### 修正箇所 ### -->
        </init-param>
        <load-on-startup>1</load-on-startup>
    </servlet>
    <servlet-mapping>
        <servlet-name>appServlet</servlet-name>
        <url-pattern>/</url-pattern>
    </servlet-mapping>

<!-- omitted -->この更新手順は、 single blank を使用して作成したシングルプロジェクト向けです。
resource/META-INF配下の各定義ファイルをJavaのソースコードへ変更します。
配置先は以下のようになります。
ブランクプロジェクトで設定している各Configrationクラスを使用したい場合は、自身が使用しているアーキタイプと同様のJavaConfig用のアーキタイプを作成し、クラスをコピーしてご使用ください。
|
Note
|
JavaConfig用のアーキタイプは以下となります。
|
todo/com/example/todo/config/app配下にApplicationContextを配置します。
-
ApplicationContextConfig.java
todo/com/example/todo/config/web配下にSpring MVC及びSpring SecurityのConfigrationを配置します。
-
SpringMvcConfig.java
-
SpringSecurityConfig.java
todo/com/example/todo/config/app配下にドメイン層のConfigrationを配置します。
-
TodoDomainConfig.java
|
Note
|
データベースにMybatis3を使用している場合の例となります。 |
todo/com/example/todo/config/app配下にインフラストラクチャ層のConfigrationを配置します。
-
TodoInfraConfig.java
todo/com/example/todo/config/app/mybatis配下にMybatis3用のConfigrationを配置します。
-
MybatisConfig.java
Javaクラスへ変更したConfigrationを読み込めるよう修正します。
-
todo/src/main/webapp/WEB-INF/web.xml
<?xml version="1.0" encoding="UTF-8"?>
<web-app xmlns="https://jakarta.ee/xml/ns/jakartaee"
    xmlns:xsi="http://www.w3.org/2001/XMLSchema-instance"
    xsi:schemaLocation="https://jakarta.ee/xml/ns/jakartaee https://jakarta.ee/xml/ns/jakartaee/web-app_6_0.xsd"
    version="6.0">

    <context-param>
        <param-name>logbackDisableServletContainerInitializer</param-name>
        <param-value>true</param-value>
    </context-param>

    <!-- ### 追加箇所 開始 ### -->
    <context-param>
        <param-name>contextClass</param-name>
        <param-value>
            org.springframework.web.context.support.AnnotationConfigWebApplicationContext
        </param-value>
    </context-param>
    <!-- ### 追加箇所 終了 ### -->

    <listener>
        <listener-class>ch.qos.logback.classic.servlet.LogbackServletContextListener</listener-class>
    </listener>

    <listener>
        <listener-class>org.springframework.web.context.ContextLoaderListener</listener-class>
    </listener>
    <context-param>
        <param-name>contextConfigLocation</param-name>
        <!-- Root ApplicationContext -->
        <param-value>
            com.example.todo.config.app.ApplicationContextConfig <!-- ### 修正箇所 ### -->
            com.example.todo.config.web.SpringSecurityConfig <!-- ### 修正箇所 ### -->
        </param-value>
    </context-param>

    <!-- omitted -->

    <servlet>
        <servlet-name>appServlet</servlet-name>
        <servlet-class>org.springframework.web.servlet.DispatcherServlet</servlet-class>
        <!-- ### 追加箇所 開始 ### -->
        <init-param>
            <param-name>contextClass</param-name>
            <param-value>
                org.springframework.web.context.support.AnnotationConfigWebApplicationContext
            </param-value>
        </init-param>
        <!-- ### 追加箇所 終了 ### -->
        <init-param>
            <param-name>contextConfigLocation</param-name>
            <!-- ApplicationContext for Spring MVC -->
            <param-value>com.example.todo.config.web.SpringMvcConfig</param-value> <!-- ### 修正箇所 ### -->
        </init-param>
        <load-on-startup>1</load-on-startup>
    </servlet>
    <servlet-mapping>
        <servlet-name>appServlet</servlet-name>
        <url-pattern>/</url-pattern>
    </servlet-mapping>

    <!-- omitted -->