TECH REPAIR - tconklin-champlain/Tech-Journal GitHub Wiki
Useful Links
Portal Tutorial
The Top Bar
- Store Location (This determines the notifications)
- Trainings / Notifs / Mail / Messages
- The page is a single webpage that constantly changes so it stays speedy
Leads Tutorial
The Basics
-
Create a lead when a prospective customer calls
-
Contact (call and email) customers when leads are created; during this contact make sure to set an appointment time, manage device and parts on the lead, and change the lead status
-
Contact (call or email) customers when appointment times are missed
-
Check-in the customer from the lead when they come into the store
6R's of Troubleshooting
-
Restart: perform a soft or hard restart(opens in a new tab)
-
Remove power: remove or disconnect the battery, then power flush(opens in a new tab)
-
Reseat: reseat the flexes(opens in a new tab) involved in the symptom
-
Replace: Replace any part involved in the symptom chain. Test the part using the frankenstein method.
-
Restore: If the issue persists, perform a restore(opens in a new tab). This erases the device and restores it to factory settings, and usually makes sure the device is using the most up-to-date operating system. This is the last possible step we can perform from a troubleshooting perspective and should be used as a last resort. (Exception: you may perform a restore before other troubleshooting steps if a device is sealed solely with adhesive. In these cases, we have no easy way to access the internal hardware without breaking a factory, OEM seat—and potentially breaking a factory part in the process. Seek customer permission for a restore. If the restore resolves the symptom, then we know we don't have to open the device. If the issue persists post-restore, we know we have to proceed to the hardware troubleshooting steps.)
-
Replace: If the symptom persists, then the motherboard or entire device needs to be replaced. The exception to this is if you can repair the motherboard at the component level.
Training
Apple Training
RepairCal
- Verify IMEI (Ususally found in the ABOUT section in Settings)
- IF NOT "Fail the repair as Non-Matching Device and refer the customer to contact Asurion at the number dialed for original claim creation"

- Identify Model
- IF NOT "Fail the repair as Non-Matching Device and refer the customer to contact Asurion at the number dialed for original claim creation"
Some companies like Apple use color specific LCM's
- Check against required models chart
- IF NOT "Calibration is not required for this repair! You may exit the instructions and follow the work instructions for the appropriate model."
- Identify Part SKU Part 1.

- IF NOT "The LCM-Kit SKU must match the Part SKU on the repair ticket. Try to locate the matching part. If you are unable to locate the matching part, process the repair as No Repair - Parts Out of Stock."
- Does SKU start with APA or 661? If so it requires Calibration
- Repair CAL Prep
- Find My iPhone (FMIP) must be disabled on the customer's device before the repair.
- Found under ICLOUD in settings
- RepairCal requires the customer's device to be running iOS 10.3 or later. Beta and Jailbroken iOS versions are not supported.
- You must add the Part Number to the repair ticket before calibration.(Do not update the status to "Part Installed" until after RepairCal is complete.)
- If the device is powered on before calibration is performed, you will see "Face/TouchID Failed to Activate." This is normal and should be resolved by calibration.
- Find My iPhone (FMIP) must be disabled on the customer's device before the repair.
MAKE SURE IPHONE BATTERY IS ABOVE 20%!
THE REPAIR
Required before proceeding
-
MacBook with RepairCal software (if software update is needed see RepairCal software updates)
-
Apple Lightning to USB Cable
-
Apple 5W or 12W USB Power Adapter
-
Internet Connectivity
-
Microfiber Cloth
-
Attach Power and Open Device
-
Connect to WIFI or MIFI
-
Open RepairCal
-
Connect to ITunes and cancel auto sync after dismissing other prompts
-
Quit ITunes
-
Check if any errors in completing calibration ususally a bad cable and just need restart process
-
Clean Lightning Port
- Use an ESD safe nylon brush and a few drops of 99% isopropyl alcohol to clean the lightning port.
- Gently brush and scoop any dirt/debris outward from the port.
- Allow one minute to dry
-
Check LCM Connections for damaged pins
- *IF DAMAGE "Repair Unsuccessful: Follow your Unsuccessful Repair/Escalation procedures including contacting your support line."
Always use new LCM Adhesive
- Open Finder
- MAKE SURE TO UPDATE NOT RESTORE Restoring will erase customer data
- Update in ITunes by going to Summary
- Exit RepairCal
- Perform IPhone post testing instructions & Fill out Repair Ticket
Apple Service Toolkit: System Configuration
Check list
- System Configuration is for APA / LL661 parts only. (*UBIF users, see SKUs matrix linked below.)
| Model | Battery | Screen | Camera |
|---|---|---|---|
| iPhone 6S | No | RC | |
| iPhone 6S Plus | No | RC | |
| iPhone 7 | No | RC | |
| iPhone 7 Plus | No | RC | |
| iPhone 8 | No | RC | |
| iPhone 8 Plus | No | RC | |
| iPhone X | No* | RC | |
| iPhone XR | Yes* | RC | |
| iPhone XS | Yes* | RC | |
| iPhone XS Max | Yes* | RC | |
| iPhone 11 | Yes | RC | |
| iPhone 11 Pro | Yes | RC | |
| iPhone 11 Pro Max | Yes | RC | |
| iPhone SE (2nd gen) | Yes | RC | |
| iPhone 12 | Yes | Yes | Yes |
| iPhone 12 Mini | Yes | Yes | Yes |
| iPhone 12 Pro | Yes | Yes | Yes |
| iPhone 12 Pro Max | Yes | Yes | Yes |
-
Find My iPhone must be disabled.
-
iOS Version requirements vary by model and are listed at the beginning of this document and in section: iOS Version. For all models, beta and jailbroken versions are not supported.
CHECK WITH CUSTOMER BEFORE UPDATING OS
-
The correct Sub-Status must be set on the ServiceBench Work Order (*does not apply to eTicket users):
-
In Home - Service in Process (HSP) for Remote Tech jobs
-
Carry In - Assigned to Technician (AAT) for In-Store jobs
-
On the repair ticket, do not update the part status to "Part Installed" until after System Configuration is complete.
-
The iPhone must be booted into Diagnostics Mode and on the "Waiting for support" screen before selecting System Configuration. Accessing Diagnostics mode from iPhone Settings does not work.
Logging into ATS2
- GOTO diagnostics.apple.com
- Boot IPhone into Diagnostics Mode
- Use the Information at bottom right to get serial number and other info
- On AST2 Click + -> Diagnostics and Tools -> System Configuration
AST2 Setup
- Wait for Email
Notes on Pixel devices
- Never use metal pry tools to open.
- Make sure the corners on the frame are not bent.
- Make sure to use primer with OEM adhesive.
- Use the available fixtures on EVERY repair.
- Have the teardown guide open while repairing the device.
- Below you will find the service guide for each device along with any notes/tips for the device.
Advice from expert on original Pixel and Pixel XL
This device is front loaded, meaning you MUST remove the glass/LCD before gaining additional entrance. It is suggested to use a hot plate set at 65ºC for 5-10 minutes in combination with a suction cup tool such as the iSclack to remove the display. Be weary not to insert the pick/spudger too far under the top or bottom edges of glass to ensure it doesn't contact and crack the LCD. Performing a glass/LCD replacement only is extremely simple. Once the front is removed from the remainder of the device all that is needed is to remove and replace the adhesive using a pre-cut adhesive kit. Once open you will find a clean and uncluttered component layout. Be weary of any gray EMI tape that is present on any component you may be replacing. If the new component does not come with the tape pre-installed you must transfer it from the original to the new part. Also, the two antenna coaxial cables found on either side of the motherboard are held in place using multiple antenna channels and guides. This is to ensure the coaxial cable is not being pinched by the housing or sandwiched under any other component. Keep this in mind when re-installing them and ensure they are properly cable managed again.
The above videos show a Pixel, not Pixel XL, being taken apart, but with the exception of the size of the device and battery the only thing that differs in how they're put together is the fact that the proximity sensor is adhered to the mid chassis on the smaller Pixel. On the Pixel XL it is on the board only, meaning one does not need to be as cautious when removing the mid chassis on the Pixel XL. As such the teardown steps taken in the videos above can also be applied to the Pixel XL.
Asurion U.S. Mobility Repair Operations Guide
| Client/Carrier | Frontline Claims Phone Number | Cracked Screen | Battery | Screen Malfunction |
|---|---|---|---|---|
| AT&T | 888-562-8662 | Yes | Yes | Yes |
| Verizon | 888-881-2622 | Yes | No | No |
| Cricket | 855-309-8342 | Yes | No | No |
| US Cellular | 888-864-0428 | Yes | ||
| (Device Protection+ Ultimate and ACS only) | Yes (DP+ Ultimate only) | No | ||
| Tracfone (*Straight Talk customers only) | 866-598-4874 | Yes | No | No |
| Samsung Premium Care | 866-371-9501 | Yes | No | No |
- Asurion Same Unit Repair Program:
- Advanced Exchange (AE): Allows the customer to have a replacement device mailed to their home.
- Same Unit Repair (SUR): Fixes a customer’s current device. If a device cannot be repaired in-store, then the customer can choose to move their claim to an AE. In some scenarios, the customer may need to pay a higher deductible for AE.
- Is it in scope? If not suggest connecting to claims or going to http://www.phoneclaim.com/
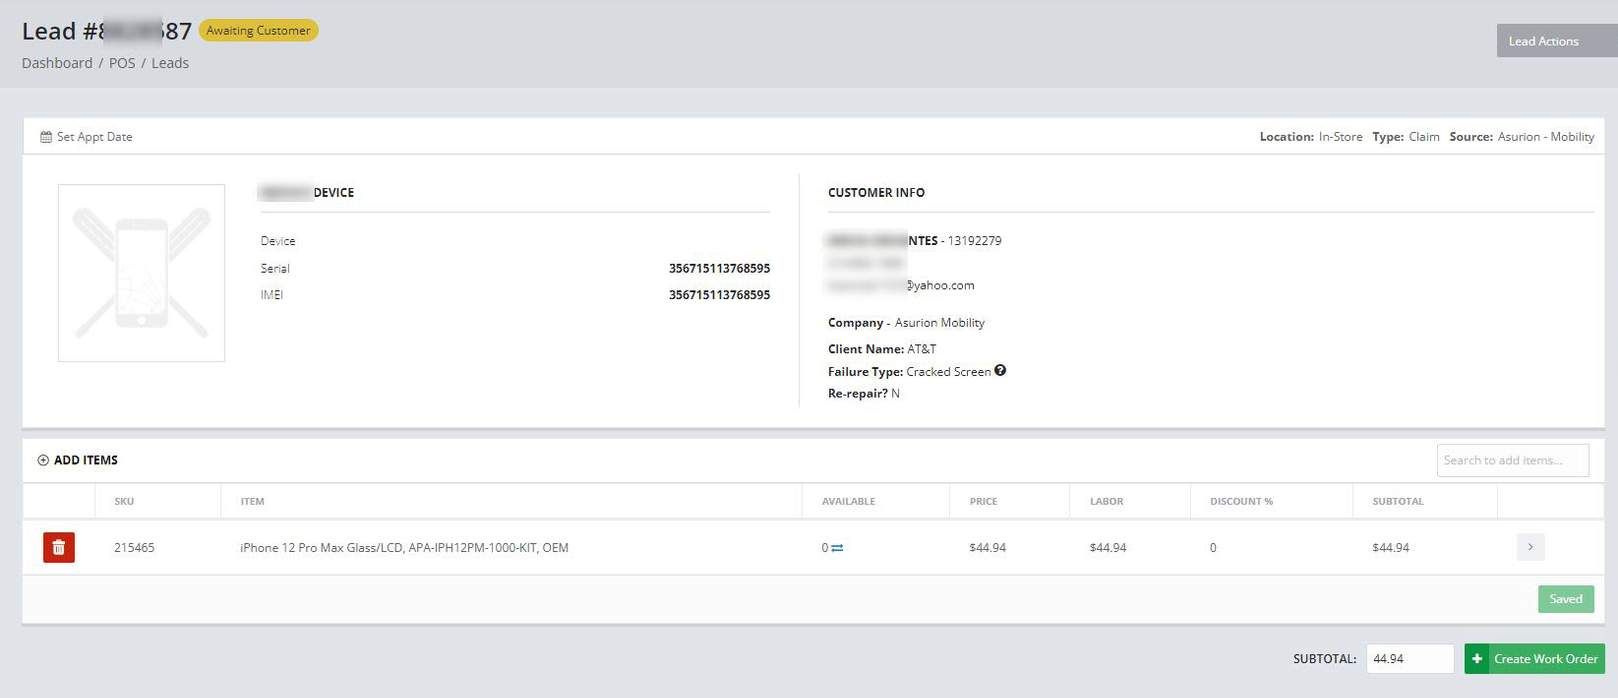
- Claim Filling
- The Customers Information (name, phone number, and email address).
- Device IMEI: note the serial number for the device is listed above the Device IMEI section.
- Lead Location, Type and Source.
- Company name.
- Device type: in this section, the device type may or may not be present. This won't impact a technician's ability to triage or repair the device.
Customer Interaction
- Greet the customer nicley and learn their basic info like first and last name
- Next Steps
-
Go into Portal into the leads section and find the Asurion-Mobility lead associated with this customer’s claim. Use the search function to look them up by name, phone number, or claim number.
-
Then make sure that the device the customer has brought into the store matches the description on the lead. If “Device Type” isn't present, check that the description of the part reserved on the lead matches the model and color of the customer’s device.
-
Lastly, verify that the serial number or IMEI matches the device brought into the store.
-
- Check that the lead in the claim is all correct
Check List Before Repairs:
- Confirm the device powers on.
- Front and rear cameras.
- Note: Test to see if the camera displays an image on the screen.
- Microphone, Speaker, and Volume Buttons.
- Proximity sensor.
- Charging Port.
- Check the screen area and frame of the device on all edges for damage (bent, damaged bezels, or separation).
- Check ALL buttons for functionality including, but not limited to, home button, volume buttons, and Power button.
- Check that the case is free from bulging.
- Check that the device is free from physical damage beyond the front screen (broken back glass, bent housing, water damage, etc).
Check List After Repairs
- Device powers on
- Full screen touch sensitivity
- Battery is free from physical damage/swelling
- Screen brightness
- Front and Rear cameras- Only test to see that the Camera displays an image on the screen (DO NOT take a PHOTO or VIDEO or access the Photo/Video Gallery)
- Microphone, Speaker and Volume buttons
- Proximity sensor
- Charging port
- Screen is flush with the frame of the device on all edges
- All menu operations all functional
- On all Phone Models that have Touch ID/Face ID, please have the Customer test for full functionality
- All buttons are functional, including but not limited to, home button, volume buttons, and Power button
- Front screen and back glass are free from physical damage ( If AT&T Asurion Mobility )
- Wipe down the customers phone with a cloth to remove exterior dirt.
- Blow out all ports to clear out any debris.
- Place the customers phone in the UV sanitation machine and wait for the sanitation process to complete.
Hands On Notes
If needed, the iPhone 12/12 Pro Screw Mat template can be downloaded below and printed on card stock. This is sized to fit the 160x177mm Magnetic Pad on the Product Engineering Recommended Tool List.