Calibration - tangible-landscape/grass-tangible-landscape GitHub Wiki
Calibration
To properly calibrate, we first make sure the sensor and projector are aligned and the model is in their field of view. Then we perform the software calibration.
Aligning sensor, projector and model
-
Make sure the projector is horizontally aligned (e.g. use a level). Use keystone correction if necessary to fix any tilting of the projector.
-
Project any application window on the table, and place the rectangular model so that it aligns with the projection.
-
Run Protonect program, which shows what Kinect sees. The program comes with libfreenect2 library and if you used the install script, should be available from libfreenect2/build/bin/Protonect, so for example run from terminal:
./tangiblelandscape/libfreenect2-0.2.0/build/bin/ProtonectNow move the model to a place where the sensor can see the entire model and the projector can project on the entire model.
-
Adjust the sensor. If it's tilted, use a level to correct, however it doesn't have to be highly accurate, the system will correct for tilting. Check if it is rotated (meaning not parallel to projection), fix the rotation. If the rotation is not easy to fix due to the way the sensor is mounted, the rotation can be corrected manually in Tangible Landscape plugin (see rotation in Tangible Landscape plugin: Scanning).
Software calibration
-
Before the first calibration phase, it is important to keep the sensor running for approximately 5 minutes to warm it up, because during this time the measurement is not stable. To do that press the main Start button in Tangible Landscape plugin and wait. Then stop scanning (using Stop button) and start the calibration. Calibration itself launches the scanning, so scanning must be off before that.
-
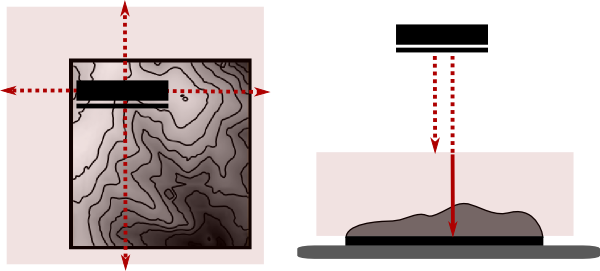
There are 2 calibration phases. The first phase of calibration procedure estimates the distance between the scanner and the table, and estimates how the scanner is tilted (the scanner axis should be completely perpendicular to the table, but often isn't). It is important to remove things including the model from the table before calibration. Then press Calibration 1 and wait couple seconds. Then, the Tangible Landscape plugin's Trim vertically, B field should be automatically adjusted and rotation matrix describing the tilting correction is saved into user settings.
-
The second phase of calibration procedure is used when we need to find the boundaries of the physical model. Put the model on the table and align it with the projector's projection. It detects the model boundaries, so it is important to keep the surroundings of the model clear. Then press Calibration 2 and wait couple seconds. After that, the Trim horizontally, N, S, E, W fields are adjusted.
Note: the Trim vertically and Trim horizontaly can be adjusted manually in case the calibration fails for some reason. See also the explanation of what the calibration values are in Tangible Landscape plugin: Scanning.