Software Installation - tangentaudio/opencv_tank_gauge GitHub Wiki
Requirements
- Micro SD Card, at least 8GB. Use a high quality card such as SanDisk Industrial.
- USB Micro SD Card reader
- Mini HDMI Cable for video out of the Pi Zero W
- USB OTG cable to plug keyboard into Pi Zero W
- USB keyboard
- Raspberry Pi 3 or 4 (optional)
- Full-Sized HDMI Cable (Pi 3) or Micro HDMI Cable (Pi 4) (optional)
- Pi 4 power supply (optional if using Pi 4 for installation).
- Standard Pi camera flex cable (optional for testing camera on faster Pi)
The installation process is much faster if you can use a spare Pi 3 or Pi 4 with more memory and more cores. The Pi Zero W is single-core, limited to 512MB RAM, and quite sluggish for basic operations. However, if all you have is the Pi Zero W, you can still install everything as long as you're patient.
Install Raspberry Pi Lite OS
Use Raspberry Pi Imager to install Raspberry Pi OS Lite 32-bit on a micro SD card. It's important to install the 32-bit version, as there are some incompatibilities with the 64-bit version of the OS and the dependencies used in this project. You also want to be sure to use the Lite version, which removes the X desktop.
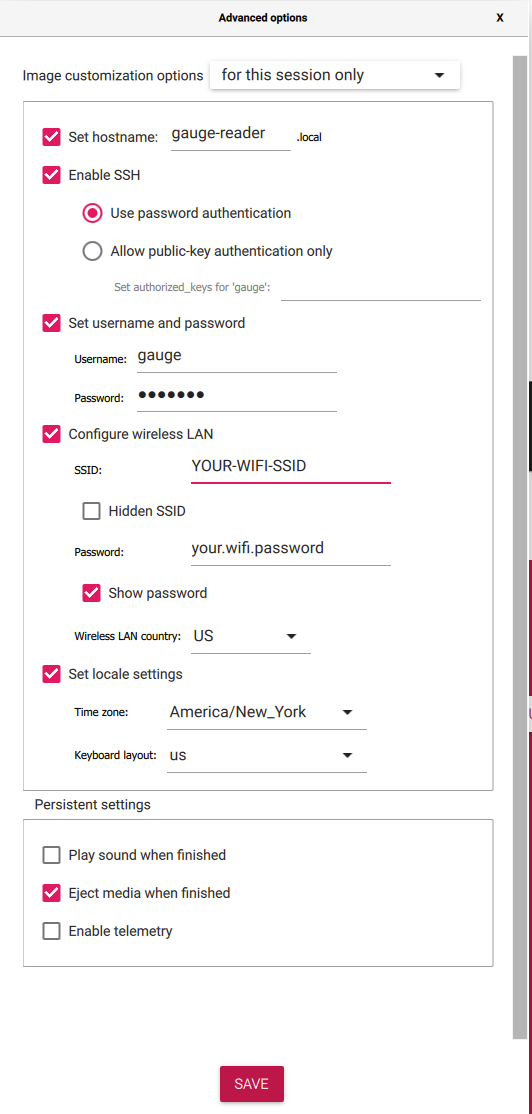
One of the major benefits of using the Pi Imager software is that it offers configuration of several key settings before flashing the card. This can allow the Pi to boot up and join a network without having a keyboard and monitor connected. To access these configuration settings, click the ⚙️ icon in the lower right.
Configure as below, but be sure to set your correct wifi SSID/password. Also be sure to pick a memorable account password. NOTE: It is recommended that you keep the gauge username to run the software, as the scripts and configurations expect to be able to find things in that user directory.
Once you've got things configured, write the image. The writing process should be fairly quick, as the Lite OS is quite small. Once completed, safely eject the card from your PC and install it into the Pi that you will use for installation.
Configure System Settings
With the keyboard and monitor plugged into the Pi, power it up and wait for it to boot.
The system will boot, and reboot a couple of times while it does the initial configuration. You should now be able to SSH into the Pi using the hostname gauge-reader.local. If you can't connect, you may need to log into the console of the Pi and check connectivity. The ip a command will tell you the current IP address of the device.
Run sudo raspi-config. For full documentation of this program, see the official raspi-config documentation
Enable Legacy Camera
Go to Interface Options->Legacy Camera and select Yes. This is necessary for the software to access the Raspberry Pi Camera.

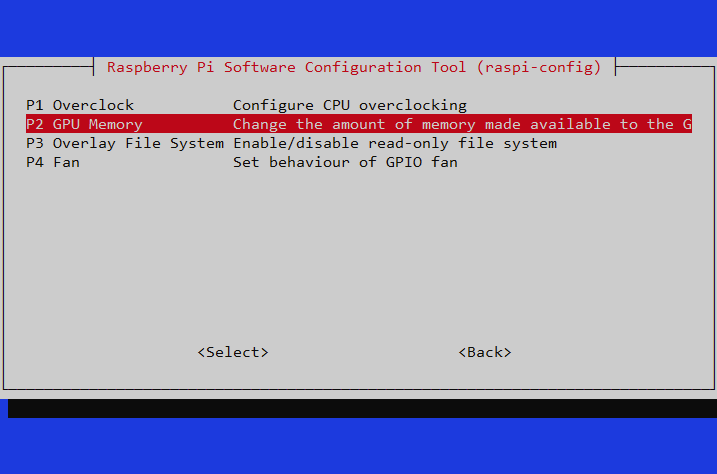
Reduce GPU Memory
Navigate to Performance Options->GPU Memory and set the GPU memory to 64MB. This will free up some valuable RAM on the constrained Pi Zero W. Note that you can't go lower than this, as camera support uses the GPU and requires 64MB to work.
Save the config and exit back to the command shell. It should ask you to reboot after saving your changes.
Update
After the reboot, log back in via SSH and run the following commands:
sudo apt updatesudo apt upgrade
This will update the system, and may take a few minutes.
Raspberry Pi OS Lite has very little installed by default. Get things rolling by installing git with sudo apt install git.
Clone Repository
Clone the Git repository with the following command:
git clone https://github.com/tangentaudio/opencv_tank_gauge.git
Do not clone the repo into another directory name, as the scripts expect to find things in the opencv_tank_gauge directory.
Run the Installer
The repository has an install script which will install all of the remaining prerequisites via apt, set up a Python virtual environment with all of the required Python modules, create the SQLite3 database, and install systemd services that will run the various components of the system.
Enter the opencv_tank_gauge directory and run the installer script:
./install.sh
On a fast Pi 4 with a good network connection, this script takes a few minutes to run. It will be much slower on a Pi Zero W.
Set up a Web App Account
The installer script will walk you through setting up a default account for the web app. Read more about the admin utility for adding more accounts or changing passwords.
Set up Home Assistant Token
Home Assistant requires a Long-Lived Access Token for external software to use its API. These tokens are created in the Home Assistant web interface by clicking on your account name in the lower left of the navigation panel, and scrolling to the bottom of your profile page. Click the Create Token button, name the token something sensible like Oil Gauge Reader and click OK. When the token is shown, copy it to your clipboard.

The final step of the installer script is to ask if you want to enable the Home Assistant integration. If you answer y, the nano text editor will open, allowing you to paste your token and save it (use Ctrl-X to save). Be sure not to add any newlines or other text when you paste your token. If the token looks to be the wrong length, the script will loop and allow you to edit your mistake.
If you choose to disable support, the systemd service for the Home Assistant module will be disabled.
Installation Complete!
That's it, you now have everything installed. Time to move on to testing and calibration!