개발환경 파일럿 설정 - t3qdev/nextg GitHub Wiki
Eclipse 기반의 통합개발환경을 설정한다.
- Mylyn을 이용해서 JIRA를 연동하기 위해서 Task Repository를 추가한다.
- Task Repositories view 화면에서 Add Task Repository를 클릭한다.

- repository type으로 JIRA를 선택하고 server, user, password를 입력한다.

- Task Repositories view 화면에서 Add Task Repository를 클릭한다.
-
JIRA에서 제공하는 JIRA 연동 커넥터는 Eclipse Mars Release (4.5.0) 이하 버전에서만 가능하다.
- 그 이상의 버전에서는 "Tasktop" 이라는 상용 플러그인을 사용해야 한다.
- Task List view 화면에서 New Query...를 클릭한다.

- Task Repository를 선택하고 Next 버튼을 클릭한다.

- Predefined filter for selected project 화면에서 연동할 프로젝트와 "Assigned to me"를 선택하고 Finish 버튼을 클릭한다.

- Task List 화면에 JIRA에 등록된 이슈목록이 나타난다.

Git을 이용해서 소스코드를 관리한다.
- Eclipse import 화면에서 Git > Projects from Git 을 선택한다.
- Cron URI 를 선택하고 Source Git Repository 화면에서 Location 및 Authentication 정보를 입력한다.
- Local Destination 화면에서 저장 경로를 입력한다.
- "Select a wizard to user for importing projects" 화면에서 "Import existing Eclipse projects" 를 선택한다.
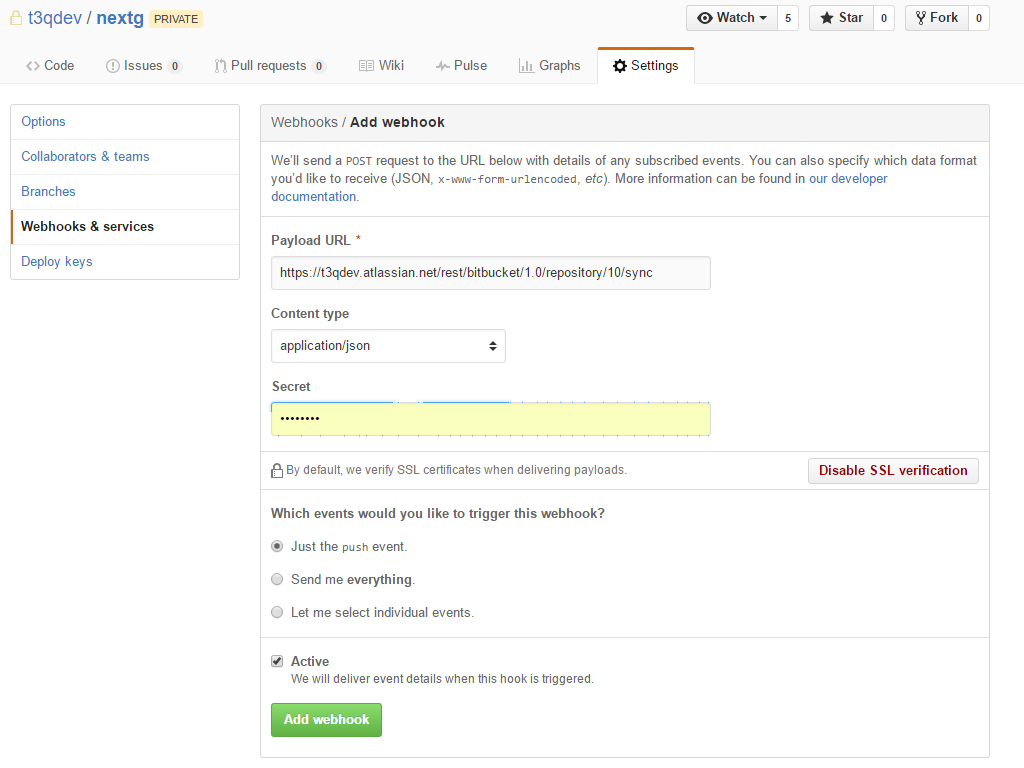
GitHub 에서 Webhook 을 이용하여 JIRA 와 연동한다.
- GitHub repository의 Settings > Webhooks & services 화면에서
Add webhook버튼을 클릭한다. - 다음과 같이 "Payload URL"을 입력하고 Content type 과 trigger event를 선택한다.
 - Webhooks 화면에서 등록된
Webhooks를 수정 및 삭제 가능하다.
이제 Eclipse 에서 Task List를 활용하여 commit message를 JIRA 와 연동할 수 있다.
- 작업중인 이슈항목의 오른쪽 라이오 버튼을 클릭하여 이슈를
Activate상태로 만든다.
- 소스코드 커밋 시 다음과 같이 이슈번호가 자동으로 포함된다.

- JIRA의 해당 이슈화면의
Activity에서 commit comment 목록과 내용을 확인할 수 있다.
- 수정된 소스코드 링크를 클릭하여 변경된 부분을 확인하는 것도 가능하다.

Private library repository 를 사용하기 위해서 Nexus를 설정한다.
- 다음 URL로 Nexus 서버에 접속한다.
- admin/admin123 으로 로그인한다.
- 좌측 메뉴에서 Repositories를 클릭하고 우측목록화면에서 Central Repository를 선택한다.
- Configuration 탭에서 Download Remote Indexes를 True로 변경한 후 저장한다.
Nexus 서버의 접근권한을 설정하기 위해서 maven 설정파일인 setting.xml에 다음의 내용을 추가한다.
<servers>
...
    <server>
      <id>releases</id>
      <username>deployment</username>
      <password>deployment123</password>
    </server>
    <server>
      <id>snapshots</id>
      <username>deployment</username>
      <password>deployment123</password>
    </server>
    <server>
      <id>thirdparty</id>
      <username>deployment</username>
      <password>deployment123</password>
    </server>
...
</servers>
Maven Central 레포지토리 대신에 Nexus 서버를 프록시 서버로 사용하도록 다음의 설정을 pom.xml 에 추가한다.
    <repositories>
      <repository>
        <id>central</id>
        <url>http://192.168.0.115:8080/nexus/content/groups/public</url>
        <releases><enabled>true</enabled></releases>
        <snapshots><enabled>true</enabled></snapshots>
      </repository>
    </repositories>

    <pluginRepositories>
      <pluginRepository>
        <id>central</id>
        <url>http://192.168.0.115:8080/nexus/content/groups/public</url>
        <releases><enabled>true</enabled></releases>
        <snapshots><enabled>true</enabled></snapshots>
      </pluginRepository>
    </pluginRepositories>
어플리케이션의 배포본을 Nexus Snapshots 레포지토리에 배포하기 위해서 다음의 설정을 pom.xml 에 추가한다.
    <distributionManagement>
        <repository>
            <id>releases</id>
            <url>http://192.168.0.115:8080/nexus/content/repositories/releases</url>
        </repository>
        <snapshotRepository>
            <id>snapshots</id>
            <url>http://192.168.0.115:8080/nexus/content/repositories/snapshots</url>
        </snapshotRepository>
    </distributionManagement>
Jenkins를 이용한 지속적 통합(Continous Integration) 환경 구축
개발환경에서 소스코드를 빌드하고 WAS에 배포하는 작업을 자동으로 수행하기 위한 Jenkims Item을 생성하며 세부 설정은 다음과 같다.
- 소스 코드 관리
GitHub를 연동하기 위해서 Repository URL을 설정하고 GitHub에 접속하기 위한 ID/PW 정보를 입력한다.
- Pre Steps
품질검사를 수행하고 SonarQube와 연동하기 위해서 SonarQubeScanner를 선택한다.
- Build
Build 후 Nexus Snapshots 레포지토리에 배포하기 위해서deploygoal을 사용해야 한다.
- 빌드 후 조치
빌득가 완료된 후에 WAS(Tomcat)에 배포하기 위해서 "Deploy war/ear to a container" 플러그인을 사용한다.
(단, Tomcat Manager 어플리케이션이 활성화 되어 있어야 하고 접근권한이 필요하다. 자세한 사항은 관련 설정을 참고한다.)

Maven Release Plugin 을 이용하여 운영환경에 배포하기 위한 release 버전을 생성하고 Nexus의 release repository에 배포한다.
Jenkins에서 Maven 릴리즈를 편리하게 수행하기 위해서 Maven Release Plugin을 사용한다.
-
소스 코드 관리
GitHub를 연동하기 위해서 Repository URL을 설정하고 GitHub에 접속하기 위한 ID/PW 정보를 입력한다.
"Check out to specific local branch" 에master를 지정한다.

-
빌드 환경
**"빌드 환경"**에서 다음과 같이 Maven release build 를 설정한다.
-
Maven 설정
다음과 같이 pom.xml 에 Maven Release Plugin 과 scm 설정을 추가한다.
  <scm>
        <connection>scm:git:https://github.com/t3qdev/nextg.git</connection>
        <url>http://github.com/t3qdev/nextg</url>
        <developerConnection>scm:git:https://github.com/t3qdev/nextg.git</developerConnection>
  </scm>
    <build>
        <plugins>
            ....
            <plugin>
                <artifactId>maven-release-plugin</artifactId>
                <version>2.5.3</version>
                <configuration>
                    <autoVersionSubmodules>true</autoVersionSubmodules>
                    <goals>deploy</goals>
                    <arguments>-Dmaven.javadoc.skip=true</arguments>
                </configuration>
                <dependencies>
                    <dependency>
                        <groupId>org.apache.maven.shared</groupId>
                        <artifactId>maven-invoker</artifactId>
                        <version>2.2</version>
                    </dependency>
                </dependencies>
            </plugin>
            ...
        </plugins>
    </build>
-
릴리즈 작업 실행
Jenkins Item 목록화면에서 release 를 선택하고Perform Maven Release메뉴를 클릭한다.

Release Version, Development version, SCM, SCM tag를 입력하고 우측하단의Schedule Maven Release Build버튼을 클릭한다.

주의: 중복된 버전이 올라갈 경우 Nexus repository 와 GitHub repository에서 충돌이 발생하므로 버전 입력 시 주의해야 한다. -
릴리즈 결과
릴리즈가 수행되면 GitHub master branche에 새로운 release tag가 생성되고 pom.xml의 SNAPSHOT 버전이 지정된 신규버전으로 변경되며 다음과 같이 Nexus release repository에 Release 버전이 저장된다.

Jenkins Item에서 SonarQube Scanner를 실행하여 품질분석 결과를 수집하며, 추가적으로 테스트 커버리지 결과를 분석하기 위해서는 Maven 실행 옵션에 cobertura:cobertura를 추가하여야 한다.
또한 다음과 같이 pom.xml 에 cobertura plugin 설정을 추가해야 한다.
    <build>
        <plugins>
            ....
            <plugin>
                <groupId>org.codehaus.mojo</groupId>
                <artifactId>cobertura-maven-plugin</artifactId>
                <version>2.6</version>
                <configuration>
                    <formats>
                        <format>xml</format>
                    </formats>
                </configuration>
                <!-- Support for JDK 1.8 -->
                <dependencies>
                    <dependency>
                        <groupId>org.ow2.asm</groupId>
                        <artifactId>asm</artifactId>
                        <version>5.0.3</version>
                    </dependency>
                </dependencies>
            </plugin>
            ...
        </plugins>
    </build>
Jeinkin 에서 빌드가 수행되면 다음과 같이 SonarQube에서 결과를 확인할 수 있다.

어플리케이션 서버는 Tomcat을 사용하며 데모 웹어플리케이션의 접근경로는 다음과 같다.
