Andor camera server - syue99/Lab_control GitHub Wiki
Introduction
The Andor Camera server interfaces with Andor CCD Cameras. It talks to the Andor camera and also talks to the user via its accompanied PYQT GUI. It consists of 4 python files and a C SDK file (DLL) with the structure shown below:
Note that the bottom Andor SDK can only be used on a Windows machine. To access the SDK in python we load the DLL library with ctypes.
Running the server
To run the andor camera server, execute python PATH-TO\servers\iXon_server\AndorServer.py
Installation
-
Requires pyqtgraph
-
pyqtgraph works faster if there are c and c++ compilers installed on the machine. To get them on Windows, install MinGW.
Andor Server
As the Andor server is implemented based on the Andor SDK (in C), most of the features we introduced below is mainly implemented in the Andor SDK and we basically just called them and built the data pipeline. It would be hard to implemented them from scratch but most scientific cameras should have these features available in the SDK. If more than one features below are not supported by the SDK, we would be cautious using them.
One might need to write a python wrapper if the original SDK does not support python, but it clearly would be better if the SDK/API support Python natively. Thanks to PyAndor (initially 3rd party, now official), we do not need to write python wrappers for Andor Camera.
Key features
Live Display
Live Display is the most important features of a camera server. All cameras support this feature, but we need to integrate it into the Labrad system if we want to see ions and do spin-state detections at the same time, as otherwise Live display program and Labrad Clients for taking data will access camera simultaneously and cause deadlock problems. Once integrated into Labrad system, we can automatically pause the Live Display while taking data or even display the real time experimental data (it might be different format though) on the Live GUI. As a result, we need an API to return the camera shots with low latency(at least 30Hz, the faster the better). With that we can implement the live display feature and show it on a GUI (see later GUI Section). For Andor server, we implement the AndorVideo class at the AndorVideo.py file with all the Pyqt5 Widgets and features (e.g. save image, change ROI). One can check the GUI section for more details. With Labrad command line/script interface, one can also call startLiveDisplay() for starting live Display.
The graph below shows the basic layout of the GUI for our labrad system.
Trigger to start
External triggers are necessary for taking experiment data. We need to control the timing of camera by TTL signals and hardware timing rather than CPU clocks. In Andor Server one can set different Trigger modes, including external trigger start (necessary), external trigger exposure (TTL controls the exposure time, optional), internal start, software start. One can set different mode by calling Set_Trigger_Mode(string Mode), or set default trigger mode at config file, or call special acquisition modes (e.g. that requires external trigger) that we later discussed.
External Start
Andor cameras have a port specifying for receiving TTL signals and depending on the Acquisition modes, it will do different jobs (e.g. take one shot or run continuously) after receiving the trigger, as shown by graph below:
As you can see from the graph, there is a read time after the camera takes the shot so TTL signals cannot be exactly as the exposure time. This read time is determined by the size of the images(the smaller the faster), the Readout Modes(how to scan the sensor) and Acquisition Modes (to push shots to PC or to save locally) we chose. (It can be quite slow for EMCCD, for our current experiment we need to wait for 10us+ for the readout.)
Readout Mode
In Andor Server one can set different Readout mode. Different modes have different binning/refreshing ways and results in features such as faster processing time/more accurate data. For example, if the readout mode refresh horizontally line by line then it might leave lines of shadows that looked like false signal (will find a fig later), but if it refresh randomly such problems can be solved. Overall readout mode is particularly important when finding ions (as we do not want be fouled by false signals) and spin-state detection (as we want high fidelity). The graph below shows the different modes Andor provides:
One can check out Andor User Guide for more details. In Andor servers they can be easily set and viewed by Set_Read_Mode(string Mode) and Get_Read_Mode() functions in the server menus. But note changing modes might not be required if the default mode is good enough. (e.g. for a fast CMOS with low noise and high refreshing speed)
Acquisition Mode
In Andor server one can also set different Acquisition modes. Acquisition modes actually are just different combination of readout(binning) modes and the number and the timing details of acquisitions made.(e.g. see Kinetic Mode section). To simplify the process of controlling these acquisitions the Andor SDK has divided the acquisition process into several different Acquisition Modes:
Every different modes needs different parameters to pass in (this is the same for Andor Server as it needs to call the SDK). See charts below for details. (Also check User manual for more details)
Fast Kinetic Mode
Fast Kinetic modes are provided by Andor as the fastest modes for us to use this EMCCD. It is very useful in the experiment as this is the fastest way to get image out with bearable delay time in the real experiment. The mode would be a combination of fast binning with external trigger single shot, and using local camera memory to save shots and pushing to the PC collectively. Note that the blackened feature is quite important features for doing the experiment.
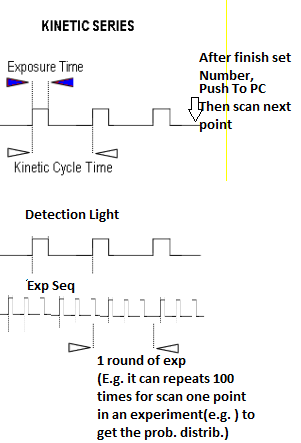
In order to use Kinetic Mode in an experiment, one needs to set up all the camera parameters (e.g. ROI, exposure time, etc.) and then set the acquisition mode to "Kinetic". One also have to specify how many shots are needed in every round of repetition in an experiment (e.g. 100 for a round of repetition). This number tells the camera when to complete shots taken and push the data to PC. See how to do an experiment page for more details. Also see the code below for reference:
#Get orignal ROI, Exp Time for resuming Live display after experiment


cam_var['initial_exposure'] = cam.get_exposure_time()
cam_var['initial_region'] = cam.get_image_region()
#Stop Livedisplay or previous jobs
cam.abort_acquisition()


#Set ROI and Exp Time
cam.set_exposure_time(cam_var['identify_exposure'])
image_region = (cam_var['horizontalBinning'],cam_var['verticalBinning'], cam_var['start_x'], cam_var['stop_x'], cam_var['start_y'], cam_var['stop_y'])

pixels_x = (cam_var['stop_x'] - cam_var['start_x'] + 1)
pixels_y = (cam_var['stop_y'] - cam_var['start_y'] + 1)
cam.set_image_region(*image_region)

#Set mode and number
cam.set_acquisition_mode('Kinetics')
cam.set_number_kinetics(cam_var['kinetic_number'])
#Set trigger mode
cam.set_trigger_mode('External')
#Start
cam.start_acquisition()
print('waiting, needs to get TTLs to proceed with each image')
Set ROI, Temp, Exposure, Shutter
These are basic settings that one needs to alter. It would be good if one can set them both by command lines and GUI. It would be better if GUI can reflects changes even when changes are made by command lines. Graph above in LiveDisplay Section shows the general layout and graph below shows the ROI sections. It pops up after you click the ROI button. All of these functions can be implemented by PyQt.
Andor video/GUI
The Andor server also provides a graphical user interface to view the streaming camera images. This is done directly instead of having a separate GUI client to speed up the display of live images. It can also set the exposure time, EM Gain, ROI of the camera and can save recording/images locally. All of the functionality can, of course, also be accessed through the server settings by calling server functions or change config file. This makes the GUI a semi-client as it is not an exact Client but carries a lot of the Client features. I guess they use this manner to transfer data without using Datavault. This might reduce latency.
We reduce latency by avoiding image data to loop around data vault. But note that processed data (e.g. 100 shots) still goes to datavault and is displayed at RSG in real time. See Graph below for structural illustration:
Note that the Andor_video.py file is itself a python class that inherits from QTGUI and it is called and ran as self.gui when calling the Andor Server (a class that inherits from the labradserver class). However, this does not mean the code in the Andor_video class is not reusable. Basically, the Andor_video class can be migrated to work with other cameras as long as all the functions that use the self.server can be satisfied by the other camera's server (or delete some of the functions that we do not use in the GUI, e.g. set EM gain is not used by a CMOS), the class should run just fine. And also, running python Andor_video.py directly has some bugs which I do not understand and is not recommended as it is just a class and will not initiate the GUI window as many would have thought.
Connection to real-simple-grapher
The camera data is processed and tranferred to the RSG server, as dicussed in the data pipeline section.
Resources
One can check User manual for the features Andor SDK provides with explanations and Documentation for all the functions in the SDK. Andor_Users_Guide.pdf