4. Learning ROS through Simulation - sundevilrobotics/urc-code GitHub Wiki
4. Learning ROS through Simulation with TurtleBot3 and Gazebo
Author: Brandon Rice
The full, original tutorial (for Ubuntu 16) can be found here.
The original, original tutorial (for Ubuntu 14) can be found here.
Videos for each part of the workshop can be found here and here.
Preface: Robots are expensive, and it's difficult to test code when the bot is in the lab and you're at home...
I wrote this tutorial (or rather adapted an existing tutorial) on July 31, 2021. COVID-19 had physically removed our team from using our lab for over one full year. One full year of trying to figure out how a team could write software for a robot that was locked away in an nearly inaccessible room. No more "let's meet next week and test the code (physically on the rover)."
As SDRC's software team lead, one leadership role was particularly tricky: how can I get new members up to speed and teach them ROS (already a difficult task under normal circumstances) without actually running code on a physical device?
It was a problem I didn't know how to solve. Instead of gaining new members interested in software throughout the 2020-21 academic year, we lost nearly our entire team. Such an avoidable mistake if only I or anyone else on our team had experience in simulation-based software development and testing, what I now know and what you too can learn from this tutorial. Don't let working remotely halt your productivity!
Wait, so we don't actually need a robot to write and test software? 😮
No!!! Everything* software related can be virtually simulated on your computer.
I put an asterisk (*) on "everything" because simulations are not real, meaning:
- No simulation is 100% accurate because of how complex and random the universe is,
- A realistically modeled (i.e. correct dimensions, material properties, and joints) CAD model of the assembly you are wanting to simulate is needed for accurate results, and
- You'll want to eventually test your code on a physical robot to confirm that your code works, the simulation is close, and you can celebrate a job well done!
Luckily, in this tutorial, everything (including the model of the robot) is provided in the install of the software package we will use!
Enough talk, let's jump into it!
We will use a model of a robot called TurtleBot and a prebuilt simulator called Gazebo that ships with the Desktop-Full Install of ROS.
The (real) TurtleBot family.
The TurtleBot2 and TurtleBot3 models released with a full ROS library, including the properly defined 3D models of the robots. Because we are using ROS Melodic Morenia, we will use TurtleBot3.
Part 1
A video tutorial can be found at: https://youtu.be/cOMtzShsGug
Installation
First we need to install the core dependencies of TurtleBot, which can be done by executing the following command in a terminal:
sudo apt install ros-melodic-joy ros-melodic-teleop-twist-joy \
  ros-melodic-teleop-twist-keyboard ros-melodic-laser-proc \
  ros-melodic-rgbd-launch ros-melodic-depthimage-to-laserscan \
  ros-melodic-rosserial-arduino ros-melodic-rosserial-python \
  ros-melodic-rosserial-server ros-melodic-rosserial-client \
  ros-melodic-rosserial-msgs ros-melodic-amcl ros-melodic-map-server \
  ros-melodic-move-base ros-melodic-urdf ros-melodic-xacro \
  ros-melodic-compressed-image-transport ros-melodic-rqt* \
  ros-melodic-gmapping ros-melodic-navigation ros-melodic-interactive-markers \
  ros-melodic-gazebo-ros-pkgs
We also need to install the following package for the servo actuators (motors) used on TurtleBot:
sudo apt install ros-melodic-dynamixel-sdk
Next, install this package that defines the messages that TurtleBot uses to communicate with ROS:
sudo apt install ros-melodic-turtlebot3-msgs
Additionally, we need to install the main TurtleBot3 package:
sudo apt install ros-melodic-turtlebot3
Once the main installation is complete, we need to install the TurtleBot3 Simulations package from source, by cloning it with Git into our Catkin Workspace:
cd ~/catkin_ws/src/
git clone -b melodic-devel https://github.com/ROBOTIS-GIT/turtlebot3_simulations.git
Finally, we need to navigate back to the root of the Catkin Workspace to run a catkin_make:
cd ~/catkin_ws && catkin_make
Setup
These next commands are to edit your .bashrc file so every time you open a new terminal, the terminal will have the right variables pre-defined. This command adds sourcing the devel/setup.bash file so new packages installed through apt are recognized by Catkin and your terminal:
echo "source ~/catkin_ws/devel/setup.bash" >> ~/.bashrc
Next, this line defines the default model used in our TurtleBot simulation to be the Burger model. You can also choose the Waffle model instead:
echo "export TURTLEBOT3_MODEL=burger" >> ~/.bashrc
Once these commands are executed (which wrote what's in the quotation marks into the .bashrc file), we need to source the .bashrc file for these things to take effect:
source ~/.bashrc
Launching your first Gazebo world
We can launch the TurtleBot in an empty Gazebo world with:
roslaunch turtlebot3_gazebo turtlebot3_empty_world.launch
I have found that loading Gazebo worlds in a virtual machine can result in very slow physics rendering. To increase performance and to increase the physics update rate to 1.0 (real-time speed), we can run the following command in a terminal window with Gazebo running:
gz physics -s 0.01
This will increase the time step size used in the physics engine, meaning the physics will be faster but less accurate. Change the 0.01 to a value that results in the Real Time Factor in Gazebo to be about 1.0.
Driving the TurtleBot around the house world
The empty world is a bit boring, so let's launch a more complex world - the House world:
roslaunch turtlebot3_gazebo turtlebot3_house.launch
To drive the TurtleBot around, we need to launch the TurtleBot Teleop node:
roslaunch turtlebot3_teleop turtlebot3_teleop_key.launch
We can drive the TurtleBot by typing W to drive forward, A and D to turn, X to drive backward, and S to stop all motors while having the terminal running the Teleop node selected.
Here is a list of commands to launch other pre-made Gazebo worlds:
Autorace World
More information can be found at: https://emanual.robotis.com/docs/en/platform/turtlebot3/autonomous_driving_autorace/
roslaunch turtlebot3_autorace_2020.launch
Or
roslaunch turtlebot3_autorace.launch
Empty World
roslaunch turtlebot3_gazebo turtlebot3_empty_world.launch
(ROS Logo) World
roslaunch turtlebot3_gazebo turtlebot3_world.launch
Stage Worlds (For Mapping, Increasing in Complexity)
roslaunch turtlebot3_gazebo turtlebot3_stage_1.launch
roslaunch turtlebot3_gazebo turtlebot3_stage_2.launch
roslaunch turtlebot3_gazebo turtlebot3_stage_3.launch
roslaunch turtlebot3_gazebo turtlebot3_stage_4.launch
Additional Worlds
Additional worlds for TurtleBot can be found on GitHub and elsewhere:
- https://github.com/Gastd/turtlebot3_hospital_sim
- https://github.com/ROBOTIS-GIT/turtlebot3_home_service_challenge
Part 2
A video tutorial can be found at: https://youtu.be/3hswO5bAIK4
Before we begin, it should be noted that the Burger model does not have a camera, so we will need to change the model to the Waffle Pi model for the camera steps in Part 2. To do this, you can either edit your ~/.bashrc file which we added the line export TURTLEBOT3_MODEL=burger to in Part 1 to now state:
export TURTLEBOT3_MODEL=waffle_pi
(And remember to source the file after saving for the edits to immediately take effect):
source ~/.bashrc
Or, you can just type export TURTLEBOT3_MODEL=waffle_pi in every new terminal tab or window.
SLAM: Creating a Map
SLAM stands for Simultaneous Localization and Mapping, meaning creating and updating a map of the environment while also keeping track of where the robot is on this map. We will use SLAM to autonomously navigate around a partially known world. If this world were to change, say another robot or human were to enter the world, our robot will be able to detect this new object with its sensors and add it as an obstacle to the map. With the correct autonomous control logic, we can tell our robot to always try to avoid these obstacles (even if they are dynamically changing their position in the world)!
Before we can autonomously drive around any world, we need to provide the robot with a map which will be used to localize (position) the robot relative to obstacles or features defined in the map. We will create a new map of the default world by doing the following:
- Launch the world in Gazebo
- Launch the mapping node
- Launch the teleop node so we can drive around
- Drive around and collect data from the robot's sensors until we have a (nearly) complete and accurate map.
We will use the following commands to launch the files:
roslaunch turtlebot3_gazebo turtlebot3_world.launch
roslaunch turtlebot3_slam turtlebot3_slam.launch slam_methods:=gmapping
roslaunch turtlebot3_teleop turtlebot3_teleop_key.launch
Now, with the terminal tab or window running the teleop node selected, drive the robot around using the W A D X and S keys.
Once your map has all of the features defined (black for walls or obstacles, white for no obstacles, and gray/transparent for unknown regions), we need to save the map. In a new terminal tab or window, run:
rosrun map_server map_saver -f ~/map
to save the map into your home directory. This will create two files:
- map.pgm - the image containing the white, gray, and black regions.
- map.yaml - the configuration data for the map.pgm image.
You can change ~/map to another name and location, wherever you want to save your map files.
SLAM: Autonomous Navigation
Now that we have a map of our world, we can drive autonomously inside the world and the TurtleBot should avoid all obstacles in the map. To do this, we will:
- Launch the necessary scripts
- Set an initial pose estimate to align the map relative to the current sensor data (i.e. perform an initial localization)
- Set target (goal) positions and orientations for the robot to drive to
- Have the robot navigate to the goal autonomously
First, let's launch the following scripts:
roslaunch turtlebot3_gazebo turtlebot3_world.launch
roslaunch turtlebot3_navigation turtlebot3_navigation.launch map_file:=$HOME/map.yaml
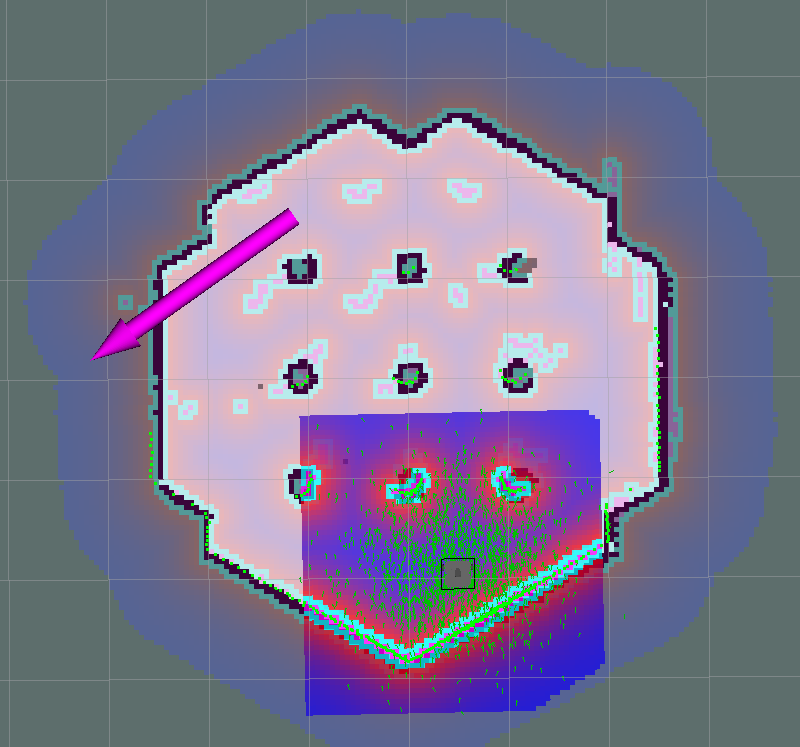
Next, in rviz, we will select 2D Pose Estimate:
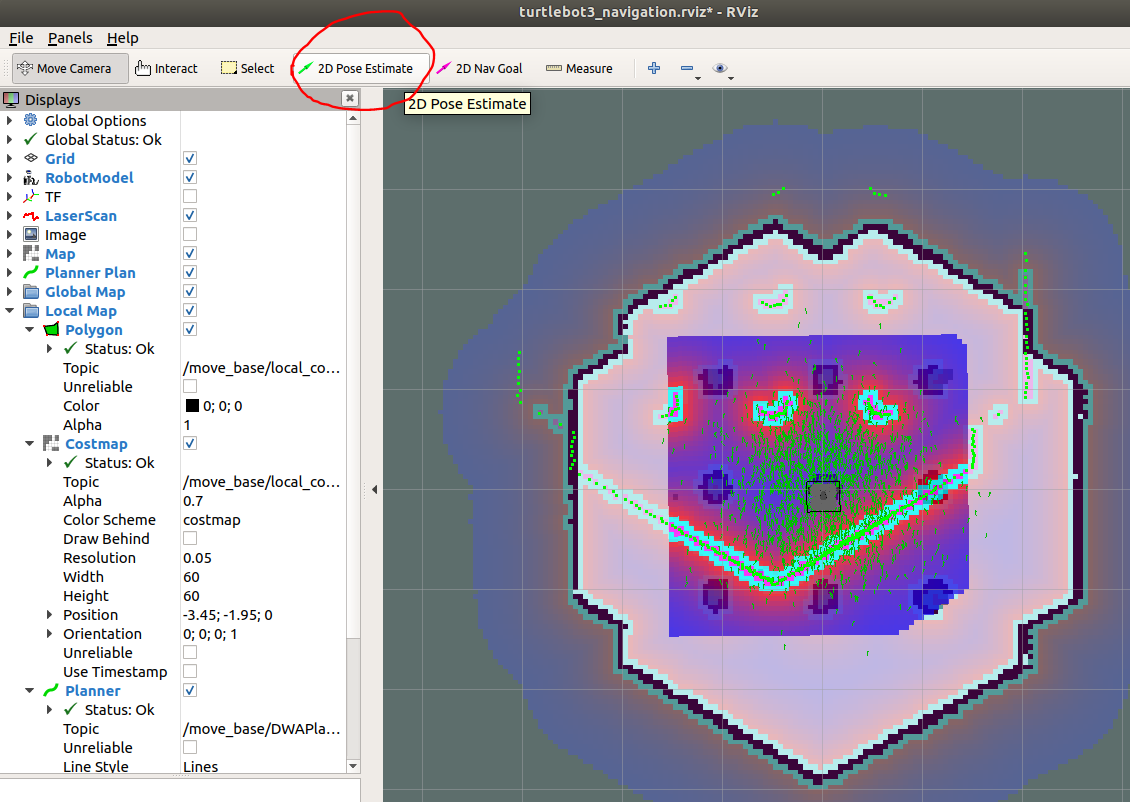
Click and drag an arrow that estimates where the robot is currently positioned relative to the map that we created:
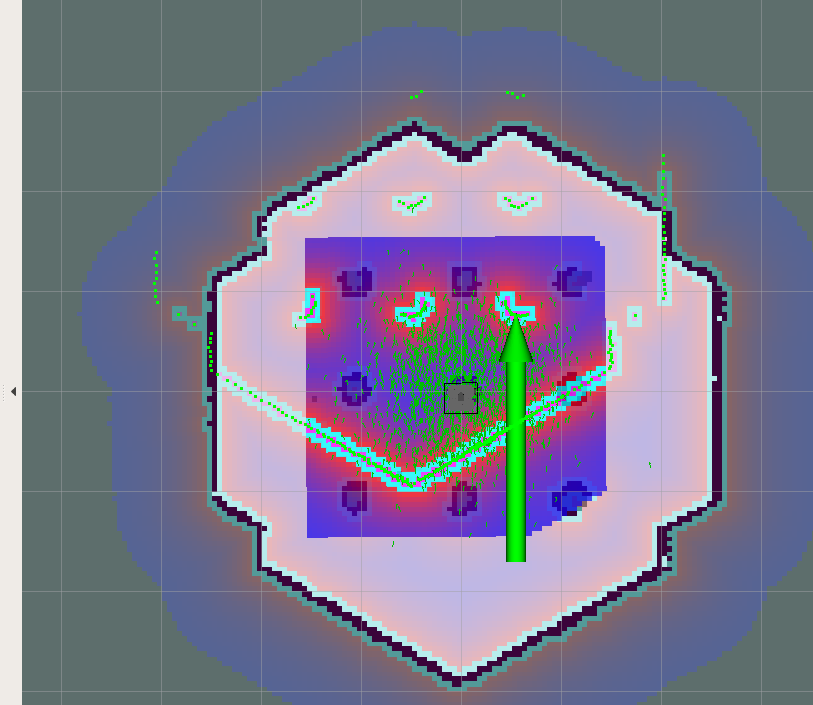
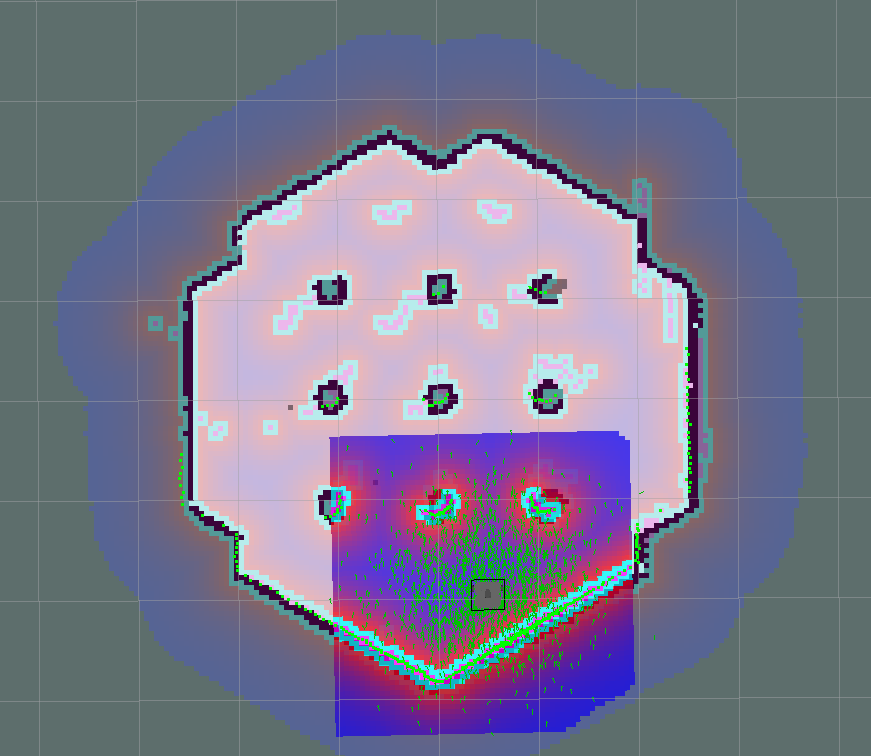
If done correctly, this should localize the robot and the map and the current sensor feed (the green dots from the LiDAR point cloud) should align:
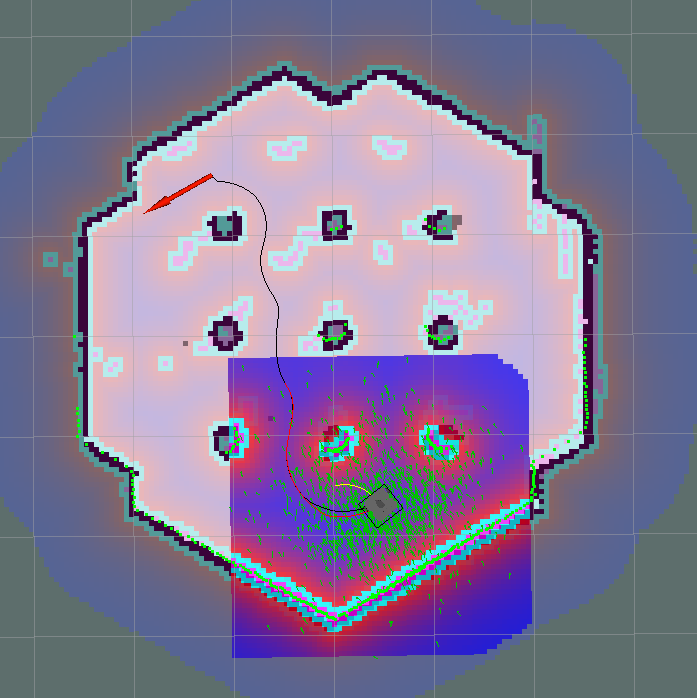
Next, select 2D Nav Goal:
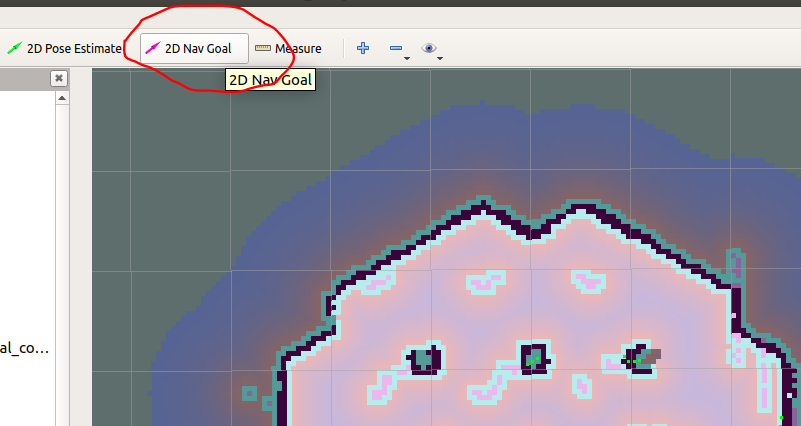
Click and drag an arrow that represents the position and heading of where you want the robot to drive to. In order for a path to be calculated, this arrow must be inside a white or gray region, signifying that there is no known obstacle at the goal location:
You should see the robot compute a local path (a yellow arc), a global path (the blue or red spline), and the robot should start to autonomously drive to the goal position:
Viewing the world through TurtleBot's simulated camera
Note: Simulating a camera is very resource intensive, and we suggest not running this step in a virtual machine.