3DR Troubleshooting - stronnag/mwptools GitHub Wiki
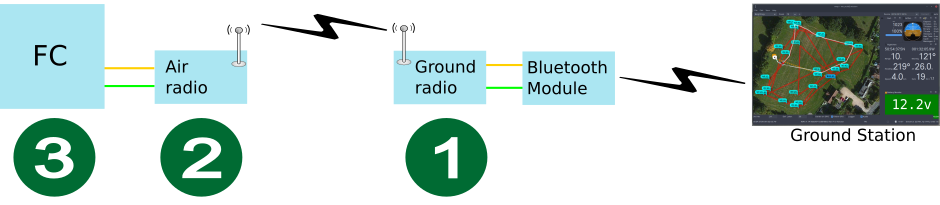
Consider the following fairly typical data flow. On the left, the flight controller, with a UART connected to a telemetry radio (the air radio), then the ground side radio, connected to a transparent Bluetooth bridge, and finally the ground control station (GCS), i.e. mwp.
So many places for something to go wrong:
-
The BT device is not bound or correctly configured for the GCS (e.g.the baud rate is wrong)
-
The BT device is incorrectly wired to the radio
-
RX/TX are not connected correctly
-
The baud rate is wrong
-
-
The radios do not talk to each other
-
Numerous 3DR settings to get wrong
-
-
The radio is incorrectly wired into the flight controller
-
The radio / flight controller baud rate is incorrectly configured.
The numbers in the diagram represent points at which we easily check that things are working using a serial terminal. Some examples:
-
Linux / FreeBSD: cliterm (part of mwptools), minicom, picocom, screen, cu and many others
-
Windows: putty
-
MacOS: somewhat as Linux probably, less cliterm
-
Android: Serial Bluetooth
In this example, I’m using cliterm on Linux. The Bluetooth device is bound as /dev/rfcomm2 and has been configured for 9600 baud with AT+BAUD4. On the flight controller, a UART is configured for MSP and LTM at 9600, so all we need is to make sure all the bits in the middle are passing data.
serial 0 17 9600 38400 9600 38400
The first stage is to connect to the ground radio. This is via the BT
device /dev/rfcomm2; note if we can’t even get to the radio, then at
least one of following is true:
-
We’ve failed to bind the BT device to the computer
-
We’ve failed to physically connect the BT device to the radio
-
There is a baud rate mismatch between the computer, the BT device or the radio.
So much to go wrong before we even get beyond the ground radio.
First, connect the serial terminal to the BT device. if you use a different terminal program or device name (e.g. putty, COM4), then you’ll need to substitute your parameters.
$ # -n means no other initialisation, otherwise cliterm will send '#'
$ # in order to enter the CLI
$ cliterm -n /dev/rfcomm2 9600
Nothing should be displayed in the terminal. Next, we’re going to put the radio in command mode by typing +++; this needs to be done without appreciable delay between the characters; the device will echo OK. Then we enter ATI5⏎ to get the device settings. In the dialogue below, the items typed by the user are in bold, and ⏎ is the keyboard "Return" key.
+++
OK
ATI5⏎
S0:FORMAT=25
S1:SERIAL_SPEED=9
S2:AIR_SPEED=24
S3:NETID=17
S4:TXPOWER=20
S5:ECC=0
S6:MAVLINK=0
S7:OPPRESEND=0
S8:MIN_FREQ=433050
S9:MAX_FREQ=434790
S10:NUM_CHANNELS=20
S11:DUTY_CYCLE=100
S12:LBT_RSSI=0
S13:MANCHESTER=0
S14:RTSCTS=0
S15:MAX_WINDOW=66
If you get this far, congratulations, your computer / BT / radio link is working as far as the ground station. If not, check:
-
The BT device is correctly bound to the computer
-
The connections between the BT device and the radio are correct (RX-TX, TX-RX)
-
The baud rate is correct.
Otherwise, we can move on to the air radio.
In the terminal, now enter RTI5⏎ to get the remote device settings.
RTI5⏎
S0:FORMAT=25
S1:SERIAL_SPEED=9
S2:AIR_SPEED=24
S3:NETID=17
S4:TXPOWER=20
S5:ECC=0
S6:MAVLINK=0
S7:OPPRESEND=0
S8:MIN_FREQ=433050
S9:MAX_FREQ=434790
S10:NUM_CHANNELS=20
S11:DUTY_CYCLE=100
S12:LBT_RSSI=0
S13:MANCHESTER=0
S14:RTSCTS=0
S15:MAX_WINDOW=66
Note that each paramter matches the ground side. If you don’t get the remote response, then the radios are not set to a compatible configuration, and it will be necessary to connect each directly to a computer and reconfigure them so the paramters are the same. Otherwise, to the flight controller.
Recall, we had already set the baud rate to 9600 for MSP and LTM; note also that faster that 9600 is pointless for LTM, as the maximum throughput is around 330 bytes/sec.
Now we will put the radio back into transparent pass-through mode with ATO⏎ and type # to get to the flight controller CLI.
ATO⏎
#
Entering CLI Mode, type 'exit' to return, or 'help'

# status⏎
System Uptime: 197 seconds
Current Time: 2017-09-24T12:25:07.845+01:00
Voltage: 109 * 0.1V (3S battery - OK)
CPU Clock=168MHz, GYRO=MPU6500, ACC=MPU6500, BARO=BMP280, MAG=HMC5883
STM32 system clocks:
  SYSCLK = 168 MHz
  HCLK   = 168 MHz
  PCLK1  = 42 MHz
  PCLK2  = 84 MHz
Sensor status: GYRO=OK, ACC=OK, MAG=OK, BARO=OK, RANGEFINDER=NONE, GPS=OK
SD card: Manufacturer 0x3, 15558144kB, 08/2016, v8.0, 'SL16G'
Filesystem: Ready
Stack size: 6144, Stack address: 0x10010000
I2C Errors: 1, config size: 3404, max available config: 131072
ADC channel usage:
   BATTERY : configured = ADC 1, used = ADC 1
      RSSI : configured = ADC 3, used = none
   CURRENT : configured = ADC 2, used = none
  AIRSPEED : configured = none, used = none
System load: 1, cycle time: 1000, PID rate: 1000, RX rate: 49, System rate: 9

# exit⏎.

Leaving CLI mode, unsaved changes lost.

Rebooting
Congratulations, your 3DR - BT link is working!