Layout - strohne/Facepager GitHub Wiki

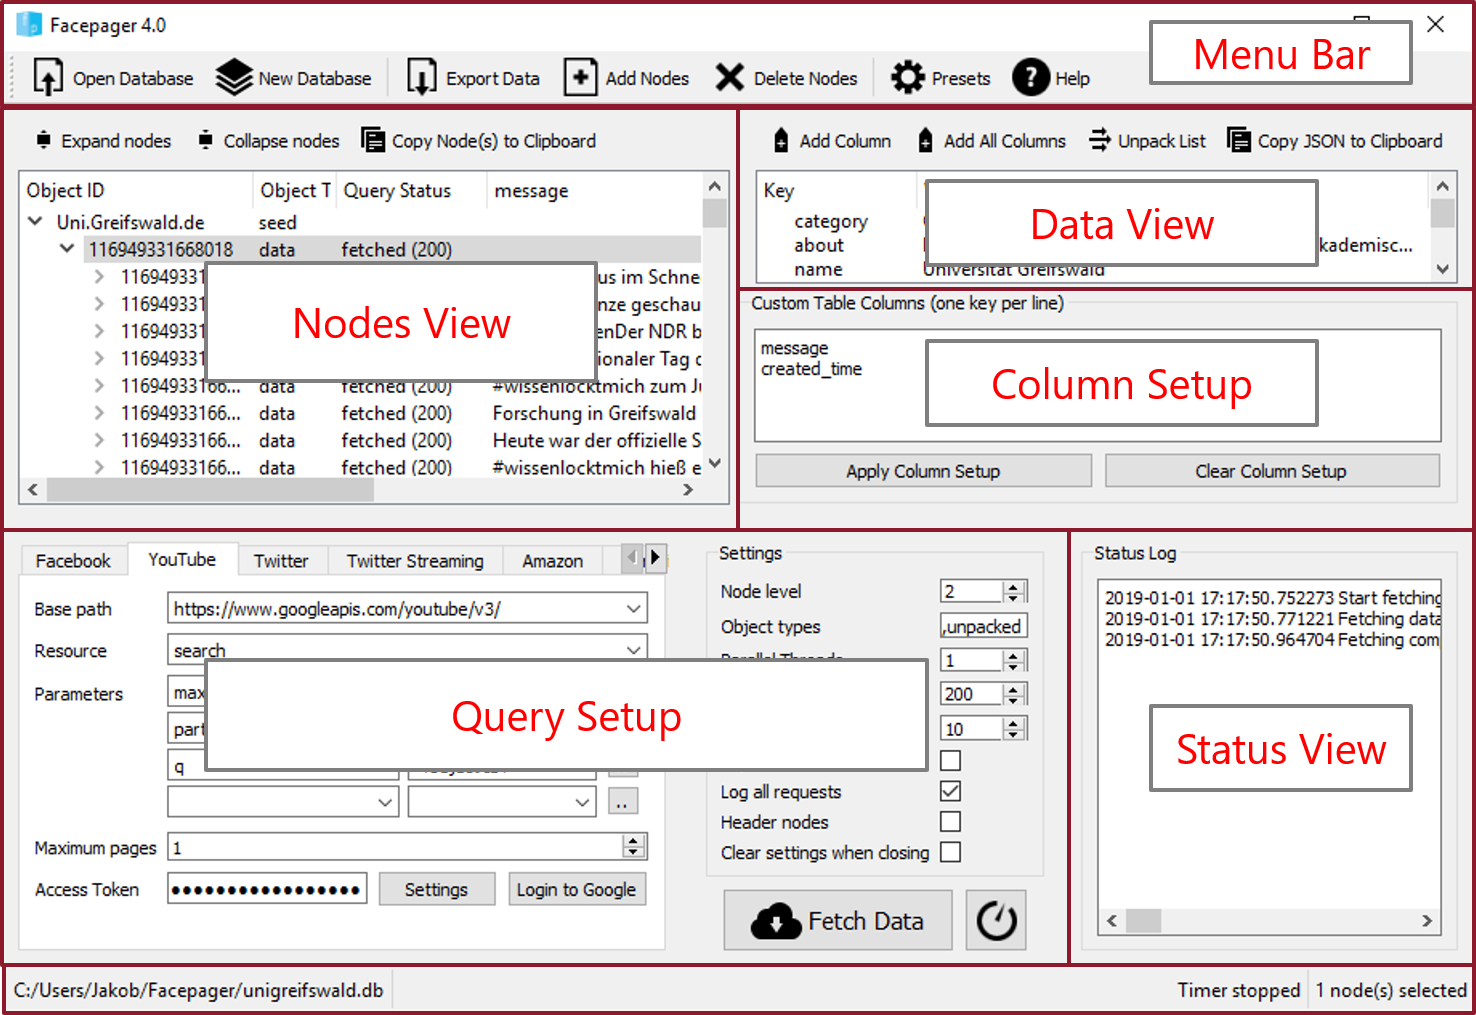
Menu Bar
The Menu Bar shows some of the most important commands in Facepager. Use the commands New Database and Open Database to start a new project or to open an existing one.
No matter which API you’re working with, you need to add starting points by using Add Nodes (see the Getting Started section). In case you want to delete some or all of your nodes, it’s necessary to select them before you use the command Delete Nodes. To simplify your Facepager experience, regardless of whether you are a beginner or a pro, you should use the Presets.
At the end of your data fetching process use the command Export Data to create a CSV file. CSV files can be read by all common statistic programs or programs like Excel.
Nodes View
The nodes are the objects of your data collection and are included in the Nodes View.
Objects may contain other objects (they may be nested). For example, a Facebook post may have comments related to that post. When you request the comments for a post and a result is returned, these comments are automatically inserted under the post as single rows. You'll notice - depending on your operating system - an arrow or plus sign besides the objects. Clicking it, will unfold the object showing related "child"-objects. Of course, objects may have multiple levels or relationships.
The data contained in nodes can be displayed in the columns of the nodes view. The first five columns do not change, because they are crucial throughout the whole data collection process. Other columns are shown as defined in the Column Setup.
Multiple objects in the view can be selected at once by pressing down shift or control while selecting the objects with the mouse.
This makes bulk deletions easier and also enables a request against the API for multiple objects at once.
Nodes and their Object IDs are central concepts for Facepager:
Every request is issued against a specific node.
If multiple nodes are selected (via shift), one request for each node is issued.
Usually every single of these requests depends on the Object ID of the specific node.
Data View
This view shows all data of the selected object or row in the Nodes View.
Internally this view parses raw JSON-data as returned by API requests and displays the result in a tree.
You can unfold nested data.
If the data contains a list (marked with square brackets [ ]), you can slice it by clicking the button Extract Data
and passing the key of the list. This puts every item into a single row in the Nodes View.
In case of error messages, you’ll get more detailed information about what went wrong in the Data View.
Click on the relevant node in the Nodes View and if neccessary unfold the items in the Data View.
If the explanation is not completely readable, copy the line to a common text program with CTRL+C or Command+C.
You can also use the button Copy JSON to Clipboard.
The documentations of the specific API provider should help you with understanding the error reports.
Facebook: https://developers.facebook.com/docs/
Twitter: https://developer.twitter.com/en/docs
YouTube: https://developers.google.com/youtube/v3/
Column Setup
You can control which data is shown in the Nodes View with the Column Setup. Furthermore, only these columns will be exported.
Each line in this field defines one column. The lines correspond to extraction keys in the Data View.
For example, if there is an item with the key "message" in the Data View, insert message into this field and click Apply.
Vice versa, if you do not want to display the "message" data, simply delete message from the setup and click Apply.
Instead of manually writing down keys, you may select a row in the Data View and click Add Column.
Clicking Add All Columns will analyze all data of the selected nodes and add as many columns as possible.
Query Setup
The Query Setup is the starting point for fetching data from an API. To the left side you find modules for different APIs. At the moment you can use these modules: Facebook, YouTube, Twitter, Twitter Streaming, SPARQL and Generic. The settings to the right give you control about which nodes in the Nodes View are considered and how fast or slow fetching data will proceed. To get the most out of Facepager learn the systematic of URLs and Placeholders and Extraction Keys. It will save you a lot of time when dealing with parameters in the Query Setup.
Status View
This window is for logging and debugging purposes. Messages issued here may inform you about the details of the data collection process or any errors while fetching data. Inspect these messages to get a deeper understanding of how URLs are assembled based on the Query Setup.
Most errors are common HTTP status codes and not specific Facepager errors. You can see them in the status view. In this window will just get a code and sometimes a short message. For a more detailed message look at the data view. Besides understanding the general codes (see https://en.wikipedia.org/wiki/List_of_HTTP_status_codes) the documentations of the providers will help you to understand the error reports:
Facebook: https://developers.facebook.com/docs/
Twitter: https://developer.twitter.com/en/docs/
YouTube: https://developers.google.com/youtube/v3/