Sonoff S20 - stodev-com-br/Tasmota GitHub Wiki
Sonoff S20 comes in 4 different plug type variations. Flashing process will be the same for each type.
Please see the Hardware Preparation page for general instructions.
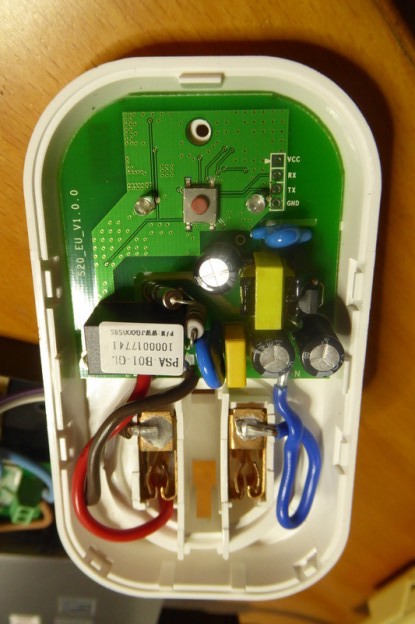
 The picture shows how to program the S20 Smart Socket powered by the serial-to-USB converter. With newer US sockets, either use a right-angle header, or remove the header after flashing. Otherwise,the pushbutton may rub against a pin and get stuck.
Be sure it is NOT plugged in mains!
Remove the "hidden" screw.

(optional) Remove the board from the plastic shell to have better access to serial pins. There are 2 screws at the red and blue wire. Be careful not to damage the soldered connection!

Connect the jumper wires.

From top to bottom (see image below):
- Vcc (3,3V)
- RXD
- TXD
- GND
Connected? Hold the little button pressed while connecting the serial-to-USB adapter to your computer. After about 2 seconds let go of the button. It is now in flashing mode and ready to be flashed with Tasmota.

- Itead Product Page: http://sonoff.itead.cc/en/products/residential/s20-socket
- Itead Wiki: https://www.itead.cc/wiki/S20_Smart_Socket
sonoff.items:
Switch S20_1 "Coffee S20-1 Powerplug" (LR,gLight)
       { mqtt=">[broker:cmnd/sonoff-S20-1/POWER:command:*:default],
                 <[broker:stat/sonoff-S20-1/POWER:state:default],
                 <[broker:stat/sonoff-S20-1/RESULT:state:JSONPATH($.POWER)],
                 <[broker:tele/sonoff-S20-1/STATE:state:JSONPATH($.POWER)]
                 "}
Switch S20_1_Reachable "S20-1 reachable" <contact> (gReachable)
       { mqtt="<[broker:tele/sonoff-S20-1/LWT:state:MAP(reachable.map)],
               <[broker:stat/sonoff-S20-1/RESULT:state:ON],
               <[broker:stat/sonoff-S20-1/POWER:state:ON],
               <[broker:tele/sonoff-S20-1/STATE:state:ON]
               " }
default.sitemap:
Switch item=S20_1 labelcolor=[S20_1_Reachable == "ON" = "green",S20_1_Reachable == "OFF" = "red"]
Once set up and connected, you can set the module type to Sonoff S2X (8) in Configure module.