How to flash image into eMMC - starfive-tech/edk2 GitHub Wiki
Flash image into eMMC
Setup TFTP server:
- Download TFTP tool with this link
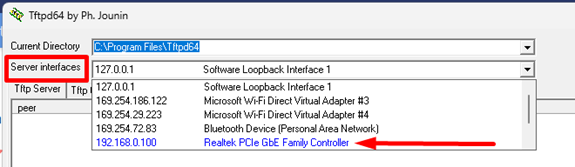
- Identify the server ethernet IP address in the TFTP64 tool.
- Browse the images files folder using TFTP64 tool:
- Click the “Browse” icon in the tool.
- Search for the folder containing all the images.
- Click “Show Dir” to view all the files in the selected folder.
- Make sure all the files are present as shown in Figure below:

Perform the following to flash images into eMMC:
- Set VisionFive2 board to boot from “Flash”
Note: Make sure Flash has a working U-Boot if not, refer to here.
- Connect the board ethernet to the same router as the server.
- Setup environment:
> setenv serverip 192.168.0.100
> setenv ipaddr 192.168.0.101
> setenv gatewayip 192.168.0.1
Replace the above ip according to your environment
- Flash sdcard.img file into eMMC.
> tftpboot 0x90000000 192.168.0.100:sdcard.img
> mmc write 0x90000000 0x0 0x190029
Image files can download from release page here
- Replace partition 1-2 (if required to update SPL or EDK2 image)
> tftpboot 0x90000000 192.168.0.100:u-boot-spl.bin.normal.out
> mmc write 0x90000000 0x1000 0x1000
> tftpboot 0x90000000 192.168.0.100:JH7110.fd
> mmc write 0x90000000 0x2000 0x2000
Image files can build from quick start guide here or download from release page here