Packaging Characters - squidgy617/BrawlInstallerPlugins GitHub Wiki
This serves as a guide to all the fields in the character package form in the BrawlInstaller plugin suite.
To start with this guide, you'll first want to follow the installation instructions on the main page. Afterward, open BrawlCrate and navigate to Plugins > BrawlInstaller Plugins > Package Character.
If preferred, you can also use this plugin to edit existing character packages. You can find some here. Alternatively, you can extract character packages from a build using the "Extract Character" plugin, which is detailed on the Plugins page of this wiki, and edit them with this form.
Upon opening the Package Character plugin, you will be presented with the Package Character form.

Note: this is the form filled in with a character package. When creating a new one, it will look different.
This form has numerous components, which will be detailed below. Also, every control group here has a caption - if you click the caption, you can expand or collapse the entire group.
Nearly every image on this form also has a corresponding "HD" field, which is intended to be used to include HD versions of the respective cosmetic. At this time, these HD fields are not used, but can be helpful to include for manual installation by users, and eventually the plugins may support automatic installation, so it is wise to include them.
Note that you do not need to fill in every available field on this form or include every possible file. Character packages that are missing some components may still be installed. For instance, if you don't wish to include REMIX cosmetics or a Kirby hat, these things can be skipped. Only include the components you wish to and the components that are necessary for the character to function - unless you want to include everything, of course.
Fields with a "Browse..." button can be filled by clicking the button and selecting an appropriate file. Most files will be renamed correctly when the character is installed, but PAC files, ex configs, and ending PAC files should all have the name written correctly. IDs in these filenames will be updated automatically, however, so they can be anything.
Most labels on this form also have a tooltip that can be viewed by hovering over them, which explains their function.
The main form has four buttons on it, outside of any of the other groups. They are:
- Open - Opens an existing character package, allowing you to edit its contents or save it to a new location.
- Save As... - Allows you to save the currently opened character package to a location of your choice.
- Save - Overwrites the currently opened character package with any changes you've made to it. If this is a new package, you will be prompted to choose a location instead.
- Cancel - Close the form without saving.
This section covers the cosmetic resources used for a fighter.
This section lets you customize the CSPs and stocks that will come with your character package.
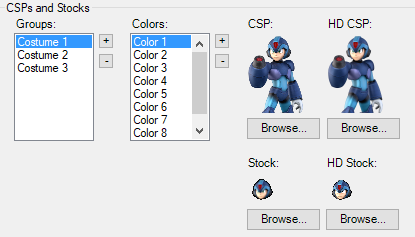
Controls here include:
- Groups - A list of the color-smash groups associated with your character. Any stock icons or CSPs placed into a group will be color smashed together with other stock icons or CSPs in the same group. You should create groups for each separate costume included with your character, and each group should contain the recolors of that costume's cosmetics.
- Colors - A list of the individual colors in the group selected in the "Groups" box. Whichever color you select will have its CSPs and stock icons displayed on the right-hand side.
- CSP - The CSP for the chosen color. This is the portrait displayed when you select a character on the character select screen.
- Stock - The stock icon for the chosen color. In most builds, this is displayed in battle to represent your stocks. It is also used in other places, such as to denote how many KOs or falls occurred on the result screen.

The "Browse" buttons here allow you to choose a .png file to use for the image above them. If you choose only a single image, only the currently selected color will have the image updated. If you choose multiple image files when browsing, the plugin will attempt to update every color in the "Colors" list with your newly selected image, starting with the first color in the list. If there are more colors than the number of images you chose, it will only update a number of colors equal to the number of images you selected. If no color is selected, new colors will be created upon selecting images.
This means you can use "Browse" to pick multiple images all at once or to simply update a single image, if you prefer.
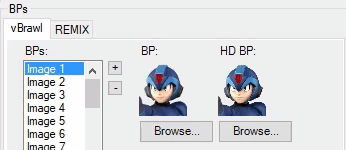
This section lets you customize the battle portraits that will be included with your character package.
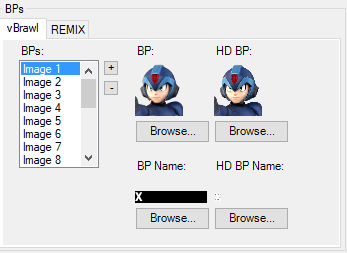
- Tabs - This section has multiple tabs to switch between. At this time, these tabs are "vBrawl", for vanilla-Brawl styled battle portraits, and "REMIX", for battle portraits in the style of PMEX REMIX.


vBrawl and REMIX style BPs.
- BP List - A listbox on the left-hand side serves as a list of the BPs being included in the package.
- BP - The BP image for the chosen list item. The BP is the battle portrait, and appears on the UI during a match.
- BP Name - The name that appears beneath the battle portrait during a match. This is not used in most modern builds, but is used in vanilla Brawl. REMIX does not use this, so you shouldn't include it on the REMIX tab.

The browse buttons here work similarly to the browse buttons in the CSPs section - you can select one file to modify the currently selected image, or select multiple to modify multiple images starting from the first.
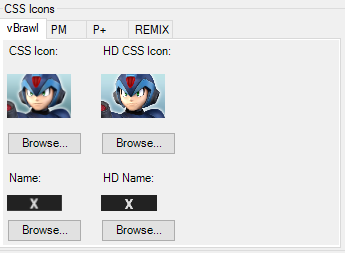
This section lets you customize the character select screen icons that will be included with your character package.
-
Tabs - This section has multiple tabs for the different styles of character select screen icons. They are as follows:
- vBrawl - The style of icon used in vanilla Brawl.
- PM - The style of icon used in Project M.
- P+ - The style of icon used in Project+.
- REMIX - The style of icon used in REMIX.


vBrawl, PM, P+, and REMIX style icons.
- CSS Icon - The icon that appears on the character select screen.
- Name - The name that appears above the CSS icon on the character select screen. This is typically only used for vBrawl and PM style icons.

This section lets you customize the replay icons that will be included with your character package.
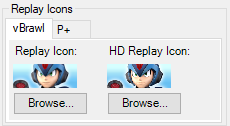
- Tabs - This section has multiple tabs. At this time, these are "vBrawl" for vanilla Brawl style replay icons and "P+" for Project+ style icons.


vBrawl and P+ style replay icons.
- Replay Icon - The icon that appears in the replay menu.
This section lets you customize the portrait name that will be included with your character package.
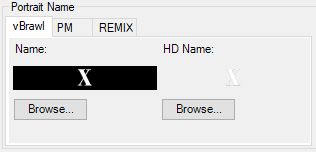
- Tabs - This section has multiple tabs. At this time, these are "vBrawl" for vanilla Brawl style portrait names, "PM" for Project M style portrait names, and "REMIX" for PMEX REMIX style portrait names.


vBrawl and PM style portrait names.
- Name - The name that appears in the portrait window when selecting a character on the character select screen. Used in most modern builds, but not used in Project+.
This section lets you customize the franchise icon which will be included with your character package.
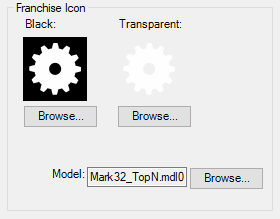
- Black - The desired franchise icon with a black background. This is used in-game. You can use an HD version of the franchise icon if you wish, as BrawlInstaller will resize it.
- Transparent - The desired franchise icon with a transparent background. This is used on the result screen if no model is included. You can and should use an HD version of the franchise icon for this, as BrawlInstaller will resize it and users may use this icon for HD textures as well.
- Model - A MDL0 of a modeled version of the franchise icon. Modeled franchise icons are used on the result screen to ensure maximum quality when rendering them. If you don't include this, the transparent icon will be used instead.
This section covers the main files needed for a fighter to function.
This section covers the files used for the core functionality of the character.

-
Fighter Folder - The directory containing the
.pacfiles that will be used for the fighter. The+and-buttons are used to add new entries to the drop down below. This drop down lets you choose between multiple sets of .pac files. If you include multiple sets of .pac files with your fighter, users will be presented an option to choose which version they want to install upon character installation. You can use theNameandDescboxes to configure a name and description for the selected file set that will be presented to users when they make this choice. Use the "Browse" button to select the directory containing the .pac files you would like to include in the selected file set. Any files or folders within the directory will be installed along with the character. - Ex Configs - The list of Ex config .dat files that will be used for your character. Use the "Browse" button to select all desired files at once, and ensure they contain "Fighter", "Cosmetic", "Slot", or "CSSSlot" in their name as appropriate.
- Module - The module .rel file to be used for your character. Supported modules at this time include all Ex modules, plus the following: Marth, Sonic, Lucario, and Pit's patched Project M module.
This section covers the files needed to add a Kirby hat along with your fighter. You can ignore these if you'd like to exclude a Kirby hat entirely.
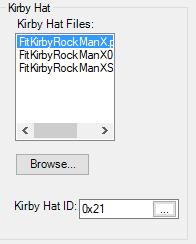
- Kirby Hat Files - The .pac files that will be used for the Kirby hat. Use the "Browse" button and select all desired files at once.
- Kirby Hat ID - The fighter ID which the included Kirby hat is based on. If no PAC files are included, when installing the package, Kirby hat files will instead be copied from the specified fighter ID and used for the Kirby hat. For example, if you set this to Lucario's ID (0x21), Lucario's hat will be used. This field has an ID picker.
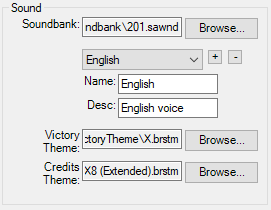
This section covers sound and music files to be included with your fighter.
-
Soundbank - The soundbank used by your fighter. The
+and-buttons are used to add new entries to the drop down below. This drop down lets you choose between multiple soundbank files. If you include multiple soundbank files with your fighter, users will be presented an option to choose which version they want to install upon character installation. You can use theNameandDescboxes to configure a name and description for the selected file option that will be presented to users when they make this choice. Use the "Browse" button to select the desired soundbank file to use for the chosen option. - Victory Theme - The victory theme that plays on the result screen after a match.
- Credits Theme - The theme that plays during the credits for classic mode. If not included, most builds default to a placeholder.
This section covers files used for classic mode that you would like to include with your character.
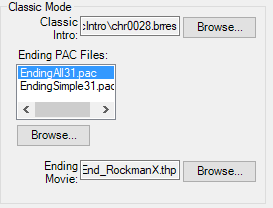
- Classic Intro - A .brres file used when displaying a character before a match during classic mode. Only used if you manually add your character as an opponent to classic mode.
- Ending PAC Files - PAC files used for your character's All-Star and Classic mode ending images. If not included, most builds default to a placeholder. Use "Browse" to select all desired files, and ensure they include "Simple" or "All" in their name as appropriate.
- Ending Movie - THP file used for your character's classic mode ending movie. If not included, most builds default to a placeholder.
This section contains miscellaneous settings and files used in your character package.
These are settings used to configure Gecko codes included in some builds. You can find more information on some of these settings in the FighterSettings.txt section of the Character Packages page.

- Credits Theme ID - The song ID (in hex or decimal format) to be used for the fighter's credits music in Classic and All-Star mode. This is meant to be used if you want to set your character's credits theme to a vanilla character's - don't use it if you're already including a credits theme with your fighter!
- Trophy ID - The trophy ID (in hex or decimal format) to be used for the fighter's trophy. This is meant to be used if you want to set your character's trophy to a vanilla trophy - don't use it if you're already including a trophy with your fighter!
-
Throw Release 1 - The first value to use for your fighter's throw release point, as it would appear in the code
ThrowN Fix and Throw Release Points v1.1c (Throw Animation Fix) [Magus]. If you don't set this, a placeholder will be used. -
Throw Release 2 - The second value to use for your fighter's throw release point, as it would appear in the code
ThrowN Fix and Throw Release Points v1.1c (Throw Animation Fix) [Magus]. If you don't set this, a placeholder will be used. - ASM Files - A list of ASM Gecko code files you'd like to include with your character. Users will be asked if they would like to install these codes when installing your package. Use the "Browse" button to select all desired files.
-
Character-Specific Settings - There are several settings in this section that only apply to clones of specific characters. You can click the character's name to expand the group and customize these settings. If you don't know anything about these settings, or your character isn't cloned from any of these, you can probably skip them. They are as follows:
-
Lucario - Settings for Lucario clones.
-
Bone ID - The bone ID used in the code
Lucario Clone Aura Sphere Bone ID Fix [Dantarion, ds22, PyotrLuzhin, Yohan1044, KingJigglypuff, Desi]. -
Kirby Effect ID - The Effect.pac ID used in the code
Kirby Lucario Clone Aura Sphere GFX Fix [ds22, DesiacX, Eon].
-
Bone ID - The bone ID used in the code
-
Jigglypuff - Settings for Jigglypuff clones.
-
Bone ID - The bone ID used in the code
Jigglypuff Clone Rollout Bone Fix [codes, DesiacX]. -
EFLS ID - The EFLS ID/index used in the code
Jigglypuff Clone Rollout Max Charge GFX Fix [Codes, DesiacX]. -
SFX IDs - The SFX IDs, in order, used in the code
Jigglypuff Clone Rollout SFX Fix [codes, DesiacX].
-
Bone ID - The bone ID used in the code
-
Bowser - Settings for Bowser clones.
-
Bone ID - The bone ID used in the code
Bowser Clone Fire Breath Bone Fix [KingJigglypuff].
-
Bone ID - The bone ID used in the code
-
Lucario - Settings for Lucario clones.
This section has only a single field for a Subspace door ID. This is the ID of the door that must be passed through for the character to be unlocked in SSE mode. If left blank, the character will be unlocked per conditions specified in build settings. In hex, this ID should match the GDOR ID displayed in BrawlCrate (e.g. a GDOR ID of 4900102 should be written here as 0x4900102). For more information on using door IDs and SSE mode, see this guide by Kapedani.

This section covers the fields used to configure a trophy for your fighter. For more info on these settings, you can see the TrophySettings.txt section of the Character Packages page.
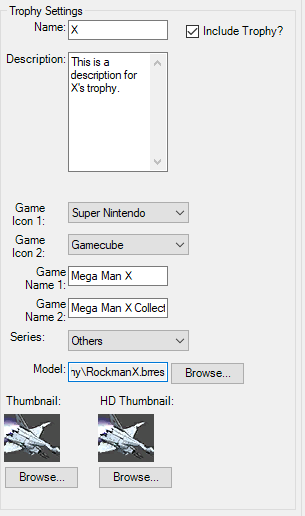
- Include Trophy? - A checkbox indicating whether you want to include a trophy with your fighter or not. Unchecked by default. Leave unchecked if you don't wish to configure a trophy, and check this box if you would like to configure one.
- Name - The name of the trophy as it appears in the trophy viewer.
- Description - The description of your trophy as it appears in the trophy viewer.
- Game Icon 1 - An icon representing the first console the character appeared on. If you do not select an item from this list, it will default to "None".
- Game Icon 2 - An icon representing the last console the character appeared on. If you do not select an item from this list, it will default to "None".
- Game Name 1 - The name of the first game the character appeared in.
- Game Name 2 - The name of the last game the character appeared in.
- Series - The series the character is from, which determines what series the trophy is displayed under in the gallery. If you do not select an item from this list, it will default to "Others".
- Thumbnail - The thumbnail for the trophy, as it appears in the gallery.
This section includes a simple text field where you can type any information that you'd like to have included in a README in the character package.

This section includes a simple file list. You can click the "Browse" button and select any number of files you'd like, and they will be included with your character package in a "Bonus" folder. Use this to include any extra files you want to allow users to install manually on top of your character package. You could even add a readme file to this file list to explain how the files are used.
This section includes a file list. You can click the "Browse" button to select any number of .buildpatch files you would like to have applied when the character is installed. When a file in the list is selected, you can modify the Description field to change the description for that build patch.
When the character is installed, users will be asked if they would like to install the build patches included here, and they will be shown the description you entered for each one. If the users choose to install them, the build patches will automatically be applied to their build. Build patches can be useful to include additional optional content with a character.
For more information on build patches, see the guide on them.

Once you've finished making any changes, you can click "Save" or "Save As..." in the bottom-right corner to save your package as a .zip file. This .zip file can then be installed into a build using the "Install Character" plugin.