Managing Music - squidgy617/BrawlInstallerPlugins GitHub Wiki
This serves as a guide for managing music in your build using the BrawlInstaller plugin suite.
To start with this guide, you'll first want to follow the installation instructions on the main page. Afterward, open BrawlCrate and navigate to Plugins > BrawlInstaller Plugins > Manage > Manage Music.
For the examples in this guide, we will be using the files from the Qbert stage by RedipsTheCooler and Kapedani. You can find this stage here. You'll want to extract its contents before proceeding, if you intend to follow along.
Note that the music manager only supports builds using the modern Project+ tracklist system. If your build does not use this system, it may not function correctly for you.
Tracklists
Upon opening the Manage Music plugin, you are presented with the Tracklists menu.
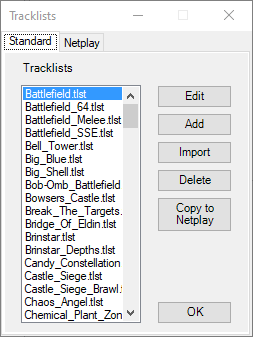
This screen has several components.
- Standard/Netplay Tabs - The tabs at the top of the screen allow you to switch between your standard and netplay tracklists. These are the tracklist files located in the
tracklistandnetplaylistfolders, respectively. All operations performed through the plugin are only performed on the tracklists belonging to the tab you have selected. - Tracklist List - On the left side of the window is a list of all of the tracklist files in your build. If you wish to edit, delete, or copy one of these tracklists, you'll select it from this list.
- Edit - Opens an instance of the tracklist editor, allowing you to modify the tracklist you have selected.
- Add - Opens an instance of the tracklist editor, allowing you to add a brand new tracklist file to your build.
- Import - Opens a file select prompt. Selecting a tracklist file will instantly import it into your build, and it will then appear in the list of tracklist files.
- Delete - Deletes the selected tracklist. Upon doing so, you will also be asked if you wish to delete the associated .brstm files located in your build as well.
- Copy to Netplay/Offline - This button allows you to copy tracklists from the standard list to the netplay list and vice-versa. If you are in the standard tab, this button copies files from the
tracklistfolder in your build to thenetplaylistfolder. If you are in the netplay tab, it does the reverse. - OK - This button closes the window.
Note that since this screen is simply a file manager, any files you delete on this screen are deleted from the filesystem. You can restore them using the Restore Backup plugin, however.
For this guide, we will click the Import button to import the tracklist that came with the Qbert stage. When you do so, you will be presented with a file select window. Locate the Qbert files you downloaded earlier and navigate to the Music folder, selecting the Qbert.tlst file located within and clicking Open. You'll get a message indicating the file was imported successfully. Click Ok, and then, with the Qbert.tlst file selected in the listbox, click Edit. This will bring up the tracklist editor.
Tracklist Editor
Note: the window may look slightly different for you upon opening.
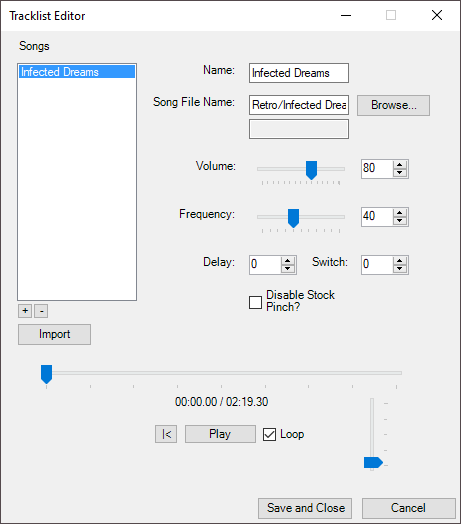
The tracklist editor allows you to manage songs within a given tracklist. Although it may appear somewhat daunting at first, modifying tracks is quite simple. As with the previous screen, there are several controls and fields to be aware of.
- Song List - On the left side of the window is a list of all songs in the tracklist you are editing. Whichever song you have selected is the one impacted by any changes you make using the other controls. The song list also has a
+and-button. These buttons let you add new entries to the song list or remove existing ones. If you remove an entry, upon saving, you will be asked if you wish to remove the associated .brstm file if it is located in your build. - Import - Opens a file selection window. Upon selecting files, you will be presented with a directory selection window. Selecting any folder located in the
strmfolder of your build will add the song to the song list on the left, with theSong File Namefield automatically populated. .brstm files imported in this way will be copied into your build upon saving. - Name - The name of the selected song, as it will appear in-game. Changing the text of this field will change the in-game name of the song upon saving.
- Song File Name - A shorthand of the file path for the .brstm in your build. First is the directory where your .brstm file is located in the
strmfolder of your build, followed by a/, then the name of the .brstm file, without the .brstm extension. If you are importing a new file, this represents the location where the song will be imported, rather than where it currently is. To the right of this is aBrowse...button, which when selected will open a file select window to choose a .brstm file to import. Doing so will automatically populate the box with the appropriate value, as well as fill in the below box with the file path. Upon saving, such files will be imported into the build. - Volume - A slider and associated number box for adjusting the in-game volume of your track.
- Frequency - A slider and associated number box for adjusting the frequency your track will appear in-game when a stage is associated with it.
- Delay - The delay, in frames, before your track begins to play in-game at match start.
- Switch - The time remaining in a match, in frames, before the game will switch to an alternate track, if one is set up. To learn more about these types of tracks, see this guide.
- Disable Stock Pinch? - A checkbox representing whether or not characters must be low on stocks before an alternate track will play, if one is set up. See above.
- Music Player - A playback tool for the currently selected track. Only displays for custom tracks present in your build, not for tracks in the vanilla game files or tracks that you have not yet imported.
- Save and Close - Upon clicking this, any changes you made to the tracklist, and any entries within, are saved, and all imported files are copied into your build. If you changed certain fields, you may be asked if you want to delete old files as well. If you got to this screen from the
Addbutton on the previous window, upon saving you will be asked to name your tracklist file. - Cancel - Close the window without saving any changes.
Any changes you make on this screen are not saved to your build until you click the Save and Close button, so if you're worried you may have messed something up, you can click the Cancel button at any time and then re-open the window to start fresh.
For our Qbert tracklist, we've already imported the tracklist file into our build, so the only thing missing is the .brstm file associated with the selected song, Infected Dreams. To import this, click the Browse... button to the right of the Song File Name textbox, then once again navigate to the Music folder from the Qbert stage files and this time select the Infected Dreams.brstm. Next, navigate to the Retro folder inside the pf/sound/strm folder in your build and select this folder. Upon doing so, the Song File Name field and the below filepath field will be updated accordingly.
You've successfully added the .brstm file to your build, so now you can click Save and Close to save the changes you've made. Upon doing so, you will be taken back to the tracklist listing form.
If you wish to check out the audio player with your new track, you can select the Qbert.tlst and click Edit again to bring it up, and the audio player should now be visible. In addition, if you want to have your changes in netplay as well, you can click the Copy to Netplay button to copy Qbert.tlst over to the netplaylist folder.
And with that, you're done! Your tracklist has been added to your build, and should be able to be chosen from the stage editor. You can learn how to manage stages using this guide.