Managing Characters - squidgy617/BrawlInstallerPlugins GitHub Wiki
This serves as a guide for managing characters in your build using the BrawlInstaller plugin suite.
Installing Characters
To start with this guide, you'll first want to follow the installation instructions on the main page. Afterward, open BrawlCrate and navigate to Plugins > BrawlInstaller Plugins > Install > Install Character.
Before starting, you'll also need a BrawlInstaller-compatible character package. You can find some here. If you'd like to learn more about character packages, including some information on creating your own, you can learn more here. You can also create character packages automatically.
Note that the plugins documented in this guide will only work for BrawlEx builds like P+Ex. They will not work on non-Ex builds like base Project+.
Upon opening the Install Character plugin, you will first be prompted to select a .zip file. Select the .zip character package of the fighter you would like to install and click "Open". After doing so, you will be presented with another prompt.
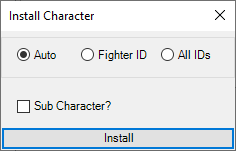
This form contains several options:
- Auto - When selected, any IDs (fighter ID, cosmetic ID, etc) will be chosen for your new character automatically during installation, instead of you needing to specify them manually. If conflicts are found on any IDs, these conflicts will be resolved automatically as well, with the plugin choosing the first available ID instead. Choose this option for the quickest and easiest installation.
- Fighter ID - When selected, reveals two more boxes for
Fighter IDandCosmetic ID, which are used to determine what fighter ID and cosmetic ID the character will be given rather than determining them automatically. These fields also use ID pickers. - All IDs - When selected, reveals five boxes:
Fighter ID,Cosmetic ID,Cosmetic Config ID,CSS Slot Config ID, andSlot Config ID. This works just like the Fighter ID option - values entered in these fields will be used to determine the IDs of the installed character, and you can use ID pickers for them. This field is meant to be used if you want to make use of unused IDs in Brawl, and should only be selected if you know what you're doing. - Sub Character? - When checked, reveals a
Base CSS Slot IDfield. You can enter the CSS slot ID of an existing character into this field and your character package will be installed as a sub-character of that ID instead of a main roster character. In builds like P+Ex that use the codeBrawlEX Hold Shield Rewrite v4 Clone Fix [codes, ChaseMcDizzle, HyperL!nk, PyotrLuzhin, ds22, Desi], this means you can select your new character by hovering over the base character and holdingLwhile selecting them (Note: some builds use a different code, and thus are not supported). In builds with SSE Ex support, this means you can hover over the base character on the SSE CSS and use the C-stick to flip between the base character and your new character (this does not work for Samus/ZSS, the starter Pokemon, or Sheik/Zelda, because they all already have sub characters). Characters installed in this way will not be added to the character select screen.
Select your preferred settings and then click Install. If you do not select Auto and there are conflicts with any of your chosen IDs, you will be warned of them, but can proceed anyway if you wish. Doing so will overwrite the files associated with the existing fighter and replace them with your new fighter. This is primarily intended to be used for updating an existing character rather than replacing them with an entirely new one - if you wish to replace an existing character, you should usually uninstall them first and then install the new character.
After clicking install, the plugin will check for any other conflicts between your character and build. You may see prompts about the following:
- Fighter Name - If your new character has the same internal name as an existing character (determined based on whether or not a folder with the name already exists in
pf/fighter), you will be asked if you want to overwrite the existing fighter. If you say yes, installation will proceed as normal. If you say no, you will be asked to change the internal name. Doing so will cause the plugin to change the internal name for your new fighter everywhere necessary when installing it. - Victory Theme - If your character package comes with a victory theme, you will be asked if you wish to install it. If you select yes, it will install as normal. If you select no, you have the opportunity to manually enter a victory theme ID, for which you can use ID pickers to select an existing ID from your build. If you select no, the victory theme will not be installed and the character will likely not play a theme on the result screen.
- If you're replacing an existing fighter and they already have a different victory theme from the one you're installing, you'll also be asked if you'd like to remove the existing theme.
- Credits Theme - If your fighter comes with a credits theme, you will receive similar prompts to the above victory theme ones. They have the same effect but for credits themes.
- ASM Files - If your new fighter comes with any custom Gecko codes, you will be asked if you'd like to install them. If you say yes, the plugin will check if any of the codes already exist in your build. If they do, it will ask if you'd still like to proceed. Regardless, confirming these prompts will install the .asm files into your build in a
BrawlInstallerfolder in your build'sSourcedirectory, and will add a reference to the .asm files to yourBOOST.txtfile. - Soundbanks - If a soundbank with the same ID as your new fighter's soundbank already exists and you did not select
Autoinstallation, you will be asked if you'd like to use a different ID. If you say no, the old soundbank will be overwritten. If you say yes, you will have the opportunity to either choose an ID yourself or have BrawlInstaller pick one for you. You can use ID pickers if you choose to select one manually. If you selectedAutoinstallation, BrawlInstaller will resolve the conflict automatically by selecting the first available soundbank ID. This conflict check only occurs if you havelavaSawndIDReplaceAssist.exeand Codes'sfxchange.exeinstalled, which are included with theBrawlInstaller.Tools.Setup.exein the releases. - Effect.pac IDs - If a fighter already exists with the same Effect.pac ID as your new fighter and you did not select
Autoinstallation, you will be asked if you'd like to use a different ID. If you say no, the character will be installed without doing anything to resolve the conflict. If you say yes, you will have the opportunity to either choose an ID yourself or have BrawlInstaller pick one for you. You can use ID pickers if you choose to select one manually. If you selectedAutoinstallation, BrawlInstaller will resolve the conflict automatically by selecting the first available Effect.pac ID. This conflict check only occurs if you have Codes'gfxchange.exeinstalled, which is included with theBrawlInstaller.Tools.Setup.exein the releases. - Franchise Icons - If your new fighter comes with a franchise icon, you will be asked if you'd like to install it. If you select yes and you did not select
Autoinstallation, you will be asked to enter a franchise icon ID; if you choseAutoinstallation, BrawlInstaller will choose one automatically. Regardless, the franchise icon will be installed. If you select no, you will have the opportunity to enter a different ID, which allows you to choose one that already exists in your build. If you select no to this, fighter installation will abort.
Once you've gotten through all conflict checks and confirmed your choices, you should see a progress bar and your BrawlCrate form may begin to flash. This is normal behavior. Once the character installation is complete, you'll receive a message indicating success, and you should see the character in-game.
If an error occurs during installation, the plugin will restore a backup of the build prior to any changes it made and will show an error message.
Uninstalling Characters
If you wish to remove a character from your build, open BrawlCrate and navigate to Plugins > BrawlInstaller Plugins > Uninstall > Uninstall Character.
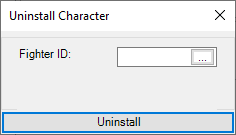
You will be prompted to enter a fighter ID. You can use the ID picker to select one as well. Once you've selected your ID, click Uninstall.
Before the plugin uninstalls anything, you will be asked if you wish to uninstall the fighter's franchise icon, victory theme, and/or their credits theme, if they have one. You should only say yes to these if your character does not share these with anyone else - especially if they share these with characters on the base roster.
After this, you will see a progress bar and the BrawlCrate form may flash - this is normal. Once the process completes, you will receive a message indicating if it was successful, and if you go in-game the character should no longer appear.
If an error occurs during installation, the plugin will restore a backup of the build prior to any changes it made and will show an error message.
What changes do the plugins make?
These plugins perform a variety of operations which would be too lengthy to explain in full detail. In short, the plugins perform virtually every step to adding a character described in the BrawlEx Guide for P+Ex by KingJigglypuff. It moves files to their respective locations, modifies them as needed, removes existing files as needed, and places cosmetics into their appropriate places as well. If you install characters into SSE mode as well, it does steps outlined in this guide, also by KingJigglypuff.
If your build contains lavaKirbyHatManager or PowerPC Assembly Functions by QuickLava (both included with BrawlInstaller.Tools.Setup.exe found in the releases), the plugins will also be able to automatically install Kirby hats and add a fighter to the code menu by modifying the appropriate text files included with these tools.
While the plugins detect many aspects of a build automatically, much of their behavior is influenced by your build settings. BrawlInstaller will only install or uninstall things based on how these are configured, so make sure they are correct before using these plugins.
Also, when installing and uninstalling characters, some Gecko codes may be modified in your build. The plugin will search for and modify the following codes as needed:
- ThrowN Fix and Throw Release Points v1.1c (Throw Animation Fix) [Magus]
- Lucario Clone Aura Sphere GFX Fix [Dantarion, ds22, DesiacX]
- Kirby Lucario Clone Aura Sphere GFX Fix [ds22, DesiacX, Eon]
- Lucario Clone Aura Sphere Bone ID Fix [Dantarion, ds22, PyotrLuzhin, Yohan1044, KingJigglypuff, Desi]
- Jigglypuff Clone Rollout Bone Fix [codes, DesiacX]
- Jigglypuff Clone Rollout Max Charge GFX Fix [Codes, DesiacX]
- Jigglypuff Clone Rollout SFX Fix [codes, DesiacX]
- Dedede Clones Fix [MarioDox]
- Bowser Clone Fire Breath Bone Fix [KingJigglypuff]
- Classic and All-Star Ending Choice Engine v1.1d [DukeItOut]
- Classic and All-Star Results Music Table [DukeItOut]
- BrawlEX Hold Shield Rewrite v4 Clone Fix [codes, ChaseMcDizzle, HyperL!nk, PyotrLuzhin, ds22, Desi]
- Clone Classic & All-Star Result Data V1.21 [ds22, Dantarion, DukeItOut]