User Guide - spencershepard/RotorOps GitHub Wiki
Installation
Download here.
Run the setup exe to install in your directory of choice.
Usage
- Run MissionGenerator.exe
- Select desired options and press 'Generate Mission'
- Open DCS Mission Editor and click the top left folder icon
- Navigate to where the generated mission file is, either in the default location ...\RotorOps\MissionOutput, or in the Save Directory you selected under Preferences in the RotorOps interface
- Open the mission and fine-tune the ground unit placement and any other settings you like such as weather, loadouts, waypoints, etc
- You MUST save the mission from the Mission Editor or launch from the mission editor Launching the generated mission directly can have unexpected results.
- You can safely add/change player helicopters but make sure there is only one per group
- Click 'Fly' and have fun!
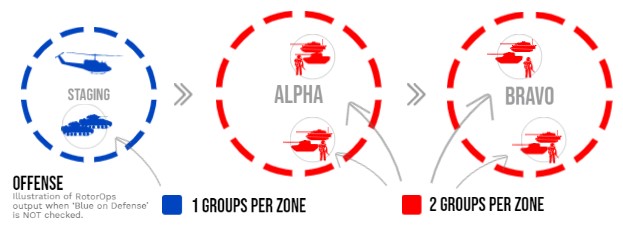
Offense
The default generator settings put friendly forces in an offensive position. You are to support the BLUE convoy leaving the staging zone. If you wipe out the RED forces in the active conflict zone, it is captured. If your other settings allow for it, a captured conflict zone will establish a FARP near the center for refueling/rearming/spawning.
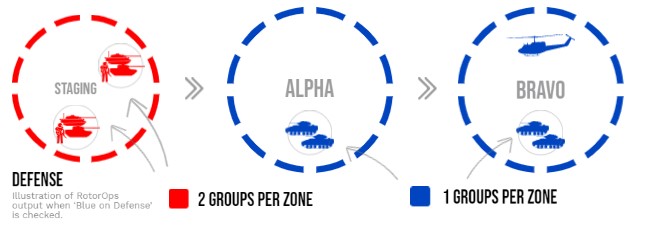
Defense
If 'Blue on Defense' is checked, you start in the last conflict zone, and you have to try to defend against the RED convoy. If you wipe out the convoy, you win. If they destroy all BLUE ground forces in the conflict zones, you lose. If your settings allow for it, you will start with FARPs near the center of the BLUE conflict zones for refueling/rearming/spawning.
Defense is a very fun mode that adds a sense of urgency and promotes teamwork! There is less searching for the enemy, as they are constantly in motion.
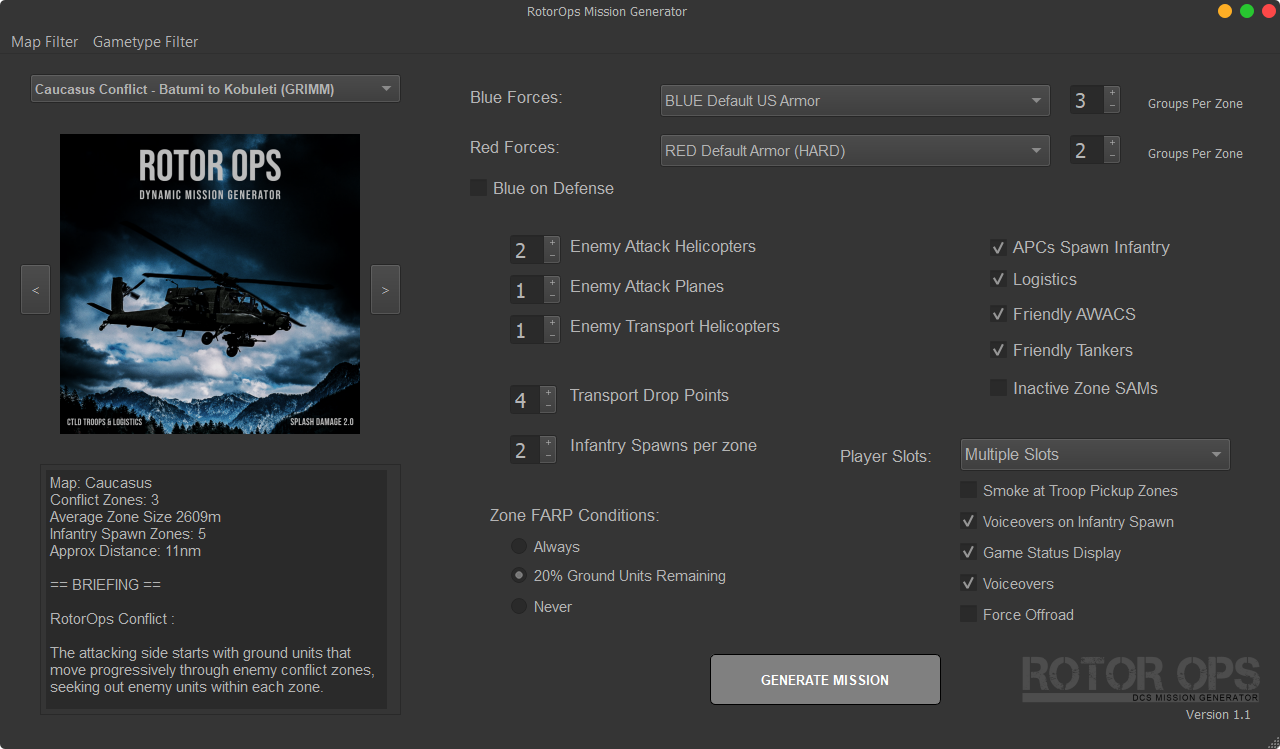
Generator Settings
Map: Select the maps you want available for your missions.
Filter: Mission scenarios specifically designed for Multiplayer, Single-Player or Co-Op can be selected/deselected here (WIP).
Preferences: You can choose a Save Directory for the generated missions to be automatically placed in.
Scenario Selection: (Top left drop down menu) This is the base mission that defines the map, conflict zones, spawn points, etc.
Blue/Red Forces: Forces templates defining ground units and AI aircraft, loadouts and liveries. This does not affect player aircraft.
Groups per Zone: This is your primary control for balancing the ground forces. The generator will pick groups at random from the forces templates. The quantity of groups to populate per staging zone, and per conflict zone is defined here. Since most scenario templates have one staging zone and multiple conflict zones, a higher quantity for the attacking force is likely required for a balanced conflict.
Blue on Defense: When this checkbox is selected, blue forces will occupy defensive positions in all conflict zones. The enemy will advance and attempt to take the zones.
Enemy Attack Helicopters: The number of potential spawns. May spawn groups of two helicopters, depending on the forces template. Enemy attack helicopters will attack friendly ground units and will engage aircraft if encountered.
Enemy Attack Planes: The number of potential spawns. May spawn groups of two planes, depending on the forces template. Enemy attack planes will attack friendly ground units and will engage aircraft if encountered.
Enemy Transport Helicopters: The number of potential spawns. Transport helicopters will drop enemy troops at random points across all enemy-held zones (including the active zone).
Transport Drop Points: The number of enemy troop drops per transport helicopter.
Infantry Spawns per zone: The number of infantry group spawns per spawn zone (defined in the scenario mission). Actual spawn locations are a random selection of the defined potential spawn zones.
Zone FARP Conditions: When a conflict zone is defeated, a FARP for rearming may be built for refuel/rearm/repair if the condition is met. Available options are 'never', 'always', and '20% ground units remaining'. With the ground units remaining option (default), a FARP will only be built if there are sufficient ground units remaining. This is a measure of the starting 'staged' ground vehicles. They cannot be replenished, so you will need to help protect them in order for FARPs to be built.
APCs Spawn Infantry: APCs will drop an infantry group shortly after they arrive at a new zone. Transport capable players can pick up these troops and drop them in a new location (ie once the zone is defeated).
Logistics: Enable CTLD logistics crates for building ground units and air defenses. Logistics containers can be moved to new locations with sling loading to create new logistics sites. See Logistics section below for more details.
Friendly AWACS: A support flight of AWACS and fighter escort will start from the friendly airbase or in the air. The fighter escorts can be tasked to attack enemy aircraft with Combined Arms via the F10 map. See briefing for AWACS radio frequency.
Friendly Tankers: Both boom and basket tankers will spawn. See briefing for TACAN and radio frequency.
Inactive Zone SAMs: Short-range IR SAMs will be present at the center of conflict zones. When the conflict zone becomes active, the SAMs will be disabled.
Player Slots: You can select specific helicopters to fly or double-click on Multiple Slots to add your desired Multiplayer Slots.

Player Hotstart: If you would like player helicopters to start withe engines and systems running. Does not apply to zone FARP spawns.
Spawns at Zone FARPs: If enabled, client/player helicopters will be placed at FARP locations. Because we don't have a good way to restrict access to spawning at these locations, these will start without fuel or weapons. If the supporting FARP vehicles have not been established yet, or if they've been destroyed by the enemy, you will not be able to start the aircraft.
How to Play
The attacking side starts with ground units that move progressively through enemy conflict zones, seeking out enemy units within each zone.
CAS / Ground Attack
Protecting our ground forces is essential for establishing forward bases for rearming/refueling, troop pickup, and winning the battle! Go forth and blow stuff up!
Troop Transport
Infantry squads can be collected from green pickup zones on the F10 map (ie STAGING zone), or where they have been dropped by APCs or transport. Use the "CTLD" category under the "F10 Other" section of the radio menu. These pickup zones can be marked with blue smoke via the option in the generator.
Units deployed into the active conflict zone will automatically seek out and destroy any enemies. You will need to manage the weight of your aircraft with the squads you attempt to transport.
Logistics
Ground units and air defenses can be built with CTLD crates available from the logistics containers in the staging area. Land in the logistics zone, or next to a logistics container, and spawn crates with the CTLD option in the F10 menu. Hover above crates to pick them up and transport them to the active zone. Multiple crates may be required before unpacking what you are trying to build. Once you have the required number of crates, use the 'Unpack crates' command in the CTLD menu.
Logistics containers can be moved to new areas by sling load. Once delivered safely they can be used to spawn CTLD logistics crates. Use the 'All cargos' command from the top-level F10 menu to select a 'logistics' container. Hover over the smoke-marked container to attach the sling.
Enemy Threats
Generator options allow you to add enemy attack planes and helicopters. Some strategies for dealing with them in transport roles:
- Task the AWACS escort aircraft via the F10 menu (requires Combined Arms module)
- Build AA vehicles with logistics crates
- Attack them on the ground before takeoff (a 'preparing for takeoff' warning is given when they spawn)
- Drop a group of troops containing AA stinger units (manpads).
Tips and Tricks
Apache and attack helicopter roles
-
Infantry spawns are typically in trees, on or around buildings, by design in the mission template. This is to simulate troops appearing from cover. You can turn the infantry spawns to zero if you don't want this.
-
Troops in cover may be best dealt with by friendly troop transport and door gunners. If you don't have anyone in this role, consider turning Infantry Spawns to zero. Finding and killing them in an attack helicopter will be challenging.
-
The gun in combo with PNVS, properly adjusted FLIR, proper range settings, and a bit of practice will make you a god.
-
If you do use infantry spawns, consider using dot labels.
Changing FARPs and FOBs
You can change the templates that are used for the creation of the various bases. For example, if you wanted to change the helicopters that are included for spawning at zone FARPs. The templates are .miz files in templates/Imports
- FARP_ACTIVATED_ZONE: Standard FARP that becomes active when a zone is captured. (vehicles/helicopters only)
- FARP_DEFENSIVE_ZONE: When 'Blue on defense', these FARPs are active from mission start at each conflict zone. (vehicles/statics/helicopters)
- FARP_LOGISTICS_ZONE: When 'Blue on defense', this FARP will be present at the last conflict zone.
- STAGING_LOGISTICS_BASE: When 'Logistics Base' checkbox is checked, this is placed in the staging zone. You might choose to replace this with a FOB. (vehicles/statics/helicopters)
- ZONE_ACTIVATED_DEFENSE: When 'Zone Protect' checkbox is checked, these will be present at inactive conflict zones for the red side. (vehicles only)
Overriding in template folder To semi-permanently modify a FARP template in your RotorOps installation, simply copy the folder from templates/Imports/downloaded to templates/Imports/user. Then the file in the user file can be modified as you wish.
Overriding in config file
To override import templates for a particular mission, a line can be added to the .yaml config file. For example, to override the logistics area with a FOB containing helicopter spawns, you can add this line to the mission's config file: staging_logistics_file: FOB_16_SPWN_WIDE_LIGHTED
See the Mission Creator Guide for more info.