2.2. SORACOM Beam (Advanced) MQTT bidirectional - soracom/handson GitHub Wiki
You can learn how to control your device remotely and safely by using SORACOM Beam and MQTT.
- RPi connected with SORACOM Air
- Solderless Breadboard
- LED
- Resistor
- 2 x Jumper wires
quoted from MQTT
MQTT is a machine-to-machine (M2M)/"Internet of Things" connectivity protocol. It was designed as an extremely lightweight publish/subscribe messaging transport. It is useful for connections with remote locations where a small code footprint is required and/or network bandwidth is at a premium. For example, it has been used in sensors communicating to a broker via satellite link, over occasional dial-up connections with healthcare providers, and in a range of home automation and small device scenarios. It is also ideal for mobile applications because of its small size, low power usage, minimised data packets, and efficient distribution of information to one or many receivers.
You need to know following keywords to understand hwo MQTT works.
-
Message Data on MQTT is called "Message".
-
Broker MQTT server is called as "Broker". It authenticates and accepts connections from MQTT clients and exchange data called "Message"s between.
-
Topic MQTT messages are sent to a group called "Topic".
MQTT clients can communicate MQTT Broker in two ways. One is "Publish" and the other is "Subscribe".
-
Publish Clients can "Publish" data to specific "Topic".
-
Subscribe Clients can listen to a "Topic" or multiple "Topic"s by using wildcard meta character "#". For example, If a client listen to "foo/#", it can get message from "Topic" "foo/bar", "foo/baz" at the same time.
We will use GUI MQTT client "MQTT.fx" to send/receive messages.
open http://mqttfx.jensd.de/index.php/download and find the link to the latest version (1.5.0 as of August 2017), download installer file for your PC (Windows/Mac/Linux).
Once you download and open the app, you will see a window like this.

For Mac, you need to approve to open it in System Preferences / Security and Privacy.
We have a server to test with. To connect the server, click on the gear mark next to "Connect" button.

You need to click on "+" in the bottom/left corner and fill in information of test server.

- Profile Name: beamtest
- Broker Address: beamtest.soracom.io
- Broker Port: 8883
- Client ID: click on Generate to generate your unique ID

- User Name: beamuser
- Password: passwd

- Enable SSL/TLS: ☑️ checked, select "CA signed server certificate"
- Protocol: TLS v1.2

Then save setting by clicking on OK
Now you can connect to the server by clicking "Connect" button.
When the indicator in upper/right corner turns to green, it could connect to the servrer.
Click on "Subscribe" button and fill in some topic name like "test"(it can be anything). Now it is ready to receive messages.

Click on "Publish" button, input topic name you choose(i.e. "test") to input box, input something like "THIS IS TEST!" in the textarea, then click "Publish".

Click on "Subscribe" and you will see the message you just sent.

It may take a while to receive.
Now you understand how MQTT is working!
SORACOM Beam (“Beam”) is a service that enables you to offload the high-load processes resulting from device encryptions into the cloud and to set up their destination. By using Beam, you can easily manage your IoT devices anytime and anywhere through the cloud. You do not need to directly set up large numbers of devices.
Sending and receiving sensitive information through IoT devices need to go through an encryption process, but sometimes it is difficult to do so with the limited resources on IoT devices. In these situations, the encryption can be done using SORACOM resources. By using Beam, it will do what your device has difficulty doing, i.e., encrypt communication between your devices and your server for you.
With Beam, when uploading data from your IoT device, the data will be sent to the end point in Beam through a closed 3G/LTE network. The data emerging from Beam will be encrypted so that you can deliver it to your server safely and securely.
More specifically, TLS (Transport Layer Security) is used between Beam and your server, and the data is encrypted during both data upload and data download (data communication between Beam endpoint and your server). Through TLS, besides encryption of information, peer connection (to check whether your server has been spoofed by a malicious third party) and detection of information tampering (to check whether the data has been rewritten intentionally by a malicious third party) are also possible.
In this way, you can encrypt any data communication of IoT devices that do not support data encryption due to CPU and power limits. Complicated processes like certificate management and responses to vulnerabilities can be offloaded to the cloud and the encrypted data can be easily used.
Currently, Beam supports the following encryption offloading.
| Device Protocol | Server Protocol |
|---|---|
| HTTP | HTTPS |
| MQTT | MQTTS |
| TCP | TCPS |
In this tutorial, we will use MQTT to MQTTS offloading.
In this section, we will try MQTT ovet Beam togther with command line MQTT client called mosquitto.
Go to Soracom console, on the top left menu select Group.
You can then select the group you created previously.
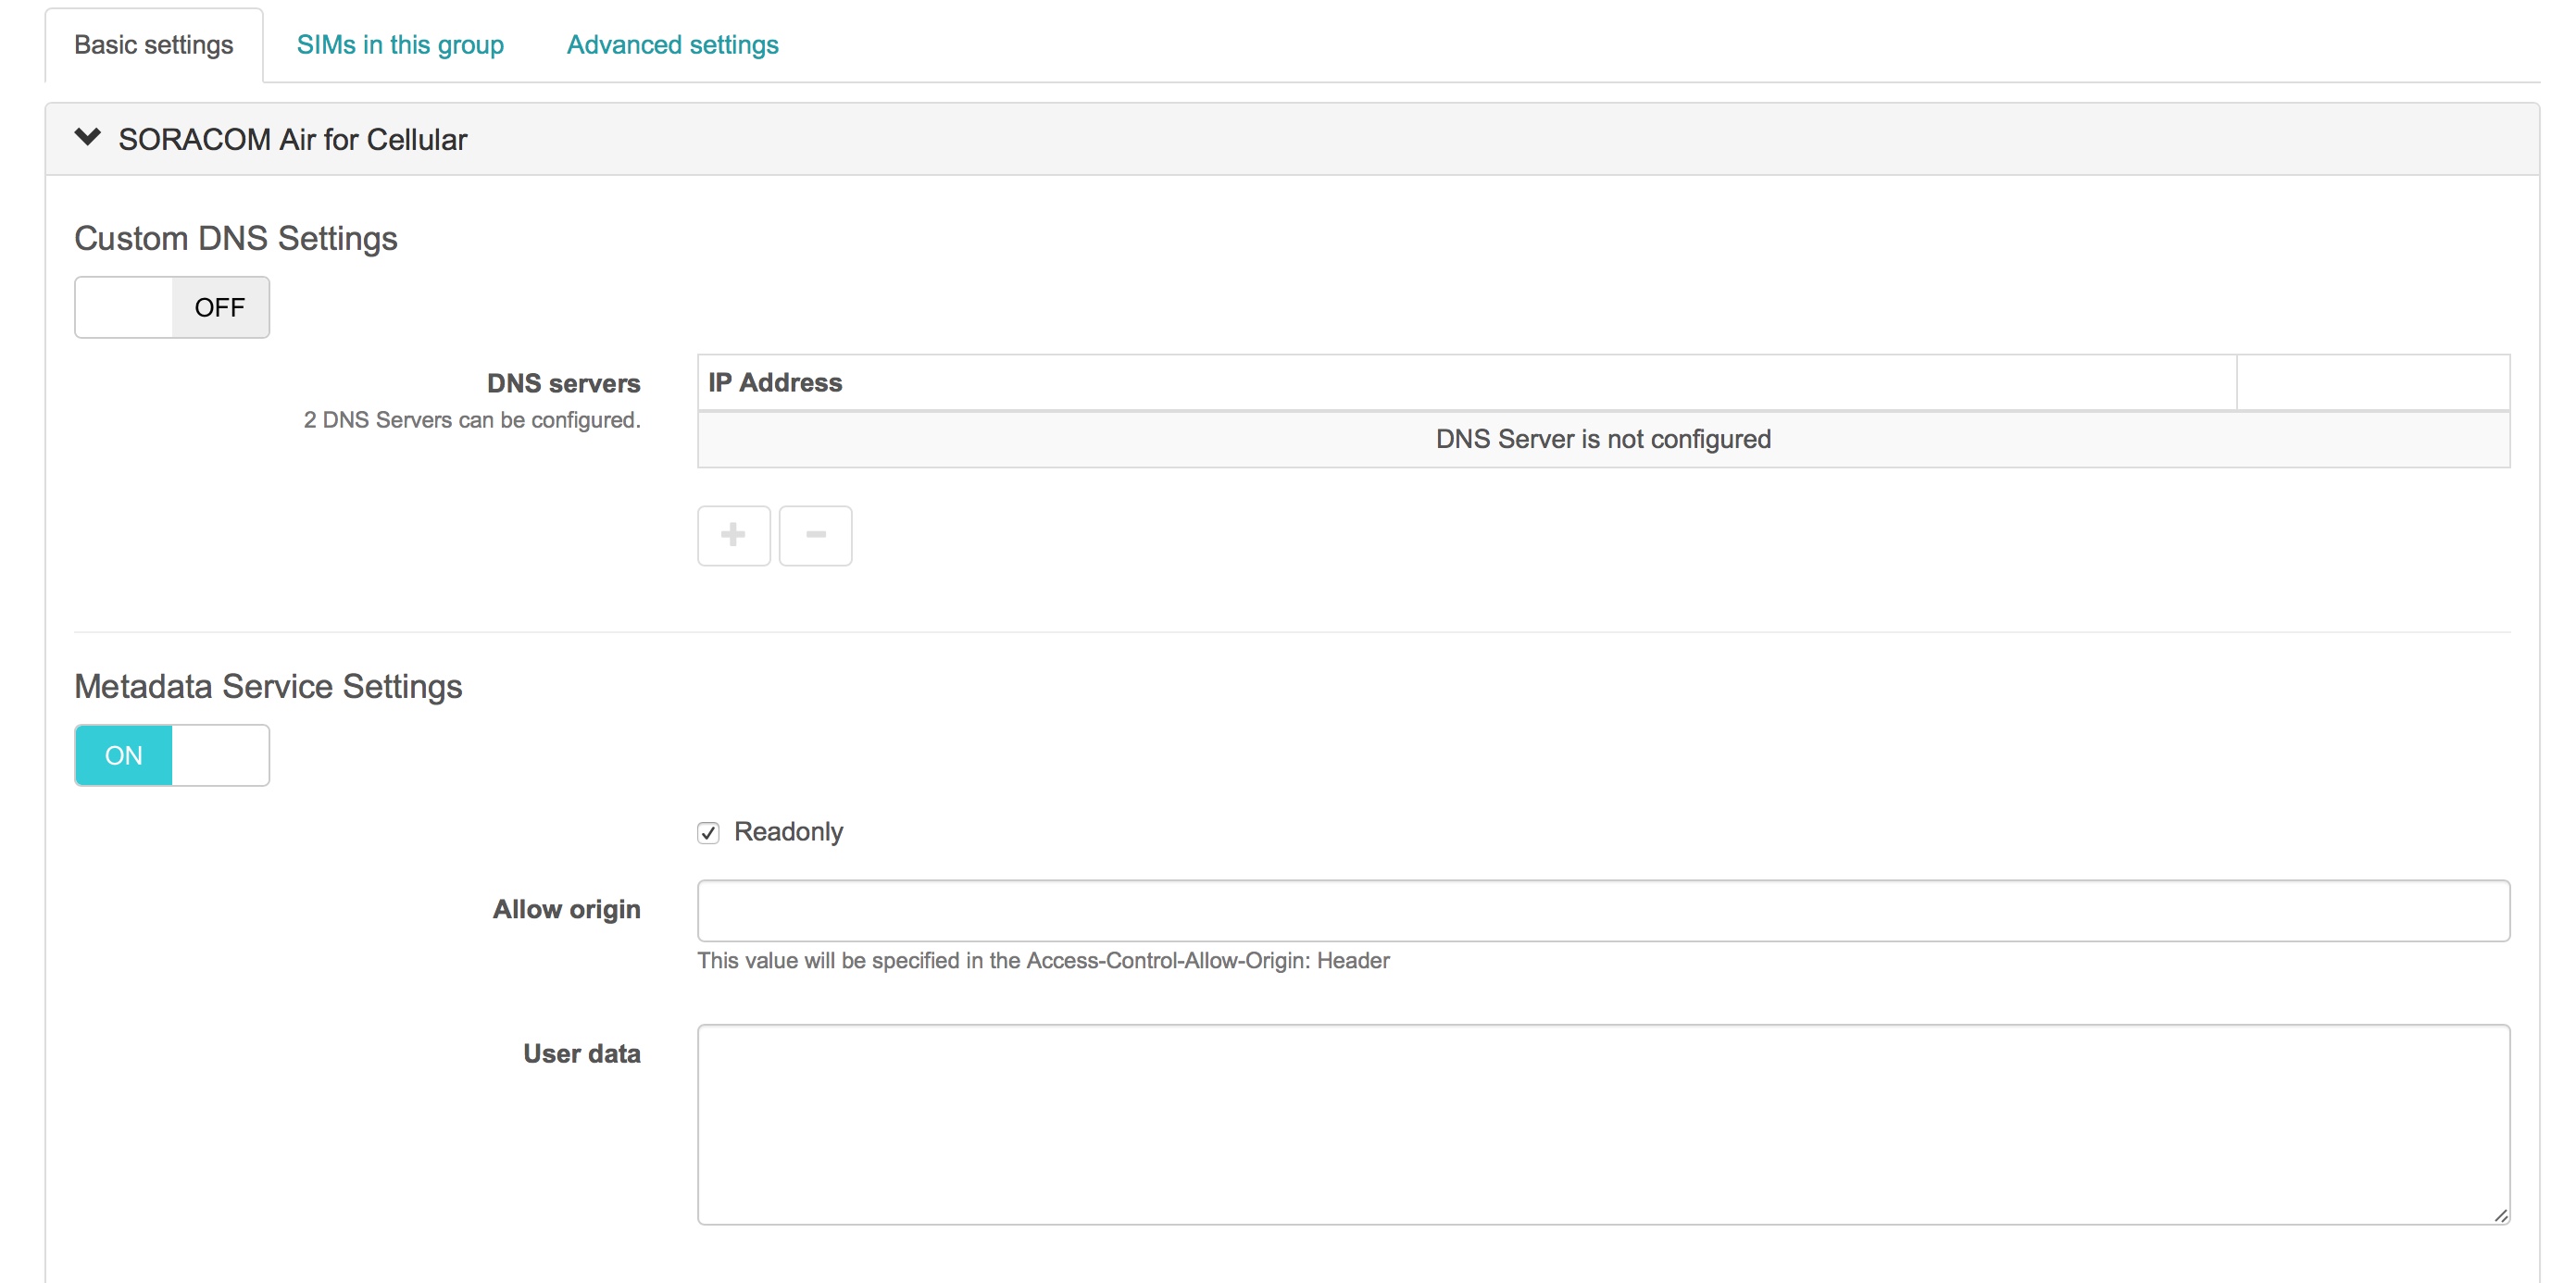
In the basic setttings, open up Soracom Air for Cellular and switch on Metadata Service. This will expose a http interface on http://metadata.soracom.io/v1/subscriber which allows you to get various metadata items attached to your SIM card.
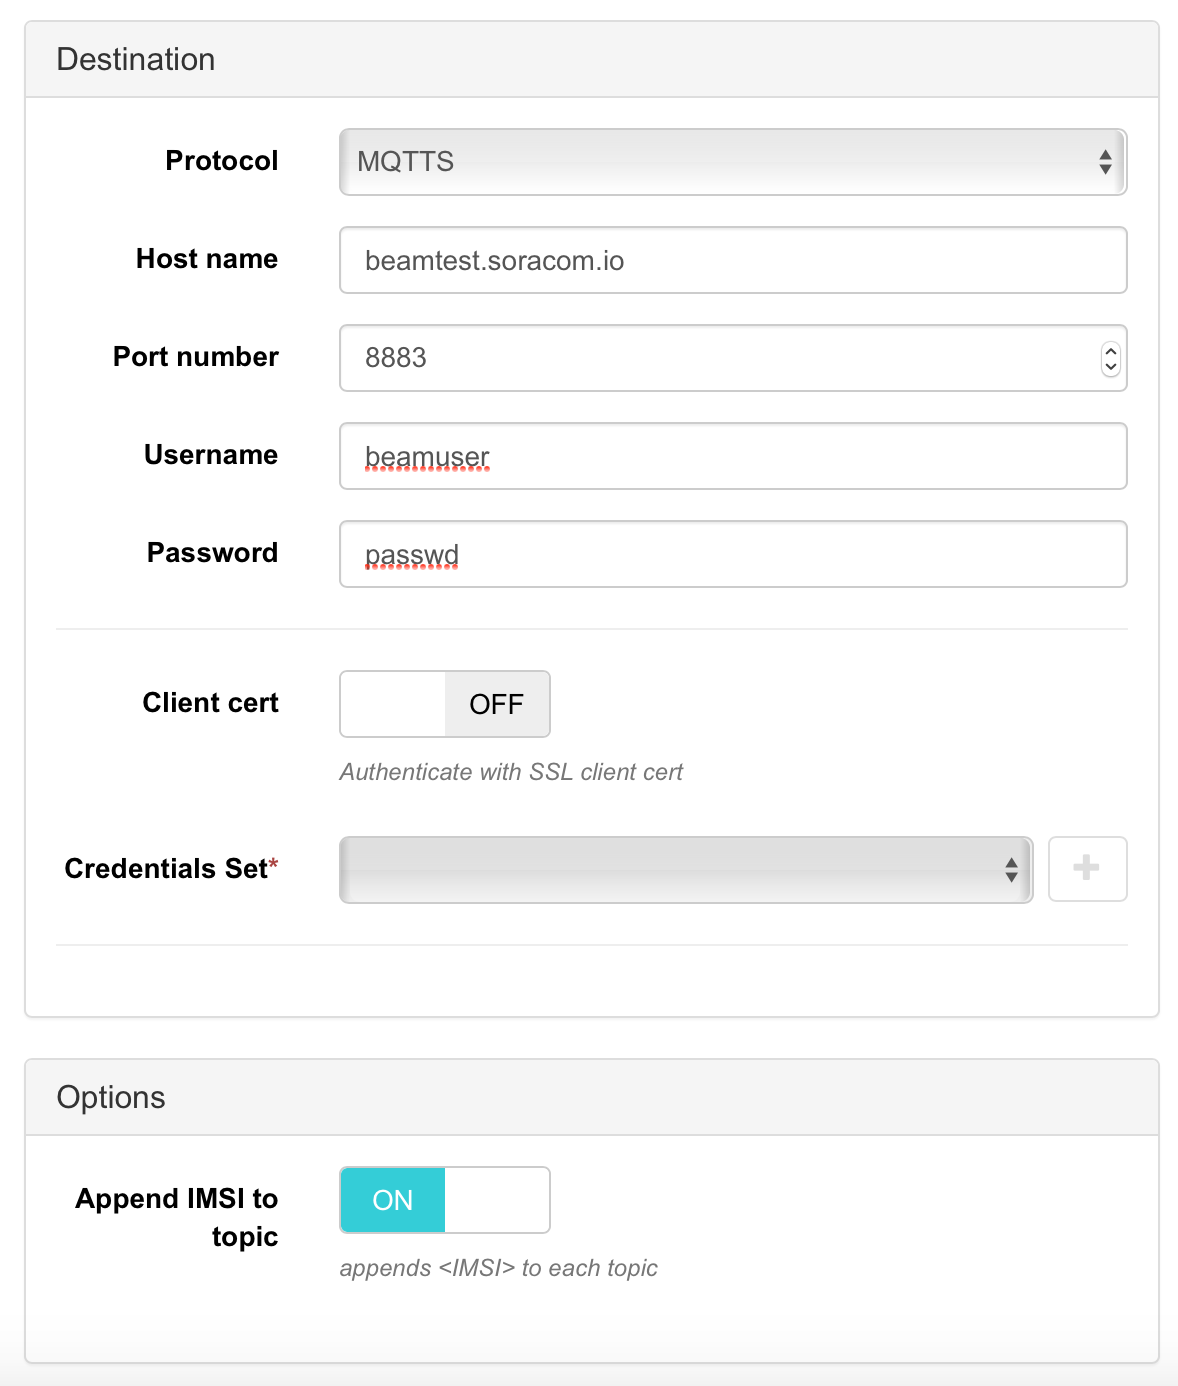
Once you have enabled metadata, scroll down to Soracom Beam and add a new endpoint, click on the + sign and select "MQTT entry point", create an entry point with the following settings:
- Protocol: MQTTs
- Hostname: beamtest.soracom.io
- Port Number: 8883
- Username: beamuser
- Password: passwd
In the Options, make sure you enable "Append IMSI to topic"
For this tutorial, we will leave client cert OFF
Before starting, make sure you unplug your USB Dongle, that way you'll use WiFi rather than 3G data to install packages Now that you have configured your Beam MQTT entry point, we will install command line MQTT client to test and make sure everything has been configured correctly:
sudo apt-get update && sudo apt-get install mosquitto-clients
Now that your sofware has been installed, you can connect your USB dongle again
You need to have 2 terminals, one is for publish, the other is for subscribe. Please open another ssh terminal. We will call terminal 1 and 2.
Find out your RPi IMSI:
on terminal 1
curl http://metadata.soracom.io/v1/subscriber.imsi
imsi=$(curl http://metadata.soracom.io/v1/subscriber.imsi)
echo $imsi
on terminal 1
pi@raspberrypi:~ $ curl http://metadata.soracom.io/v1/subscriber.imsi
29505xxxxxxxxxx
pi@raspberrypi:~ $ imsi=$(curl http://metadata.soracom.io/v1/subscriber.imsi)
pi@raspberrypi:~ $ echo $imsi
29505xxxxxxxxxx
Subscribe to a topic:
on terminal 1
mosquitto_sub -h beam.soracom.io -p 1883 -t "beamtest/$imsi"
on terminal 1
pi@raspberrypi:~ $ mosquitto_sub -h beam.soracom.io -p 1883 -t "beamtest/$imsi"
Publish to a topic (As you configured it in Beam, IMSI will be appended to topci when you send a message):
on terminal 2
mosquitto_pub -h beam.soracom.io -p 1883 -t 'beamtest' -m "hello Beam MQTT world"
on terminal 2
pi@raspberrypi:~ $ mosquitto_pub -h beam.soracom.io -p 1883 -t 'beamtest' -m "hello Beam MQTT world"
pi@raspberrypi:~ $
on terminal 1
pi@raspberrypi:~ $ mosquitto_sub -h beam.soracom.io -p 1883 -t "beamtest/$imsi"
hello Beam MQTT world
Now, let's test LED with RPi.
You will use GPIO (General Purpose Input/Output) pins to control LED. Please refer following picture for pin layout.

You can use a RPi like a battery or power supply. It has plus (5v and 3.3v) and minus (GND) pins. Plug a LED and resistor like below.
- Attach LED to breadboard. Longer pin is for plus, shorter is minus.
- Bend feet of resistor and attach it to the breadboard, one is to LED minus (shorter) pin.
- Connect black cable to the other foot of resistor and RPi pin 6 (GND).
- Connect green cable to the longer foot of LED and RPi pin 3 (3.3V)

If LED does not turn on, you may have something wrong. Maybe you can try to make LED feet reverse.
Next, we will control LED from RPi.
Login to RPi using ssh, then type following command.
echo 4 > /sys/class/gpio/export
echo out > /sys/class/gpio/gpio4/direction
echo 1 > /sys/class/gpio/gpio4/value
pi@raspberrypi:~ $ echo 4 > /sys/class/gpio/export              # initialize GPIO4
pi@raspberrypi:~ $ echo out > /sys/class/gpio/gpio4/direction   # use GPIO4 as Output
pi@raspberrypi:~ $ echo 1 > /sys/class/gpio/gpio4/value         # turn it to HIGH(1)
Then, change pin of green cable from Pin 1 (3.3v) to Pin 7 (GPIO4).

The LED should be ON. If not, please check the commands and retry.
Type following command to turn LED off.
echo 0 > /sys/class/gpio/gpio4/value
pi@raspberrypi:~ $ echo 0 > /sys/class/gpio/gpio4/value # turn it to LOW(0)
So, if you put 0 and 1 in turn, it should be blinking. Let's try to do this with following command.
while [ 1 ] ; do echo 1 > /sys/class/gpio/gpio4/value ; sleep 1 ; echo 0 > /sys/class/gpio/gpio4/value ; sleep 1 ; done
pi@raspberrypi:~ $ while [ 1 ] ; do echo 1 > /sys/class/gpio/gpio4/value ; sleep 1 ; echo 0 > /sys/class/gpio/gpio4/value ; sleep 1 ; done
(Ctrl+C to stop)
Before starting, make sure you unplug your USB Dongle, that way you'll use WiFi rather than 3G data to install packages
cd ~
wget http://nodejs.org/dist/v8.4.0/node-v8.4.0-linux-armv6l.tar.gz
cd /usr/local
sudo tar xzvf ~/node-v8.4.0-linux-armv6l.tar.gz --strip=1
sudo apt-get remove --purge npm node nodejs
sudo npm install -g npm
cd ~
rm node-v8.4.0-linux-armv6l.tar.gz

mkdir beam_mqtt
cd beam_mqtt
curl -O https://soracom-files.s3.amazonaws.com/handson/beam_mqtt/app.js
curl -O https://soracom-files.s3.amazonaws.com/handson/beam_mqtt/package.json
npm i
now that you've installed the software, you can plugin your USB dongle again
Start node application to control LED.
node app.js
pi@raspberrypi:~/beam_mqtt $ node app.js
[DEV] Loading MQTT client

              ..;;ttLLCCCCCCLLtt;;..
          ..11CCCCCCCCCCCCCCCCCCCCCC11..
        ::LLCCCCCCttii::,,::iittCCCCCCLL::
      ::CCCCCC11..              ..11CCCCCC::
    ::CCCCCCCCttii::..              ::LLCCCC::
  ..LLCCCCCCCCCCCCCCCCffii::..        ,,LLCCLL..
  11CCCC::,,;;ttLLCCCCCCCCCCCCff11::..  ::CCCC11
..CCCC11          ,,;;11LLCCCCCCCCCCCC..  11CCCC..
iiCCCC,,                  ..::11LLCCCC..  ,,CCCCii
ttCCff                          ;;CCCC..    ffCCff
LLCCii                          ;;CCCC..    iiCCLL
CCCC;;                        ,,11CCCC..    ;;CCCC
CCCC::                ,,iittLLCCCCCCCC..    ::CCCC
CCCC;;      ..::iittCCCCCCCCCCCCCCffii      ;;CCCC
LLCCii    ;;CCCCCCCCCCCCLLttii,,            iiCCLL
ttCCff    ..LLCCCCtt;;,,          ::        ffCCff
iiCCCC,,    iiCCCC,,          ,,::tt,,..  ,,CCCCii
..CCCC11    ..LLCCtt          ;;LLCCtt..  11CCCC..
  11CCCC::    iiCCCC,,          LLff;;  ::CCCC11
  ..LLCCLL,,  ..LLCCtt  ..tt11..,,  ::,,LLCCLL..
    ::CCCCLL::  iiCCCC::ffCCCC;;    ::LLCCCC::
      ::CCCCCC11,,LLCCCCCCCC11  ..11CCCCCC::
        ,,LLCCCCCCLLCCCCCCffiittCCCCCCLL::
          ..11LLCCCCCCCCCCCCCCCCCCLL11..
              ..;;ttLLCCCCCCLLtt;;..

  ___  ___  _ __ __ _  ___ ___  _ __ ___
 / __|/ _ \| '__/ _` |/ __/ _ \| '_ ` _ \
 \__ \ (_) | | | (_| | (_| (_) | | | | | |
 |___/\___/|_|  \__,_|\___\___/|_| |_| |_|

[DEV] successfully sent data to Soracom Harvest
[DEV] Device IMSI is: 29505xxxxxxxxxx

[DEV] Connected to Beam MQTT
[DEV] Subscribe to MQTT topic: imsi_in/29505xxxxxxxxxx
The app will periodically post RPi performance data to MQTT topic "imsi_out/" and also subscribe to messages on "imsi_in/" to control your LED
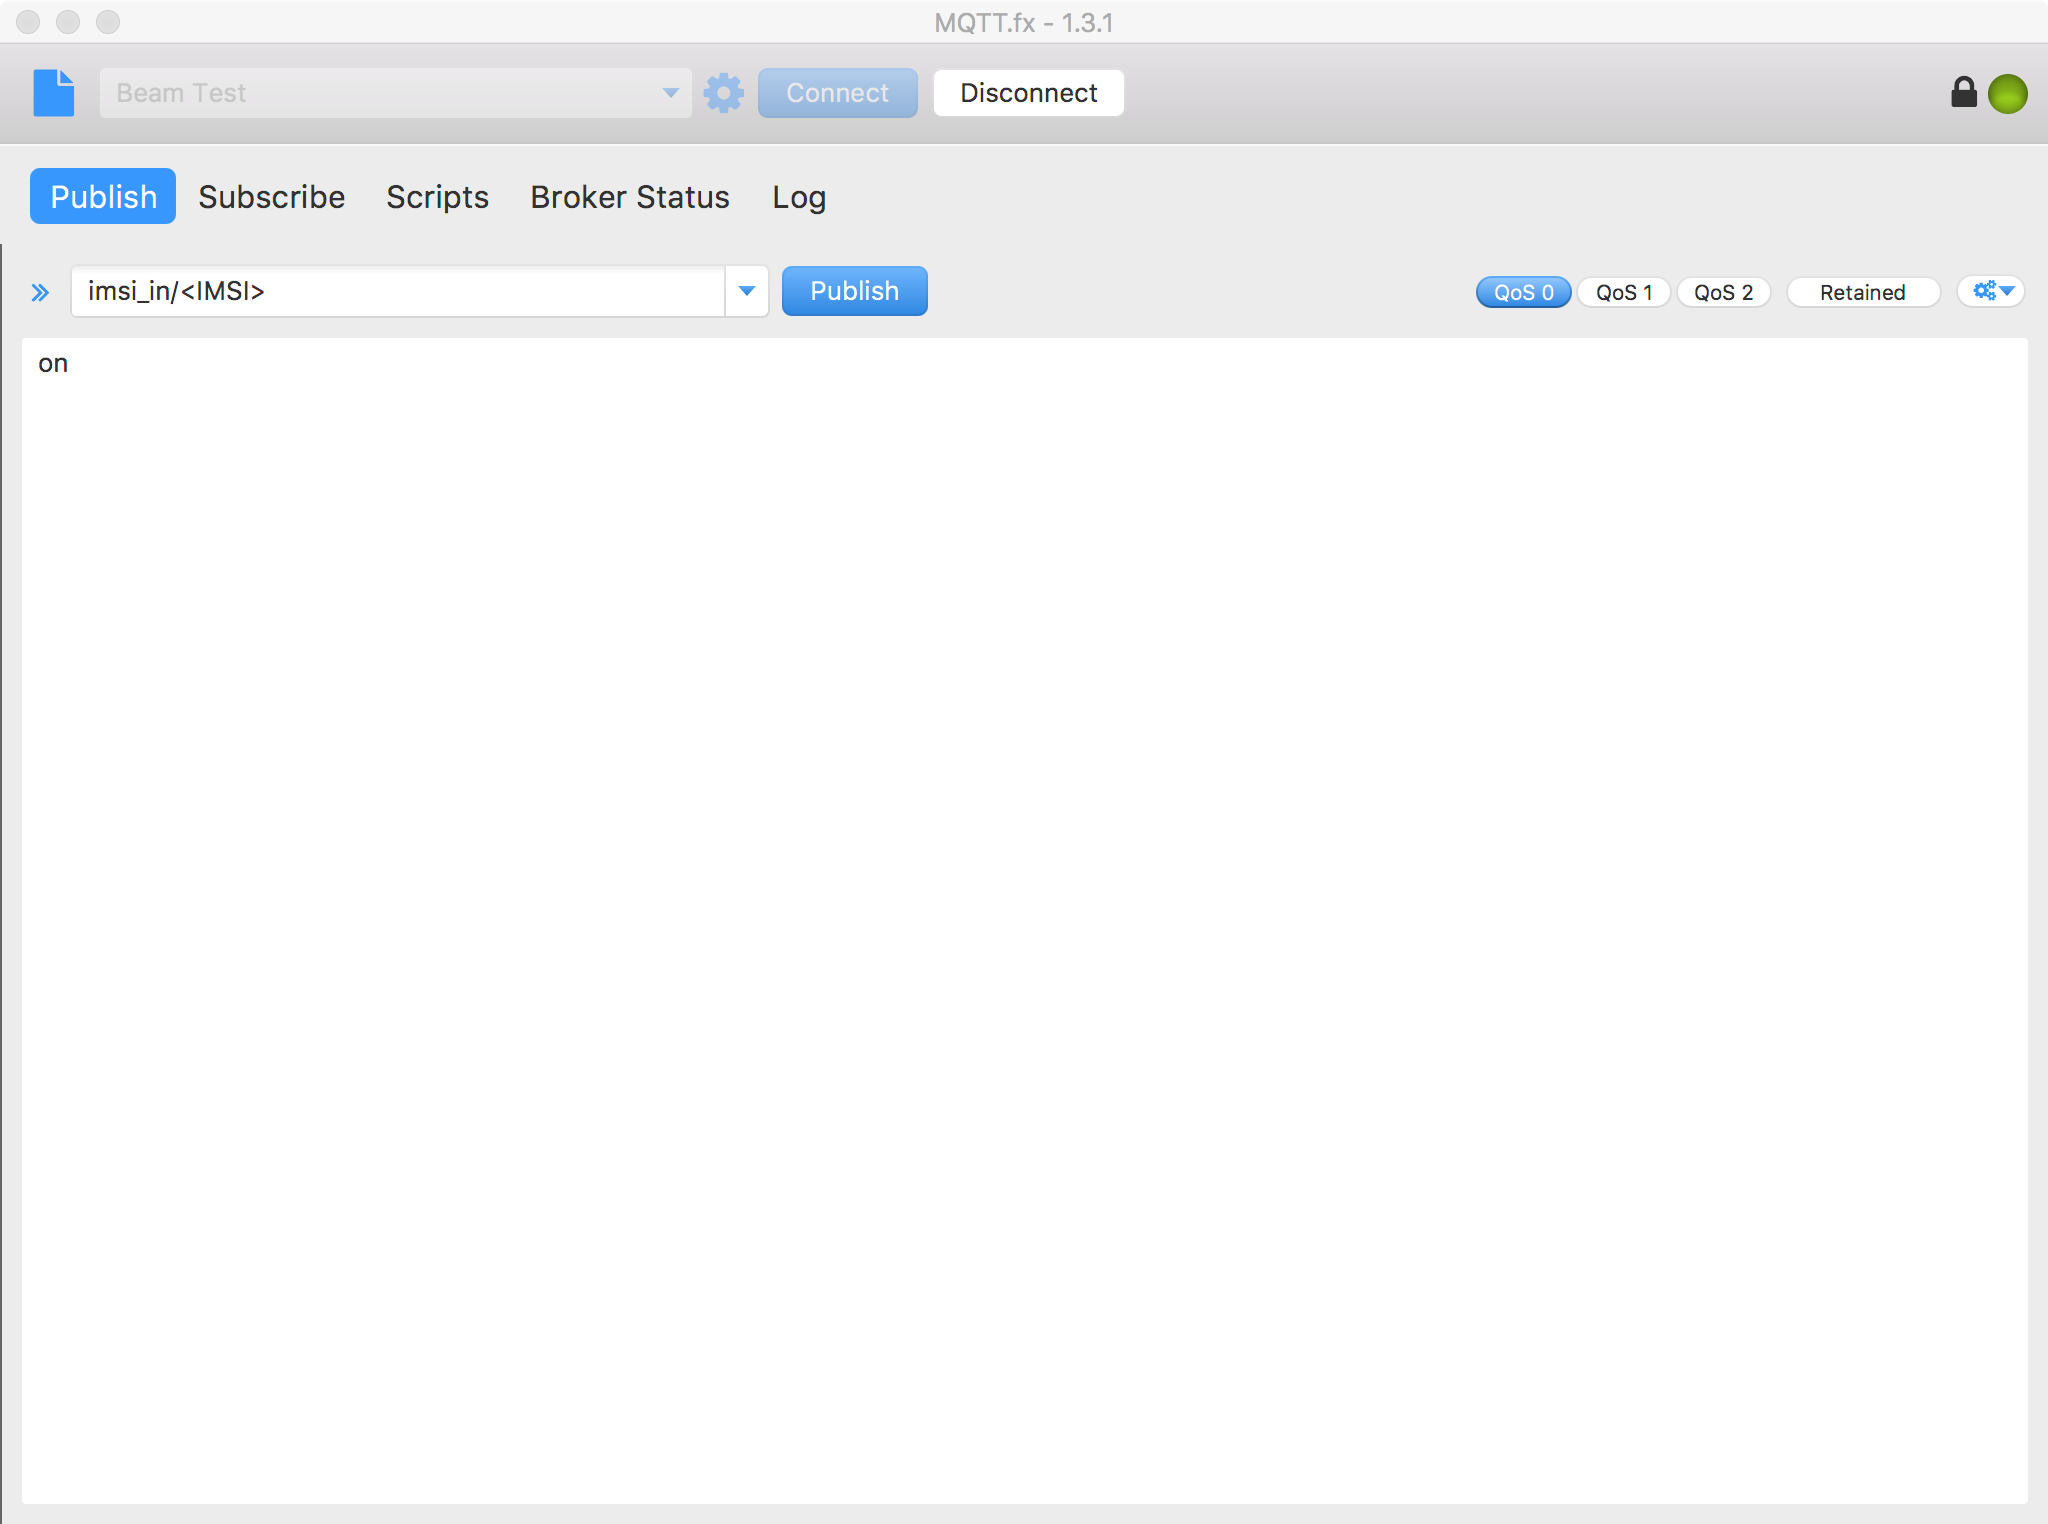
Send "on" message to your device with topic 'imsi_in/' to switch on the LED
[DEV] Received MQTT message on topic: imsi_in/295057330042739 with message on
[DEV] switching LED on
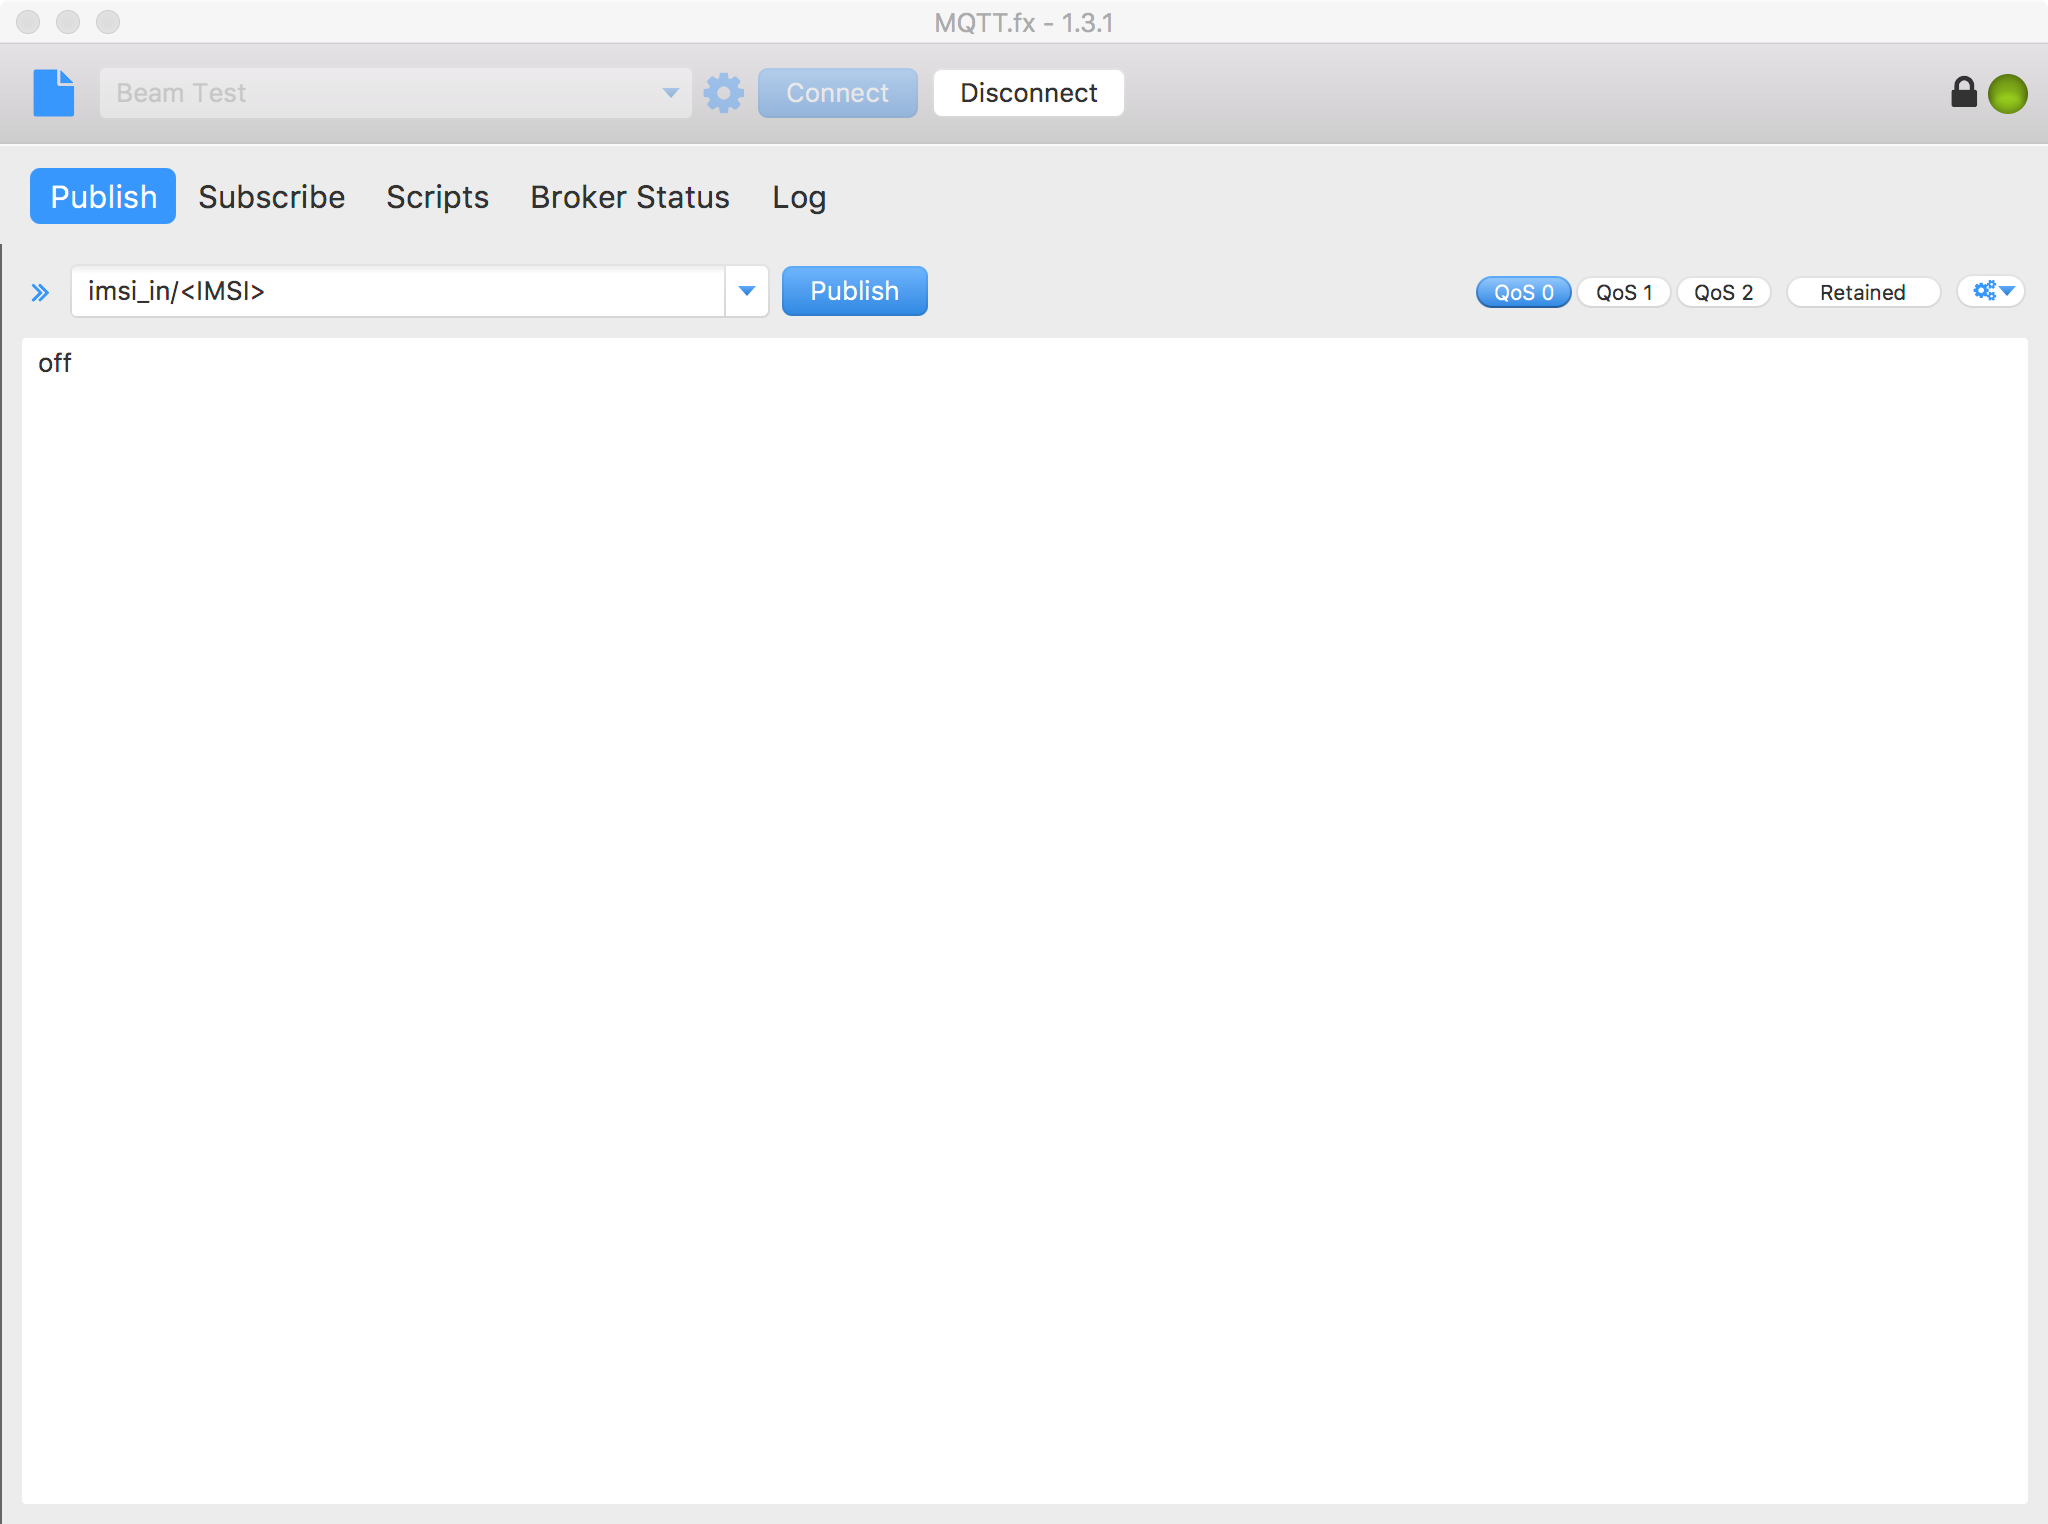
Send "off" message to your device with topic 'imsi_in/' to switch off the LED
[DEV] Received MQTT message on topic: imsi_in/295057330042739 with message off
[DEV] switching LED off
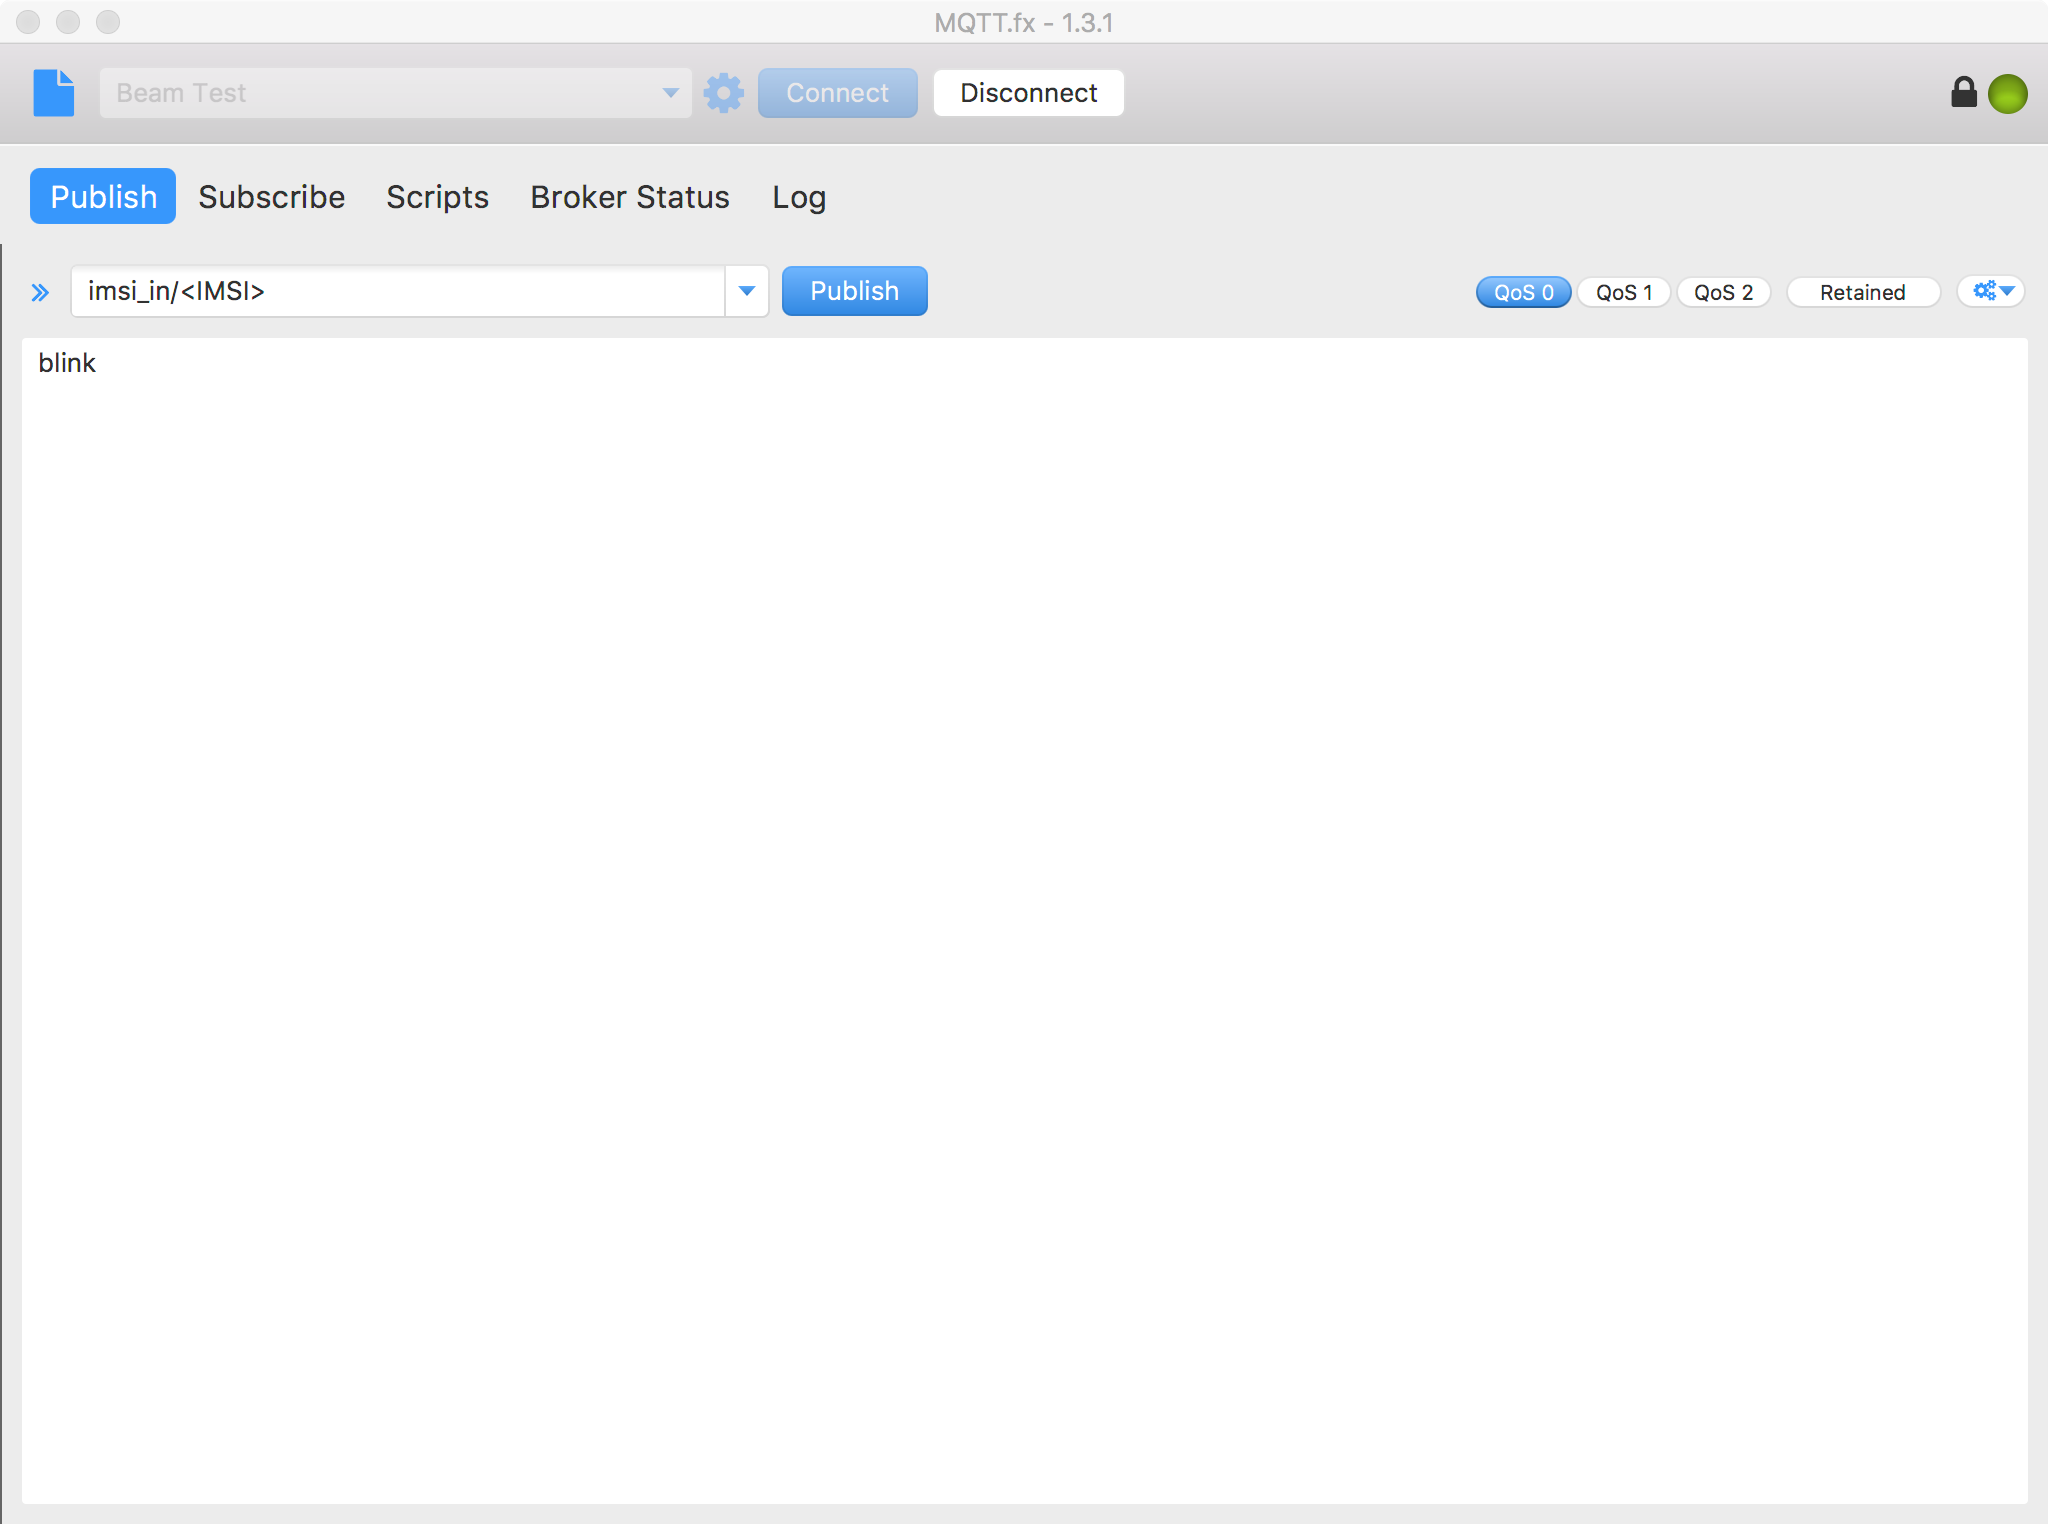
Send "blink" message to your device with topic 'imsi_in/' to let the LED blink
[DEV] Received MQTT message on topic: imsi_in/295057330042739 with message blink
[DEV] switching LED blink mode
Since Beam configuration itself will not cause any charge, you can keep them as is for free. But if you still want to remove resources, you can delete entry point configuration or group itself.
This section shows how to connect your device to AWS IoT message broker in easy and secure way.
AWS IoT requires devices to connect with TLS client certificate. You usually install that certificate directly to your device, but with Beam, devices do not need to have certificate files because Beam will handle TLS authentication instead. It means, even if your device were stolen, credentials for AWS IoT is not there. Also, your device can talk to Beam endpoint without TLS encryption. It helps even tiny MCUs with low cpu/memory capability can connect to AWS IoT.
To use AWS IoT via MQTT, you need a policy to allow connection.
-
Open AWS IoT Console and click to open "Secure" in left menu, click "Policies". Click "Create a policy" button (if you don't have any policies yet) or click "Create" button (if you already have some policies).
-
Input following fields and click "Create"
- Name: MQTT (or anything you like)
- Action:
iot:* - Resrouce ARN:
* - Check "Allow"

Now you are ready to register a device.
-
Click "Manage" in the left menu. Click "Register a thing" button (if you don't have any Things yet) or click "Create" button (if you already have some Things).
-
Click 'Create a single thing'. Input "Name" of the device (i.e. raspi) and push "Next"

-
Click "Create certificate"

-
Download ceritificate files (do not forget to download "root CA for AWS IoT from Symantec", in the bottom). Then, click "Activate" and click "Atach a policy".

-
Check the policy you created and click "Register a Thing" to finish device registration.

-
Check your AWS IoT custom endpoint FQDN. Click "Settings" in left menu and copy Custom endpoint FQDN.

-
Open SORACOM user console and click "Groups" in upper/left menu. Click the group you want to configure (if you do not have any group, click "+ Add" to create a new group).
-
Open "SORACOM Beam" setting and click "+" button, then select "MQTT entry point".

-
Input fields like below.
- Name: AWS IoT (or anything you like)
- Protocol:
MQTTS - Host name: your custom endpoint
- Port number: 8883
- Client cert: ON
- Append IMSI to topic: ON

-
Click '+' button next to "Credentials Set" and register a credentials set.
- Credentials set ID: raspberrypi (or anything you like)
- Key: copy/paste from (random)-private.pem.key file
- Cert: copy/paste from (random)-certificate.pem.crt file (not public.pem.key file!)
- CA: copy/paste from 'VeriSign-Class 3-Public-Primary-Certification-Authority-G5.key' file

-
Click 'Save' to finish setting.
-
Open AWS IoT Console and click "Test" in left menu, type
#as "Subscription topic" and click "Subscribe to topic".
-
Use mosquitto_pub command to send data from Raspberry Pi.
mosquitto_pub -d -h beam.soracom.io -t 'beam' -m '{"foo":"bar"}'
pi@raspberrypi:~ $ mosquitto_pub -d -h beam.soracom.io -t 'beam' -m '{"foo":"bar"}'
Client mosqpub/1553-raspberryp sending CONNECT
Client mosqpub/1553-raspberryp received CONNACK
Client mosqpub/1553-raspberryp sending PUBLISH (d0, q0, r0, m1, 'beam', ... (13 bytes))
Client mosqpub/1553-raspberryp sending DISCONNECT
You will see message from device like this. If you this message, configuration is completed.


