植物観察 - soracom/handson GitHub Wiki
ハンズオンキット:植物観察
おおまかな流れ
- 温度センサー
- 接続、試験
- Beam経由で ElasticSearch にデータを送信し、Kibana で可視化する
- USBカメラ
- 画像をキャプチャしてみる
- Webサーバ経由でアクセスをしてみる
- 画像を定期的に撮影する
- 画像をクラウド(Amazon S3)にアップロードする
- 撮り貯めた画像からタイムラプス動画を作成する
前提条件
- Raspberry Pi に Raspbian (2016-05-27-raspbian-jessie-lite.img を使用)をインストール
- Raspberry Pi へ ssh で接続ができる(またはモニターやキーボードを刺してコマンドが実行出来る)
- Raspberry Pi から SORACOM Air で通信が出来ている
共通セットアップの部分は切り出して別のテキストとしておく
温度センサーを接続する
必要なもの
- 温度センサー DS18B20+
- 抵抗 4.7kΩ
- ジャンパワイヤ(オス-メス) x 3 (黒・赤・その他の色の3本を推奨)
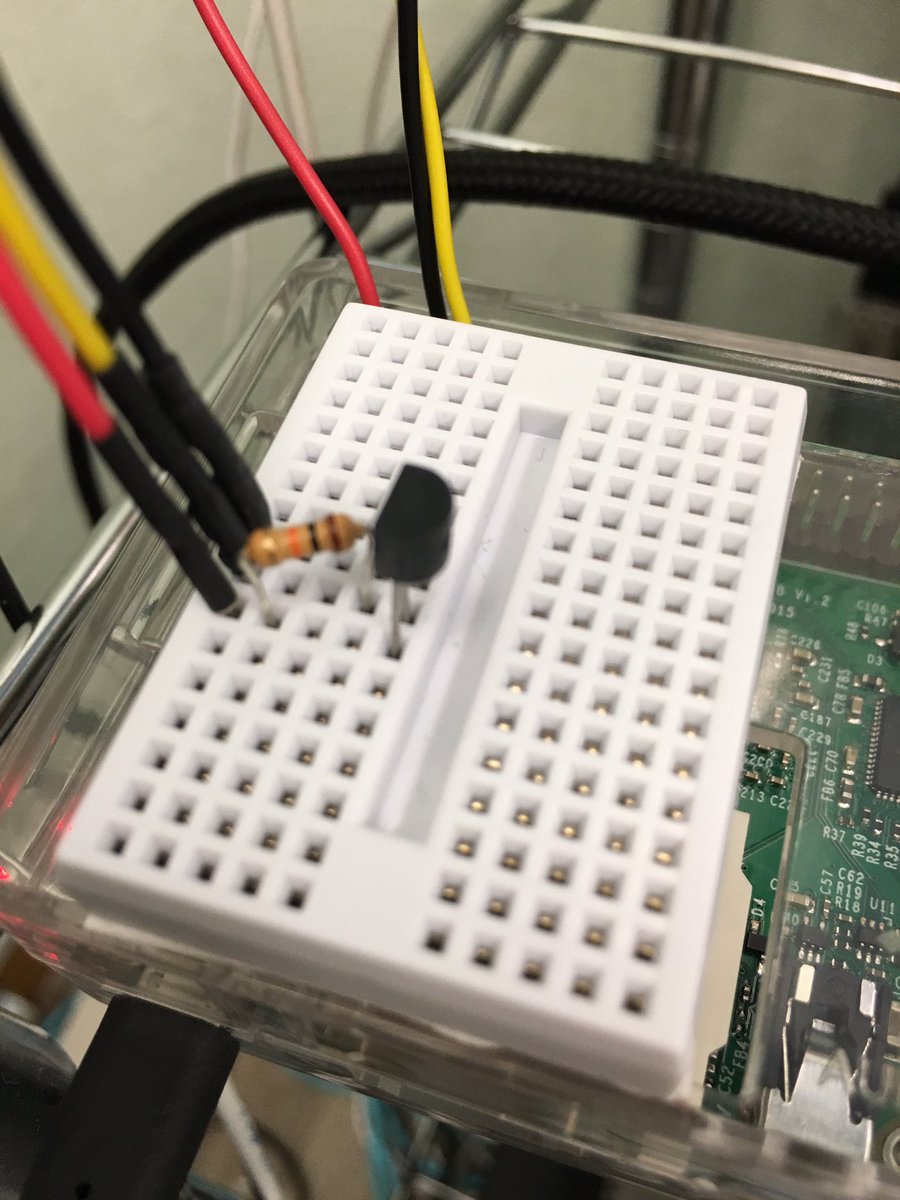
結線する
- Raspberry Pi の GPIO 端子の、Ground を DS18B20+ の1番ピン、3V Power を DS18B20+ の3番ピン、GPIO 4 を DS18B20+ の2番ピンにそれぞれつなぐ
- DS18B20+ の 2番ピンと3番ピンの間に抵抗を入れる


Raspberry Pi でセンサーを使えるように設定する
- /boot/config.txt に
dtoverlay=w1-gpio-pullup,gpiopin=4の1行を追加 - /etc/modules に w1-gpio と w-1therm を追加
- 再起動
- cat コマンドで動作確認
コマンド
pi@raspberrypi:~ $ echo dtoverlay=w1-gpio-pullup,gpiopin=4 | sudo tee -a /boot/config.txt
dtoverlay=w1-gpio-pullup,gpiopin=4
pi@raspberrypi:~ $ echo -e "w1-gpio\nw-1therm" | sudo tee -a /etc/modules
w1-gpio
w-1therm
pi@raspberrypi:~ $ sudo reboot

(再起動後、ログインして)

pi@raspberrypi:~ $ cat /sys/bus/w1/devices/28-*/w1_slave
c3 01 4b 46 7f ff 0d 10 2f : crc=2f YES
c3 01 4b 46 7f ff 0d 10 2f t=28187
この場合、t=28187 の値を 1000 で割って、摂氏 28.187 度となる
温度データをクラウドに送る
取得した温度データを AWS の Elasticsearch Service に送信して、Kibanaプラグインで可視化する
SORACOM の設定
- Group を作成して SIM を割り当て
- Group の設定
- Air のメタデータサービスを有効化
- Beam の Webエンドポイントとして Elasticsearch Service のホストを設定
上記は超音波センサーハンズオンと全く同じ
Pythonの設定
- Python pip コマンドのインストール
- elasticsearch プラグインのインストール
上記は超音波センサーハンズオンと全く同じ
プログラムコードのダウンロードと実行
プログラムコードのダウンロードと実行
URL:https://soracom-files.s3.amazonaws.com/send_temp_to_cloud.py
pi@raspberrypi:~ $ wget https://soracom-files.s3.amazonaws.com/send_temp_to_cloud.py
--2016-07-14 07:24:00--  https://soracom-files.s3.amazonaws.com/send_temp_to_cloud.py
Resolving soracom-files.s3.amazonaws.com (soracom-files.s3.amazonaws.com)... 54.231.229.21
Connecting to soracom-files.s3.amazonaws.com (soracom-files.s3.amazonaws.com)|54.231.229.21|:443... connected.
HTTP request sent, awaiting response... 200 OK
Length: 1208 (1.2K) [text/plain]
Saving to: ‘send_temp_to_cloud.py’

send_temp_to_cloud. 100%[=====================>]   1.18K  --.-KB/s   in 0s

2016-07-14 07:24:01 (9.37 MB/s) - ‘send_temp_to_cloud.py’ saved [1208/1208]

pi@raspberrypi:~ $ python send_temp_to_cloud.py /sys/bus/w1/devices/28-*/w1_slave
- メタデータサービスにアクセスして IMSI を確認中 ... 440103147053785
- ただいまの温度 28.250000
- Beam 経由でデータを送信します
{u'_type': u'temperature', u'_id': u'AVXoSwR_DpzhkadZHY22', u'created': True, u'_version': 1, u'_index': u'sensor'}
ブラウザで下記URLにアクセスし、データが来ていることを確認
- 生データ http://bit.ly/kibana4
- ダッシュボード http://bit.ly/temp-graph
データが多数の場合には、上の * に imsi=440103147053785 みたいに入れてフィルタするとよい
定期的に実行するには、crontab を使う
pi@raspberrypi:~ $ ( crontab -l ; echo '* * * * * python send_temp_to_cloud.py /sys/bus/w1/devices/28-*/w1_slave &> /dev/null' ) | crontab -
pi@raspberrypi:~ $ crontab -l
# Edit this file to introduce tasks to be run by cron.
#
# Each task to run has to be defined through a single line
# indicating with different fields when the task will be run
# and what command to run for the task
#
# To define the time you can provide concrete values for
# minute (m), hour (h), day of month (dom), month (mon),
# and day of week (dow) or use '*' in these fields (for 'any').#
# Notice that tasks will be started based on the cron's system
# daemon's notion of time and timezones.
#
# Output of the crontab jobs (including errors) is sent through
# email to the user the crontab file belongs to (unless redirected).
#
# For example, you can run a backup of all your user accounts
# at 5 a.m every week with:
# 0 5 * * 1 tar -zcf /var/backups/home.tgz /home/
#
# For more information see the manual pages of crontab(5) and cron(8)
# m h  dom mon dow   command
* * * * * python send_temp_to_cloud.py /sys/bus/w1/devices/28-*/w1_slave &> /dev/null
pi@raspberrypi:~ $
USBカメラを使う
画像をキャプチャしてみる
まずは普通に写真を撮ってみる
fswebcam というパッケージをインストール
pi@raspberrypi:~ $ sudo apt-get update ; sudo apt-get install -y fswebcam
(メモ: パッケージの情報が古く、apt-get update してからでないとインストールできなかった)
pi@raspberrypi:~ $ fswebcam -r 640x480 test.jpg
--- Opening /dev/video0...
Trying source module v4l2...
/dev/video0 opened.
No input was specified, using the first.
--- Capturing frame...
Captured frame in 0.00 seconds.
--- Processing captured image...
Writing JPEG image to 'test.jpg'.
手元に持ってきて開けてみる
Macの場合
~$ scp [email protected]:test.jpg .
[email protected]'s password:
test.jpg                                      100%  121KB 121.0KB/s   00:00
~$ open test.jpg
Linux や Windows の場合はどうするか(特にWindows...)
Webサーバ経由でカメラにアクセスをしてみる
流れ
- apache のインストール
- CGIの有効化
- CGI用スクリプトのダウンロード
- アクセスしてみる
pi@raspberrypi:~ $ sudo apt-get install -y apache2
アクセスしてみる URL: http://raspberrypi.local または IPアドレスで
pi@raspberrypi:~ $ sudo ln -s /etc/apache2/mods-available/cgi.load /etc/apache2/mods-enabled/
pi@raspberrypi:~ $ sudo service apache2 reload
スクリプトの設置
pi@raspberrypi:~ $ cd /usr/lib/cgi-bin/
pi@raspberrypi:/usr/lib/cgi-bin $ sudo wget https://soracom-files.s3.amazonaws.com/camera
--2016-07-14 08:04:34--  https://soracom-files.s3.amazonaws.com/camera
Resolving soracom-files.s3.amazonaws.com (soracom-files.s3.amazonaws.com)... 54.231.225.58
Connecting to soracom-files.s3.amazonaws.com (soracom-files.s3.amazonaws.com)|54.231.225.58|:443... connected.
HTTP request sent, awaiting response... 200 OK
Length: 374 [text/plain]
Saving to: ‘camera’

camera              100%[=====================>]     374  --.-KB/s   in 0s

2016-07-14 08:04:35 (1.45 MB/s) - ‘camera’ saved [374/374]

pi@raspberrypi:/usr/lib/cgi-bin $ sudo chmod +x camera
pi@raspberrypi:/usr/lib/cgi-bin $ sudo gpasswd -a www-data video
Adding user www-data to group video
pi@raspberrypi:/usr/lib/cgi-bin $ sudo service apache2 reload
アクセスしてみる
URL: http://raspberrypi.local/cgi-bin/camera
リロードするたび、リアルタイムに撮影された画像が確認できる
定期的に画像を撮影する
温度をキャプションに入れつつ、時刻をファイル名として保存していく
クラウドに画像をアップロードする
全体の仕組み
- Endorse から JWT を取る
- アップロードする際に、JWTをヘッダとして付ける
- アップロード先のbucketからlambdaを呼び、ヘッダを検証して、問題がなければ公開用の bucket にコピーする
スクリプト http://soracom-files.s3.amazonaws.com/upload_image.sh
確認用のURL http://soracom-handson.s3.amazonaws.com/camera/440103128085585