Using libgdx with intellij idea - sinistersnare/libgdx GitHub Wiki
The newest, and easiest way to setup libgdx for use with IntelliJ IDEA is to use the gradle build system. A detailed tutorial can be read here
First there will be a short version, outlining only the major steps. This is for people familiar with IntelliJ IDEA or those that have set up libgdx project before and only need a small recap. Below there is a step-by-step guide with screenshots.
Following this guide will enable you to use IntelliJ IDEA while others on your team use the standard Eclipse setup. Note that a workspace in Eclipse is a project in IntelliJ IDEA, and that a project in Eclipse is a module in IntelliJ IDEA.
There is also a github repo containing a pre-built skeleton project for libgdx + IntelliJ that you can clone for a quick start: https://github.com/jrenner/libgdx-intellij-project-skeleton
Quick reference
- Create a new project from scratch, name it and name the module Main.
- Add a new module named Desktop.
- Add a second module, name it Android and select the Android Module type.
- Create directories in the Desktop and Main module and name them libs.
- Add the following files and directories from the libgdx zip:
* Main/libs:
- gdx.jar
- sources/gdx-sources.jar * Desktop/libs:
- gdx-natives.jar
- gdx-backend-lwjgl.jar
- gdx-backend-lwjgl-natives.jar * Android/libs:
- gdx-backend-android.jar
- armeabi (directory)
- armeabi-v7a (directory)
- Open up the Module Settings and add the content of each libs-directory to the corresponding module.
- Make the Main module export its libraries.
- Give the Android module a Module Dependency pointing to the Main module.
- Do the same for the Desktop module.
- Add starter classes.
- Remember to configure the manifest.
- Link the assets between Android module and Main module: * Make a run configuration for the DesktopStarter and set the Working directory to be the Android/assets directory. * OR * Create a directory named data in the main module, and make a sym-link from the assets directory in the Android module.
- Create an awesome app!
Step-by-step guide with screenshots
The screenshots were taken when running IntelliJ IDEA Ultimate 11.1.1 on Windows, so everything may not look exactly the same on your computer.
The project in this guide is located in C:\Android and named MyLibgdxGame. All the code for the game will be in the Main module.
Preparing
-
You will need to install the Android SDK and the Android versions you want to target.
-
Make sure the Android plugin in IntelliJ IDEA is enabled. File->Settings->Plugins
images/using-libgdx-with-intellij-idea01.png
Creating the project
- Select File->New Project
- Select Create project from scratch in the dialog and press Next.
- In the next screen, enter the name (1) and select the location (2) of the project. Give the module to be created the name Main (3) and then press Next.
images/using-libgdx-with-intellij-idea02.png
- In the next screen, select Create source directory, name it src and press Next.
- Press Finish in the last screen.
Creating the Desktop module
- Select File->New Module (1).
- Select Create module from scratch and press Next.
- Name it Desktop (2) and press Next.
images/using-libgdx-with-intellij-idea03.png
- Select Create source directory, name it src and press Next.
- In the next screen press Finish.
Creating the Android module
- Again, select File->New Module.
- Select Create module from scratch and press Next.
- In this screen, give the module the name Android (1) and select the Android Module type (2). Then press Next.
images/using-libgdx-with-intellij-idea04.png
- Select Create source directory, name it src and press Next.
- In the next screen, select the Android SDK you want to target (1). Give the application a name (2), a package and create an activity (3). If you have no Android SDK in the drop down menu, or would like to add more, read below.
images/using-libgdx-with-intellij-idea05.png
- Select a run configuration and press Finish.
Adding Android SDKs to IntelliJ IDEA
This step is only if you need a new Android SDK to select when creating the Android module.
- Press the [...] button next to the drop down ( (4) in the previous picture).
- In the new window that appears, press the [+] button (1), select Android SDK (2).
- Yet another window will open. Here, select where you installed the Android SDK (3) and press OK (4).
- Select Java 1.6 if prompted, and then select the Android SDK you would like to target (5) and press OK (6).
images/using-libgdx-with-intellij-idea06.png
- If the Android version you would like to target is not in list (5), you will need to download it through the Android SDK tool first.
Add the libgdx files
-
Right click the Desktop module (1), select New->Directory (2). Name the directory libs and press OK.
-
Do the same for the Main module (3).
images/using-libgdx-with-intellij-idea07.png
-
Download libgdx, either the last stable or the nightlies.
-
In the libs folder for the Main module, place these files from the libgdx zip file:
- gdx.jar
- sources/gdx-sources.jar
-
In the libs folder for the Desktop module, place these files from the libgdx zip file:
- gdx-natives.jar
- gdx-backend-lwjgl.jar
- gdx-backend-lwjgl-natives.jar
-
In the libs folder for the Android module, place these files and directories from the libgdx zip file:
- gdx-backend-android.jar
- armeabi (the whole directory)
- armeabi-v7a (the whole directory)
-
The picture below shows how the libraries should be placed when done with this step.
images/using-libgdx-with-intellij-idea08.png
Add the libraries
- Right click the Main module and select Open Module Settings.
- Select Libraries (1) in the first panel.
- Press the [+] (2) above the second column and choose Java if prompted.
- Select the libs directory of the Android module (3) and press OK.
- Select the Android module (4) and press OK again.
- Name it Androidlibs (5).
images/using-libgdx-with-intellij-idea09.png
- Press the [+] (2) again, but this time select the libs directory of the Desktop module in (3), select the Desktop module in (4) and name it Desktoplibs in (5).
- Press the [+] (2) again, but this time select the libs directory of the Main module in (3), select the Main module in (4) and name it Mainlibs in (5).
Adding dependencies
- Select Modules (1) in the first panel.
- Select the Main module (2) in the second panel.
- Select the Dependencies tab (3) in the third panel.
- Check Export in front of Mainlibs (4)
images/using-libgdx-with-intellij-idea10.png
- Select the Desktop module (5) in the second panel.
- Press the [+] to the right (6).
- Select Module Dependency (7).
- Select the Main module (8) and press OK.
- Select the Android module (9) in the second panel and repeat (6), (7) and (8).
images/using-libgdx-with-intellij-idea11.png
- Press OK to close the Project Structure window.
Add the starter classes
- Right click the Main module's src directory and select New->Package. Give it a name, here com.example.mylibgdxgame is used.
- Right click the new package and select New->Java Class and name it. Here MyLibgdxGame is used.
- Make the class implement ApplicationListener, or extend a class that does so. E.g. make it extend Game.
public class MyLibgdxGame extends Game {
    @Override
    public void create() {
    }
}
- This is the entry point for your game.
- Right click the source directory in the Desktop module and add a new package here as well.
- Then add a Java Class to that package and name it DesktopStarter.
- Make the class look like the run configuration below, substitute the name of the game with the class you created in the Main module.
public class DesktopStarter {
    public static void main(String[] args) {
        LwjglApplicationConfiguration cfg = new LwjglApplicationConfiguration();
        cfg.title = "Title";
        cfg.width = 800;
        cfg.height = 480;
        new LwjglApplication(new MyLibgdxGame(), cfg);
    }
}
- Open up the class in the Android module, which was created when we created the Android module.
- Instead of extending Activity, the class should extend AndroidApplication.
- Add initialize and run configurations like below:
public class MyLibgdxGameAndroidStarter extends AndroidApplication
{
    @Override
    public void onCreate(Bundle savedInstanceState)
    {
        super.onCreate(savedInstanceState);
        AndroidApplicationConfiguration cfg = new AndroidApplicationConfiguration();
        cfg.useAccelerometer = false;
        cfg.useCompass = false;
        cfg.useWakelock = true;
        initialize(new MyLibgdxGame(), cfg);
    }
}
See Starter Classes & Configuration on how to use these settings and how to set up the manifest.
Linking the asset directories
Android is a bit picky when it comes to assets, so it needs to have all the assets in its own assets-directory and will not fetch assets from the Main module (as the Desktop module would).
This leaves us with three options:
- (bad) Keep a copy of each asset in the Android/assets folder, and one copy in the Main/data folder. This can be a lot of work, and you will get crashes every time you try to launch and haven't copied the latest assets.
- (good) Make the Desktop module use the Android/assets directory as its working directory. When collaborating with people using the Eclipse set up, this may be the preferred way as you don't have to alter any files or directories in the project.
- (good) Create a sym-link between the two directories in your OS. This will make both the directories be "the same" directory.
Alternative 2: Working directory
- Select Run->Edit Configurations... (1).
images/using-libgdx-with-intellij-idea12.png
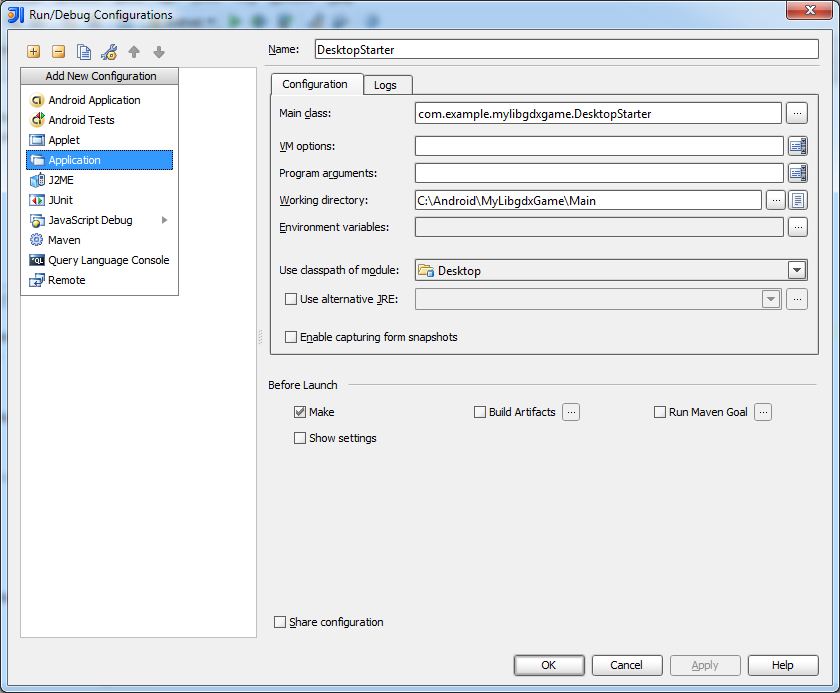
- Press the [+] button (2) and select Application (3).
- Give the configuration a name (4).
- Select the DesktopStarter class (5).
- Set the Working directory to the Android\assets directory (6).
- Select the Desktop module (7).
images/using-libgdx-with-intellij-idea13.png
Alternative 3: Sym-link
See this image on how to set up sym-link in windows. (will need to run Command Prompt as admin). Linux/OSX can do the same with the ln -s-command.
Note: You will need a data-directory in the Main module, and you will need to prefix all your assets with data/.
And see this image on the run configuration you should use.
Tips for using IntelliJ IDEA
CTRL + Q when having the caret positioned over any method or variable or when viewing quick-suggestions will bring up the Javadoc.
images/using-libgdx-with-intellij-idea16.png
CTRL + SHIFT + I will show the code for a method in a small window, nice when you want to quick check the inner workings of a gdx class. This works because we added the gdx-sources.jar
images/using-libgdx-with-intellij-idea17.png
CTRL + LEFT MOUSE CLICK will open up the code in the editor.
CTRL + P will show all parameters to a method.