04. React Components - senthilpazhani/ReactJS GitHub Wiki
class vs. functional components, stateful vs. stateless components, and container vs. presentational components.
Components are self-sustaining, independent micro-entities that describe a part of your UI. An application's UI can be split up into smaller components where each component has its own code, structure, and API.
Facebook, for instance, has thousands of pieces of functionality interfaced together when you view their web application. Here is an interesting fact: Facebook comprises 30,000 components, and the number is growing. The component architecture allows you to think of each piece in isolation. Each component can update everything in its scope without being concerned about how it affects other components.
Components are also reusable. If you need the same component in multiple places, that's easy. With the help of JSX syntax, you can declare your components wherever you want them to appear, and that's it.
<div>
Current count: {this.state.count}
<hr />
{/* Component reusability in action. */ }
<Button sign = "+" count={this.state.count}
updateCount = {this.handleCount.bind(this) }/>
<Button sign = "-" count={this.state.count}
updateCount = {this.handleCount.bind(this) }/>
</div>
Components need data to work with. There are two different ways that you can combine components and data: either as props or state. props and state determine what a component renders and how it behaves. Let's start with props.
If components were plain JavaScript functions, then props would be the function input. Going by that analogy, a component accepts an input (what we call props), processes it, and then renders some JSX code.
Although the data in props is accessible to a component, React philosophy is that props should be immutable and top-down. What this means is that a parent component can pass on whatever data it wants to its children as props, but the child component cannot modify its props. So, if you try to edit the props as I did below, you will get the "Cannot assign to read-only" TypeError.
const Button = (props) => {
// props are read only
props.count =21;
.
.
}
State, on the other hand, is an object that is owned by the component where it is declared. Its scope is limited to the current component. A component can initialize its state and update it whenever necessary. The state of the parent component usually ends up being props of the child component. When the state is passed out of the current scope, we refer to it as a prop.
Now that we know the component basics, let's have a look at the basic classification of components.
A React component can be of two types: either a class component or a functional component. The difference between the two is evident from their names.
Functional components are just JavaScript functions. They take in an optional input which, is what we call props.
const Button = (props) => {return(<button>{props.sign}</button>);};
Some developers prefer to use the new ES6 arrow functions for defining components. Arrow functions are more compact and offer a concise syntax for writing function expressions. By using an arrow function, we can skip the use of two keywords, function and return, and a pair of curly brackets. With the new syntax, you can define a component in a single line like this.
const Hello = ({ name }) => (<div>Hello, {name}!</div>);
Class components offer more features, and with more features comes more baggage. The primary reason to choose class components over functional components is that they can have **state**.
class App extends Components{
state = {count:1};
render(){
<div>...</div>
}
}
The state = {count: 1} syntax is part of the public class fields feature.
There are two ways that you can create a class component. The traditional way is to use React.createClass(). ES6 introduced a syntax sugar that allows you to write classes that extend React.Component. However, both the methods are meant to do the same thing.
Class components can exist without state too. Here is an example of a class component that accepts an input props and renders JSX.
class Hello extends React.Component {
constructor(props) {
super(props);
}
`render() {`
    `return(`
        `<div>`
            `Hello {props}`
        `</div>`
    `)`
`}`
}
We define a constructor method that accepts props as input. Inside the constructor, we call super() to pass down whatever is being inherited from the parent class. Here are a few details that you might have missed.
First, the constructor is optional while defining a component. In the above case, the component doesn't have a state, and the constructor doesn't appear to do anything useful. this.props used inside the render() will work regardless of whether the constructor is defined or not. However, here's something from the official docs:
Class components should always call the base constructor with props.
As a best practice, I will recommend using the constructor for all class components.
Secondly, if you're using a constructor, you need to call super(). This is not optional, and you will get the syntax error "Missing super() call in constructor" otherwise.
And my last point is about the use of super() vs. super(props). super(props) should be used if you're going to call this.props inside the constructor. Otherwise, using super() alone is sufficient.
This is another popular way of classifying components. And the criteria for the classification is simple: the components that have state and the components that don't.
Stateful components are always class components. As previously mentioned, stateful components have a state that gets initialized in the constructor.
// Here is an excerpt from the counter example
constructor(props) {
super(props);
this.state = { count: 0 };
}
We've created a state object and initialized it with a count of 0. There is an alternative syntax proposed to make this easier called class fields. It's not a part of the ECMAScript specification yet, but If you're using a **Babel **transpiler, this syntax should work out of the box.
class App extends Component {
/*
// Not required anymore
constructor() {
super();
this.state = {
count: 1
}
}
*/
state = { count: 1 };
handleCount(value) {
this.setState((prevState) => ({count: prevState.count+value}));
}
render() {
// omitted for brevity
}
}
You can avoid using the constructor altogether with this new syntax.
We can now access the state within the class methods including render(). If you're going to use them inside render() to display the value of the current count, you need to place it inside curly brackets as follows:
render() {
return (
Current count: {this.state.count}
)
}
The this keyword here refers to the instance of the current component.
Initializing the state is not enough - we need to be able to update the state in order to create an interactive application. If you thought this would work, no, it won't.
//Wrong way
handleCount(value) {
this.state.count = this.state.count +value;
}
React components are equipped with a method called setState for updating the state. setState accepts an object that contains the new state of the count.
// This works
handleCount(value) {
this.setState({count: this.state.count+ value});
}
The setState() accepts an object as an input, and we increment the previous value of count by 1, which works as expected. However, there is a catch. When there are multiple setState calls that read a previous value of the state and write a new value into it, we might end up with a race condition. What that means is that the final results won't match up with the expected values.
Here is an example that should make it clear for you. Try this in the codesandbox snippet above.
// What is the expected output? Try it in the code sandbox.
handleCount(value) {
this.setState({count: this.state.count+100});
this.setState({count: this.state.count+value});
this.setState({count: this.state.count-100});
}
We want the setState to increment the count by 100, then update it by 1, and then remove that 100 that was added earlier. If setState performs the state transition in the actual order, we will get the expected behavior. However, setState is asynchronous, and multiple setState calls might be batched together for better UI experience and performance. So the above code yields a behavior which is different from what we expect.
Therefore, instead of directly passing an object, you can pass in an updater function that has the signature:
(prevState, props) => stateChange
prevState is a reference to the previous state and is guaranteed to be up to date. props refers to the component's props, and we don't need props to update the state here, so we can ignore that. Hence, we can use it for updating state and avoid the race condition.
// The right way
handleCount(value) {
this.setState((prevState) => {
count: prevState.count +1
});
}
The setState() rerenders the component, and you have a working stateful component.
You can use either a function or a class for creating stateless components. But unless you need to use a lifecycle hook in your components, you should go for stateless functional components. There are a lot of benefits if you decide to use stateless functional components here; they are easy to write, understand, and test, and you can avoid the this keyword altogether. However, as of React v16, there are no performance benefits from using stateless functional components over class components.
The downside is that you can't have lifecycle hooks. The lifecycle method ShouldComponentUpdate() is often used to optimize performance and to manually control what gets rerendered. You can't use that with functional components yet. Refs are also not supported.
This is another pattern that is very useful while writing components. The benefit of this approach is that the behavior logic is separated from the presentational logic.
Presentational components are coupled with the view or how things look. These components accept props from their container counterpart and render them. Everything that has to do with describing the UI should go here.
Presentational components are reusable and should stay decoupled from the behavioral layer. A presentational component receives the data and callbacks exclusively via props and when an event occurs, like a button being pressed, it performs a callback to the container component via props to invoke an event handling method.
Functional components should be your first choice for writing presentational components unless a state is required. If a presentational component requires a state, it should be concerned with the UI state and not actual data. The presentational component doesn't interact with the Redux store or make API calls.
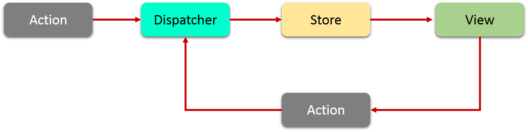
Container components will deal with the behavioral part. A container component tells the presentational component what should be rendered using props. It shouldn't contain limited DOM markups and styles. If you're using Redux, a container component contains the code that dispatches an action to a store. Alternatively, this is the place where you should place your API calls and store the result into the component's state.
The usual structure is that there is a container component at the top that passes down the data to its child presentational components as props. This works for smaller projects; however, when the project gets bigger and you have a lot of intermediate components that just accept props and pass them on to child components, this will get nasty and hard to maintain. When this happens, it's better to create a container component unique to the leaf component, and this will ease the burden on the intermediate components.
You will get to hear the term pure component very often in React circles, and then there is React.PureComponent. When you're new to React, all this might sound a bit confusing. A component is said to be pure if it is guaranteed to return the same result given the same props and state. A functional component is a good example of a pure component because, given an input, you know what will be rendered.
const HelloWorld = ({name}) => (
<div>{Hi ${name}}</div>
);
Class components can be pure too as long as their props and state are immutable. If you have a component with a 'deep' immutable set of props and state, React API has something called PureComponent. React.PureComponent is similar to React.Component, but it implements the ShouldComponentUpdate() method a bit differently. ShouldComponentUpdate() is invoked before something is rerendered. The default behaviour is that it returns true so that any change to the state or the props rerenders the component.
shouldComponentUpdate(nextProps, nextState) {
return true;
}
However, with PureComponent, it performs a shallow comparison of objects. Shallow comparison means that you compare the immediate contents of the objects instead of recursively comparing all the key/value pairs of the object. So only the object references are compared, and if the state/props are mutated, this might not work as intended.
React.PureComponent is used for optimizing performance, and there is no reason why you should consider using it unless you encounter some sort of performance issue.

React components are considered as the building blocks of the User Interface. Each of these components exists within the same space but execute independently from one another. React components have their own structure, methods as well as APIs. They are reusable and can be injected into interfaces as per need. To have a better understanding, consider the entire UI as a tree. Here the starting component becomes the root and each of the independent pieces becomes branches, which are further divided into sub-branches.
This keeps our UI organized and allows the data and state changes to logically flow from the root to branches and then to sub-branches. Components make calls to the server directly from the client-side which allows the DOM to update dynamically without refreshing the page. This is because react components are built on the concept of AJAX requests. Each component has its own interface that can make calls to the server and update them. As these components are independent of one another, each can refresh without affecting others or the UI as a whole.
We use React.createClass() method to create a component. This method must be passed an object argument which will define the React component. Each component must contain exactly one render() method. It is the most important property of a component which is responsible for parsing the HTML in JavaScript, JSX. This render() will return the HTML representation of the component as a DOM node. Therefore, all the HTML tags must be enclosed in an enclosing tag inside the render().
Following is a sample code for creating a component.
 import React from 'react';
 import ReactDOM from 'react-dom';

 class MyComponent extends React.Component{
     render(){
         return(
               <div>
                 <h1>Hello</h1>
                 <h1>This is a Component</h1>
               </div>
         );
     }
 }
 ReactDOM.render(
     <MyComponent/>, document.getElementById('content')
 );
-
Code Re-usability – A component-based approach makes your application development easier and faster. If you want to use a pre-existing functionality in your code, you can just put that code in yours instead of building it from scratch. It also allows your application architecture to stay up to date over time as you can update the specific areas which need up-gradations.
-
Fast Development – A component-based UI approach leads to an iterative and agile application development. These components are hosted in a library from which different software development teams can access, integrate and modify them throughout the development process.
-
Consistency – Implementing these reusable components helps to keep the design consistent and can provide clarity in organizing code throughout the application.
-
Maintainability – Applications with a set of well-organized components can be quickly updated and you can be confident about the areas which will be affected and which won’t.
-
Scalability – The development becomes easier with a properly organized library of ready to implement components. Ensuring the components are properly namespaced helps to avoid style and functionality leaking or overlapping into the wrong place as the project scales up.
-
Easy Integration – The component codes are stored in repositories like GitHub, which is open for public use. Application development teams are well-versed in using source code repositories, and so they are able to extract the code as needed and inject it into the application.
Now that you have understood what is a component and what are its advantages, let’s now find out how to feed data to these components.
There are two ways the components receive data:
- Props
- States
Props stand for Properties. They are the read-only components which work similar to the HTML attributes. Prop is a way of passing data from parent to child component. Let’s understand this with an example.
As we already know, the react components arrange the UI in the form of a tree where the parent component becomes the root and child components become branches and sub-branches. Now suppose parent component wants to send data to one of its deeply nested components. Let us say from component 1 you need to send a property to component 6. How will you do that?

You cannot pass down a property directly to the target component. This is because React follows the rule where properties have to flow down from a parent component to an immediate child component. This means you can’t skip a layer of child components when sending a property and the child components can’t send property back up to a parent as well. You can have default props in case a parent component doesn’t pass down props so that they are still set. This is why React has one-way data binding.
So, in this case, we need to send data, layer by layer until it reaches target child component. Every component in this path has to receive the property from its parent and then resend that property to its child as received. This process repeats until your property reaches its target component.

  import React from 'react';
  import ReactDOM from 'react-dom';

  class MyComponent extends React.Component{
          render(){
          return(
                <div>
                 <h1>Hello</h1>
                 <Header name="maxx" id="101"/>
             </div>
          );
      }
  }

  function Header(props) {
      return (
             <div>
              <Footer name = {props.name} id = {props.id}/>
             </div>
      );
  }
  function Footer(props) {
      return (
             <div>
              <h1> Welcome : {props.name}</h1>
              <h1> Id is : {props.id}</h1>
             </div>
    );
  }
  ReactDOM.render(
     <MyComponent/>, document.getElementById('content')
  );
Since the props can only be passed from parent components, they cannot be changed. This makes them immutable and dumb. This poses a great challenge as the modern apps do not have all of its states ready on page load. Ajax or Events can happen when data returns, so someone needs to take responsibility for handling the updates. This is where React states come into the picture.
Generally, components take in props and render them. These are called stateless components. But they can also provide state which are used to store data or information about the component which can change over time. Such components are called stateful components. The change in state can happen as a response to user event or system event. In other words, state is the heart of every react component which determines how the component will behave and render. They are also responsible for making a component dynamic and interactive. Thus they must be kept as simple as possible.
The state can be accessed with this reference, e.g., this.state. You can access and print variables in JSX using curly braces {}. Similarly, you can render this.state inside render(). You must set a default state for the component else it will set to null.
Now let’s see how a state is assigned to a component.
 import React from 'react';
 import ReactDOM from 'react-dom';

 class MyComponent extends React.Component {
     constructor() {
         super();
         this.state = {
             name: 'Maxx',
             id: '101'
         }
     }
     render()
         {
             setTimeout(()=>;{this.setState({name:'Jaeha', id:'222'})},2000)
             return (
                    <div>
                      <h1>Hello {this.state.name}</h1>
                      <h2>Your Id is {this.state.id}</h2>
                    </div>
              );
         }
     }
 ReactDOM.render(
     <MyComponent/>, document.getElementById('content')
 );
React provides various methods which notify when a certain stage in the lifecycle of a component occurs. These methods are called the lifecycle methods. These lifecycle methods are not very complicated. You can think of these methods as specialized event handlers that are called at various points during a components life. You can even add your own code to these methods to perform various tasks. Talking about the lifecycle of the component, the lifecycle is divided into 4 phases. They are:
a Initial Phase
b Updating Phase
c Props change Phase
d Unmounting Phase
Each of these phases contains some lifecycle methods which are specific only to them. So let’s now find out what happens during each of these phases.
a. Initial Phase – The first phase of the lifecycle of a React component is the initial phase or initial rendering phase. In this phase, the component is about to start its journey and make its way to the DOM. This phase consists of the following methods which are invoked in a predefined order.
-
getDefaultProps(): This method is used to specify the default value of
this.props. It gets called before your component is even created or any props from the parent are passed into it. -
getInitialState(): This method is used to specify the default value of
this.statebefore your component is created. -
componentWillMount(): This is the last method that you can call before your component gets rendered into the DOM. But if you call
setState()inside this method your component will not re-render. -
render(): This method is responsible for returning a single root HTML node and must be defined in each and every component. You can return
nullorfalsein case you don’t want to render anything. - componentDidMount(): Once the component is rendered and placed on the DOM, this method is called. Here you can perform any DOM querying operations.
b. Updating Phase – Once the component is added to the DOM, they can update and re-render only when a state change occurs. Each time the state changes, the component calls its render() again. Any component, that relies on the output of this component will also call its render() again. This is done, to ensure that our component is displaying the latest version of itself. Thus to successfully update the components state the following methods are invoked in the given order:
-
shouldComponentUpdate(): Using this method you can control your component’s behavior of updating itself. If you return a
truefrom this method, the component will update. Else if this method returns afalse, the component will skip the updating. -
componentWillUpdate(): This method is called just before your component is about to update. In this method, you can’t change your component state by calling
this.setState. -
render(): If you are returning
falseviashouldComponentUpdate(), the code insiderender()will be invoked again to ensure that your component displays itself properly. - componentDidUpdate(): Once the component is updated and rendered, then this method is invoked. You can put any code inside this method, which you want to execute once the component is updated.
c. Props Change Phase – After the component has been rendered into the DOM, the only other time the component will update, apart from the state change is when its prop value changes. Practically this phase works similar to the previous phase, but instead of the state, it deals with the props. Thus, this phase has only one additional method from the Updating Phase.
- componentWillReceiveProps(): This method returns one argument which contains the new prop value that is about to be assigned to the component. Rest of the lifecycle methods behave identically to the methods which we saw in the previous phase.
- shouldComponentUpdate()
- componentWillUpdate()
- render()
- componentDidUpdate()
d. The Unmounting Phase – This is the last phase of components life cycle in which the component is destroyed and removed from the DOM completely. It contains only one method:
- componentWillUnmount(): Once this method is invoked, your component is removed from the DOM permanently. In this method, you can perform any clean-up related tasks like removing event listeners, stopping timers, etc.
Following is the entire life cycle diagram:

App.jsx
 import React from 'react';

 class App extends React.Component {
    render() {
       return (
          <div>
             <Header/>
             <Content/>
          </div>
       );
    }
 }
 class Header extends React.Component {
    render() {
       return (
          <div>
             <h1>Header</h1>
          </div>
       );
    }
 }
 class Content extends React.Component {
    render() {
       return (
          <div>
             <h2>Content</h2>
             <p>The content text!!!</p>
          </div>
       );
    }
 }
 export default App;
main.js
 import React from 'react';
 import ReactDOM from 'react-dom';
 import App from './App.jsx';

 ReactDOM.render(<App />, document.getElementById('app'));
App.jsx
 import React from 'react';

 class App extends React.Component {
    constructor() {
       super();
       this.state = {
          data:
          [
             {
                "id":1,
                "name":"Foo",
                "age":"20"
             },
             {
                "id":2,
                "name":"Bar",
                "age":"30"
             },
             {
                "id":3,
                "name":"Baz",
                "age":"40"
             }
          ]
       }
    }
    render() {
       return (
          <div>
             <Header/>
             <table>
                <tbody>
                   {this.state.data.map((person, i) => <TableRow key = {i}
                      data = {person} />)}
                </tbody>
             </table>
          </div>
       );
    }
 }
 class Header extends React.Component {
    render() {
       return (
          <div>
             <h1>Header</h1>
          </div>
       );
    }
 }
 class TableRow extends React.Component {
    render() {
       return (
          <tr>
             <td>{this.props.data.id}</td>
             <td>{this.props.data.name}</td>
             <td>{this.props.data.age}</td>
          </tr>
       );
    }
 }
 export default App;
main.js
 import React from 'react';
 import ReactDOM from 'react-dom';
 import App from './App.jsx';

 ReactDOM.render(<App/>, document.getElementById('app'));
Note − Notice that we are using key = {i} inside map() function. This will help React to update only the necessary elements instead of re-rendering the entire list when something changes. It is a huge performance boost for larger number of dynamically created elements.