Building macOS - secondlife/viewer GitHub Wiki
Building the Viewer on macOS
Building the viewer on macOS has some special considerations compared to Windows and our general build instructions.
If you haven't, read our general build instructions before proceeding.
Installing pre-requisites
On macOS, most pre-requisites are taken care with a few exceptions. You will need to individually install the following:
There's multiple ways to install our pre-requisites on macOS. This guide assumes you're doing this on a clean system without a package manager such as Homebrew.
Installing Autobuild
Xcode generally uses the system installed Python when executing our python scripts - so it's recommended to use the system provided pip3 command for installation of python tools. This is required to successfully build the viewer. To do this, you can execute:
pip3 install autobuild
pip3 install llbase
An important note about pip3 and paths
By default, executables installed with the pip3 command will not be added to the path on a clean system. This is generally easy to fix on macOS though, assuming the Xcode installed version of pip3. Simply do this in your terminal:
export PATH=$(python3 -m site --user-base)/bin:$PATH
To make this persist across terminal sessions:
echo "export PATH=$(python3 -m site --user-base)/bin:$PATH" >> ~/.zshrc
source ~/.zshrc
Note that by default, .zshrc does not exist on macOS.
From there autobuild will be available to execute in your terminal.
Installing CMake
If you installed CMake from Kitware's website, by default CMake will not be available from the command line. To remedy this, run the following command:
sudo "/Applications/CMake.app/Contents/bin/cmake-gui" --install
This will make the cmake command available from the terminal. This is required in order to generate build files.
Setting up build environment variables
A script has been provided in order to simplify setting up your terminal session to build the viewer. You can find it at scripts/building/setup_viewer_build.sh. If you want a more advanced setup, please refer to Step 2 - setting build environment variables.
In order to use this script, you must source it in your terminal like so:
source viewer/scripts/building/setup_viewer_build.sh
This will clone (if necessary) the build-variables repository which can be found on GitHub. It will also set checkout the viewer branch, and setup environment variables local to your current terminal session. If you have access to proprietary packages, you can set the GitHub access token and build configuration to reflect this like so:
export AUTOBUILD_CONFIGURATION=RelWithDebInfo
export AUTOBUILD_GITHUB_TOKEN="<your personal access token here>"
Do not modify the build setup script with these values. Simply executing these commands in your terminal session will override the specific environment variables that were provided by the setup script for that session.
Generating build files
After you've installed all pre-requisites, you can now generate build files.
Refer to the Configuring section in Build Instructions for how to do this.
Common problems
If you have errors about packages such as havok_source and other proprietary libraries, follow these steps:
- For proprietary library builds:
- First make sure that you have access to our proprietary libraries. If you know you have access, make sure you have generated a GitHub fine grained personal access token for the appropriate 3p repos.
- If you do not have access, and you are not a Linden employee or contractor, more than likely you're not supposed to have access. See next step. If you are, and you've set all the correct variables - delete your build folder, run the setup script again, and re-run
autobuild configure.
- For open source builds:
- First check the build configuration you attempted to build with
- If the build configuration is
ReleaseorRelWithDebInfo- you're probably configuring with the wrong configuration. Check yourAUTOBUILD_CONFIGURATIONenvironment variable. You can set it at any time toRelWithDebInfoOSorReleaseOS.
Building with Xcode
Before you're ready to build, you will need to make some modifications to the Xcode project.
The first thing you will need to do is set secondlife-bin as your active target as shown in the following image.
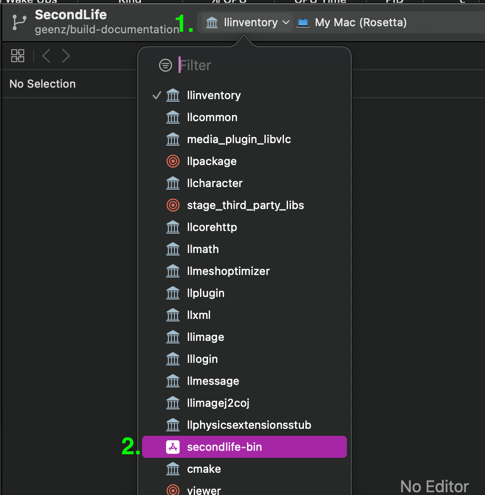 First click the field next to the run target (which should be "My Mac").
Second click secondlife-bin in the resulting list.
The next thing you will need to do is edit the scheme. To do this, the following image provides steps to get to open the "Edit Schemes" dialog.
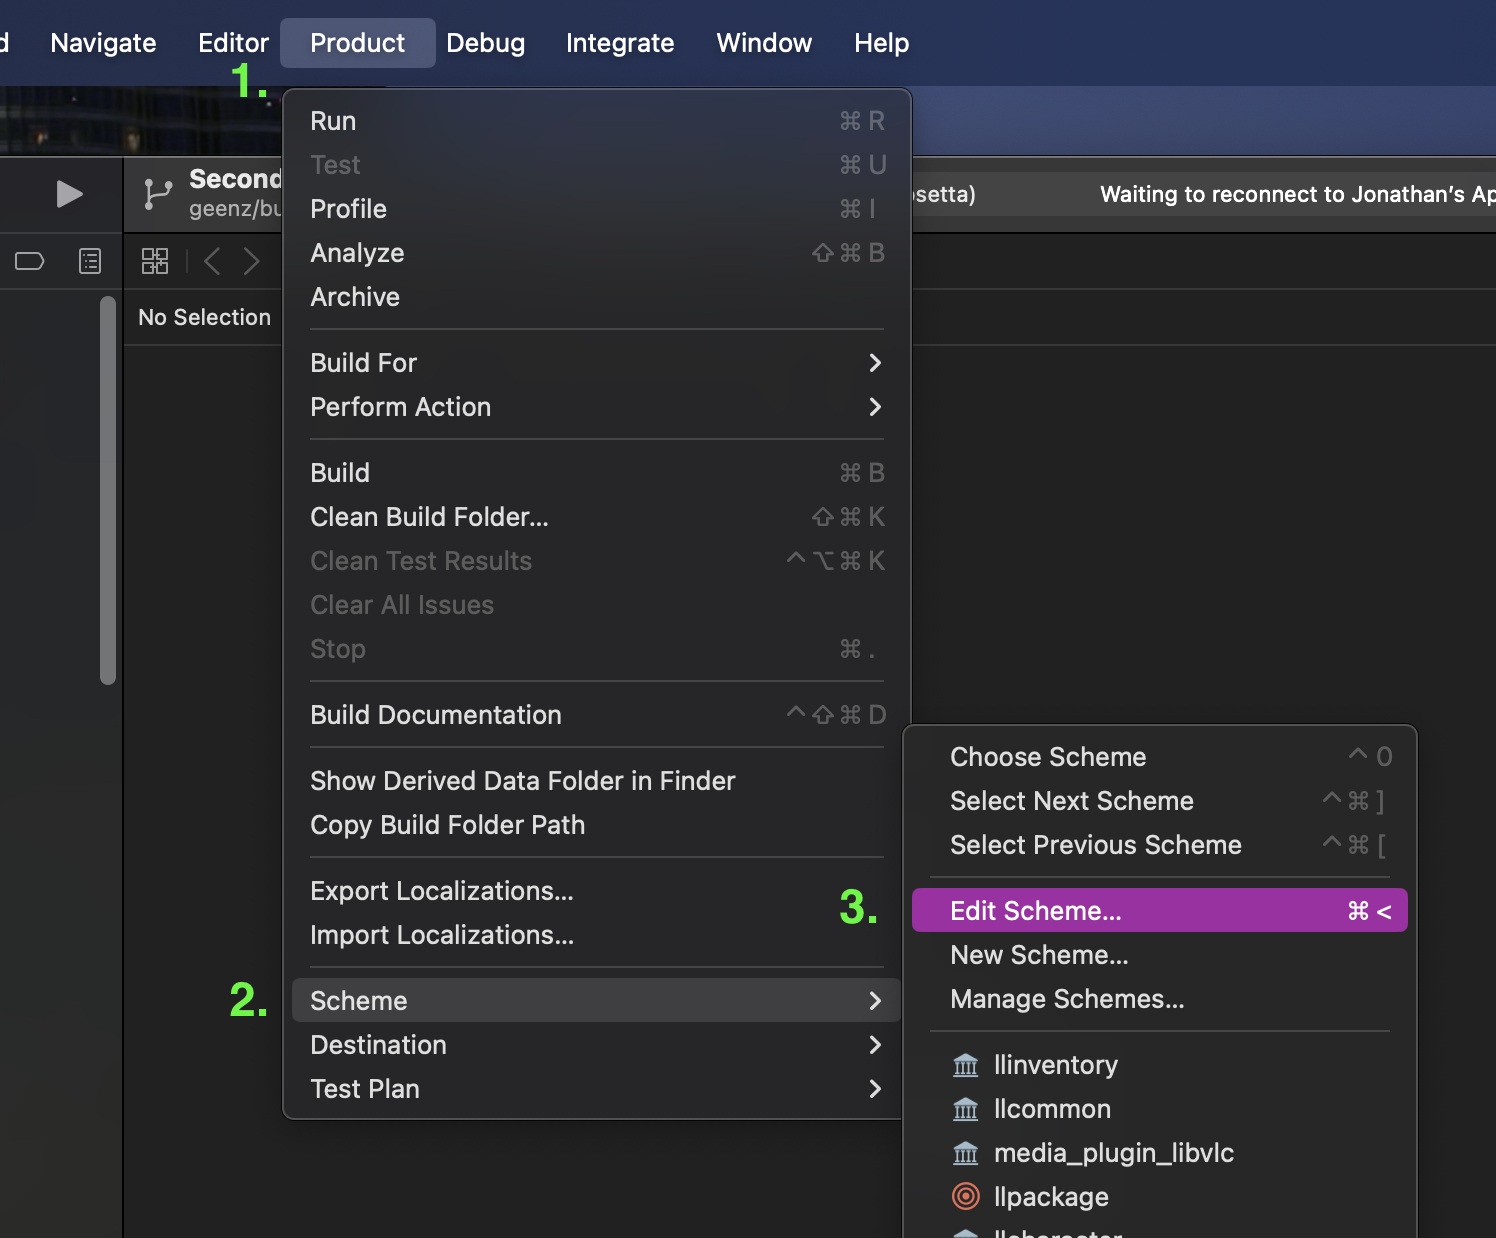
First click "Product" in the menu bar.
Second hover over "Scheme" towards the bottom of the menu.
Third click "Edit Scheme..."
Finally, to ensure that you can debug a build on macOS with Xcode, you will need to disable document version debugging.
To do this, in the resulting scheme editor, untick the box that says "Allow debugging when browsing versions" as shown in the below image.
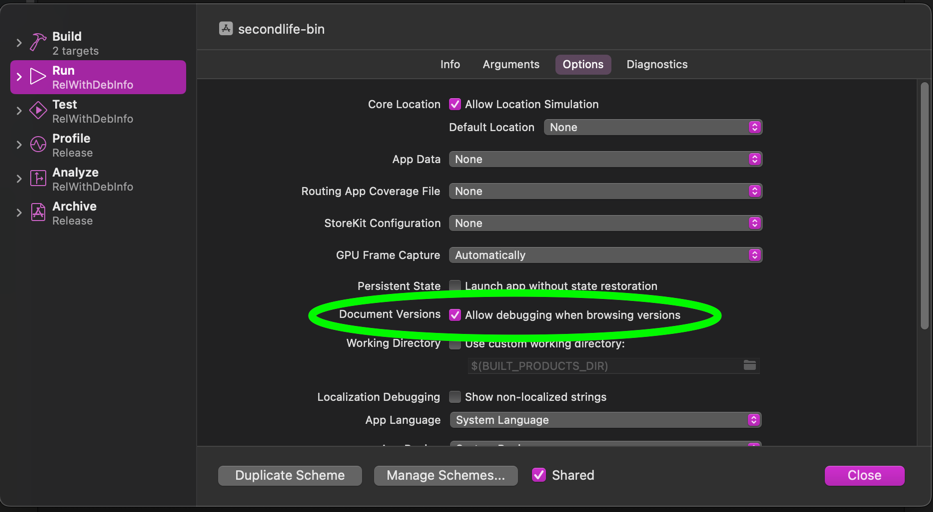
Failure to do so will result in the build throwing an error when it's ran.
Special note about Apple Silicon Macs
Apple Silicon Macs may require an additional step to ensure the viewer can be ran from Xcode. If "My Mac (Rosetta)" is not an available run target, follow these steps:
- Click "Product" in the menu bar
- Mouse over to "Destination" at the bottom of the menu
- Click "Show All Run Destinations"
This should make the viewer locally runnable on an Apple Silicon Mac through Xcode as an option. Make sure to set your run target to "My Mac (Rosetta)" in Xcode prior to running.