Campuri Personalizate - sebiboga/testlink-upgraded GitHub Wiki
Custom Fields allow you to extend TestLink's built-in data model by adding your own metadata fields to test cases, test plans, requirements, builds, and test suites. This is one of TestLink's most powerful yet underused features — it lets you track project-specific information without modifying the core schema.
Path: System > Define Custom Fields · Projects > Assign Custom Fields
URL: gui/templates/cfields/cfieldsView.html · gui/templates/cfields/cfieldsAssignView.html
Prerequisite: cfield_management or cfield_view right
- What Are Custom Fields?
- Why Use Custom Fields?
- Field Types
- Entity Types (Available For)
- Enable On / Show On
- Creating a Custom Field
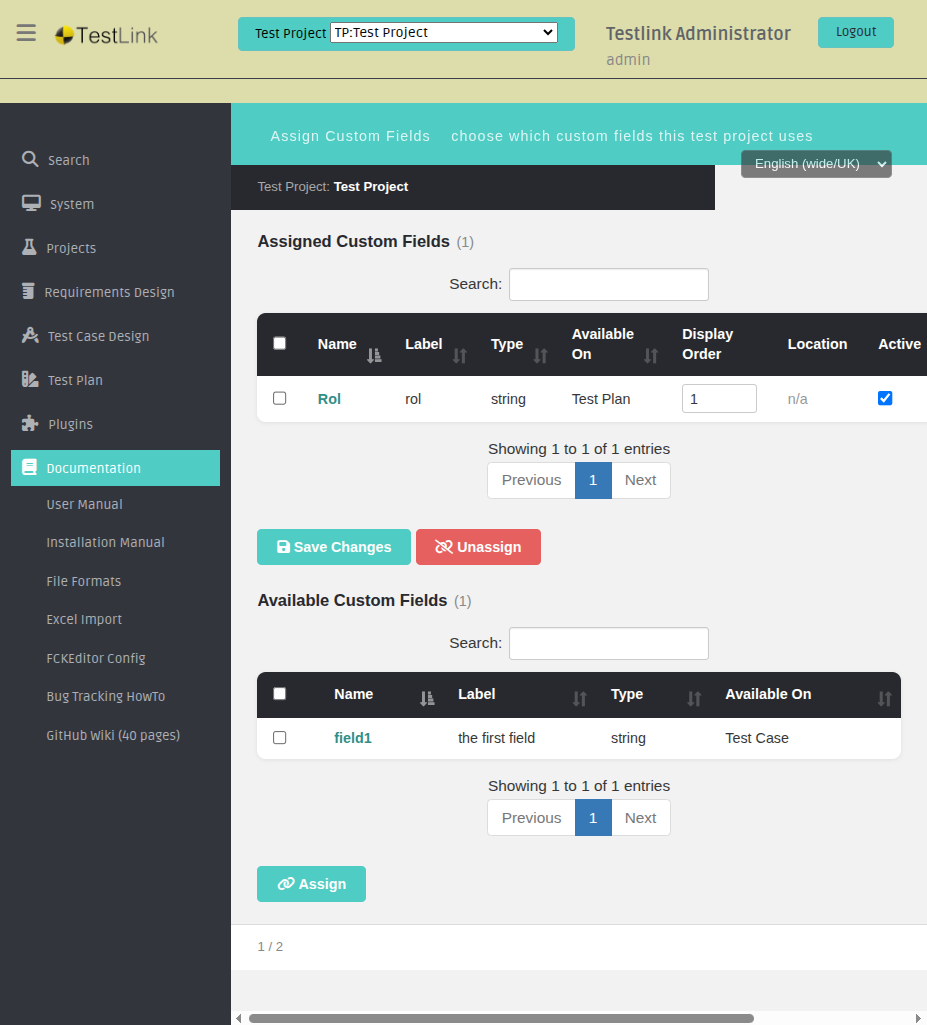
- Assigning to Test Projects
- Display Locations
- Import / Export
- Custom Fields as Variables
- Predefined Special Fields
- Best Practices
TestLink has built-in fields for test cases (title, summary, preconditions, steps, expected results, priority, etc.). But every project has unique metadata needs. Custom Fields let you add those without changing the database or code.
Built-in Fields (always present):
├── Title
├── Summary
├── Preconditions
├── Steps / Expected Results
├── Priority
└── Type

Custom Fields (you define these):
├── Browser Type        → "Which browser to test on?"
├── Environment         → "Dev / Stage / Prod?"
├── Automation Status   → "Manual / Automated / Partial"
├── Risk Level          → "Low / Medium / High / Critical"
├── Estimated Duration  → "How many minutes?"
└── Anything you need   → unlimited flexibility
| Use Case | Example |
|---|---|
| Track test environment | "Tested on: Chrome, Firefox, Safari" |
| Mark automation status | "This TC is: Manual / Automated / Partial" |
| Estimate execution time | "Expected: 15 minutes" (special field — see Section 11) |
| Record actual exec time | "Actual: 22 minutes" (special field) |
| Categorize requirements | "Epic: Payments" or "Priority: P0" |
| Link to external systems | "JIRA Ticket: PAY-1234" |
| Risk assessment | "Risk: High — payment flow" |
| Compliance tracking | "SOC2 Required: Yes" |
Potential: Most teams use 5-10% of TestLink's features. Custom Fields unlock the other 90% by making the tool adapt to YOUR process, not the other way around.
Problem: You're testing a checkout flow. Each test case needs to know which payment method, browser, and device to use. Without custom fields, testers waste time writing "Test on Chrome with Visa card" in the summary — and nobody can filter or report on it.
Custom Fields to create:
| Field Name | Type | Values | Enable On |
|---|---|---|---|
payment_method |
List | Visa|Mastercard|PayPal|Bank Transfer|Cash on Delivery |
Design |
browser |
Multiselect | Chrome|Firefox|Safari|Edge |
Design |
device_type |
List | Desktop|Mobile iOS|Mobile Android|Tablet |
Design |
test_data_set |
String | (free text, e.g. "set #3: expired card") | Execution |
defect_ticket |
String | (e.g. "PAY-1234") | Execution |
automation_status |
List | Manual|Automated|Partial|Not Automatable |
Design |
risk_level |
Radio | Low|Medium|High|Critical |
Design |
estimated_minutes |
Float | (special field CF_ESTIMATED_EXEC_TIME) |
Testplan Design |
Result:
- Filter all test cases that use PayPal → instantly see coverage gap
- Report: "47% of checkout tests are automated, 23% are manual"
- During execution, tester fills
test_data_set = "set #7: 3DS2 authenticated Visa"anddefect_ticket = "PAY-5678" - PM sees risk heatmap: all Critical-risk tests are assigned to senior testers
Problem: Your bank must prove to auditors that every payment flow test was executed by a certified tester, on a specific environment, within a regulatory window.
Custom Fields to create:
| Field Name | Type | Values | Enable On |
|---|---|---|---|
regulation |
Multiselect | PSD2|GDPR|SOX|Basel III|MiFID II |
Design |
environment |
List | DEV|SIT|UAT|STAGING|PROD-HOTFIX |
Execution |
tester_certification |
String | (e.g. "ISTQB-Foundation #12345") | Execution |
audit_reference |
String | (e.g. "AUDIT-2026-Q2-047") | Execution |
compliance_required |
Checkbox | Yes|No |
Design |
review_status |
List | Pending|Approved|Rejected|Needs Retest |
Testplan Design |
Result:
- Auditor asks: "Show me all PSD2 tests executed in PROD-HOTFIX environment"
- You filter:
regulation = PSD2+environment = PROD-HOTFIX→ instant report - Each execution shows who tested it, their certification, and the audit reference
- Compliance dashboard: "92% of PSD2 tests approved, 8% pending review"
Problem: Your SaaS app must work on 4 browsers × 3 OS = 12 combinations. You have 200 test cases. Without custom fields, you'd need 200 × 12 = 2,400 test cases. With custom fields, you need 200 + 12 configurations.
Custom Fields to create:
| Field Name | Type | Values | Enable On |
|---|---|---|---|
target_browser |
Multiselect | Chrome|Firefox|Safari|Edge |
Testplan Design |
target_os |
Multiselect | Windows 11|macOS 14|Ubuntu 24.04 |
Testplan Design |
responsive_breakpoint |
List | Desktop (1920px)|Tablet (768px)|Mobile (375px) |
Design |
accessibility_level |
List | WCAG-A|WCAG-AA|WCAG-AAA |
Design |
Result:
- During test plan design: assign TC-001 to Chrome+Windows AND Firefox+macOS
- Filter execution by browser: "Show me all failures on Safari"
- Report: "Safari has 3× more failures than Chrome — investigate WebKit bugs"
- Accessibility audit: filter
accessibility_level = WCAG-AAA→ see coverage for highest standard
If you're unsure where to start, create these 3 fields immediately:
-
automation_status(List:Manual|Automated|Partial|Not Automatable)- Know your automation coverage at a glance
- Report: "We're at 34% automation, need 60% by Q3"
-
risk_level(Radio:Low|Medium|High|Critical)- Prioritize testing effort
- Ensure Critical-risk tests always get executed first
-
environment(List:DEV|SIT|UAT|STAGING|PROD)- Track which environments each test covered
- Catch "tested in DEV but never in UAT" gaps
| Code | Type | Possible Values? | Widget | Max Length |
|---|---|---|---|---|
| 0 | String | No | Text input | 255 |
| 1 | Numeric | No | Text input (integer) | — |
| 2 | Float | No | Text input (decimal) | — |
| 4 | No | Text input (validated) | — | |
| 5 | Checkbox | Yes (pipe-separated) | Checkbox group | — |
| 6 | List | Yes (pipe-separated) | Dropdown select | — |
| 7 | Multiselection List | Yes (pipe-separated) | Multi-select listbox | — |
| 8 | Date | No | Date picker | — |
| 9 | Radio | Yes (pipe-separated) | Radio button group | — |
| 10 | DateTime | No | Date + time picker | — |
| 20 | Text Area | No | Textarea | 255 |
| 500 | Script | No | Text input (automation) | — |
| 501 | Server | No | Text input (automation) | — |
For types 5 (checkbox), 6 (list), 7 (multiselection), and 9 (radio), you must provide pipe-separated values:
Chrome|Firefox|Safari|Edge
or
Low|Medium|High|Critical
Each custom field is bound to one entity type. You choose this at creation time and cannot change it later if the field has data.
| Entity Type | node_type_id | Design | Execution | Testplan Design | Notes |
|---|---|---|---|---|---|
| Test Case | 3 | Yes | Yes | Yes | Full support — all three scopes |
| Test Suite | 2 | Yes | Yes | Yes | Configurable per scope |
| Test Plan | 5 | Yes | Yes | Yes | Configurable per scope |
| Build | 12 | Yes (forced) | No (forced) | No | Always design-only |
| Requirement Spec | 6 | No (forced) | No (forced) | No | Design values only |
| Requirement | 7 | No (forced) | No (forced) | No | Design values only |
Key insight: Only Test Cases support the full lifecycle (design → testplan assignment → execution). Requirements and requirement specs are design-time only.
When creating a custom field, you choose when it appears:
| Option | Meaning |
|---|---|
| Enable on Design | User can fill in the value during test specification creation/editing |
| Enable on Execution | User can fill in the value during test execution |
| Enable on Testplan Design | User can fill in the value when linking test cases to a test plan |
Show On is a read-only display option (the field is visible but not editable). If "Enable on" is set, "Show on" is automatically set too.
Important: Not all combinations are available for all entity types. For example, Requirements only support Design — you cannot enable custom fields on Execution for requirements.
Path: System > Define Custom Fields > Create
The modern screen (cfieldsView.html) opens creation in a modal dialog — no page navigation, the list refreshes after save.
| Field | Required | Description |
|---|---|---|
| Name | Yes | Internal identifier (unique, e.g., browser_type) — read-only when editing an existing field |
| Label | Yes | Display label on UI (e.g., "Browser Type") |
| Available On | Yes | Entity type (test case, test plan, requirement...) |
| Type | Yes | Field type (string, list, date...) |
| Possible Values | For list/checkbox/radio | Pipe-separated values: `Chrome |
| Enable On | Yes | Where the field can be edited: Design, Execution, or Testplan Design |
| Button | Action |
|---|---|
| Save | Create the field (or update it, when editing) via POST/PUT /api/cfields/
|
| Cancel | Close the modal without saving |
Editing: click the field name in the table — the same modal opens pre-filled, with Name locked (it is the unique identifier). Saving issues a
PUT /api/cfields/{id}request; no full-page reload happens.
Custom field definitions are global. To make a field available in a specific test project, you must assign it.
Path: Projects > Assign Custom Fields
URL: gui/templates/cfields/cfieldsAssignView.html
| Option | Description |
|---|---|
| Active | Field is active for this project |
| Required | User must fill in the value before saving |
| Monitorable | Changes to the field are tracked in the audit log |
| Display Order | Numeric order for field display (1, 2, 3...) |
| Location | Where to display on the page (test case fields only — see Section 8) |
- Create the custom field definition
- Go to Assign Custom Fields to Test Project
- Select the test project from the dropdown
- Check the fields you want to assign
- Set Active, Required, Order, and Location
- Click Assign (or Save Changes to update order/location/flags)

Clicking a field name in either table (Assigned or Available) opens the same Edit modal used by Define Custom Fields — pre-filled with that field's data (label, type, node type, possible values, enable-on flags).
- The modal lives inside the assignment screen, so you stay in context: no navigation to the legacy page, sidebar and navbar remain visible.
-
Save issues
PUT /api/cfields/{id}and refreshes both tables (a "Changes saved" toast confirms it). - Cancel closes the modal; unsaved assignment edits (order/location/flags) are kept.
Before this modernization the name links jumped to the legacy
lib/cfields/cfieldsEdit.phpscreen withtarget="_top", which replaced the whole shell — the modal removes that jump entirely.
For test case custom fields, you can control where on the page the field appears:
| Code | Location | Description |
|---|---|---|
| 1 | Standard | After all test case definition (default) |
| 2 | Before Steps/Results | Between summary and steps |
| 3 | Before Summary | At the very top |
| 4 | Before Preconditions | Between title and preconditions |
| 5 | After Title | Right after the title |
| 6 | After Summary | After the summary section |
| 7 | After Preconditions | After preconditions |
| 8 | Hidden (Variable) | Hidden — used via [tlVar] syntax only |
Custom field definitions can be imported and exported as XML.
Path: System > Define Custom Fields > Export
Generates an XML file with all field definitions. The format:
<?xml version='1.0' encoding='ISO-8859-1'?>
<custom_fields>
  <custom_field>
    <name><![CDATA[browser_type]]></name>
    <label><![CDATA[Browser Type]]></label>
    <type><![CDATA[6]]></type>
    <possible_values><![CDATA[Chrome|Firefox|Safari|Edge]]></possible_values>
    <default_value><![CDATA[]]></default_value>
    <valid_regexp><![CDATA[]]></valid_regexp>
    <length_min><![CDATA[0]]></length_min>
    <length_max><![CDATA[0]]></length_max>
    <show_on_design><![CDATA[1]]></show_on_design>
    <enable_on_design><![CDATA[1]]></enable_on_design>
    <show_on_execution><![CDATA[0]]></show_on_execution>
    <enable_on_execution><![CDATA[0]]></enable_on_execution>
    <show_on_testplan_design><![CDATA[0]]></show_on_testplan_design>
    <enable_on_testplan_design><![CDATA[0]]></enable_on_testplan_design>
    <node_type_id><![CDATA[3]]></node_type_id>
  </custom_field>
</custom_fields>Path: System > Define Custom Fields > Import
Upload an XML file in the same format. Fields with duplicate names are skipped.
| Field | Description |
|---|---|
name |
Internal name (unique identifier) |
label |
Display label |
type |
Type code (0=string, 6=list, etc.) |
possible_values |
Pipe-separated values for list/checkbox/radio |
default_value |
Default value |
valid_regexp |
Validation regex (legacy, not enforced) |
length_min |
Minimum length (legacy) |
length_max |
Maximum length (used for HTML input) |
show_on_design |
1 = visible during design |
enable_on_design |
1 = editable during design |
show_on_execution |
1 = visible during execution |
enable_on_execution |
1 = editable during execution |
show_on_testplan_design |
1 = visible during TP design |
enable_on_testplan_design |
1 = editable during TP design |
node_type_id |
Entity type (3=testcase, 7=requirement, etc.) |
Custom fields with location = 8 (hidden) can be referenced in test case content using the [tlVar] syntax:
[tlVar]browser_type[/tlVar]This renders the field's value inline. Useful for:
- Embedding dynamic metadata in test case descriptions
- Creating template-driven test documentation
- Hiding internal tracking fields from the main UI
TestLink recognizes two special custom field names that trigger automatic behavior:
| Field Name | Type | Purpose |
|---|---|---|
CF_ESTIMATED_EXEC_TIME |
Float (2) | Stores estimated execution time in minutes. Set by test plan designers during TC assignment. |
CF_EXEC_TIME |
Float (2) | Stores actual execution time in minutes. Set by testers during execution. |
These are not built-in — you must create them as custom fields with the exact names above. TestLink then uses them for time tracking and reporting.
- Start small: Create 3-5 fields first, expand as needed
-
Use meaningful names:
browser_typenotcf1 - Use list types wisely: 3-7 options per dropdown is ideal
- Document what each field means: Add a description in the label
- Set Required for critical fields: "Environment" might be mandatory
- Use Import/Export: Deploy the same fields across environments
- Don't create 20+ fields: It clutters the UI and confuses users
- Don't change a field's type after creation: You'll lose data
- Don't assign fields to projects you don't use: Keep it clean
- Don't forget to assign: A field definition alone does nothing — it must be assigned to a test project
| File | Purpose |
|---|---|
gui/templates/cfields/cfieldsView.html |
Modernized Dashio HTML page — DataTable, Create/Edit/Delete modals, i18n |
gui/templates/cfields/cfieldsAssignView.html |
Modern assignment screen — link/unlink, order, location, flags + edit modal for field definitions |
api/cfields/index.php |
BFF API — GET/POST/PUT/DELETE + meta + assignment endpoints |
lib/cfields/cfieldsEdit.php |
Legacy PHP page (kept for import/export flows) |
lib/cfields/cfieldsTprojectAssign.php |
Assign / Unassign fields to test projects |
lib/cfields/cfieldsExport.php |
Export field definitions to XML |
lib/cfields/cfieldsImport.php |
Import field definitions from XML |
lib/functions/cfield_mgr.class.php |
Core class — all business logic and DB operations (3042 lines) |
lib/functions/exec_cfield_mgr.class.php |
Execution-specific custom field logic |
gui/templates/dashio/cfields/ |
Dashio theme templates |
gui/javascript/cfield_validation.js |
Client-side validation by type |
install/sql/mysql/testlink_create_tables.sql |
DB schema (lines 98-177) |