Retouching - saraoswald/lettering-tutorials GitHub Wiki
Outline:
Practice Files
I occasionally run lettering challenges on Twitter. I made these images, and anyone is free to use them for practicing. Also feel free to put them in your portfolio if you'd like.
All practice files found below in this guide:
The kind of file and amount of retouch you'll encounter vary from publisher to publisher, from artist to artist, from book to book. There's no away to cover every possible scenario, so this is a guide to some of the tools and techniques available to you.
This guide assumes at least a basic understanding of the software it covers, so if you need a Photoshop 101, search for one of the many guides online.
File Types
It's your responsibility to maintain the resolution and quality of the art, and submit it in the format requested by the client. If you're ever unsure of which image files to use or what resolution or file format they should be submitted as, reach out to your client.
Batch Conversion
You can quickly convert a bunch of images at once using Photoshop's Batch functionality.
- Create an Action for converting the image's color mode and saving as the desired file type.
- Go to
File > Automate > Batch... - Select the Action you created in Step 1, the source folder with all the images, and the destination folder.
You can relink images that have already been placed in InDesign using the Relink All Images script. (How to use scripts in InDesign)
If you'd like to be able to quickly switch between source and converted files in InDesign, you can bind the Relink Image script to a keyboard shortcut.
Color Mode
The two main color modes you'll work with are Bitmap and Grayscale, unless you're working on full color pages.
- Bitmap - Only black and white values. Many features are unavailable, such as multiple layers and the stamp tool preview.
- Grayscale - Black, white, and gray values. Much more functionality.
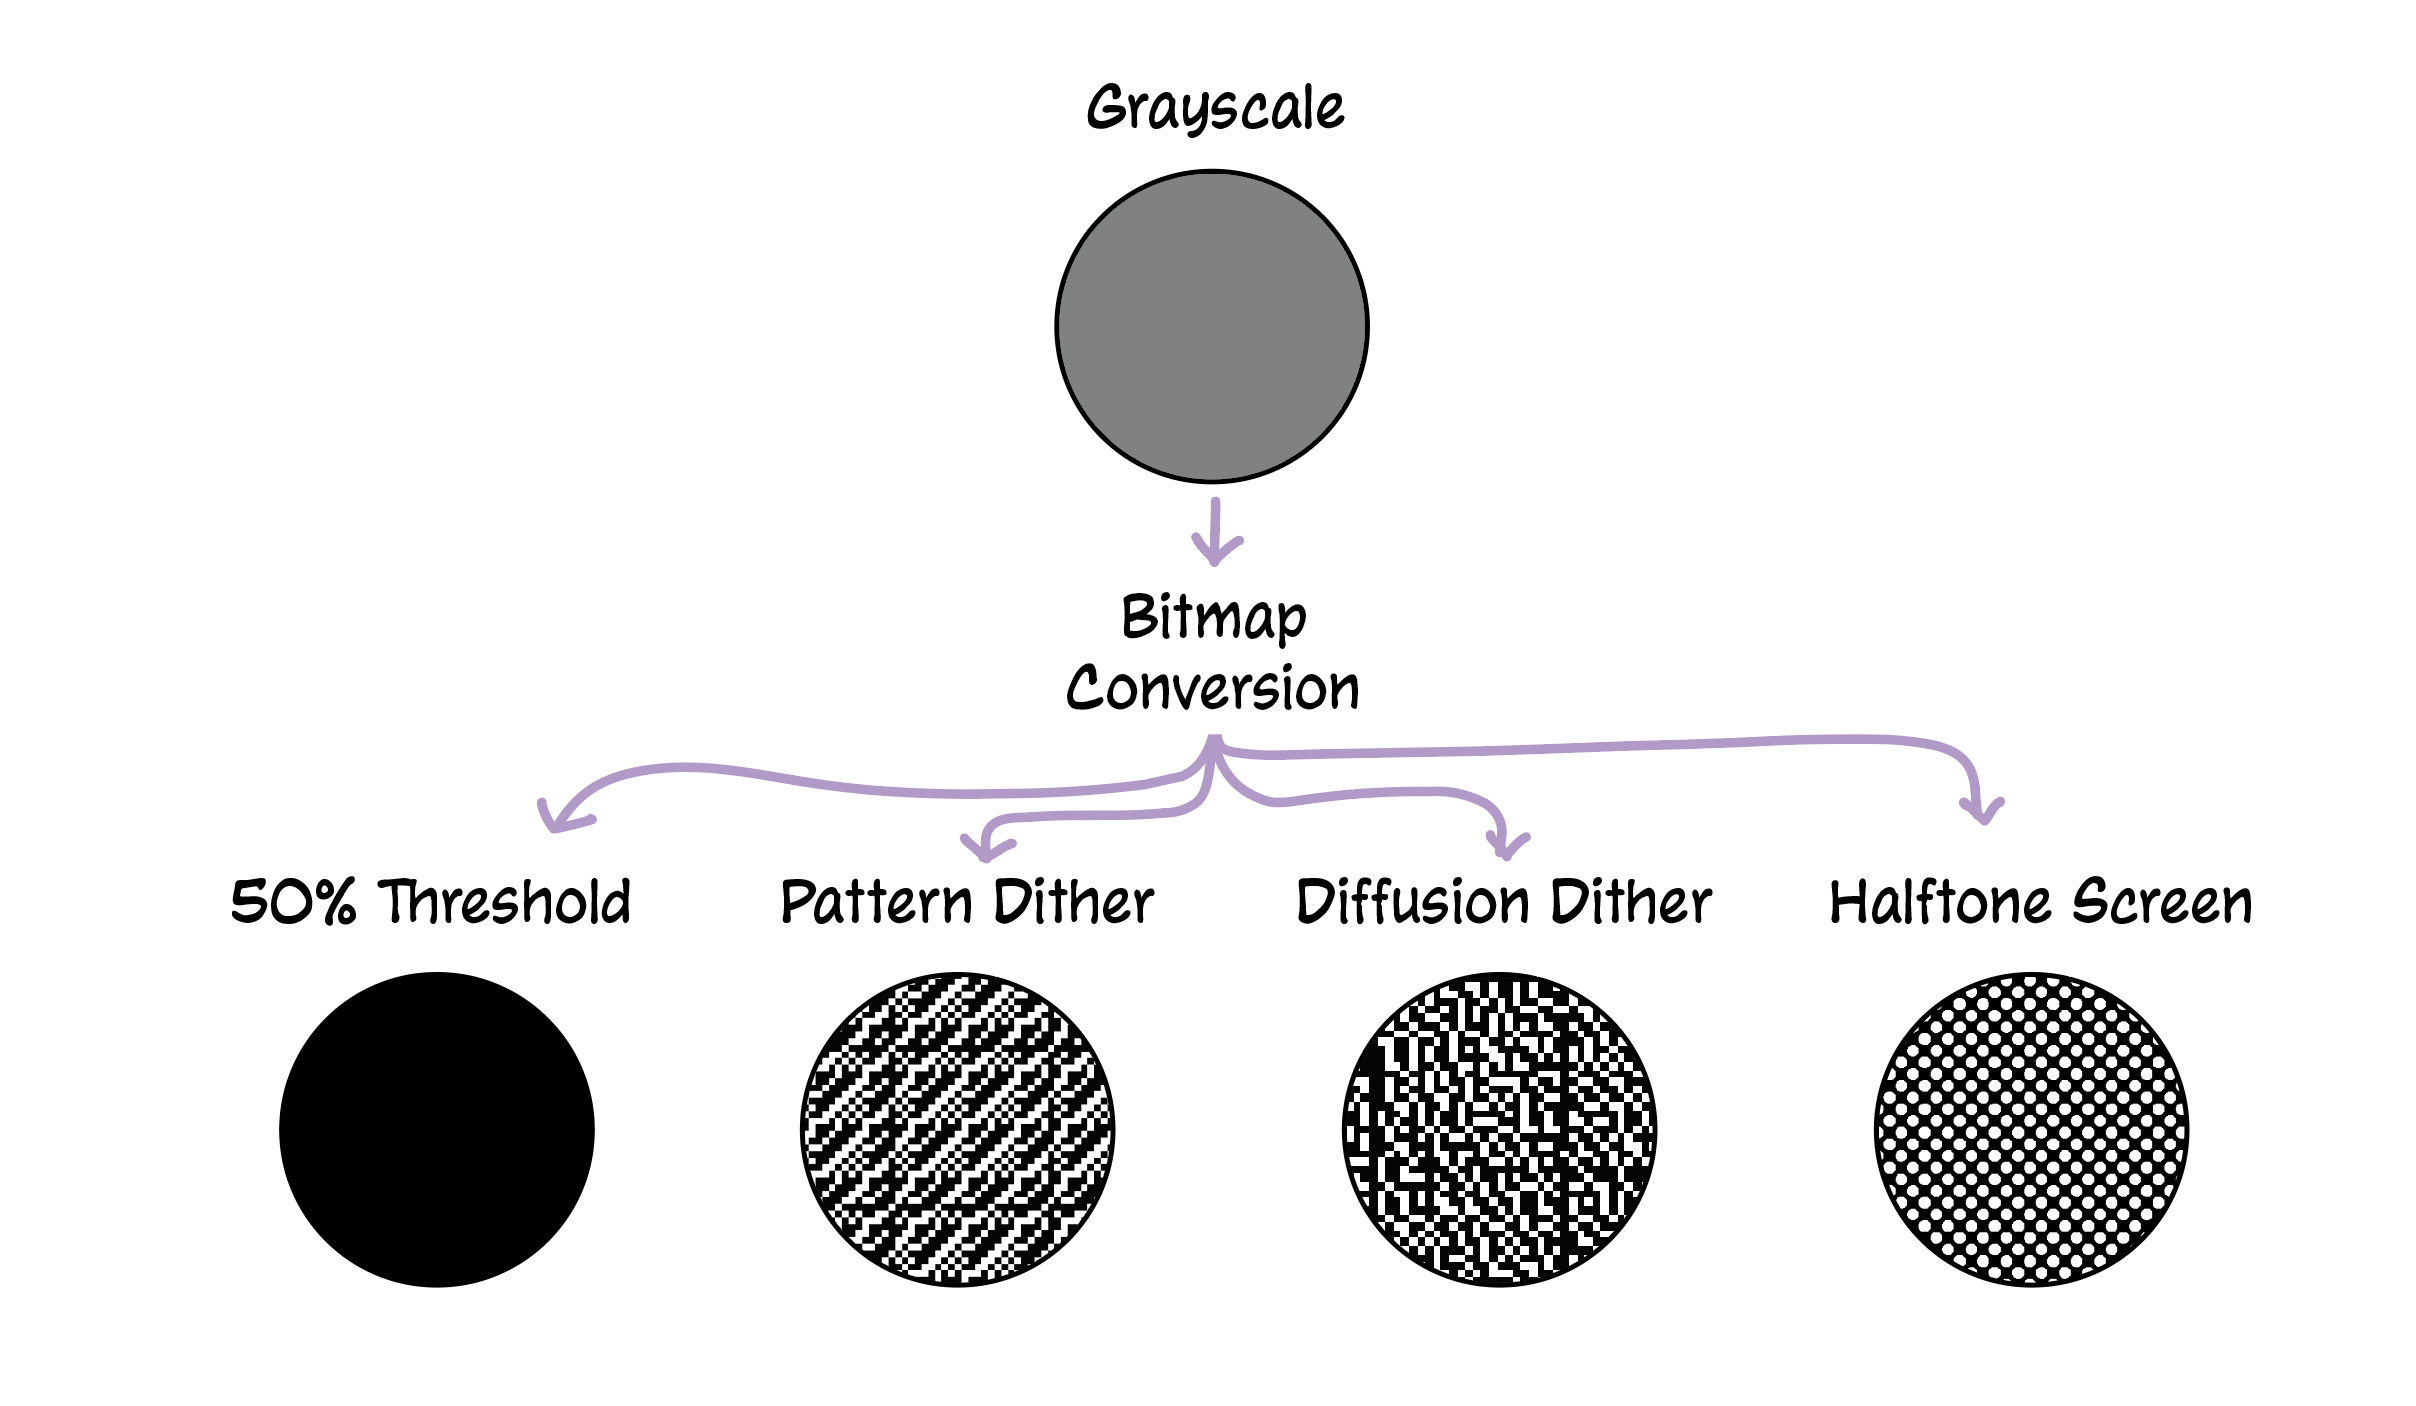
Bitmap Conversion Method
If your client requires images to be submitted as Bitmaps and if you're retouching them as Grayscale, you'll need to pay attention to the conversion method.
Note: Each tool description below has an explanation of how to avoid creating gray values. By default, Photoshop tries to make a smooth look with anti-aliasing, but we don't want that!
When you select Image > Mode > Bitmap..., the Method section in the popup dialog will have a number of conversion methods. Here's a brief explanation of each:
- 50% Threshold
- essentially erases all sub-100K values, which was catastrophic for the plain gray swatch
- removes all aliasing on textures
- most destructive method
- Halftone Screen
- converts everything into a halftone texture
- can be used to create your own halftone textures, but I recommend using Clip Studio Paint to do that if possible
- halftone dots create a uniform "grid" look
- Pattern Dither
- converts gray values into "specks" in a uniform grid
- Diffusion Dither
- converts gray values into randomly-placed "specks"
The main way they differ is by how they handle gray values. Here's a quick diagram showing an expanded view of how gray is output in each conversion method:
Tones
Tones (also known as "halftones" or "screentones") are a way to reproduce shades of a color with only one ink. Here is an example of how a gray gradient (left) is represented as tones (right):
Tone Types
Tones can look very different depending on the artist, the publisher, and when the comic was made.
Physical Tones
Traditionally, artists used physical sheets of tone to shade their line art. Some artists still use it today, though it's fallen out of popularity with the rise of digital art.
Advantages:
- Imperfection is pretty
- Nostalgic
Potential Issues:
- Slipping - As physical tones are glued onto the page, sometimes they slip. This means that, if you start retouching tone on one side of a block of text, it might not meet up perfectly when you get to the other side
- Warping - This is exaggerated in the example above, but physical tones are not always completely flat. This makes using Photoshop patterns to retouch areas of tone much more difficult
- Shadows - When the tones are digitized, sometimes the scanner picks up the overlap between the tones and paper. This overlap shows up as a shadow in the image file, which needs to also be removed when retouching an area.
Digital Tones
Usually applied in Clip Studio Paint, digital tones have all the advantages of physical tones with none of the issues.
Advantages:
- Very easy to replicate in CSP or Photoshop
- All of the tones are perfectly uniform
- Very compatible with CSP's tone creation and removal features
Potential Issues:
- Artists have access to thousands of custom patterns online. They can be really complex, and you likely won't be told where to find them
Resized Digital Tones
One technique publishers use to avoid moiré in printed books is to resize the image, and allow the color conversion algorithm generate random fuzz around halftone dots.
Notice how the original digital tone is completely uniform, while the resized tone varies a little bit with each dot.
Advantages:
- Almost all the advantages of digital tones
- Less moiré in print
Potential Issues:
- When using patterns in Photoshop, you might need to sample larger areas to make the tone look natural
- Results may vary when using CSP's tone creation and removal
Techniques
The retouching process can be boiled down into three essential steps:
- Remove all the Japanese by selecting it and filling it in with white
- Replace all of the halftone
- Redraw any lines on top of the halftone
Below you can find a number of tools to help, but following those steps in that specific order is a recipe for success.
Speedlines
The image used in this guide can be downloaded here. (Copyright's mine, feel free to use however you want)
Step 1: Use the Magic Wand to select the sound effect, and Select > Modify > Expand... to expand the selection until all of the black parts of the sound effect are selected.
Step 2: On a new Layer (Shift + CMD + N), fill the selection with white (CMD + Delete fills with background color, and Option + Delete fills with foreground), and then deselect with CMD + D.
Step 3: Style and place the sound effect's translation, trying to cover up as much of the original sound effect as possible. Here I have the retouch layer from Step 2 set to 50% Opacity so I can see the original:
Step 4: On a new Layer, draw in the speedlines. You do not have to retouch underneath the sound effect, and placing the sound effect first like we do in this guide is an excellent way to save time.
Here I'm using the Polygonal Lasso Tool to create a selection. Next, fill with black the same way you did in Step 2. Repeat on all
- The Pen tool and paths can do something similar to make selections, if you're more comfortable with that tool
- Optional - If you're redrawing speedlines often, there are paid apps that allow you to create dynamic rulers to draw against:
- For Windows: Lazy Nezumi
- For Mac OS: Hej Stylus!
A video of this process can be found here.
Step 5: Zoom out, make sure there aren't any patches that need to be retouched, and BAM you're done!
Radial Gradients
Step 1: Identify clean tone, select the Clone Stamp Tool and sample from somewhere in the clean tone by holding option/alt
Step 2: Use the Clone Source panel to transform the source as needed (this example uses the Horizontal Flip option). Align the source tone with the destination's tone.
Step 3: Draw the new tone, resampling as needed.
And done!
Tools
Photoshop
Certain tools are not available in Bitmap files, or they have limited capabilities. Here's a list of the functions covered in this guide for quick reference:
| Feature Name | Grayscale | Bitmap | Limited Bitmap Functionality |
|---|---|---|---|
| Layers | X | ||
| Actions | X | X | |
| Zoom | X | X | |
| Lasso | X | X | |
| Magic Wand | X | ||
| Quick Mask Mode | X | ||
| Brush | X | X | X |
| Clone Stamp | X | X | X |
| Content-Aware Fill | X | ||
| Patterns | X |
I recommend converting Bitmap images into Grayscale if you will be doing a significant amount of work on them. The benefits of Grayscale images often result in cleaner and faster retouching. You have to be more careful not to add noise, but that can be avoided with a few simple steps outlined in this guide.
Layers
Always use at least new layer to retouch on. It’s easier to see what you’ve already retouched, and it's easier to retrace your steps. I recommend using separate layers for replacing halftone and redrawing lines.
As you're retouching, you can hide and show the current layer with Command + ,, and you can also change the opacity of a layer to 50% (and toggle it with Actions)
Access Layer Styles by double-clicking on a layer's name. Here are some useful styles you might need:
- Stroke (add multiple strokes with the
+icon) - Pattern Overlay (covered below in Patterns)
- Color Overlay
- Drop Shadow
- Outer Glow
To avoid grays, set the blend mode of the layer and layer's styles to Dissolve.
Actions
If you're doing something repeatedly, it's a good idea to use Actions to make your life easier. You can also map them to your keyboard and tablet buttons for easy access.
To create an Action:
- Open the Actions Panel
- Click the
+icon at the bottom to create a new action. - Perform whatever steps you want recorded
- Click the stop-sign icon at the bottom of the Actions Panel to stop recording
Some useful things to save as Actions:
- Expanding the selected area (
Select > Modify > Expand...) for multiple pixel values - Converting color modes and saving as various file types
- Setting the current layer's opacity to 50% and 100%
- Creating new layers with specific names and settings (perhaps one for retouching halftone and one for lineart)
- Applying common layer styles (like a white stroke)
- Setting the font family of some text
- Filling with a specific color (
Edit > Fill...) - Combining any of the above actions!
Zoom
This might seem overly simple, but zooming out (Command + -) can help you see messy patches of retouched halftone!
Depending on your monitor's resolution, zooming out will force the tone to look more like the gray it's trying to mimic on paper. You'll be able to see defects in retouched halftone more clearly.
You can find the raw, unretouched image from above to practice with here.
Lasso
Shortcut: L
Great for:
- Quickly selecting a large areas of text that need to be removed (like aside text)
- Redrawing straight lines (including speed lines)
- Mouse users
Usage Tips:
- Hold
Shiftto add to your selection, or select the "Add to selection" option in the tool menu - Press
Shift + Lto cycle through the different Lasso types - Press
Escto remove all the points you've placed - Press
CMD + Deleteto undo the last point you placed
To avoid grays - uncheck "Anti-alias" in the tool menu at the top of the window
Magic Wand
Shortcut: W
Great for:
- Selecting whole sound effects to fill with white
Usage Tips:
- Use
Select > Modify > Expand...with 1-5px after selecting something to make sure you get all the fuzzy bits (you can set this +Edit > Fill...to an Action for easy access) - Hold
Shift(or select "Add to selection" in the tool menu) to add to the selection - Hold
Optionto remove pixels from the selection
To avoid grays - uncheck Anti-alias in the tool menu at the top of the window
Quick Mask Mode
Shortcut: Q (toggles the mode on and off)
Great for:
- Making selections via the Brush tool
- Quickly touching up selections made with the Magic Wand
Brush
Shortcut: B
If you have a drawing tablet, the Brush tool is perfect for redrawing lines. You can get by with just the default Hard Round Pressure Size brush, but feel free to experiment with other brushes.
Usage Tips:
- Hold
Shiftwhile drawing to straighten your line perpendicular to the canvas - Hold
Shiftand click/draw two separate points to automatically draw a line between those two points - Turn up the
Smoothingin the tool options menu to smooth your brush strokes. This may slow down your computer as you draw, though - Use
[and]to quickly change the brush size (your drawing tablet likely has dedicated buttons for this) - Press
Xto flip between foreground and background colors (andDto reset them back to black and white) - Turn down the
OpacityandFlowwith theBlending Modeset toDissolveto simulate a distressed texture
To avoid grays - set the Mode in the tool options menu to Dissolve
Clone Stamp
Shortcut: S
Great for:
- Retouching halftone and toned textures
- Redrawing speed lines
The Clone Source Panel The biggest advantage to converting Bitmap images to Grayscale is the ability to use the Clone Stamp's options.
The Horizontal and Vertical flip buttons are very useful, as well as the rotation angle.
Usage Tips:
- Decrease the opacity of the overlay to make it easier to line up the sample with where you're drawing.
- Use
alt/option + Shiftand the arrow keys to nudge the sample offset pixel by pixel - If you're using a drawing tablet, I recommend sticking to the Hard Round brush (no pressure sensitivity) for filling, to prevent a splotchy fill. Only use pressure sensitivity if you're redrawing toned lineart
- Try to avoid sampling from tone you've reconstructed yourself
- Try to resample often to prevent striping
- Zoom out often to spot defects
- In the tool options menu, I recommend checking
Aligned. This will prevent you from having to resample every time you start a new stroke. - When retouching halftone, make sure to only rotate the source in increments of 90°. This will maintain the grid of the halftone.
To avoid grays:
- in
Preferences > General, set theImage Interpolationsetting toNearest Neighbor (preserve hard edges) - set the Mode in the tool options menu to
Dissolve
Content-Aware Fill
Location: Edit > Content-Aware Fill... (this can also be set to a keyboard shortcut in Edit > Keyboard Shortcuts...)
The Content-Aware Fill functionality is very powerful in CC 2020+. You can select specific patches to sample from, and the computer will try its best to fill in the selection area.
It can take some getting used to, and you'll quickly learn what its algorithm is and isn't good at recreating.
You can find the raw, unretouched image from above to practice with here.
Great for:
- Retouching art in areas where it's okay if the tone looks a little messy (like the area underneath a sound effect or text)
- Retouching large patches of flat tone from a small sample area
Terrible for:
- Redrawing lineart
- Large areas of tone that need to be picture-perfect
Usage Instructions:
- Create a selection of tone that needs to be retouched. (Consider using Lasso, Magic Wand, and Quick Mask Mode).
- Make sure the selection overlaps the source tone by a couple pixels at least. This will help the new tone to blend into its surroundings. You can expand the selection area easily with
Select > Modify > Expand.... - Activate the CAF dialog with
Edit > Content-Aware Fill... - Using the Brush Tool (
B), sample tone from the area surrounding the selection until the preview on the right looks nice. - Click
OKor pressEnter
Usage Tips:
- Save your file before you open the Content-Aware dialog. This process is computationally intensive, and it can break Photoshop.
To avoid grays
- Set the
Color Adaptationin the tool options toNone
Patterns
Great for:
- Filling sound effects with tone
- Creating large areas of clean tone to retouch with
- Reusing assets across a book, or even a series if you're lucky
Terrible for:
- Gradient tones
- Physical tones
To create a Pattern:
- Select the
Rectangular Marquee Tool (M), and sample an area of tone (see below) - Go to
Edit > Define Pattern..., and give it a name if you want. HitOK.
To use a Pattern:
- Create a new layer, and use the
Rectangular Marquee Tool (M)to select a large area. Fill with white (Edit > Fill...orCMD + Delete). - (optional) Set the Layer Opacity to 50%.
- Double-click on the layer in the Layers panel to bring up the
Layer Optionsdialog. Click onPattern Overlayto activate the pattern overlay and bring up its options. - Under
Pattern Overlay > Pattern > Pattern, click on the dropdown to select the tone pattern you'd like to use. Make sure thatOpacityandScaleare set to100, and thatAngleis set to0. - (optional) With the Layer Options dialog still open, use your mouse/stylus to drag the layer around the canvas until it matches the art. If you set the opacity to 50% in Step 2, it should make it easier to line the dots up perfectly.
- Click
OK. If the tone looks weird, you might need to resample the tone and start over. If you lowered the opacity in Step 2, make sure to return it to 100%.
Usage Tips:
- If the tones are resized, the tone will look more natural the larger your sample area is
- If your pattern is off by a pixel or two and you can't seem to get it to match up, you can rasterize and resize it like this:
- With the tone layer at 100% opacity, rasterize the pattern by right-clicking on the layer in the Layers panel and selecting "Rasterize Layer Style"
- Set the tone layer to 50% opacity, and use Free Transform (
Edit > Free TransformorCMD + T) to resize the tone area until it matches up with the source. - Set the opacity back to 100%
Sampling Tone
The secret to creating seamless tone every time is to make sure the sample area is repeatable both horizontally and vertically. Here are two
Note: your sampled area doesn't need to be a perfect square, or a square at all. These demos are oversimplified to show how samples work conceptually.
Imagine the Tone Repeating Imagine taking your sampled tone area and repeating it over and over to the right, and then again to the bottom. It should look like the tone you're trying to reproduce.
Look at the Sample's Edges
Look at the first row of pixels in your sample. They should exactly match the first row of pixels just outside the sample area.
Here's what that looks like in the horizontal direction:
And here's what that looks like in the vertical direction:
Batch Automation in Photoshop
If you're doing the same task on every art file, it can be helpful to make Photoshop do the work for you. You create an Action, and tell Photoshop perform it on a whole bunch of files at once.
This feature can be found in PS 2020 under File > Automate > Batch...
- Open one of the files, and create an Action performing the steps that need to be automated. Close the file.
- Quick tip: Don't include saving the file in your action. Leave that for the Batch dialog in the next steps
- Open the Batch dialog under
File > Automate > Batch... - Under the
Playsection, select the Action that you made in Step 1 - Under
Source, selectFolderfrom the dropdown. ClickChoose..., and select the folder of image files you'd like to convert.- I recommend turning on "Suppress File Open Options Dialogs"
- Optional - Under
Errors, select "Log Errors to File" from the dropdown. ClickSave As...to tell PS where to save the error log file. - Under
Destination, selectChoose..., and select the folder where you'd like the converted images to be saved. - In the
File Namingsection, you can build the final file names. Here is an example of how to keep the same file name, but change the extension to ".tif":
- Click
OK, and watch Photoshop do all the hard work for you.