Access your RPi's Desktop Remotely from a Windows Box via RDP - sakaki-/gentoo-on-rpi-64bit GitHub Wiki
Remotely access a desktop session on your RPi from your Windows box, using RDP, even when your Pi doesn't have a local monitor or keyboard attached!
It is often useful to be able to connect to your RPi4/3 from a (possibly geographically distant) computer, and run a remote desktop on it.
So, in this tutorial, I'll show how to set up a Remote Desktop Protocol (RDP) server on your RPi4/3, and also (briefly) review how to connect to this from a Windows box (using the built-in client).
For an alternative approach using VNC, which will work with both Windows and Linux clients, please see this note.
The process involved isn't difficult or time consuming!
For avoidance of doubt, you won't need to keep a screen, mouse or keyboard locally attached to the RPi4/3 you wish to remotely access (although you can do if you wish).
Although not shipped pre-installed with the image, the FOSS xrdp package is available in pre-compiled form on the project's binhost.
So, to install it, running as the regular user, you need simply issue:
demouser@pi64 ~ $ sudo emaint sync --repo genpi64
demouser@pi64 ~ $ sudo emerge --verbose --noreplace net-misc/xorgxrdp
This shouldn't take long to complete. Once done, create a new TLS key/certificate pair ('keypair') for your RDP link, to allow secure, encrypted access across the Internet. In what follows, we'll specify the use of 4096-bit RSA encryption, and one year's validity (adapt as required). As this is a self-created keypair, we'll only provide some minimal identifying information (by typing . then Enter for all fields, except the Common Name):
demouser@pi64 ~ $ sudo openssl req -x509 -newkey rsa:4096 -nodes -keyout /etc/xrdp/key.pem -out /etc/xrdp/cert.pem -days 365
Generating a RSA private key
<snip>
writing new private key to '/etc/xrdp/key.pem'
-----
You are about to be asked to enter information that will be incorporated
into your certificate request.
What you are about to enter is what is called a Distinguished Name or a DN.
There are quite a few fields but you can leave some blank
For some fields there will be a default value,
If you enter '.', the field will be left blank.
-----
Country Name (2 letter code) [AU]:.
State or Province Name (full name) [Some-State]:.
Locality Name (eg, city) []:.
Organization Name (eg, company) [Internet Widgits Pty Ltd]:.
Organizational Unit Name (eg, section) []:.
Common Name (e.g. server FQDN or YOUR name) []:sakaki's RPi
Email Address []:.
Obviously, adapt to your own requirements. You can fill out more detail in these fields should you wish (see e.g. these notes), or, if you have your own existing keypair (and e.g. a domain name published in DNS) you can use that instead (rather than generating your own).
Next, create a SHA1 fingerprint for the certificate; this can be used to check later that it has not been tampered with, prior to trusting it at the client end. Issue:
demouser@pi64 ~ $ sudo openssl x509 -noout -fingerprint -sha1 -inform pem -in /etc/xrdp/cert.pem
SHA1 Fingerprint=A9:92:D9:A1:42:13:67:9B:77:BA:E7:60:DF:2D:B2:8E:FB:13:9D:AB
Your displayed fingerprint will differ; make a note of the output you get.
With that done, we need to edit the server startup file, to force it to use TLS. Still as the regular user, issue:
demouser@pi64 ~ $ sudo nano -w /etc/xrdp/xrdp.iniand then modify the following lines of that file so they read (you many need to scroll down the file a little to see these):
; security layer can be 'tls', 'rdp' or 'negotiate'
; for client compatible layer
security_layer=tls
; minimum security level allowed for client
; can be 'none', 'low', 'medium', 'high', 'fips'
crypt_level=high
; X.509 certificate and private key
; openssl req -x509 -newkey rsa:2048 -nodes -keyout key.pem -out cert.pem -days>
certificate=/etc/xrdp/cert.pem
key_file=/etc/xrdp/key.pem
; set SSL protocols
; can be comma separated list of 'SSLv3', 'TLSv1', 'TLSv1.1', 'TLSv1.2', 'TLSv1>
ssl_protocols=TLSv1.2, TLSv1.3
; set TLS cipher suites
tls_ciphers=HIGH
Leave the rest of the file as is. Save, and exit nano (hit Ctrlx followed by y and Enter).
Next, ensure that the xrdp server will listen on all available interfaces, not just localhost, for a connection. Issue:
demouser@pi64 ~ $ sudo nano -w /etc/xrdp/sesman.iniAnd modify the following line (it is very near the top), so it reads:
ListenAddress=0.0.0.0Leave the rest of the file as is. Save, and exit nano (hit Ctrlx followed by y and Enter).
With that done, we can start the xrdp server. Issue:
demouser@pi64 ~ $ sudo rc-service xrdp startIf you also wish for the server to be started automatically each boot, please see the additional instructions below, once you have tested that you can connect successfully etc.
That's the basic setup done!
Next, we can set up the client Windows box. In what follows, I'll assume you're using Windows 10 (a similar process may also be used on earlier Windows systems).
To begin, determine the IP address of your RPi (you can e.g. use the ifconfig command in a terminal on your Pi for this, if both it and the Windows client box are directly connected to the same subnet).
Once done, type Remote Desktop in the Search Windows box, and then click on the Remote Desktop Connection icon that appears.
When the app opens, click on the Show Options button to open the full panel, then enter your RPi's IP address and user name (demouser, for example; note that direct remote login as root is prohibited for security):
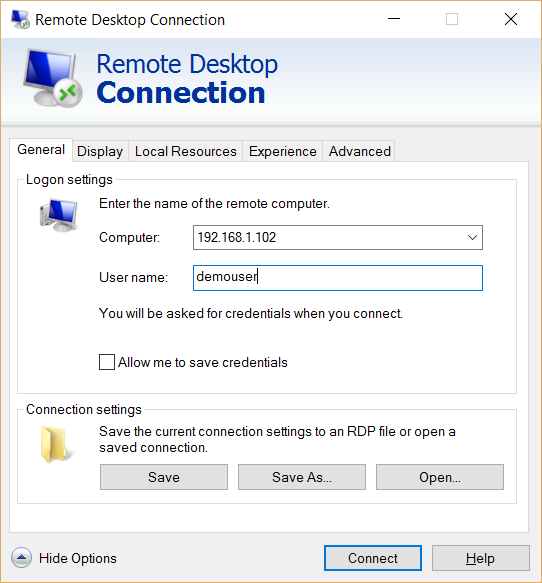
Remember to substitute the appropriate IP address for
192.168.1.102in the above.
Once you have filled this out, to avoid an ugly display, click on the Display tab, and then set the Colors: dropdown to High Color (16 bit) (at least). You can also set the resolution of the Remote Desktop window here, using the Display configuration slider, if you wish. Then, click Connect to attempt to connect to the RPi.
At this point, a warning dialog similar to the below should appear:
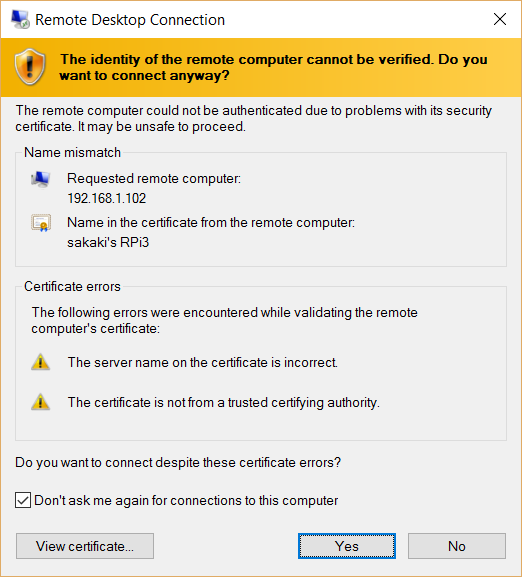
The IP address and certificate name information should match that you created earlier.
Tip: to double-check you haven't been prey to a 'man-in-the-middle' attack, click on View certificate..., and check that the
Thumbprint(shown in the Details tab) matches that computed earlier. Press OK to close the dialog, once satisfied.
Check the Don't ask me again for connections to this computer box (as shown above), and then click Yes (this stores a single-machine, single-certificate exception).
Other approaches are possible here, but this is generally the simplest way to proceed.
If successful, you should shortly see an xrdp login panel, similar to the below:
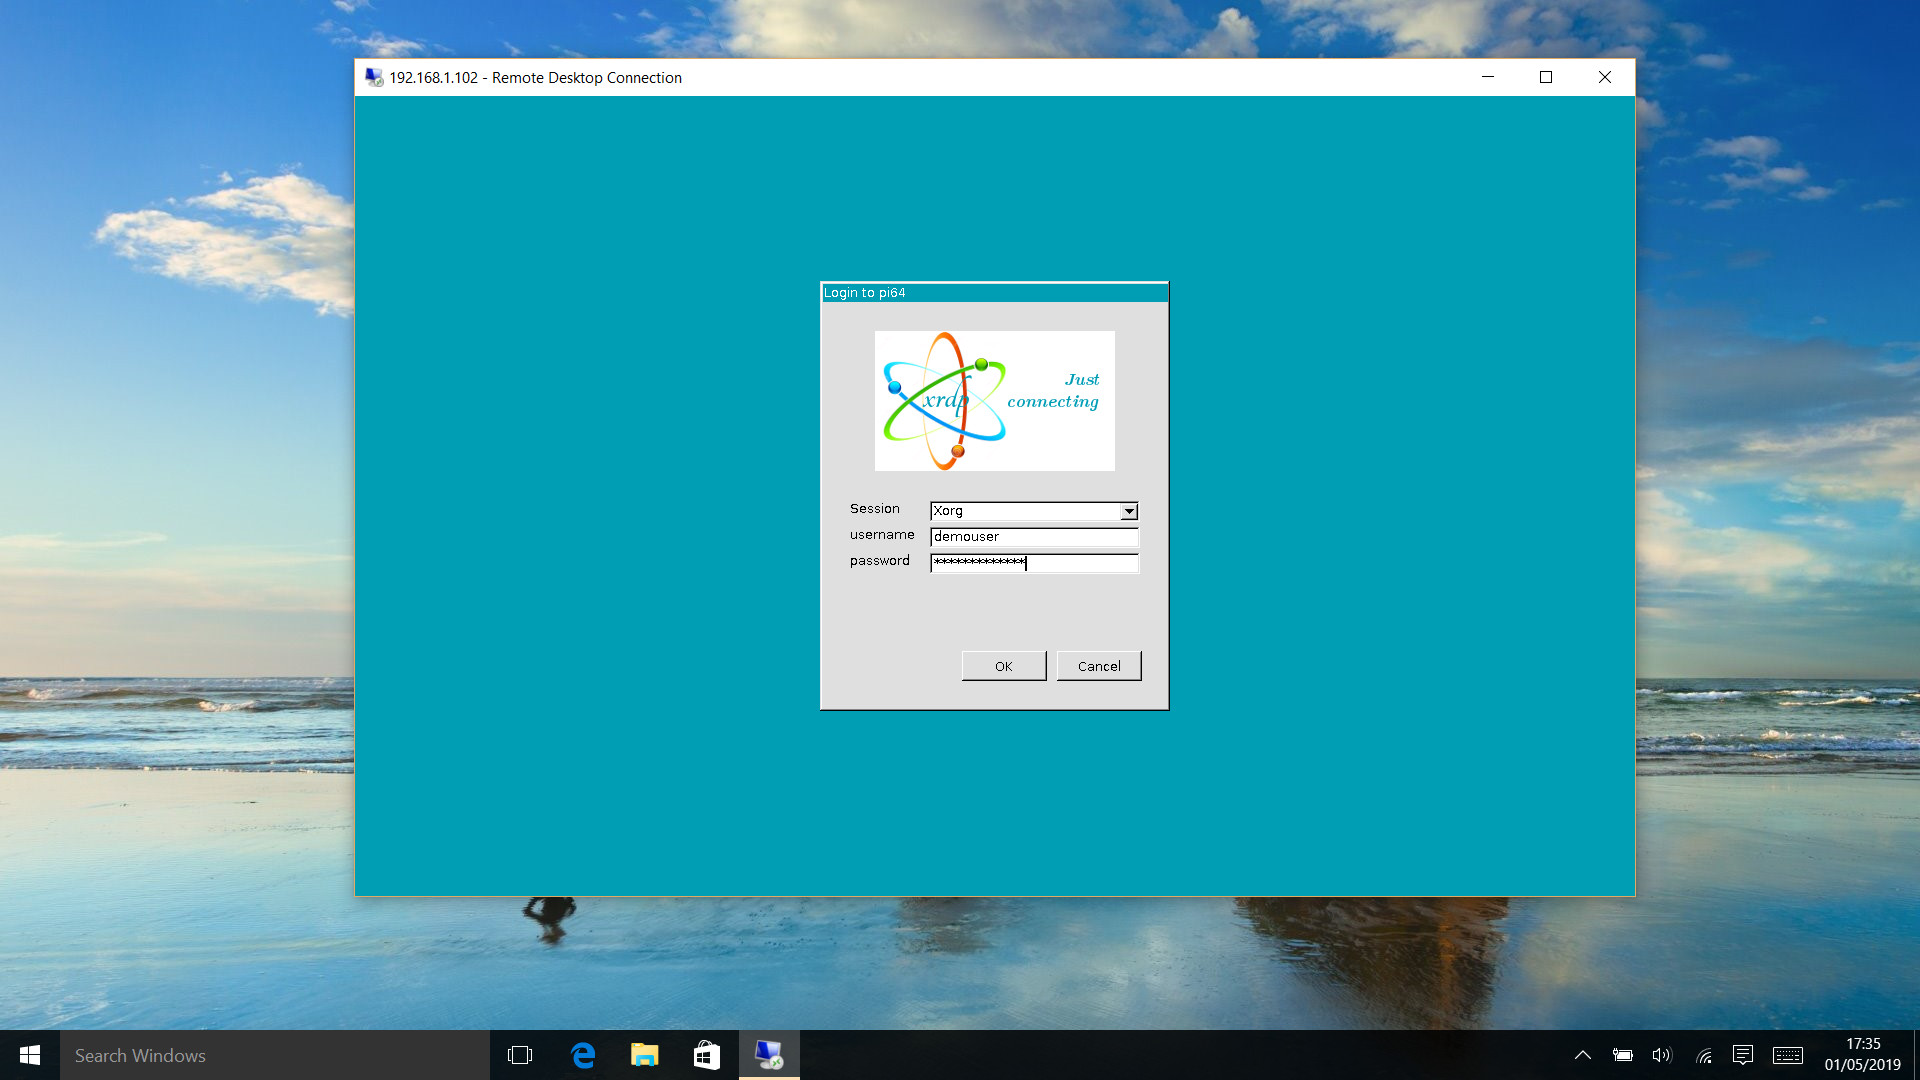
Enter your user's password (e.g., raspberrypi64 for demouser, unless you have changed it) and click OK. After a short delay, you should be in:
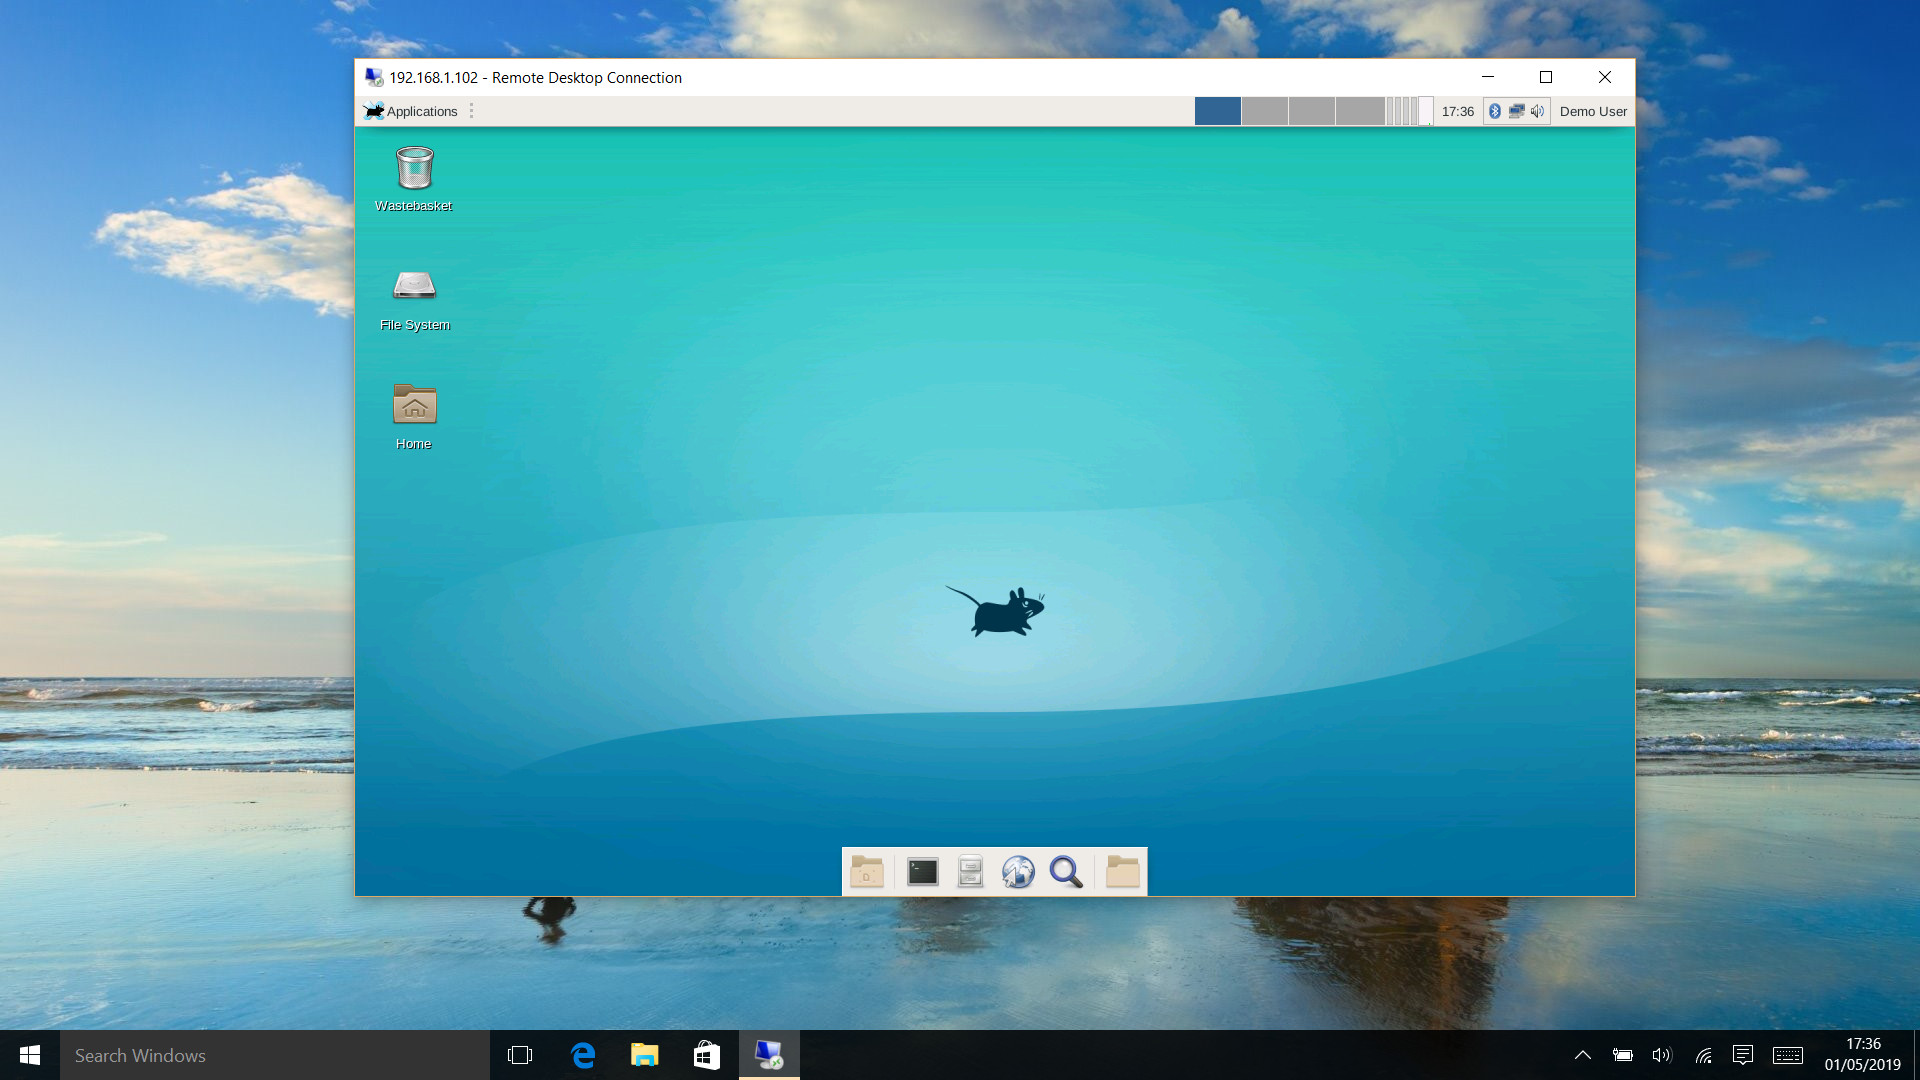
Note that, by default, the RPi's audio output is not streamed to the client. This issue can be addressed (see for example the notes here) but is beyond the scope of this basic tutorial.
If you would like the xrdp server to start automatically each boot, then simply issue:
demouser@pi64 ~ $ sudo rc-update add xrdp defaultYou need only do this once.
Tip: you may wish to assign a fixed IP address to your RPi (either via your router, or using NetworkManager) if you are going to connect to it regularly, for convenience. Also, note that wired headless systems are generally more reliable, and easier to debug, than wireless ones.
To remove the auto-start again (should you want to do so at some future point), simply issue:
demouser@pi64 ~ $ sudo rc-update del xrdp defaultIf you wish, you can run your target RPi4/3 with no monitor attached, and use the virtual desktop exclusively. If you do this, you can also, at your option, disable the default vc4 graphics display driver and X11 server, to save system resources. To do so (remember, this is optional!) issue:
demouser@pi64 ~ $ sudo rc-update del xdm defaultthen:
demouser@pi64 ~ $ sudo mousepad /boot/config.txt &>/dev/null&If setting up the RPi over an
sshconnection, you can use e.g.sudo nano -w /boot/config.txtinstead.
Comment out the following line in that file, so it now reads:
#dtoverlay=vc4-fkms-v3d,cma-256Depending on your configuration, the
,cma-256suffix may be absent; even so, that's the line you need to comment out.
Leave the rest of the file as-is. Save, and exit the editor. Make sure you have set up the xrdp server to automatically start up on boot (as described above), then reboot your RPi.
Should you wish to re-enable a locally connected display at some point in future, simply uncomment the above line in /boot/config.txt again, and then issue:
demouser@pi64 ~ $ sudo rc-update add xdm defaultand reboot.
Have fun!
