SYS 255 Tech Journal - ryanm292002/Ryans-Repository GitHub Wiki
Linux notes
"top" command -Interactive and live view of your system -Basic task manager for Linux
"ctrl+c" = terminate running process "ctrl z" = stop running process (just pauses it) "jobs" = view paused processes %1 = brings first paused process out %2 =brings second paused process out fg = brings jobs back to foreground if you ctrl z
cd / = root of file system (like c drive on windows system ls -lrt = list files and directories in reverse order by timestamp (most recent shows at bottom of screen) boot = directory where kernel boots from
SOA - start of authority, tells name server where the zone starts for DNS : DNS CONFIG ON LINUX: 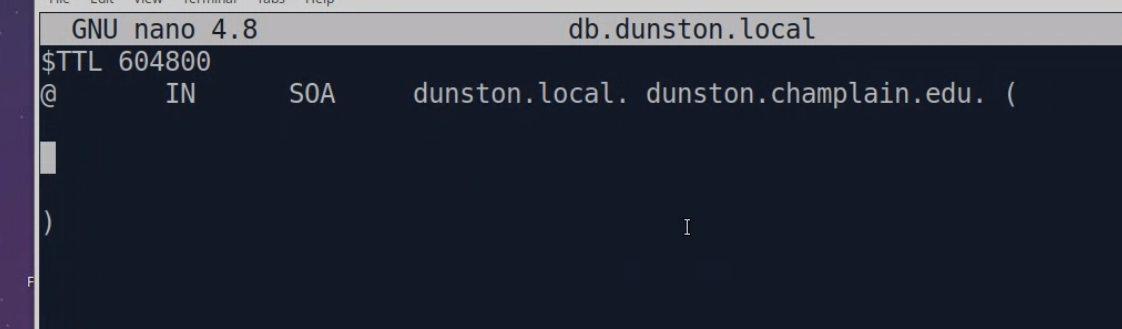
sudo apt update - downloading metadeta from any configured source on your system, it updates your packages sudo apt upgrade - applies any new software that needs to install
This lab was a introduction into building our own small network, we setup the environments for both a firewall and a workstation. We created both a WAN and LAN configuration on the firewall so that they could communicate with one another in our lab environment.
- To edit the settings of whatever device you are working on in the vSphere space, you right click the device in the column on the left hand side, in the middle of the popup bar will be a "edit settings" option, both for firewall and the workstation.
-Setting up the WAN and LANin the firewall was done first by setting the interface and addresses, so you can tell one from another and so they actually connect, without a proper address configuration with the right DCHP and HTTP settings then the connection probably wouldn't work on the workstation
-HOW TO ADD NEW USER WINDOWS 10 go into lusrmgr.msc and go into the right tab right click and hit new user
-To configure firewall on workstation to allow connection, go to the address of the LAN in a browser, this brings you to the pfSense configuration screen, things like domain, hostname and the primary DNS server (8.8.8.8) were changed to allow for connection to the LAN from the workstation
whoami vs hostname command whoami gives specific user currently using the host while hostname gives just the name you gave your desktop
-TRACERT To specify number of hops in tracert command, tracert -h #ofhops champlain.edu
-PING Specify # of pings ping -n #ofpings champlain.edu
3 topics to study (lab 1) -More about the difference between WAN and LANs, what configurations to use and how to properly setup so they can work together LANS tend to be smaller which results in faster speeds and lower prices but limits the distnace the lan can span over WAN- Over larger locations, as a result and opposite of the LAN its slower and more costly
(https://www.tribuscomputer.com/lan-vs-wan-the-pros-cons-of-each/)
-RFC1918 Network- I think its just the type of cable but I still wanna know what makes the difference between RFC cables
Turns out I was wrong, an RFC1918 network is basically just a term to describe private networks (https://www.ucl.ac.uk/isd/services/get-connected/wired-networks/use-private-rfc1918-address-space-ucl-internal-network)
-Powershell- Don't really get the use of PowerShell when there's command line, I'm guessing its just more advanced and can do more than the CMD line
PowerShell can be used for more advanced things rather than just simple commands, things like automation scripts or "cmdlets" (https://www.temok.com/blog/powershell-vs-cmd-command-prompt/)
This lab was about setting up a DNS within our virtual lab environment and adding two new users to it for use on the workstation
-Active Directory Domain installation takes place within the Windows Server Manager, we were already given a workstation for active directory with Windows server 2016 installed
-DSRM Passwords setup just incase the active directory ever has some error
-Local Server Tab (within Windows Server) Good for basic configuration of your server and just to easily check if everything looks right
-Creating the active directory/adding ADDS within Windows Server: 1.Windows Server, manage tab, add roles and features 2. (configuration might be different for different situations) Select Active Directory Domain Services->Add Features. Pick Active Directory Domain Services
-Creating a forest within windows server (creating the domain): After ADDS is deployed you wanna actually make a domain for all your different workstations to join
- Click Flag Icon, "promote this server to domain controller"
- In deployment configuration tab, select "add a new forest option", name your domain what you please, in this case its ryan.local, add dsrm password (recovery)
-DNS Manager can be found within windows server: Server Manager/DNS/AD01 context menu (right click whatever directory you are trying to configure)
-To add new pts records in your DNS
Topics to Study
- Forest - Something related to domains, the other options are relating to adding single domains to already existing forests, so im guessing forests are just the term for either a wide area or local group of domains
-Active Directory vs Domain Controller- Active Directory is where you find the configuration of all the users and groups within your network, the domain controller is basically the server that runs the active directory
This lab was mostly about working in a Linux (censeos) command line environment and setting up the Linux environment to setup the DHCP server for the LAN were currently setting up
useradd -mk /etc/skel -s /bin/bash -d /home/username username
SSH ssh rmorrissey@dhcp01-ryan
-HELPFUL LINUX COMMANDS Man - documentation of all different commands within linux, different options such as man df which gives all the options for commands relating to reporting file system disk space usage
-Cat .bash_history - Cat displays content of a file, .bash_history is a file you can use to lookback on commands you've run previously in the linux system -Nmtui - command to bring up an easy gui IP configuration tool within centos -Cd - change directory -Cd .. - change to parent directory -Cd ~ - go to home directory -Pwd - print working directory, tells you what directory you are working in -History | head -n 10 - prints first 10 commands used within linux -History- prints commands used previously within ssh session -sudo - allows you to use root privileges for a command, sudo -i allows you to gain access to root privileges until you don't need it anymore -Mkdir - make a new directory -passwd username - change password for newly created user
Topics to study Just practice linux, go through and learn commands and all the options for the command, im sure just using linux is the best way to do this
-nano, vi, jed - text editors for linux, nano and vi come prebuilt into the linux interface -uname, uname -a - displays information about your linux system, -a just adds more information so you get the full scope of things
- apt-get - used to install different packages on your linux system, for example above jed the text editor dosnt come with linux so to install it you would use "sudo apt-get install jed"
site for commands: https://maker.pro/linux/tutorial/basic-linux-commands-for-beginners
This lab was actually configuring our new Linux censos VM to be the DHCP server, also configuring the workstation to automatically be configured on the network by the new DHCP setup.
Download putty or use ssh through powershell to access dhcp server through workstation, makes it less complicated.
sudo yum install dhcp - installs dhcp package on linux device
vi /etcdhcp/dhcp.conf - make sure to be on root, access dhcp config server file
once in config file(using addressses from lab, change when using your address) subnet 10.0.5.0 netmask 255.55.255.0 { option routers 10.0.5.2; option subnet-mask 255.255.255.0; option domain-name "ryan.local"; option domain-name-servers 10.0.5.5; range 10.0.5.100 10.0.5.150; }
To start DHCP server once configuration is 100% correct -be root user
- run command "systemctl start dhcpd" (systemCTL not ct1)
- "systemctl status dhcpd" check to see if dhcp is active
- "systemctl enable dhcpd" make sure to enable dhcpd, so next reboot it works, if dhcpd is not functioning next boot this is probably why
once dhcp is started, add the ports associated with dhcp permanently
- Be in root
- firewall-cmd --add-service=dhcp --permanent
- firewall-cmd --reload
- firewall-cmd --list-all
to configure device to be on dhcp rather than manually entering addresses -Go into ipv4 properties of your adapter in use and click the obtain automatically option for the IP and DNS address, it'll work if you're connected and if your dhcp server address is shown in a ipconfig /all
3 DHCP items to learn about used : https://www.pearsonitcertification.com/articles/article.aspx?p=2438944
Scope - the scope of a dhcp server usually relates to the span of addresses that the dhcp server has at its disposal to give to devices requesting a new address, a dhcp server might have multiple scopes to work with subnets
address leasing - the process of the dhcp server leasing or letting a device use an address, the dhcp server sets up a list of the scope of all its addresses thats been leased, what device its assigned to, the duration of the assignment, general things like that
Reservation - alternative to static addressing on the dhcp server that sets a certain IP with a devices MAC address, this is for organization purposes, even if you run ifconfig /renew you will get the same IP as before unless you actually go into the reservation and remove the IP from the MAC from there
This lab was all about setting up our AD to have new OUs and within those OUs setup new policies
** to get to the AD users and computers editing screen**
- In windows server go to "tools" then hit the active directory users and computers option
In Lab 2 we installed the AD domain service where we created a forest, thats what were editing now
to add new OU right click, in this instance the forest, hit new then click the "organizational unit" option in this lab we created an accounts OU for users, a computer OU where host devices go and a groups OU to organize new groups we create
to add new users or groups Within the correct OU you right click and find the new object you want to add to your OU You can add users to groups by right clicking the group and in the properties pop-up go to members and add new users as needed When creating groups in a company its good practice to name the group by department name
creating new group policy In windows server again go to tools but select the "group policy management" option when creating policy you right click the OU you want to add the policy to and hit the "create a GPO in this domain, and Link it here..." All authenticated users can apply and read GPOs so you have to make sure only the groups you want have access through the security filter ( scope tab when you click on policy) under the delegation tab you want to make sure the policy is applying to what groups youve added to the policies filter
changing policies in group policy management you right click the edit policy setting and enable or disable whatever setting you want to apply to the policy
plan for next week I think for next week the best way to work through something that we've already done is by using what resources we've already made ourselves to simply repeat the process, as long as every part of the labs were correct then I should be fine in rebuilding the network. The lab manuals more specifically because they're pretty much instructions on how to build the network were gonna be destroyed. I might have to use my techjournal aswell to get more info on what to do or maybe a command that I forget. If I need assistance, I'll first contact a peer. If that doesn't work go to google, if that doesn't work go to the teacher for help. They may already be up but maybe having the wooclap sessions to go back and work through again on the canvas could possibly help.
This lab was just reinforcing the ideas of DNS, it was mostly just taking a Wireshark packet, running some pings and exploring the various DNS packets we got as a result.
The important thing to take away from the lab is how the DNS packet is structured and also the various types of DNS records there are and how they differ from one another
This lab was about creating a custom GPO through using a script and a batch file to launch the script.
We created a custom GPO policy for users where when they login the script below launches and a text file is created on the users desktop that says when the user last logged in
For adding GPO management tool to RSAT machine (run with elevated privilege):
DISM.exe /Online /add-capability /CapabilityName:Rsat.GroupPolicy.Management.Tools~~~~0.0.1.0
make sure to test scripts through the batch files to make sure it works before making it into a policy
Location of where to find adding scripts in GPO editor: Navigate under User Configuration => Policies => Windows Settings => Scripts (Logon/Logoff)
Script and batch file code for creating a "last login" text file when user logs in
-Powershell Script code: https://github.com/ryanm292002/Ryans-Repository/blob/master/lastLogon.ps1
-Batch code: https://github.com/ryanm292002/Ryans-Repository/blob/master/LastLogon.bat
Using centOS we installed a new smtp server through postfix and a pop3/imap server through dovecot
Creating user
useradd -mk /etc/skel -s /bin/bash -d /home/ddunston -G wheel ddunston (replace ddunston with ryan for exmaple)
Install
yum install dovecot (or if installing postfix just replace dovecot)
ps -ef (#centOS shows all running processes)
lsof (list all open files) -i -n (dont resolve hostnames)
grep smtp /etc/services ( list of commone information such as ports for SMTP, can replace with pop3 or imap if needed)
configure or apach postfix site:wiki.centos.org (advanced google search filter)
doveconf -n | head -n 1 (found location of doveconf file)
To create a scheduled task, say for a script you use the task scheduler gui or you can make a script but the gui is easier.
USE: https://o365reports.com/2019/08/02/schedule-powershell-script-task-scheduler/
-right click the task scheduler main directory and create a new task.
-Set schedule name to whatever and select options 'run only when user is logged on' and 'run with highest privileges'
-Set timing for whatever is needed but make sure to change duration from 1 day as well
-Adding new action: for this we put the default PowerShell program under the program/script option, add arguments is where the script file went and the start in option was set as the desktop because that's where the script was located
Helpful site used: https://activedirectorypro.com/configure-dhcp-server/
-
When DHCP isnt an option, 10.0.5.1 was used as a static IP for wks01 that worked
-
You can straight up add a new server or do what we did and added a dhcp role to our already running active directory server so now it has DNS and DHCP management capabilities
-
Accomplished through server manager so make sure to have that
-
Go to maange, "add roles and features"
-
Go through like creating any other server, make sure to choose the right server, when you get to the server roles make sure you have the dhcp option checked off
-
Once the installation is complete make sure you hit the complete DHCP configuration option
-
Once you have a DHCP server you should be able to right click it and go through the DHCP manager to edit stuff like the scope of your server
-
REMINDER: never forget ipconfig /release and ipconfig /renew that fixed a couple of problems on this lab
root for apache on most linux: /var/www/html
Use IP of the mail/web server when searching your page in browser tab
DO NOT be in root, be in sudo of a user when installing apache
- sudo yum update httpd
- sudo yum install httpd
- sudo firewall-cmd --permanent --add-service=http
- sudo firewall-cmd --permanent --add-service=https
- sudo firewall-cmd --reload (apache should now be installed
- sudo systemctl start httpd
- sudo systemctl status httpd (should see active status, if not somethings been done wrong)
- hostname -I (get the IP to put in browser)
- In a browser tab search up http://10.0.5.4 (or whatever your server ip is) you should see a test page that indicates the web server is working
editing home page
- vi /var/www/html/index.html (you wont see any data, have to add it in yourself)
Always run 'sudo systemctl reload httpd' after making changes for them to work, I think restart would also work
installing php
- sudo yum-config-manager --enable remi-php73
- sudo yum install php php-common php-opcache php-mcrypt php-cli php-gd php-curl php-mysqlnd (should be installed now)
- php -v (prints php version, verifies installation)
Run sudo systemctl reload httpd
Edit php -in the same directory, /var/www/html/ -Create new file called /var/www/html/index.php, make changes in there
-Run sudo systemctl reload httpd
-in search tab you have to do ip and index.php to get to your php page so for this lab it was, 10.0.5.4/index.php
HELPFUL LINKS: -https://www.digitalocean.com/community/tutorials/how-to-install-the-apache-web-server-on-centos-7 -https://linuxize.com/post/install-php-7-on-centos-7/
ADD WEB SERVER TO DNS, EVEN IF MAIL AND WEB ARE RUNNING ON SAME SYSTEM AND USE SAME IP
- Install realmd
- yum install realmd oddjob oddjob-mkhomedir sssd adcli openldap-clients policycoreutils-python samba-common ` samba-common-tools krb5-workstation
-realm list (check to ensure you aren't in any domain )
- Join domain
-
realm discover ad.example.com (ryan.local)
-
realm join ad.example.com
-
check: (cat) /etc/krb5.conf, /etc/sssd/sssd.conf (check for your domain name, should be listed multiple times throughout these files)
- Test for domain
- id [email protected] (use a user in the active directory to test)
- ssh [email protected]
Should be able to access domain users on Linux system
Unsuccessful site log example
| Field Value | Field Name |
|---|---|
| 10.0.5.4 | Client IP |
| 28/OCT/2021:10:41:59 | Timestamp |
| Get /doesnotexist.html HTTP/1.1 | Request Line |
| 404 215 | Status Code |
 |
User Agent |
Successful site log example
| Field Value | Field Name |
|---|---|
| 10.0.5.4 | Client IP |
 |
Timestamp |
 |
Request Line |
 |
Status Code |
 |
User Agent |
Joining fileserver to domain: sconfig, join domain
or in powershell: Add-Computer -DomainName "ad.activedirectorypro.com" -OUPath "OU=Sales,OU=ADPRO Computers,DC=ad,DC=activedirectorypro,DC=com"
Once server is joined to domain and the server is working in DNS
- Get to server manager and add the file server

- Add roles and features to the server

- Make sure to add the following roles
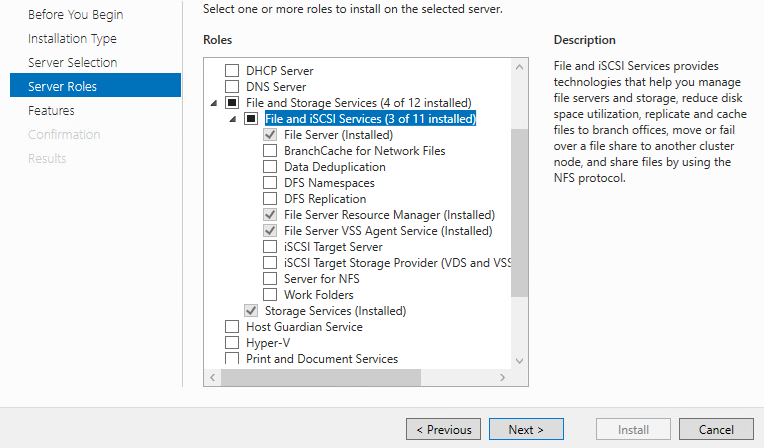
File Server Officially created and on the domain, now we just have to add network drives for the file server
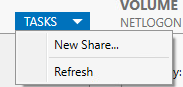
- The first step is to create a share for the server, once we have the share we can add network drives that point to the share
-
Go to Server Manager > File and storage Services > Shares
-
Add a new share for the file server
-
Do Default settings, make sure to choose file server as location
-
You should see a share for your file server, you can get the location by right clicking the share and clicking in the tab of the file location

If you arnt able to create a share then ensure the File Server role is installed on the correct server
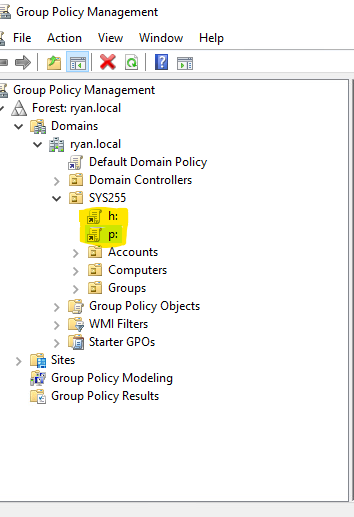
- Once you've successfully created a network share - In the Group Policy Management Console, Right Click and Select “Create a GPO in this domain, and Link it here”
Be sure to create it in an OU that will cover over the properly needed users that should be able to access the file servers drives, For exmple in the below SC I added the policies to the SYS255 OU which included the Accounts OU in it which contains all the users if I opened Active Directory users and groups.
-
Name the new GPO
-
Edit the newly created GPOS, go to: user configuration, preferences, Drive maps
-
Right Click Drive Mappings, Select New – > Mapped Drive
-
Configure Drive Mapping Properties
General Tab Settings
In location put the path to the share/folder you want to map a drive to.
()
Select a drive letter Choose Update for action Label as: This is optional but may be beneficial for users. (basically what name pops up for users seeing network drive)
Common Tab Settings
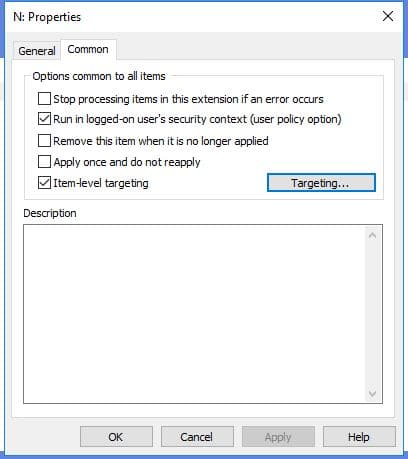
In targeting window: Target the OU that contains users, so for me I had to target accounts
You can change who has access to what within the drive such as setting to read only for non admin users in the delegation tab

Creating a mapped drive for individual users
Essentially you just have to make a new policy with a different map letter, and for the location put
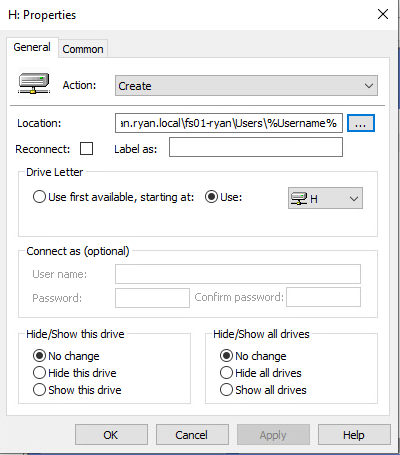
You also want to make sure inside the fileserver you have a users folder created with folders for the users that are gonna have seperate home drives
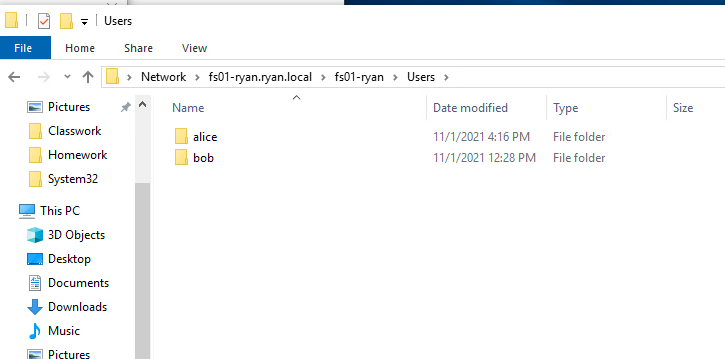
Inside of each of those folders are basically the separate home drives that Alice and Bob sees
This lab was about setting up the automation tool ansible on our ubuntu and centos workstations.
Youll have to install it through
The first step of this lab is setting up accessibility between the original ansible management host and the other systems youll be adding this is done by generating a rsa key and copying the id to a user on the system you wanna add the key to
-ssh-keygen -t rsa -b 4096 -ssh-copy-id ryan@mail
In the links below theres tutorials for installing and setting up the host file
https://www.digitalocean.com/community/tutorials/how-to-install-and-configure-ansible-on-centos-7 https://phoenixnap.com/kb/install-ansible-ubuntu-20-04