Linux - rreimi/alexa-avs-sample-app GitHub Wiki
On this page
- Prerequisites
- Clone the Sample App
- Install Dependencies
- Generate Self-signed Certificates
- Choose your authentication method - Node/Android/iOS
- Run the Sample App
- Talk to Alexa
- Log Out Instructions
Overview
The following instructions will walk you through cloning (or downloading) the sample app and downloading dependencies on Linux. You can also set this up on a Raspberry Pi, Mac, or Windows.
Terms of Service
By using the sample app and its dependencies, you agree to the AVS Terms and Agreements.
1 - Prerequisites
a. Register for an Amazon developer account
Unless you already have one, go ahead and create a free developer account at developer.amazon.com. You should review the AVS Terms and Agreements here.

b. Create a device and security profile
Follow the steps here to register your product and create a security profile.
Make note of the following parameters. You'll need these in a minute or two.
ProductID(also known as Device Type ID),ClientID, andClientSecret
Important: Make sure your Allowed Origins and Allowed Return URLs are set under Security Profile > Web Settings (see Create a device and security profile):
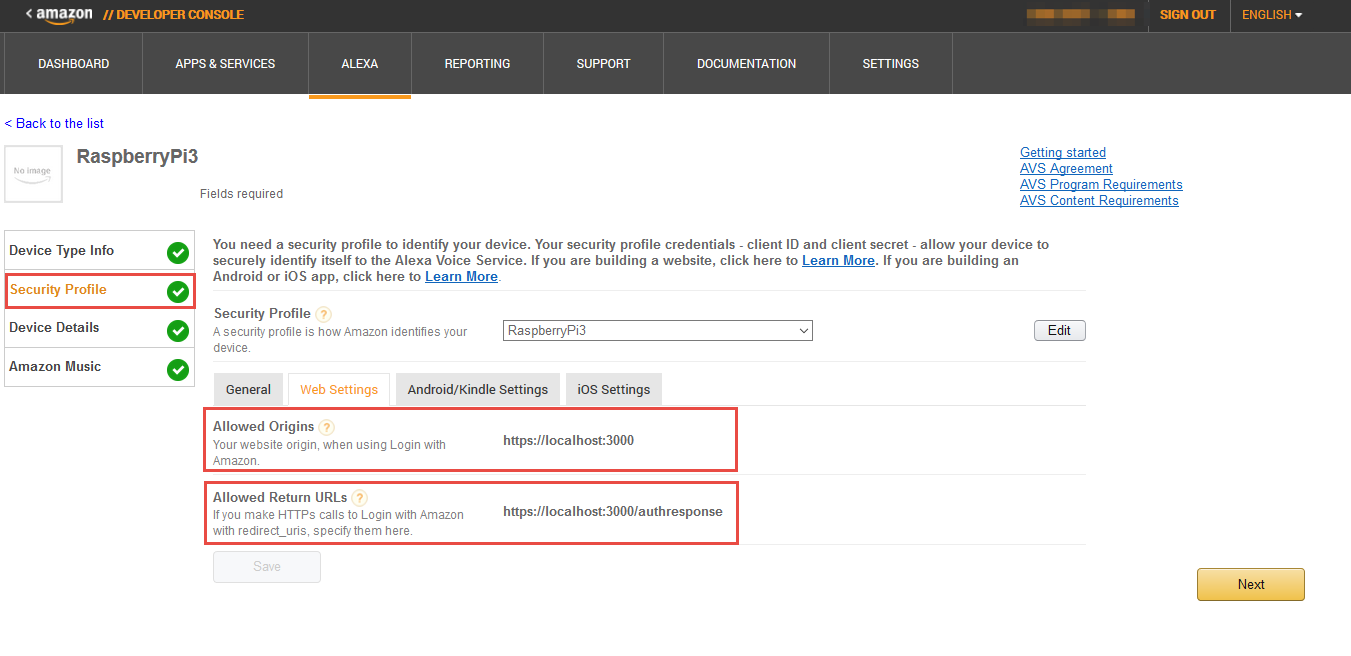
- Allowed Origins: https://localhost:3000
- Allowed Return URLs: https://localhost:3000/authresponse
2 - Clone the Sample App
- Clone the sample app into the directory of your choosing. Open terminal, navigate to the appropriate directory and type the following:
git clone https://github.com/alexa/alexa-avs-sample-app.git
Further instructions will reference this location as {REFERENCE_IMPLEMENTATION}.
If you're not familiar with Git or you prefer to download a zip click here.
3 - Install dependencies
-
Download VLC media player here. The architecture (32 or 64-bit) of the VLC media player must match the architecture of the Java Developement Kit (JDK) you have installed (or will install later in these instructions).
-
After you've installed VLC, set the following environment variables:
Note: If you've installed VLC via a package manager, these variables should already be set. If for some reason they are not set, you can set them manually.- LD_LIBRARY_PATH: point this to the VLC libs folder.
- Sample Linux location:
/usr/lib/vlc
- Sample Linux location:
- VLC_PLUGIN_PATH: point this to the VLC plugins folder.
- Sample Linux location:
/usr/lib/vlc/plugins
- Sample Linux location:
- LD_LIBRARY_PATH: point this to the VLC libs folder.
-
Download and install Node.js.
-
Ensure you have JDK version 8 installed. If JDK is not installed or you need to update from a previous version, you can download version 8 here. Note: As mentioned earlier, please ensure that your JDK's architecture matches the architecture for VLC (Step 3).
-
Download Maven and follow the instructions for Installing Apache Maven.
-
If you plan to authenticate using an Android companion app, download Android Studio. If you plan to authenticate using an iOS companion app, download Xcode 7 for Mac from the Mac App Store.
4 - Generating Self Signed Certificates
- Use your favorite package manager, such as
apt-get, to install OpenSSL. - Open a terminal window.
- Change directories to
{REFERENCE_IMPLEMENTATION}/samples/javaclient. - Edit the
ssl.cnfconfiguration file with your favorite text editor. Replace any placeholder values that start withYOUR_.
Note:countryNamemust be two characters (e.g. US). If it is not two characters, certificate creation will fail. Additionally, if you will be accessing your device from any IP or DNS entry besides localhost (127.0.0.1 or 10.0.2.2), you must add the additional IP or or DNS entries to[alt_names]. One situation where you will need to add entries to[alt_names]is if you are going to authenticate using an Android or iOS companion app from a device instead of from the Android or iOS emulators on the same machine as the Node.js server and sample app. - Enter the following command to make the certificate generation script executable:
chmod +x generate.sh - Run the certificate generation script:
./generate.sh - During generation you will be prompted for some information (save this information -- you'll need it later):
- When prompted for a
productID, enter theproductID(or Device Type ID) listed under "Device Type Info" in the Amazon developer portal. - When prompted for a
serial number, enter your product's serial number. For prototyping purposes we recommend using: 123456. - When prompted for a
password, create a password (just don't forget it -- you'll need this soon). For prototyping purposes we recommend leaving password blank.
- When prompted for a
- Edit the configuration file for the Node.js server. The configuration file is located in
{REFERENCE_IMPLEMENTATION}/samples/companionService/config.js.- Set
sslKeyto{REFERENCE_IMPLEMENTATION}/samples/javaclient/certs/server/node.key - Set
sslCertto{REFERENCE_IMPLEMENTATION}/samples/javaclient/certs/server/node.crt - Set
sslCaCertto{REFERENCE_IMPLEMENTATION}/samples/javaclient/certs/ca/ca.crt
- Set
- Edit the configuration file for the sample app. The configuration file is located in
{REFERENCE_IMPLEMENTATION}/samples/javaclient/config.json.- Set
companionApp.sslKeyStoreto{REFERENCE_IMPLEMENTATION}/samples/javaclient/certs/server/jetty.pkcs12 - Set
companionApp.sslKeyStorePassphraseto thepasswordentered in the certificate generation script. - Set
companionService.sslClientKeyStoreto{REFERENCE_IMPLEMENTATION}/samples/javaclient/certs/client/client.pkcs12 - Set
companionService.sslClientKeyStorePassphraseto thepasswordentered in the certificate generation script - Set
companionService.sslCaCertto{REFERENCE_IMPLEMENTATION}/samples/javaclient/certs/ca/ca.crt
- Set
5 - Choose your authentication method
You should now decide if you want your users to authenticate using a website or mobile app. You can only authenticate using one of the following methods at a given time:
- Build and Run a Node.js Server Authentication, or
- Build and Run an Android Companion App Authentication, or
- Build and Run an iOS Companion App for Authentication
IMPORTANT: Only one method can be used at a time. If you want to test authentication using a web site and a mobile companion app (iOS or Android), you can do so by testing the first provisioning method, then clearing your access token and switching to the other provisioning method. For instructions see Clearing Your Access Token to Change Provisioning Methods.
5a - Build and Run a Node.js Server Authentication
The following instructions will walk you through building and running the Node.js server for authentication. Looking to authenticate using a mobile app instead? See instructions for Android, and iOS.
NOTE: The server implementation does not use persistent storage; everything is stored in memory. Therefore, if you shut down the server, you will lose your tokens.
To run the server, follow these instructions:
- Open a terminal window.
- Change directories to
{REFERENCE_IMPLEMENTATION}/samples/companionService - To install dependencies, type:
npm install. - In a web browser, visit the Login with Amazon developer portal.
- Near the top of the page, select your security profile from the drop down menu and click Confirm.
- Enter a privacy policy URL beginning with
http://orhttps://. For this example, you can enter a fake URL such ashttp://example.com. Optionally, you can choose to upload an image, which will be shown on the Login with Amazon consent page. Click Save. - Next to Security Profile, click Show Client ID and Client Secret. This will display your client ID and client secret. Save these values.
- In your favorite text editor, open
{REFERENCE_IMPLEMENTATION}/samples/companionService/config.jsand edit the following values:clientId: paste in your client ID as a string.clientSecret: paste in your client secret as a string.products: the products object consists of a key that should be the same as the product ID (also referred to as Device Type ID) that you set up in the developer portal and an array of unique product identifiers. For this project, the array should be a single value, and match the serial number you entered while generating certificates.
- Save the
config.js. - In your terminal window, run the following:
npm start.
The server is running. You are now ready to run the sample app. Skip to - "5 - Run the sample app".
5b - Build and Run an Android Companion App Authentication
To build and run the Android companion app, follow these instructions:
- Generate a
keystoreto sign your app.- Open a terminal window.
- Change directories to
{REFERENCE_IMPLEMENTATION}/samples/androidCompanionApp/app/ - Enter the following command:
keytool -genkey -v -keystore keystore.jks -alias androiddebugkey -keyalg RSA -sigalg SHA1withRSA -keysize 2048 -validity 10000. You will be prompted to enter a password. Enter android. You will then be prompted to enter some information about yourself. After you've entered your personal information, you will be prompted for another password. Press Return to use android again.
- Get your Android app signature. In the same terminal window, enter the following command:
keytool -list -v -alias androiddebugkey -keystore keystore.jks. You will be prompted for a password. Enter android. When thekeytoolcommand returns, save the MD5 certificate fingerprint and the SHA256 certificate fingerprint. - Log in to the Amazon developer portal.
- In the top navigation, click Alexa then select Alexa Voice Service. Find your project, and click Edit, then navigate to the Security Profile tab.
- From the drop down, select the security profile you created in Getting Started.
- Click the Android/Kindle Settings tab.
- Enter the following information:
- API Key Name: "Alexa Voice Service Test Android App"
- Package: com.amazon.alexa.avs.companion
- MD5 Signature: The MD5 fingerprint you saved in step 2.
- SHA256 Signature: The SHA256 fingerprint you saved in step 2.
- Click Add an API Key.
- Copy the generated key into a text file and save it as
{REFERENCE_IMPLEMENTATION}/samples/androidCompanionApp/app/src/main/assets/api_key.txt. You will need to create the assets folder.
Note: Be mindful of whitespace in the path. - Open Android Studio.
- In the Welcome to Android Studio window, choose Open an existing Android Studio project.
- In the file chooser, select
{REFERENCE_IMPLEMENTATION}/samples/androidCompanionApp. - The project should open. If you get an error that says failed to find target with hash string
android-22, it means you need to load the Android API level 22 SDK. Click the link that says Open Android SDK Manager to open the SDK manager. Click the link that says Deselect All. Expand Android 5.1.1 (API 22) and select SDK Platform. Install that package, accepting any necessary license agreements. Once the SDK has installed, close and reopen the project. You will get another error that says failed to find Build Tools revision 22.0.1. Click the link to Install Build Tools 22.0.1 and sync project. Now the project should open.
- Run the Android companion app.
- Click the green right-pointing play triangle in the Android Studio task bar at the top of the Android Studio window.
- In the device chooser window, select one of the emulators, then click OK.
You are now ready to run the sample app. Skip to - "5 - Run the sample app".
5c - Build and Run an iOS Companion App for Authentication
To see an example of how to obtain a Login with Amazon authorization code from an iOS app, build and run the iOS sample project.
To build and run the iOS mobile app, follow these instructions:
- Open the iOS sample app in Xcode 7. To do this, double click
{REFERENCE_IMPLEMENTATION}/samples/iOSCompanionApp/AlexaCompanionAppSample.xcodeproj - Log in to the Amazon developer portal.
- In the top navigation, click Alexa then select Alexa Voice Service. Find your project, and click Edit, then navigate to the Security Profile tab.
- From the drop down, select the security profile you created in Getting Started.
- Click the iOS Settings tab.
- Enter the following information:
- API Key Name: "Alexa Voice Service test iOS app"
- Bundle ID: com.amazon.AlexaCompanionAppSample
- Click Add an API Key
- Copy the key to your computer's clipboard.
- Add the API key to the Xcode project.
- In the Xcode project, make sure the left navigation pane is set to the project navigator by clicking the left-most icon that looks like a file folder at the top of the navigation pane.
- Expand AlexaCompanionAppSample → Application → Supporting Files, then select
AlexaCompanionAppSample-Info.plist. - In the middle editing pane, make sure none of the entries are selected.
- In the menu bar, select Editor → Add Item.
- In the combo drop down that appears, type
APIKeyand press return. - Double click within the Value column and paste the API key that you copied in step 8. Make sure there is no extra whitespace before and after the value, then press return.
- Build and run the app in the simulator by clicking the black right-pointing play button at the top left of the Xcode window.
You are now ready to run the sample app. Skip to - "5 - Run the sample app".
6 - Run the sample app
Now that you've set up your companion site (server)/companion app for authentication you're ready to run the sample app.
-
In your favorite text editor, open
{REFERENCE_IMPLEMENTATION}/samples/javaclient/config.jsonand edit the following values:productId: Enter my_device as a string.dsn: Enter the same alphanumeric string that you entered for the unique product identifier in the products object in the server's config.js as a string. For example, use 123456.provisioningMethod: If you want to use either the Android or iOS sample app, entercompanionApp. Otherwise, entercompanionService. -
Save the config.json.
-
In that same text editor, open
{REFERENCE_IMPLEMENTATION}/samples/javaclient/pom.xmland locate{alpn-boot.version}xxx{/alpn-boot.version}. Confirm that the ALPN version matches your JDK version using the table located here. If the versions match no further action is necessary. If the versions do not match, update thepom.xmlfile with the correct ALPN version.
IMPORTANT: If your JDK version is newer than what's listed in the table, please use the latest ALPN version listed. -
Open a terminal window.
-
Change directories to
{REFERENCE_IMPLEMENTATION}/samples/javaclient -
Run
mvn validateto ensure the project is correct and that all necessary information is available. -
Run
mvn installto download dependencies and build the sample app. -
Run
mvn exec:execto run the sample app. -
Depending on whether you specified
companionApporcompanionServiceas theprovisioningMethodin theconfig.json, follow the instructions below for -
- Using a Node.js Server to Obtain Authorization from Login with Amazon.
- Using an Android or iOS App to Obtain Authorization from Login with Amazon, or
6a - Node.js
If your provisioning method is companionService, follow these instructions:
- A window should pop up with a message that says something similar to Please register your device by visiting the following website on any system and following the instructions: https://localhost:3000/provision/d340f629bd685deeff28a917. Don't press OK until you've obtained your tokens.
- Copy the URL from the popup window and paste it into a web browser. In this example, the URL to copy and paste is
https://localhost:3000/provision/d340f629bd685deeff28a917. Note that, due to the use of a self-signed certificate, you will see a warning about an insecure website. This is expected. It is safe to ignore the warnings during testing. - You will be taken to a Login with Amazon web page.
- Enter your Amazon credentials.
- You will be redirected to a URL beginning with https://localhost:3000/authresponse followed by a query string. The body of the web page will say device tokens ready.
- Return to the Java application and press OK. The sample app is now ready to accept requests.
You're now ready to talk to Alexa. Go to "Step 7 - Talk to Alexa".
6b - Android Companion App
If your provisioning method is companionApp and you followed the instructions above to build and run the Android app, follow these instructions:
- The Android app should be running in the Android emulator on the same computer where you will run the sample app.
- In the emulator, enter the following address for the device address, then click Connect:
- Android: https://10.0.2.2:8443
- A gold Login with Amazon button should appear on the screen. Click the button.
- Enter your Amazon login information and click Sign in.
- In the mobile app, you will see a message that says Your device is now successfully provisioned and ready to use. In the sample app, the
Bearer Tokentext field should now be filled-in with your access token. The sample app is now ready to accept requests.
Note: You should only attempt to log in to Login with Amazon from either the Android app or the iOS app, not both at the same time. If you want to test out each app separately, once you have successfully tested one of the apps, follow the instructions below for clearing your access token and then test the other app.
You're now ready to talk to Alexa. Go to "Step 7 - Talk to Alexa".
6c - iOS Companion App
If your provisioning method is companionApp and you followed the instructions above to build and run the iOS app, follow these instructions:
- The iOS app should be running in the iOS simulator on the same computer where you will run the sample app.
- In the simulator, enter the following address for the device address, then click Connect:
- A gold Login with Amazon button should appear on the screen. Click the button.
- Enter your Amazon login information and click Sign in.
- In the mobile app, you will see a message that says Your device is now successfully provisioned and ready to use. In the sample app, the
Bearer Tokentext field should now be filled-in with your access token. The sample app is now ready to accept requests.
Note: You should only attempt to log in to Login with Amazon from either the Android app or the iOS app, not both at the same time. If you want to test out each app separately, once you have successfully tested one of the apps, follow the instructions below for clearing your access token and then test the other app.
You're now ready to talk to Alexa. Go to "Step 7 - Talk to Alexa".
7 - Talk to Alexa
- Click once on the Start Listening button, after releasing the click, wait for the audio cue before you begin to speak. It may take a second or two for the connection to be made before you hear the audio cue.
- Once you hear the audio cue, say What's the weather in Seattle? and wait. Alexa will send a
StopCapturedirective to the client when your intent is recognized. Then you will hear Alexa's response, which should be the current weather report for Seattle. - Click the Start Listening button and wait for the audio cue. Once you hear the cue, say "Set a timer for 5 seconds" and wait. You should receive a response from Alexa, which should be "5 seconds starting now." When 5 seconds have elapsed, the timer will go off. To stop the timer, press the play/pause button directly below Start Listening.
- The previous, play/pause, and next buttons demonstrate music button events. Music button events allow you to initiate changes in the playback stream without having to speak to Alexa. For example, you can press the play/pause button to pause and restart a track of music. To demonstrate the play/pause button, you can speak the following command: Play DC101 on iHeartRadio, then press the play/pause button. The music will pause in response to the button press. Press the play/pause button again to restart the music.