React ~ Component - rohit120582sharma/Documentation GitHub Wiki
Components are the core building block of React apps. Actually, React really is just a library for creating components in its core.
A typical React app therefore could be depicted as a component tree - having one root component (App) and then a potentially infinite amount of nested child components.
Each component needs to return/render some JSX code - it defines which HTML code React should render to the real DOM in the end.
When creating components, you have the choice between two different ways:
Conceptually, components are like JavaScript functions. They accept arbitrary inputs (called props which stands for properties) and return React elements describing what should appear on the screen.
import React from 'react';
const Welcome = (props) => {
	return (<h1>Hello, {props.name}</h1>);
}
export default Welcome;Instead of function, ES6 class can be used to create component which have some advantages over Functional component.
- Every class component extends React.Component. Every class component must have a render method that returns some sort of JSX / markup / call to React.createElement.
- Not every component needs to have a constructor. If you have a constructor, you have to do the super(props) to make sure that the props are passed up to React so React can keep track of them.
- Component supports state management via instance property this.state inherited by Component.
- Component gets props from the instance variables this.props.
import React, { Component } from 'react';

class Welcome extends Component {
	state = {
		toggleShow: true
	};

	constructor(props){
		super(props)
	}
	toggleHandler=()=>{
		this.setState((prevState)=>{
			return {
				toggleShow: !prevState.toggleShow
			};
		});
	}
	render(){
		let toggleJSX = null;
		if(this.state.toggleShow){
			toggleJSX = <p>toggleShow: {this.state.toggleShow}</p>
		}

		return (
			<h1>Hello, {this.props.name}</h1>
			{toggleJSX}
			<br />
			<button onClick={this.}>Toggle</button>
		);
	}
}
export default Welcome;JSX is basically still just JavaScript with some extra functionality. With JSX, you can write code that looks very similar to HTML or XML, but you have the power of seamlessly mixing JavaScript methods and variables into your code. JSX is interpreted by a transpiler, such as Babel, and rendered to JavaScript code that the UI Framework (React, in this case) can understand.
Each JSX element is just syntactic sugar for calling React.createElement(component, props, ...children). Code written with JSX will be converted to use React.createElement(). You will not typically invoke it directly if you are using JSX.
React DOM uses camelCase property naming convention instead of HTML attribute names. For example, tabindex becomes tabIndex in JSX. The attribute class is also written as className since class is a reserved word in JavaScript.
The first part of a JSX tag determines the type of the React element. When an element type starts with a lowercase letter, it refers to a built-in component like
<div>or<span>and results in a string'div'or'span'passed to React.createElement. Types that start with a capital letter like<Foo />compile toReact.createElement(Foo)and correspond to a component defined or imported in your JavaScript file.
Any data that is passed to a component as part of it’s creation is classed as props. The data flows from the top downwards, ie. from parent to child. The props are saved for reference throughout the life of the component but the component itself does not have the power to change them.
Changes in props trigger React to rerender your components and potentially update the DOM in the browser.
In JSX expressions that contain both an opening tag and a closing tag, the content between those tags is passed as a special prop: props.children.
Any data that a component decides to store within itself is it’s state.
Only class-based components can define and use state. It is a property of the component class, you have to call it state though - the name is not optional. You can then access it via this.state in your class JSX code. You can of course pass the state down to functional components, but these then can't directly edit it.
Whenever state changes the component will re-render and reflect the new state. Every time a component’s setState() function is called, it performs the dual actions of both updating the state, and re-rendering the component.
In React, you listen to an event by specifying inside your markup both the event you’re listening for and the event handler that will get called.
In React, when you specify an event in JSX, you’re not directly dealing with regular DOM events. Instead, you’re dealing with a React-specific event type known as a SyntheticEvent. Your event handlers don’t get native event arguments of type MouseEvent, KeyboardEvent, and so on. They always get event arguments of type SyntheticEvent that wrap your browser’s native event instead.
The event handlers are triggered by an event in the bubbling phase. To register an event handler for the capture phase, append Capture to the event name; for example, instead of using onClick, you would use onClickCapture to handle the click event in the capture phase.
Returning false from an event handler will no longer stop event propagation. Instead, e.stopPropagation() or e.preventDefault() should be triggered manually, as appropriate.
- A cross-browser wrapper around the browser’s native event. It has the same interface as the browser’s native event, except the events work identically across all browsers. By wrapping all the native events as an object of type SyntheticEvent, React frees you from dealing with event-handling quirks.
- In complex UIs, the more event handlers you have, the more memory your app takes up. Manually dealing with that isn’t difficult, but it is a bit tedious as you try to group events under a common parent.
- React never directly attaches event handlers to the DOM elements. It uses one event handler at the root of your document that is responsible for listening to all events and calling the appropriate event handler as necessary.
We can declare special methods on the component class to run some code when a component creates, mounts and unmounts:
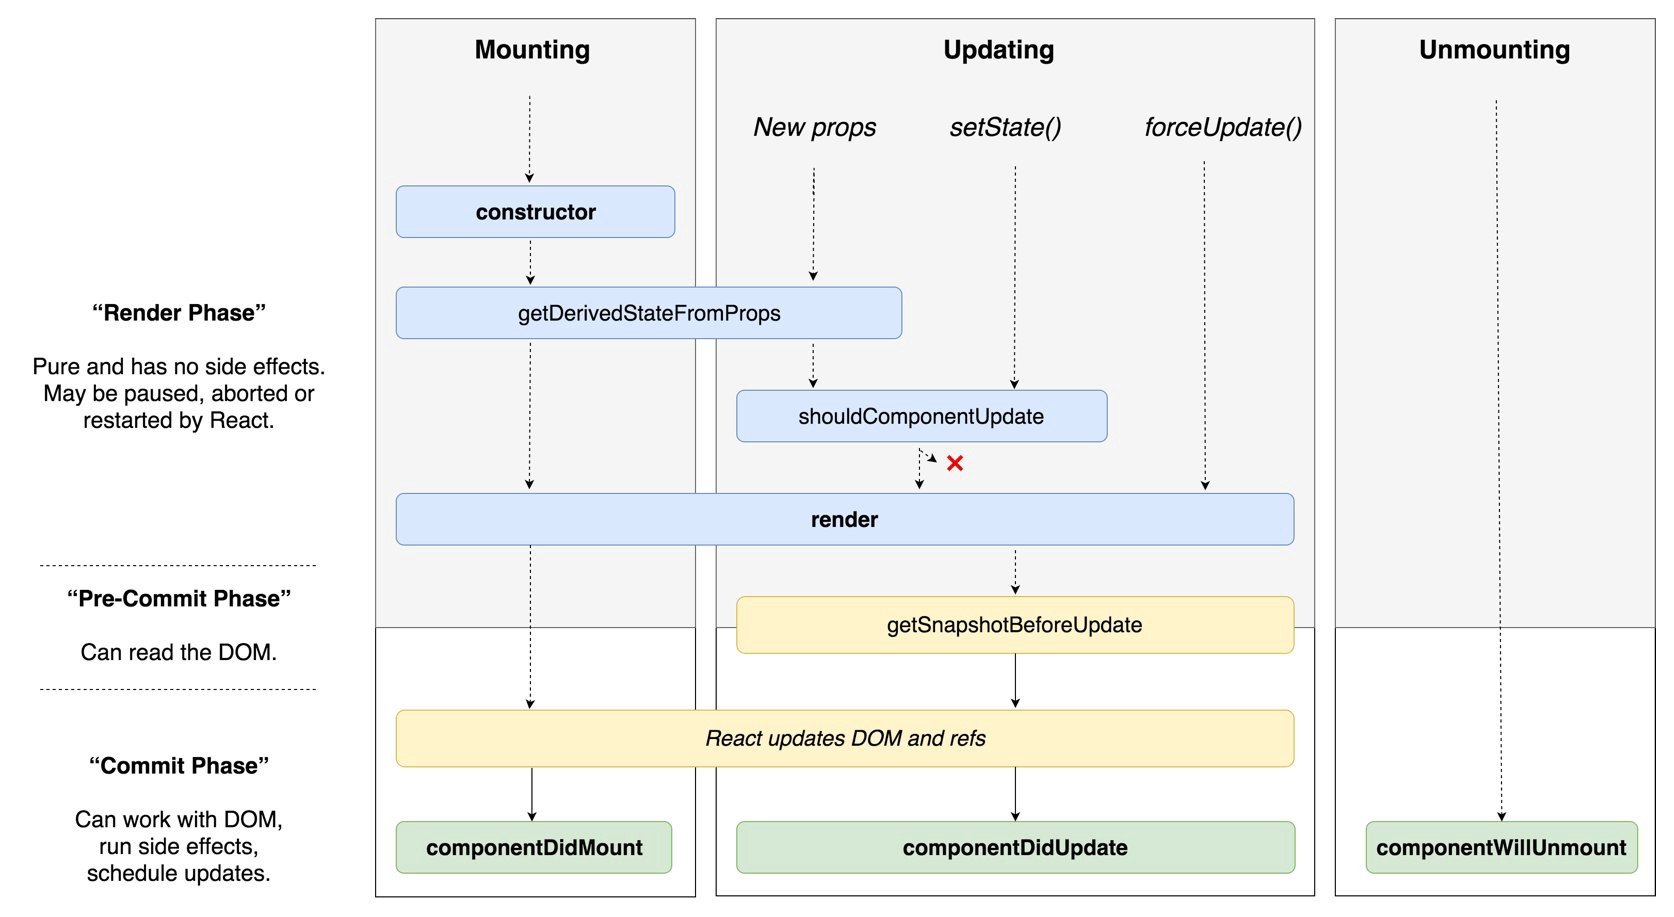
When your component is about to start its life and make its way to the DOM, the following lifecycle methods get called.
- This property on the component allows you to specify the default value of this.props. This gets run before your component is even created or any props from parent components are passed in.
- This steps happens when a component is initiated. You get the chance to call super(props) method and specify the default value of this.state as part of your component’s creation.
- This is invoked right before calling the render method, both on the initial mount and on subsequent updates. It exists for only one purpose. It enables a component to update its internal state as the result of changes in props.
- This method doesn’t have access to the component instance. It should return an object to update the state, or null to update nothing.
- Prepare & structure your JSX code. If you don’t want to render anything, simply return null or false.
- This method gets called immediately after your component renders and gets placed on the DOM. At this point, you can safely perform any side-effects calls.
After your components get added to the DOM, they can potentially update and re-render when a prop or state change occurs. During this time, a different collection of lifecycle methods gets called.
- Sometimes you don’t want your component to update when a state change occurs. This method allows you to control this updating behavior. If you use this method and return a true value, the component will update. If this method returns a false value, this component will skip updating.
- If you didn’t override the update via shouldComponentUpdate, the code inside render gets called again to ensure that your component displays itself properly.
- This method gets called after your component updates and the render method has been called. At this point, you can safely perform any side-effects calls.
The last phase to look at is when your component is about to be destroyed and removed from the DOM.
- You perform cleanup-related tasks here, such as removing event listeners and stopping timers. After this method gets called, your component is removed from the DOM and you can say goodbye to it.
In React, for every DOM object, there is a corresponding "virtual DOM object". A virtual DOM object has the same properties as a real DOM object.
When you render a JSX element, every single virtual DOM object gets updated.
Once the virtual DOM has updated, then React compares the virtual DOM with a virtual DOM snapshot that was taken right before the update.
By comparing the new virtual DOM with a pre-update version, React figures out exactly which virtual DOM objects have changed. This process is called diffing.
Once React knows which virtual DOM objects have changed, then React updates those objects, and only those objects, on the real DOM.
Changes on the real DOM cause the screen to change.